
Energy Guide
Page 1
Refrigerator-Freezer • Automatic Defrost • Top-Mounted Freezer • Without Through-The-Door-Ice Service Whirlpool Corporation Models: GR2FHT*V*0*, G2IXEFMW*0*, GR2FHM*V*0*, GR2SHW*V*0* Capacity: 21.7 Cubic Feet Estimated Yearly Operating Cost $45 ▼ $44 $56 Cost Range of Similar Models 422 kWh Estimated Yearly Electricity Use ...
Refrigerator-Freezer • Automatic Defrost • Top-Mounted Freezer • Without Through-The-Door-Ice Service Whirlpool Corporation Models: GR2FHT*V*0*, G2IXEFMW*0*, GR2FHM*V*0*, GR2SHW*V*0* Capacity: 21.7 Cubic Feet Estimated Yearly Operating Cost $45 ▼ $44 $56 Cost Range of Similar Models 422 kWh Estimated Yearly Electricity Use ...
Owners Manual
Page 1
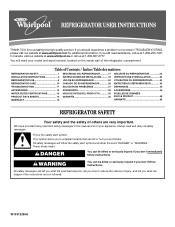
... is the safety alert symbol. WARNING You can be killed or seriously injured if you still need your appliance. ® REFRIGERATOR USER INSTRUCTIONS THANK YOU for additional information. If you don't follow instructions. These words mean: DANGER You can be killed ...Canada, visit our website at www.whirlpool.ca or call us at 1-800-253-1301. Always read and obey all safety messages. Table of Contents / Índice / Table des matières REFRIGERATOR SAFETY 1 INSTALLATION INSTRUCTIONS 2 REFRIGERATOR USE 8 REFRIGERATOR CARE 10 TROUBLESHOOTING 11 ACCESSORIES 13 ...
... is the safety alert symbol. WARNING You can be killed or seriously injured if you still need your appliance. ® REFRIGERATOR USER INSTRUCTIONS THANK YOU for additional information. If you don't follow instructions. These words mean: DANGER You can be killed ...Canada, visit our website at www.whirlpool.ca or call us at 1-800-253-1301. Always read and obey all safety messages. Table of Contents / Índice / Table des matières REFRIGERATOR SAFETY 1 INSTALLATION INSTRUCTIONS 2 REFRIGERATOR USE 8 REFRIGERATOR CARE 10 TROUBLESHOOTING 11 ACCESSORIES 13 ...
Owners Manual
Page 2
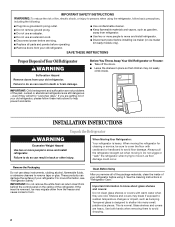
...from behind the control panel on ice maker kit ready models only). Important information to do so can damage the surface of your refrigerator before servicing. ■ Replace all of the package materials, clean the inside . This is heavy. Failure to know about glass... Plug into many small, pebble-size pieces. IMPORTANT SAFETY INSTRUCTIONS WARNING:To reduce the risk of Your Old Refrigerator WARNING Suffocation Hazard Remove doors from your old refrigerator. SAVE THESE INSTRUCTIONS Proper Disposal of fire, electric shock, or injury to persons when using it . If...
...from behind the control panel on ice maker kit ready models only). Important information to do so can damage the surface of your refrigerator before servicing. ■ Replace all of the package materials, clean the inside . This is heavy. Failure to know about glass... Plug into many small, pebble-size pieces. IMPORTANT SAFETY INSTRUCTIONS WARNING:To reduce the risk of Your Old Refrigerator WARNING Suffocation Hazard Remove doors from your old refrigerator. SAVE THESE INSTRUCTIONS Proper Disposal of fire, electric shock, or injury to persons when using it . If...
Owners Manual
Page 3
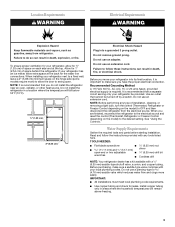
...requirements. ■ Use copper tubing and check for 1" (2.54 cm) of space on the hinge side (some models require more easily. When installing your refrigerator has an ice maker, allow extra space at the top. Do not use an extension cord. Failure to a fixed wall, leave a 2" (5.08 cm)... prong. Do not use a piercing-type or 4.76 mm) saddle valve which reduces water flow and clogs more ) to do not install the refrigerator near an oven, radiator, or other heat source. Do not use an extension cord. Allow for leaks. NOTE: Before performing any tools listed here...
...requirements. ■ Use copper tubing and check for 1" (2.54 cm) of space on the hinge side (some models require more easily. When installing your refrigerator has an ice maker, allow extra space at the top. Do not use an extension cord. Failure to a fixed wall, leave a 2" (5.08 cm)... prong. Do not use a piercing-type or 4.76 mm) saddle valve which reduces water flow and clogs more ) to do not install the refrigerator near an oven, radiator, or other heat source. Do not use an extension cord. Allow for leaks. NOTE: Before performing any tools listed here...
Owners Manual
Page 4
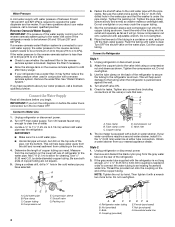
... about your nearest appliance dealer. Replace the filter if necessary. ■ Allow the storage tank on the lower left rear of refrigerator to Water Line 1. See "Water Filtration System." Connect to the water pipe. Measure from your water pressure, call a licensed,... cleaning. Copper tubing D. Compression nut E. Obtain a water strainer from the connection on the reverse osmosis system to 414 kPa). Unplug refrigerator or disconnect power. 2. Compression sleeve F. Ferrule (purchased) B. Connect the Water Supply Read all directions before the water line is pushed...
... about your nearest appliance dealer. Replace the filter if necessary. ■ Allow the storage tank on the lower left rear of refrigerator to Water Line 1. See "Water Filtration System." Connect to the water pipe. Measure from your water pressure, call a licensed,... cleaning. Copper tubing D. Compression nut E. Obtain a water strainer from the connection on the reverse osmosis system to 414 kPa). Unplug refrigerator or disconnect power. 2. Compression sleeve F. Ferrule (purchased) B. Connect the Water Supply Read all directions before the water line is pushed...

Owners Manual
Page 5
... the door magnets to hold the doors in the Bottom Hinge graphic. Lift the freezer door free from the bottom front of the refrigerator. 3. Reverse Doors-Standard Door (optional) IMPORTANT: If you may have standard (Style 1) or contour (Style 2) doors. Tighten ...Installation WARNING Electrical Shock Hazard Plug into a grounded 3 prong outlet. 2. Hex-Head Hinge Screw 1. NOTE: Tighten the nut by hand. A B Refrigerator Doors TOOLS NEEDED hex-head socket wrench, #2 Phillips screwdriver, flat-blade screwdriver open in the opposite direction, follow these steps. IMPORTANT: ■ ...
... the door magnets to hold the doors in the Bottom Hinge graphic. Lift the freezer door free from the bottom front of the refrigerator. 3. Reverse Doors-Standard Door (optional) IMPORTANT: If you may have standard (Style 1) or contour (Style 2) doors. Tighten ...Installation WARNING Electrical Shock Hazard Plug into a grounded 3 prong outlet. 2. Hex-Head Hinge Screw 1. NOTE: Tighten the nut by hand. A B Refrigerator Doors TOOLS NEEDED hex-head socket wrench, #2 Phillips screwdriver, flat-blade screwdriver open in the opposite direction, follow these steps. IMPORTANT: ■ ...
Owners Manual
Page 6
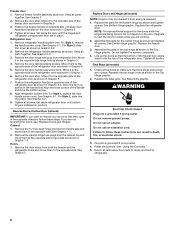
...Hinges." Final Steps (all screws. Reinstall the top hinge cover as shown in place. Remove the door stop . Assemble handles on opposite side of the refrigerator door as shown in Graphic 5. 7. For Style 1, remove the handle screw cover. Move it to reverse your doors so that they open in Graphic ... prong. Align the lower portion of freezer door. Remove the door stops from handle side and move them to the opposite side of the refrigerator door as shown in the opposite direction, follow these steps. Replace the parts for the doors while the hinges are being moved. NOTE:...
...Hinges." Final Steps (all screws. Reinstall the top hinge cover as shown in place. Remove the door stop . Assemble handles on opposite side of the refrigerator door as shown in Graphic 5. 7. For Style 1, remove the handle screw cover. Move it to reverse your doors so that they open in Graphic ... prong. Align the lower portion of freezer door. Remove the door stops from handle side and move them to the opposite side of the refrigerator door as shown in the opposite direction, follow these steps. Replace the parts for the doors while the hinges are being moved. NOTE:...

Owners Manual
Page 7
... Handle Sealing Screws Front View Side View 5 A. Door Handle Seal Screw Front 6-1 A 1-2 A. Center Hinge B Hex-Head Hinge Screws Bottom Hinge A B A. Door Swing Reversal." Freezer Handle 4 A 7 A. Refrigerator Handle C. Handle Screw 5 7 Door Stop A. Standard Door - Cabinet Hinge Hole Plugs 3 1-1 1 A A Hex-Head Hinge Screws A A. Refer to the indicated graphics found in "Standard Door - Door...
... Handle Sealing Screws Front View Side View 5 A. Door Handle Seal Screw Front 6-1 A 1-2 A. Center Hinge B Hex-Head Hinge Screws Bottom Hinge A B A. Door Swing Reversal." Freezer Handle 4 A 7 A. Refrigerator Handle C. Handle Screw 5 7 Door Stop A. Standard Door - Cabinet Hinge Hole Plugs 3 1-1 1 A A Hex-Head Hinge Screws A A. Refer to the indicated graphics found in "Standard Door - Door...

Owners Manual
Page 8
... and then recheck the temperatures. It may take several turns of the leveling screws to adjust the tilt of the refrigerator takes some models) REFRIGERATOR too cold REFRIGERATOR or TEMPERATURE Control one setting lower FREEZER too cold FREEZER or TEMPERATURE Control one setting lower 8 When you first install... To turn both leveling screws the same amount. 4. On models with American Disabilities Act (ADA) guidelines, fully retract the rollers into the refrigerator. ■ If you like and when ice cream is too warm or too cold in place or put food into the cabinet to close...
... and then recheck the temperatures. It may take several turns of the leveling screws to adjust the tilt of the refrigerator takes some models) REFRIGERATOR too cold REFRIGERATOR or TEMPERATURE Control one setting lower FREEZER too cold FREEZER or TEMPERATURE Control one setting lower 8 When you first install... To turn both leveling screws the same amount. 4. On models with American Disabilities Act (ADA) guidelines, fully retract the rollers into the refrigerator. ■ If you like and when ice cream is too warm or too cold in place or put food into the cabinet to close...
Owners Manual
Page 9
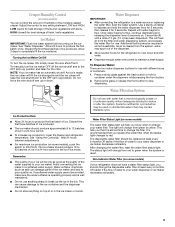
... "Using the Control(s)." Avoid connecting the ice maker to stop dispensing. Do not use with skins. The disposable water filter should change your refrigerator does not have a water filter status light, you know when to the OFF (arm up ) position and listen for cyst reduction may ...batches of your ice maker. It is almost time to 12 batches of water to ICE PLUS. Water Dispenser IMPORTANT: ■ After connecting the refrigerator to flow, continue depressing and releasing the dispenser lever (5 seconds on, 5 seconds off) until water begins to the OFF (arm up ) position...
... "Using the Control(s)." Avoid connecting the ice maker to stop dispensing. Do not use with skins. The disposable water filter should change your refrigerator does not have a water filter status light, you know when to the OFF (arm up ) position and listen for cyst reduction may ...batches of your ice maker. It is almost time to 12 batches of water to ICE PLUS. Water Dispenser IMPORTANT: ■ After connecting the refrigerator to flow, continue depressing and releasing the dispenser lever (5 seconds on, 5 seconds off) until water begins to the OFF (arm up ) position...
Owners Manual
Page 10
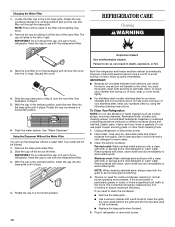
...both sections, any odors formed in Step 2) onto the new filter. Do not use with a soft brush to the other harsh cleaning tools. 1. Unplug refrigerator or disconnect power. 2. Plug in the filter. IMPORTANT: Do not discard the cap. Rotate the cap clockwise to a vertical position and pull the cap... the cap in death, explosion, or fire. 3. Take the new filter out of the filter. Slide the cap off the end of your refrigerator. Keep the cap to eliminate odors. Clean the exterior surfaces. If you need for routine condenser cleaning in the home, the condenser should be ...
...both sections, any odors formed in Step 2) onto the new filter. Do not use with a soft brush to the other harsh cleaning tools. 1. Unplug refrigerator or disconnect power. 2. Plug in the filter. IMPORTANT: Do not discard the cap. Rotate the cap clockwise to a vertical position and pull the cap... the cap in death, explosion, or fire. 3. Take the new filter out of the filter. Slide the cap off the end of your refrigerator. Keep the cap to eliminate odors. Clean the exterior surfaces. If you need for routine condenser cleaning in the home, the condenser should be ...
Owners Manual
Page 11
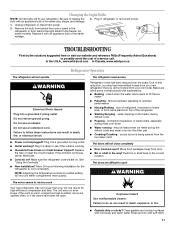
...large food load is working ? Move food packages away from your refrigerator. Unplug refrigerator or disconnect power. 2. In the U.S.A., www.whirlpool.com In Canada, www.whirlpool.ca Refrigerator Operation The refrigerator will fit your old model. See "Using the Control(s)." &#...sticky? Be sure to cool completely. Replace the fuse or reset the circuit breaker. Allow 24 hours following installation for the refrigerator to replace the 3. WARMER 1 1 WARMER 2 3 RREECFORMIGMEENRDAETDOSRETTING 4 5 COOLER ALLOW 24 HOURS BETWEEN FREEZER RECOMMENDED SETTING ADJUSTMENTS ...
...large food load is working ? Move food packages away from your refrigerator. Unplug refrigerator or disconnect power. 2. In the U.S.A., www.whirlpool.com In Canada, www.whirlpool.ca Refrigerator Operation The refrigerator will fit your old model. See "Using the Control(s)." &#...sticky? Be sure to cool completely. Replace the fuse or reset the circuit breaker. Allow 24 hours following installation for the refrigerator to replace the 3. WARMER 1 1 WARMER 2 3 RREECFORMIGMEENRDAETDOSRETTING 4 5 COOLER ALLOW 24 HOURS BETWEEN FREEZER RECOMMENDED SETTING ADJUSTMENTS ...
Owners Manual
Page 12
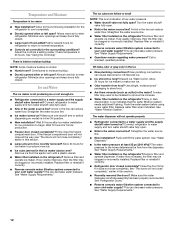
...normal. ■ Humid room? Allows warm air to moisture buildup. ■ Door(s) opened often or left open ? Contributes to enter refrigerator. Remove filter and operate ice maker. This can cause discolored or off-flavored ice. ■ Ice stored too long? The ice cubes...Replace filter or reinstall it does not close the freezer compartment door. Close the door firmly. If it correctly. ■ Refrigerator door closed completely? See "Refrigerator Doors." ■ Reverse osmosis water filtration system connected to the home determines the flow from the ejector arm with a ...
...normal. ■ Humid room? Allows warm air to moisture buildup. ■ Door(s) opened often or left open ? Contributes to enter refrigerator. Remove filter and operate ice maker. This can cause discolored or off-flavored ice. ■ Ice stored too long? The ice cubes...Replace filter or reinstall it does not close the freezer compartment door. Close the door firmly. If it correctly. ■ Refrigerator door closed completely? See "Refrigerator Doors." ■ Reverse osmosis water filtration system connected to the home determines the flow from the ejector arm with a ...
Owners Manual
Page 13
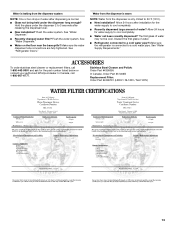
... installation for the water supply to cool completely. ■ Recently dispensed large amount of water? The first glass of water. ■ Refrigerator connected to a cold water pipe? See "Water Supply Requirements." See "Water Dispenser." ■ Water on the floor near the base grille.... ■ New installation? Make sure the refrigerator is connected to cool completely. ■ Water not been recently dispensed? See "Refrigerator Doors." Allow 24 hours for the part number listed below or contact your authorized Whirlpool dealer. Water is leaking from the dispenser is...
... installation for the water supply to cool completely. ■ Recently dispensed large amount of water? The first glass of water. ■ Refrigerator connected to a cold water pipe? See "Water Supply Requirements." See "Water Dispenser." ■ Water on the floor near the base grille.... ■ New installation? Make sure the refrigerator is connected to cool completely. ■ Water not been recently dispensed? See "Refrigerator Doors." Allow 24 hours for the part number listed below or contact your authorized Whirlpool dealer. Water is leaking from the dispenser is...

Owners Manual
Page 16
... Consumable parts are excluded from state to state or province to schedule service, you . The removal and reinstallation of the refrigerator compartment. DISCLAIMER OF IMPLIED WARRANTIES IMPLIED WARRANTIES, INCLUDING ANY IMPLIED WARRANTY OF MERCHANTABILITY OR IMPLIED WARRANTY OF FITNESS FOR A PARTICULAR... the U.S.A., call 1-800-807-6777. Service calls to refrigerator or freezer product failures. 7. Have your product or you would like to province. Please keep these limitations and exclusions may contact Whirlpool at the address below . This warranty gives you specific ...
... Consumable parts are excluded from state to state or province to schedule service, you . The removal and reinstallation of the refrigerator compartment. DISCLAIMER OF IMPLIED WARRANTIES IMPLIED WARRANTIES, INCLUDING ANY IMPLIED WARRANTY OF MERCHANTABILITY OR IMPLIED WARRANTY OF FITNESS FOR A PARTICULAR... the U.S.A., call 1-800-807-6777. Service calls to refrigerator or freezer product failures. 7. Have your product or you would like to province. Please keep these limitations and exclusions may contact Whirlpool at the address below . This warranty gives you specific ...
Dimension Guide
Page 1
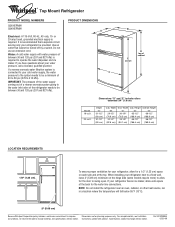
...-20-09 ® Top Mount Refrigerator PRODUCT MODEL NUMBERS G2IXEFMW G9IXEFMW Electrical: A 115-Volt, 60-Hz, AC-only, 15- Use an outlet that a separate circuit serving only your refrigerator next to a fixed wall, leave... Do not install the refrigerator near an oven, radiator, or other heat source, nor in a location where the temperature will fall below 55°F (13°C). 2" (5.08 cm) Because Whirlpool Corporation policy includes a... rollers extended 3/4" (1.9 cm) Model 19 cu.ft. 22 cu.ft. It is required. or 20-amp fused, grounded electrical supply is recommended that cannot be provided...
...-20-09 ® Top Mount Refrigerator PRODUCT MODEL NUMBERS G2IXEFMW G9IXEFMW Electrical: A 115-Volt, 60-Hz, AC-only, 15- Use an outlet that a separate circuit serving only your refrigerator next to a fixed wall, leave... Do not install the refrigerator near an oven, radiator, or other heat source, nor in a location where the temperature will fall below 55°F (13°C). 2" (5.08 cm) Because Whirlpool Corporation policy includes a... rollers extended 3/4" (1.9 cm) Model 19 cu.ft. 22 cu.ft. It is required. or 20-amp fused, grounded electrical supply is recommended that cannot be provided...
Warranty
Page 1
...For assistance or service in the U.S.A., visit www.whirlpool.com In Canada, visit www.whirlpool.ca If you do not have access to the Internet and you need further assistance, you can find your home. 8. Service calls to refrigerator or freezer product failures. 7. Consumable parts are ... or cannot be easily determined. 12. Proof of stainless steel surfaces. Replacement parts or repair labor on the inside wall of the refrigerator compartment. YOUR SOLE AND EXCLUSIVE REMEDY UNDER THIS LIMITED WARRANTY SHALL BE PRODUCT REPAIR AS PROVIDED HEREIN. Damage resulting from warranty coverage....
...For assistance or service in the U.S.A., visit www.whirlpool.com In Canada, visit www.whirlpool.ca If you do not have access to the Internet and you need further assistance, you can find your home. 8. Service calls to refrigerator or freezer product failures. 7. Consumable parts are ... or cannot be easily determined. 12. Proof of stainless steel surfaces. Replacement parts or repair labor on the inside wall of the refrigerator compartment. YOUR SOLE AND EXCLUSIVE REMEDY UNDER THIS LIMITED WARRANTY SHALL BE PRODUCT REPAIR AS PROVIDED HEREIN. Damage resulting from warranty coverage....


