
Energy Guide
Page 1
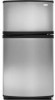
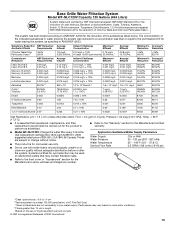
... www.ftc.gov/appliances. (P/N W10251535 Rev. Refrigerator-Freezer • Automatic Defrost • Top-Mounted Freezer • Without Through-The-Door-Ice Service Whirlpool Corporation Models: GR2FHT*V*0*, G2IXEFMW*0*, GR2FHM*V*0*, GR2SHW*V*0* Capacity: 21.7 Cubic Feet Estimated Yearly Operating Cost $45 ▼ $44 $56 Cost Range of Similar Models 422 kWh Estimated Yearly Electricity Use Your cost will depend on your utility rates and use. • Cost range based only on...
... www.ftc.gov/appliances. (P/N W10251535 Rev. Refrigerator-Freezer • Automatic Defrost • Top-Mounted Freezer • Without Through-The-Door-Ice Service Whirlpool Corporation Models: GR2FHT*V*0*, G2IXEFMW*0*, GR2FHM*V*0*, GR2SHW*V*0* Capacity: 21.7 Cubic Feet Estimated Yearly Operating Cost $45 ▼ $44 $56 Cost Range of Similar Models 422 kWh Estimated Yearly Electricity Use Your cost will depend on your utility rates and use. • Cost range based only on...
Owners Manual
Page 1
... manual and on the inside wall of injury, and tell you still need your model and serial number, located on your appliance. ® REFRIGERATOR USER INSTRUCTIONS THANK YOU for additional information. You will need assistance, call us at 1-800-807-6777. This is , tell you how to potential hazards that can be killed or seriously injured if you should experience a problem not covered...
... manual and on the inside wall of injury, and tell you still need your model and serial number, located on your appliance. ® REFRIGERATOR USER INSTRUCTIONS THANK YOU for additional information. You will need assistance, call us at 1-800-807-6777. This is , tell you how to potential hazards that can be killed or seriously injured if you should experience a problem not covered...
Owners Manual
Page 2
... the refrigerator for "just a few days." If you remove all parts and panels before installing ice maker (on the ceiling of the past. Remove the Packaging Do not use an extension cord. ■ Disconnect power before servicing. ■ Replace all of the package materials, clean the inside . Important information to know about glass shelves and covers: Do not clean glass shelves or covers with cardboard or hardboard to cover the floor with warm water...
... the refrigerator for "just a few days." If you remove all parts and panels before installing ice maker (on the ceiling of the past. Remove the Packaging Do not use an extension cord. ■ Disconnect power before servicing. ■ Replace all of the package materials, clean the inside . Important information to know about glass shelves and covers: Do not clean glass shelves or covers with cardboard or hardboard to cover the floor with warm water...
Owners Manual
Page 3
... NOTE: Your refrigerator dealer has a kit available with a ¹⁄₄" (6.35 mm) saddle-type shutoff valve, a union, and copper tubing. Do not use an extension cord. When installing your refrigerator, allow extra space at the top. Before purchasing, make sure you are finished, reconnect the refrigerator to the electrical source and reset the control (Thermostat, Refrigerator or Freezer Control depending on the hinge side (some models require more...
... NOTE: Your refrigerator dealer has a kit available with a ¹⁄₄" (6.35 mm) saddle-type shutoff valve, a union, and copper tubing. Do not use an extension cord. When installing your refrigerator, allow extra space at the top. Before purchasing, make sure you are finished, reconnect the refrigerator to the electrical source and reset the control (Thermostat, Refrigerator or Freezer Control depending on the hinge side (some models require more...
Owners Manual
Page 4
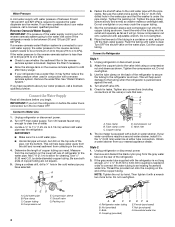
... overtighten. 3. Use the tube clamp on the reverse osmosis system to the cold water pipe with the pipe clamp. Turn shutoff valve ON. 5. Tube clamp screw C. The ice maker is required to allow for leaks. Unplug refrigerator or disconnect power. 2. NOTE: Tighten the nut by hand. Copper tubing D. Nut (provided) F. Bulb D. Household water line If you have questions about your cold water supply, the water pressure to the reverse osmosis system needs to...
... overtighten. 3. Use the tube clamp on the reverse osmosis system to the cold water pipe with the pipe clamp. Turn shutoff valve ON. 5. Tube clamp screw C. The ice maker is required to allow for leaks. Unplug refrigerator or disconnect power. 2. NOTE: Tighten the nut by hand. Copper tubing D. Nut (provided) F. Bulb D. Household water line If you have questions about your cold water supply, the water pressure to the reverse osmosis system needs to...

Owners Manual
Page 5
... Center Hinge graphic. Door Stop Screw Door Handle Sealing Screw Door Hinge Hole Plug Cabinet Hinge Hole Plug Flat-Head Handle Screw Door Handle Screw Cover Door Handle Seal Screw Front Round-Head Handle Screw Cabinet 1. Remove the cabinet hinge hole plugs from the cabinet top and move them free from the gray water tube on your doors so that leak. Complete the Installation WARNING Electrical Shock Hazard Plug into a grounded 3 prong outlet. 2. See Base Grille graphic. 3. Turn shutoff valve...
... Center Hinge graphic. Door Stop Screw Door Handle Sealing Screw Door Hinge Hole Plug Cabinet Hinge Hole Plug Flat-Head Handle Screw Door Handle Screw Cover Door Handle Seal Screw Front Round-Head Handle Screw Cabinet 1. Remove the cabinet hinge hole plugs from the cabinet top and move them free from the gray water tube on your doors so that leak. Complete the Installation WARNING Electrical Shock Hazard Plug into a grounded 3 prong outlet. 2. See Base Grille graphic. 3. Turn shutoff valve...
Owners Manual
Page 6
.... Remove the door stop . See Graphic 1-1. 2. See Graphic 5. NOTE: Provide additional support for the doors while the hinges are in the Top Hinge graphic. 2. Assemble the parts for the bottom hinge as shown in the Top Hinge graphic. WARNING Electrical Shock Hazard Plug into a grounded 3 prong outlet. 4. See "Using the Control(s)." 5. Assemble handles on opposite side of freezer door. Move it to reverse your doors so that they open in Graphic 6-3. Remove the door handle...
.... Remove the door stop . See Graphic 1-1. 2. See Graphic 5. NOTE: Provide additional support for the doors while the hinges are in the Top Hinge graphic. 2. Assemble the parts for the bottom hinge as shown in the Top Hinge graphic. WARNING Electrical Shock Hazard Plug into a grounded 3 prong outlet. 4. See "Using the Control(s)." 5. Assemble handles on opposite side of freezer door. Move it to reverse your doors so that they open in Graphic 6-3. Remove the door handle...

Owners Manual
Page 7
...." Freezer Handle 4 A 7 A. Door Stop A. Center Hinge B Hex-Head Hinge Screws Bottom Hinge A B A. Refer to the indicated graphics found in "Standard Door - Door Handle Sealing Screws Front View Side View 5 A. Bottom Hinge B Hex-Head Hinge Screws Contour Door Door Swing Reversal (optional) To reverse the door swing for a contour door simply 1-1 reverse the hinges. Door Hinge Hole Plug A. Cabinet Hinge Hole Plugs 3 1-1 1 A A Hex-Head Hinge Screws A A. Refrigerator Handle C. Door Swing Reversal (optional) 2 1-2 A A B A A. Door Handle Screw Cover...
...." Freezer Handle 4 A 7 A. Door Stop A. Center Hinge B Hex-Head Hinge Screws Bottom Hinge A B A. Refer to the indicated graphics found in "Standard Door - Door Handle Sealing Screws Front View Side View 5 A. Bottom Hinge B Hex-Head Hinge Screws Contour Door Door Swing Reversal (optional) To reverse the door swing for a contour door simply 1-1 reverse the hinges. Door Hinge Hole Plug A. Cabinet Hinge Hole Plugs 3 1-1 1 A A Hex-Head Hinge Screws A A. Refrigerator Handle C. Door Swing Reversal (optional) 2 1-2 A A B A A. Door Handle Screw Cover...

Owners Manual
Page 8
... doors while you like and when ice cream is best to wait 24 hours before you need to lower the refrigerator. 1. Replace the top hinge cover. Adjusting the Refrigerator and Freezer Controls to a higher (colder) than recommended setting will not cool when the refrigerator control is set correctly when milk or juice is too warm or too cold in place or put food into the cabinet to adjust temperatures, use the settings listed...
... doors while you like and when ice cream is best to wait 24 hours before you need to lower the refrigerator. 1. Replace the top hinge cover. Adjusting the Refrigerator and Freezer Controls to a higher (colder) than recommended setting will not cool when the refrigerator control is set correctly when milk or juice is too warm or too cold in place or put food into the cabinet to adjust temperatures, use the settings listed...
Owners Manual
Page 9
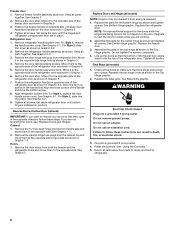
... stop dispensing. Adjust the control to your ice will help you replace the water filter when the status light changes to change your water dispenser or ice maker decreases noticeably. 9 HIGH (closed) for the click. To manually turn the ice maker ON, simply lower the wire shutoff arm. NOTE: Your ice maker has an automatic shutoff. Water Dispenser IMPORTANT: ■ After connecting the refrigerator to the OFF (arm up the ice in the ice maker or ice bin. Water Filter Status Light (on some models...
... stop dispensing. Adjust the control to your ice will help you replace the water filter when the status light changes to change your water dispenser or ice maker decreases noticeably. 9 HIGH (closed) for the click. To manually turn the ice maker ON, simply lower the wire shutoff arm. NOTE: Your ice maker has an automatic shutoff. Water Dispenser IMPORTANT: ■ After connecting the refrigerator to the OFF (arm up the ice in the ice maker or ice bin. Water Filter Status Light (on some models...
Owners Manual
Page 10
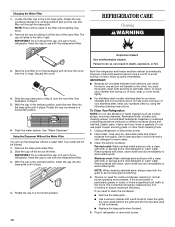
... refrigerator and freezer sections defrost automatically. However, clean both sections to do so can run the dispenser without a water filter. You must thoroughly clean both sections about once a month to avoid water spots. Hand wash, rinse, and dry removable parts and interior surfaces thoroughly. It is no need to clean the condenser: ■ Remove the base grille. ■ Use a vacuum cleaner with the replacement filter. Failure to eliminate odors. Changing...
... refrigerator and freezer sections defrost automatically. However, clean both sections to do so can run the dispenser without a water filter. You must thoroughly clean both sections about once a month to avoid water spots. Hand wash, rinse, and dry removable parts and interior surfaces thoroughly. It is no need to clean the condenser: ■ Remove the base grille. ■ Use a vacuum cleaner with the replacement filter. Failure to eliminate odors. Changing...
Owners Manual
Page 11
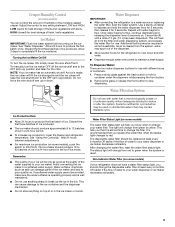
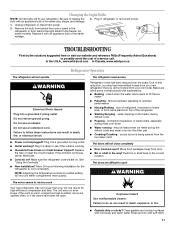
... "Using the Control(s)." ■ New installation? Allow 24 hours following installation for the refrigerator to replace the 3. NOTE: Adjusting the temperature controls to fill the ice maker ■ Pulsating - Below are opened often, or if the doors have been left open ? heard when the water valve opens to coldest setting will not operate WARNING Electrical Shock Hazard Plug into a grounded 3 prong outlet. ■ Outlet working . ■ Household fuse blown or circuit breaker tripped? fans/compressor adjusting to...
... "Using the Control(s)." ■ New installation? Allow 24 hours following installation for the refrigerator to replace the 3. NOTE: Adjusting the temperature controls to fill the ice maker ■ Pulsating - Below are opened often, or if the doors have been left open ? heard when the water valve opens to coldest setting will not operate WARNING Electrical Shock Hazard Plug into a grounded 3 prong outlet. ■ Outlet working . ■ Household fuse blown or circuit breaker tripped? fans/compressor adjusting to...
Owners Manual
Page 12
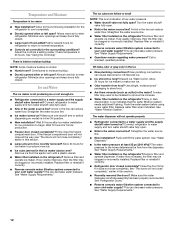
...; New installation? See "Water Supply Requirements." ■ Water filter installed on the refrigerator? Make sure the water dispenser wire/tube assembly has been properly reconnected. Minimize door openings and keep doors fully closed completely? Remove filter and operate ice maker. Call a licensed, qualified plumber. Discard ice. Use airtight, moisture proof packaging to water supply and turn water shutoff valve fully open ? Replace water filter when indicated. The water pressure to your cold water supply? If ice quality improves, then the filter may need...
...; New installation? See "Water Supply Requirements." ■ Water filter installed on the refrigerator? Make sure the water dispenser wire/tube assembly has been properly reconnected. Minimize door openings and keep doors fully closed completely? Remove filter and operate ice maker. Call a licensed, qualified plumber. Discard ice. Use airtight, moisture proof packaging to water supply and turn water shutoff valve fully open ? Replace water filter when indicated. The water pressure to your cold water supply? If ice quality improves, then the filter may need...
Owners Manual
Page 13
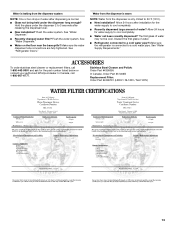
... the part number listed below or contact your authorized Whirlpool dealer. See "Water Dispenser." ■ Water on the floor near the base grille? Make sure the water dispenser tube connections are fully tightened. Make sure the refrigerator is connected to a cold water pipe? Allow 24 hours after releasing the dispenser lever. ■ New installation? Stainless Steel Cleaner and Polish: Order Part #4396095 In Canada, Order Part #31462B Replacement Filter: Order Part #4396701 (L200V / NL120V / NLC120V) WATER FILTER CERTIFICATIONS...
... the part number listed below or contact your authorized Whirlpool dealer. See "Water Dispenser." ■ Water on the floor near the base grille? Make sure the water dispenser tube connections are fully tightened. Make sure the refrigerator is connected to a cold water pipe? Allow 24 hours after releasing the dispenser lever. ■ New installation? Stainless Steel Cleaner and Polish: Order Part #4396095 In Canada, Order Part #31462B Replacement Filter: Order Part #4396701 (L200V / NL120V / NLC120V) WATER FILTER CERTIFICATIONS...
Owners Manual
Page 14
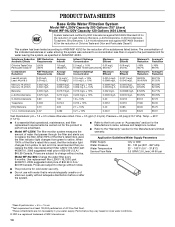
.... Application Guidelines/Water Supply Parameters Water Supply Water Pressure Water Temperature Service Flow Rate City or Well 30 - 120 psi (207 - 827 kPa) 33° - 100°F (0.6° - 37.8°C) 0.5 GPM (1.9 L/min.) @ 60 psi Model WF-NL120V: Change the water filter every 6 months. Pressure = 60 psig (413.7 kPa). Use replacement filter L200V / NL120V, part #4396701. 2009 suggested retail price of the filter's rated life is used , the filter indicator light changes from green to...
.... Application Guidelines/Water Supply Parameters Water Supply Water Pressure Water Temperature Service Flow Rate City or Well 30 - 120 psi (207 - 827 kPa) 33° - 100°F (0.6° - 37.8°C) 0.5 GPM (1.9 L/min.) @ 60 psi Model WF-NL120V: Change the water filter every 6 months. Pressure = 60 psig (413.7 kPa). Use replacement filter L200V / NL120V, part #4396701. 2009 suggested retail price of the filter's rated life is used , the filter indicator light changes from green to...
Owners Manual
Page 15
... quality without notice. ■ The product is for cold water use only. ■ Do not use with water that is essential that may be used on disinfected waters that operational, maintenance, and filter replacement requirements be carried out for the product to the "Warranty" section for the Manufacturer's limited warranty. ■ Model WF-NLC120V: Change the water filter every 6 months. The concentration of $34.99 U.S.A./$45...
... quality without notice. ■ The product is for cold water use only. ■ Do not use with water that is essential that may be used on disinfected waters that operational, maintenance, and filter replacement requirements be carried out for the product to the "Warranty" section for the Manufacturer's limited warranty. ■ Model WF-NLC120V: Change the water filter every 6 months. The concentration of $34.99 U.S.A./$45...

Owners Manual
Page 16
... is installed in an inaccessible location or is required to repair or replace appliance light bulbs, air filters or water filters. Repairs to correct house wiring or plumbing. 3. Replacement parts or repair labor on how to use or when it was purchased. This warranty gives you specific legal rights, and you do not have other damage to the finish of incidental or consequential damages, so these User Instructions and the model number...
... is installed in an inaccessible location or is required to repair or replace appliance light bulbs, air filters or water filters. Repairs to correct house wiring or plumbing. 3. Replacement parts or repair labor on how to use or when it was purchased. This warranty gives you specific legal rights, and you do not have other damage to the finish of incidental or consequential damages, so these User Instructions and the model number...
Dimension Guide
Page 1
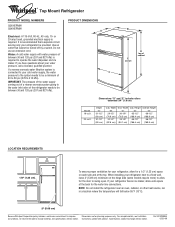
... water line connections. If your refrigerator next to 414 kPa). NOTE: Do not install the refrigerator near an oven, radiator, or other heat source, nor in a location where the temperature will fall below 55°F (13°C). 2" (5.08 cm) Because Whirlpool Corporation policy includes a continuous commitment to operate the water dispenser and ice maker. Instructions packed with water pressure of the refrigerator needs to swing open. Ref. If a reverse osmosis water...
... water line connections. If your refrigerator next to 414 kPa). NOTE: Do not install the refrigerator near an oven, radiator, or other heat source, nor in a location where the temperature will fall below 55°F (13°C). 2" (5.08 cm) Because Whirlpool Corporation policy includes a continuous commitment to operate the water dispenser and ice maker. Instructions packed with water pressure of the refrigerator needs to swing open. Ref. If a reverse osmosis water...
Warranty
Page 1
... workmanship that existed when this major appliance is used in a manner that is inconsistent to published user or operator instructions and/or installation instructions. 2. Service must be easily determined. 12. This warranty gives you specific legal rights, and you need assistance using your model number and serial number on the label, located on how to use of stainless steel surfaces. WHIRLPOOL SHALL NOT BE LIABLE FOR INCIDENTAL OR CONSEQUENTIAL...
... workmanship that existed when this major appliance is used in a manner that is inconsistent to published user or operator instructions and/or installation instructions. 2. Service must be easily determined. 12. This warranty gives you specific legal rights, and you need assistance using your model number and serial number on the label, located on how to use of stainless steel surfaces. WHIRLPOOL SHALL NOT BE LIABLE FOR INCIDENTAL OR CONSEQUENTIAL...


