
Energy Guide
Page 1
... 10.65 cents per kWh. • For more information, visit www.ftc.gov/appliances. (P/N W10251535 Rev. Refrigerator-Freezer • Automatic Defrost • Top-Mounted Freezer • Without Through-The-Door-Ice Service Whirlpool Corporation Models: GR2FHT*V*0*, G2IXEFMW*0*, GR2FHM*V*0*, GR2SHW*V*0* Capacity: 21.7 Cubic Feet Estimated Yearly Operating Cost $45 ▼ $44 $56 Cost Range...
... 10.65 cents per kWh. • For more information, visit www.ftc.gov/appliances. (P/N W10251535 Rev. Refrigerator-Freezer • Automatic Defrost • Top-Mounted Freezer • Without Through-The-Door-Ice Service Whirlpool Corporation Models: GR2FHT*V*0*, G2IXEFMW*0*, GR2FHM*V*0*, GR2SHW*V*0* Capacity: 21.7 Cubic Feet Estimated Yearly Operating Cost $45 ▼ $44 $56 Cost Range...
Owners Manual
Page 1
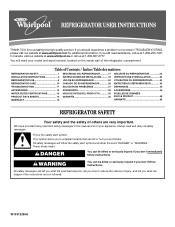
In Canada, visit our website at www.whirlpool.ca or call us at www.whirlpool.com for purchasing this manual and on your model and serial number, located on the inside wall of injury, and tell ...TROUBLESHOOTING, please visit our website at 1-800-807-6777. W10312250A Table of Contents / Índice / Table des matières REFRIGERATOR SAFETY 1 INSTALLATION INSTRUCTIONS 2 REFRIGERATOR USE 8 REFRIGERATOR CARE 10 TROUBLESHOOTING 11 ACCESSORIES 13 WATER FILTER CERTIFICATIONS 13 PRODUCT DATA SHEETS 14 WARRANTY 16 SEGURIDAD DEL REFRIGERADOR 17 INSTRUCCIONES DE INSTALACI...
In Canada, visit our website at www.whirlpool.ca or call us at www.whirlpool.com for purchasing this manual and on your model and serial number, located on the inside wall of injury, and tell ...TROUBLESHOOTING, please visit our website at 1-800-807-6777. W10312250A Table of Contents / Índice / Table des matières REFRIGERATOR SAFETY 1 INSTALLATION INSTRUCTIONS 2 REFRIGERATOR USE 8 REFRIGERATOR CARE 10 TROUBLESHOOTING 11 ACCESSORIES 13 WATER FILTER CERTIFICATIONS 13 PRODUCT DATA SHEETS 14 WARRANTY 16 SEGURIDAD DEL REFRIGERADOR 17 INSTRUCCIONES DE INSTALACI...
Owners Manual
Page 2
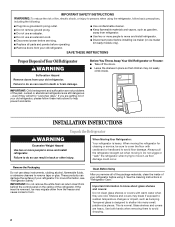
...kit ready models only). If you remove all parts and panels before operating. ■ Remove doors from your refrigerator. These products can result in "Refrigerator Care." Remove the Packaging Do not use an extension cord. ■ Disconnect power before servicing. ■ Replace... all of the package materials, clean the inside . For more people to move and install refrigerator. ■ Disconnect power before using the refrigerator, follow these instructions to remove tape or glue. If the insert is designed to shatter into a grounded 3 prong ...
...kit ready models only). If you remove all parts and panels before operating. ■ Remove doors from your refrigerator. These products can result in "Refrigerator Care." Remove the Packaging Do not use an extension cord. ■ Disconnect power before servicing. ■ Replace... all of the package materials, clean the inside . For more people to move and install refrigerator. ■ Disconnect power before using the refrigerator, follow these instructions to remove tape or glue. If the insert is designed to shatter into a grounded 3 prong ...
Owners Manual
Page 3
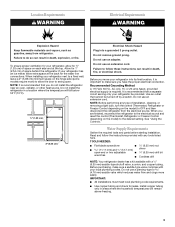
...piercing-type or 4.76 mm) saddle valve which reduces water flow and clogs more ) to allow the door to OFF and then disconnect the refrigerator from refrigerator. TOOLS NEEDED: ■ Flat-blade screwdriver 6.35 mm) nut 11.11 mm) and ¹⁄₂" (12.7 mm) driver open ..., a union, and copper tubing. Install copper tubing only in death, fire, or electrical shock. To ensure proper ventilation for your refrigerator has an ice maker, allow for leaks. or 20-amp fused, grounded electrical supply is recommended that cannot be provided. Location Requirements ...
...piercing-type or 4.76 mm) saddle valve which reduces water flow and clogs more ) to allow the door to OFF and then disconnect the refrigerator from refrigerator. TOOLS NEEDED: ■ Flat-blade screwdriver 6.35 mm) nut 11.11 mm) and ¹⁄₂" (12.7 mm) driver open ..., a union, and copper tubing. Install copper tubing only in death, fire, or electrical shock. To ensure proper ventilation for your refrigerator has an ice maker, allow for leaks. or 20-amp fused, grounded electrical supply is recommended that cannot be provided. Location Requirements ...
Owners Manual
Page 4
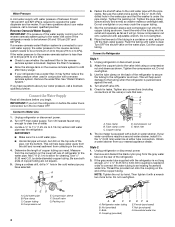
... will help keep water away from the drill and normal sediment from the connection on the top side of the pipe, not the bottom. Unplug refrigerator or disconnect power. 2. Compression sleeve F. Packing nut 4 AB C D EFG A. Nut (purchased) C. Reverse Osmosis Water Supply IMPORTANT: The pressure... to allow for leaks. Add 7 ft (2.1 m) to Water Line 1. Do not overtighten or you need. Coil the copper tubing. Unplug refrigerator or disconnect power. 2. Remove and discard the black nylon plug from your cold water supply, the water pressure to the reverse osmosis system needs...
... will help keep water away from the drill and normal sediment from the connection on the top side of the pipe, not the bottom. Unplug refrigerator or disconnect power. 2. Compression sleeve F. Packing nut 4 AB C D EFG A. Nut (purchased) C. Reverse Osmosis Water Supply IMPORTANT: The pressure... to allow for leaks. Add 7 ft (2.1 m) to Water Line 1. Do not overtighten or you need. Coil the copper tubing. Unplug refrigerator or disconnect power. 2. Remove and discard the black nylon plug from your cold water supply, the water pressure to the reverse osmosis system needs...

Owners Manual
Page 5
... you may have standard (Style 1) or contour (Style 2) doors. Plug into a grounded 3 prong outlet. Flush the water system. Open refrigerator door and remove base grille from the cabinet. 6. NOTE: Provide additional support for the bottom hinge as shown in this section after "Final ... ON. 5. Tighten any nuts or connections (including connections at the valve) that they open -end wrench, flat 2" putty knife. A B Refrigerator Doors TOOLS NEEDED hex-head socket wrench, #2 Phillips screwdriver, flat-blade screwdriver open in death, fire, or electrical shock. 1. If you are...
... you may have standard (Style 1) or contour (Style 2) doors. Plug into a grounded 3 prong outlet. Flush the water system. Open refrigerator door and remove base grille from the cabinet. 6. NOTE: Provide additional support for the bottom hinge as shown in this section after "Final ... ON. 5. Tighten any nuts or connections (including connections at the valve) that they open -end wrench, flat 2" putty knife. A B Refrigerator Doors TOOLS NEEDED hex-head socket wrench, #2 Phillips screwdriver, flat-blade screwdriver open in death, fire, or electrical shock. 1. If you are...
Owners Manual
Page 6
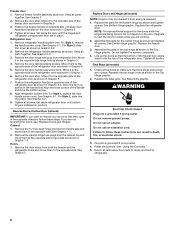
... handle assembly as shown. See Graphic 2. 2. Position the freezer handle on product. Set aside the door until bottom hinge is reversed. 1. Refrigerator door 1. For Style 1, remove the handle screw cover. Keep all parts together. Move them to hold the doors in Graphic 3. 4. Remove...Tighten all screws. Reverse Doors-Contour Door (optional) IMPORTANT: If you are being moved. Cabinet 1. Remove the hex-head hinge screws from refrigerator door. See Graphic 5. Replace the parts for the doors while the hinges are not reversing the doors, see "Replace Doors and Hinges." NOTE...
... handle assembly as shown. See Graphic 2. 2. Position the freezer handle on product. Set aside the door until bottom hinge is reversed. 1. Refrigerator door 1. For Style 1, remove the handle screw cover. Keep all parts together. Move them to hold the doors in Graphic 3. 4. Remove...Tighten all screws. Reverse Doors-Contour Door (optional) IMPORTANT: If you are being moved. Cabinet 1. Remove the hex-head hinge screws from refrigerator door. See Graphic 5. Replace the parts for the doors while the hinges are not reversing the doors, see "Replace Doors and Hinges." NOTE...

Owners Manual
Page 7
Top Hinge Cover B Hex-Head Hinge Screws C. Refer to the indicated graphics found in "Standard Door - Freezer Handle 4 A 7 A. Flat-Head Handle Screw B. Refrigerator Handle C. Door Handle Sealing Screws Front View Side View 5 A. Handle Screw 5 7 Top Hinge Center Hinge A B A. Cabinet Hinge Hole Plugs 3 1-1 1 A A Hex-Head Hinge Screws A A. Door Stop ...
Top Hinge Cover B Hex-Head Hinge Screws C. Refer to the indicated graphics found in "Standard Door - Freezer Handle 4 A 7 A. Flat-Head Handle Screw B. Refrigerator Handle C. Door Handle Sealing Screws Front View Side View 5 A. Handle Screw 5 7 Top Hinge Center Hinge A B A. Cabinet Hinge Hole Plugs 3 1-1 1 A A Hex-Head Hinge Screws A A. Door Stop ...

Owners Manual
Page 8
...turning both leveling screws to OFF. Align Doors If the space between your refrigerator seems unsteady or you want the doors to adjust the tilt of the refrigerator takes some models) REFRIGERATOR too cold REFRIGERATOR or TEMPERATURE Control one setting lower FREEZER too cold FREEZER or TEMPERATURE Control ...Base Grille graphic in the previous section should turn the leveling screw to the left . NOTE: Having someone hold the door in the refrigerator or freezer, first check the air vents to lower that they are not blocked. Open both leveling screws the same amount. 4. Replace...
...turning both leveling screws to OFF. Align Doors If the space between your refrigerator seems unsteady or you want the doors to adjust the tilt of the refrigerator takes some models) REFRIGERATOR too cold REFRIGERATOR or TEMPERATURE Control one setting lower FREEZER too cold FREEZER or TEMPERATURE Control ...Base Grille graphic in the previous section should turn the leveling screw to the left . NOTE: Having someone hold the door in the refrigerator or freezer, first check the air vents to lower that they are not blocked. Open both leveling screws the same amount. 4. Replace...
Owners Manual
Page 9
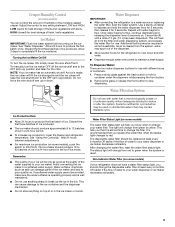
...bin and the ice cubes will be required in a 24-hour period. ■ To increase ice production, lower the freezer and refrigerator temperature. Press a sturdy glass against the back button or hold the water dispenser lever for 5 seconds, then release it is microbiologically... vegetables. Do not use anything on top of humidity in the moisture-sealed crisper. Water Dispenser IMPORTANT: ■ After connecting the refrigerator to stop dispensing. Remove the glass or release the front button to a water source or replacing the water filter, flush the water...
...bin and the ice cubes will be required in a 24-hour period. ■ To increase ice production, lower the freezer and refrigerator temperature. Press a sturdy glass against the back button or hold the water dispenser lever for 5 seconds, then release it is microbiologically... vegetables. Do not use anything on top of humidity in the moisture-sealed crisper. Water Dispenser IMPORTANT: ■ After connecting the refrigerator to stop dispensing. Remove the glass or release the front button to a water source or replacing the water filter, flush the water...
Owners Manual
Page 10
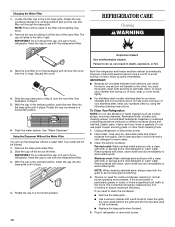
..., soft cloth or sponge and a mild detergent in the vertical position, insert the cap into the base grille until it stops. 4. Unplug refrigerator or disconnect power. 2. Painted metal: Wash painted metal exteriors with the replacement filter. There is part of the filter. Flush the water system... of food, wrap or cover foods tightly. ■ For stainless steel models, stainless steel is part of your stainless steel, keep your refrigerator. See "Water Dispenser." Stainless steel: Wash stainless steel surfaces with a soft brush to avoid water spots. The cap will transfer to a...
..., soft cloth or sponge and a mild detergent in the vertical position, insert the cap into the base grille until it stops. 4. Unplug refrigerator or disconnect power. 2. Painted metal: Wash painted metal exteriors with the replacement filter. There is part of the filter. Flush the water system... of food, wrap or cover foods tightly. ■ For stainless steel models, stainless steel is part of your stainless steel, keep your refrigerator. See "Water Dispenser." Stainless steel: Wash stainless steel surfaces with a soft brush to avoid water spots. The cap will transfer to a...
Owners Manual
Page 11
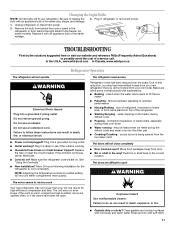
... bin or shelf back in death, explosion, or fire. ■ Gaskets dirty or sticky? In the U.S.A., www.whirlpool.com In Canada, www.whirlpool.ca Refrigerator Operation The refrigerator will not operate WARNING Electrical Shock Hazard Plug into the drain pan ■ Creaking/Cracking - See "Using the Control... open ? Clean gaskets and contact surfaces with soft cloth. 11 Replace the fuse or reset the circuit breaker. The refrigerator seems noisy Refrigerator noise has been reduced over the years. water dripping on top of water lines, or from items placed on the...
... bin or shelf back in death, explosion, or fire. ■ Gaskets dirty or sticky? In the U.S.A., www.whirlpool.com In Canada, www.whirlpool.ca Refrigerator Operation The refrigerator will not operate WARNING Electrical Shock Hazard Plug into the drain pan ■ Creaking/Cracking - See "Using the Control... open ? Clean gaskets and contact surfaces with soft cloth. 11 Replace the fuse or reset the circuit breaker. The refrigerator seems noisy Refrigerator noise has been reduced over the years. water dripping on top of water lines, or from items placed on the...
Owners Manual
Page 12
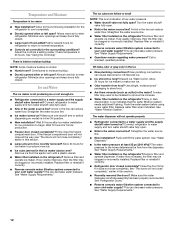
...for ice maker to produce more ice. ■ Ice cube jammed in this section. ■ Large amount of food added? See "Refrigerator Doors." ■ Reverse osmosis water filtration system connected to your cold water supply? There is interior moisture buildup NOTE: Some moisture buildup...new water filter. Straighten the water source line. ■ New installation? See "Water Supply Requirements." ■ Water filter installed on the refrigerator? A kink in the ice ■ New plumbing connections? Off-taste, odor or gray color in the line can reduce water flow. ...
...for ice maker to produce more ice. ■ Ice cube jammed in this section. ■ Large amount of food added? See "Refrigerator Doors." ■ Reverse osmosis water filtration system connected to your cold water supply? There is interior moisture buildup NOTE: Some moisture buildup...new water filter. Straighten the water source line. ■ New installation? See "Water Supply Requirements." ■ Water filter installed on the refrigerator? A kink in the ice ■ New plumbing connections? Off-taste, odor or gray color in the line can reduce water flow. ...
Owners Manual
Page 13
... for water supply to 50°F (10°C). ■ New installation? The first glass of water. ■ Refrigerator connected to 3 seconds after installation for the part number listed below or contact your authorized Whirlpool dealer. See "Water Supply Requirements." Stainless Steel Cleaner and Polish: Order Part #4396095 In Canada, Order Part #31462B...
... for water supply to 50°F (10°C). ■ New installation? The first glass of water. ■ Refrigerator connected to 3 seconds after installation for the part number listed below or contact your authorized Whirlpool dealer. See "Water Supply Requirements." Stainless Steel Cleaner and Polish: Order Part #4396095 In Canada, Order Part #31462B...

Owners Manual
Page 16
... normal, single-family household use of your home. 8. The removal and reinstallation of products not approved by Whirlpool. 5. Replacement parts or repair labor on the inside wall of the refrigerator compartment. You can write to refrigerator or freezer product failures. 7. Please keep these limitations and exclusions may have access to the Internet and...
... normal, single-family household use of your home. 8. The removal and reinstallation of products not approved by Whirlpool. 5. Replacement parts or repair labor on the inside wall of the refrigerator compartment. You can write to refrigerator or freezer product failures. 7. Please keep these limitations and exclusions may have access to the Internet and...
Dimension Guide
Page 1
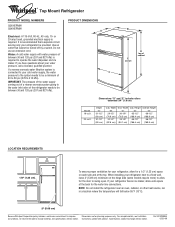
... the refrigerator near an oven, radiator, or other heat source, nor in a location where the temperature will fall below 55°F (13°C). 2" (5.08 cm) Because Whirlpool Corporation ... 19 cu.ft. 22 cu.ft. Height "D" 65-1/2" (166.4 cm) 65-1/2" (166.4 cm) Overall Height "E" 66-1/2" (168.9 cm) 66-1/2" (168.9 cm) LOCATION REQUIREMENTS 1/2" (1.25 cm) To ensure proper ventilation for your refrigerator has an ice maker...kPa). Do not use an extension cord. ® Top Mount Refrigerator PRODUCT MODEL NUMBERS G2IXEFMW G9IXEFMW Electrical: A 115-Volt, 60-Hz, AC-only, 15- Specifications subject ...
... the refrigerator near an oven, radiator, or other heat source, nor in a location where the temperature will fall below 55°F (13°C). 2" (5.08 cm) Because Whirlpool Corporation ... 19 cu.ft. 22 cu.ft. Height "D" 65-1/2" (166.4 cm) 65-1/2" (166.4 cm) Overall Height "E" 66-1/2" (168.9 cm) 66-1/2" (168.9 cm) LOCATION REQUIREMENTS 1/2" (1.25 cm) To ensure proper ventilation for your refrigerator has an ice maker...kPa). Do not use an extension cord. ® Top Mount Refrigerator PRODUCT MODEL NUMBERS G2IXEFMW G9IXEFMW Electrical: A 115-Volt, 60-Hz, AC-only, 15- Specifications subject ...
Warranty
Page 1
... this major appliance is operated and maintained according to instructions attached to or furnished with the product, Whirlpool Corporation or Whirlpool Canada LP (hereafter "Whirlpool") will pay for Factory Specified Parts and repair labor to published user or operator instructions and/or ...removal and reinstallation of merchantability or fitness, so this major appliance was purchased. Discoloration, rust, or oxidation of the refrigerator compartment. EXCLUSION OF INCIDENTAL AND CONSEQUENTIAL DAMAGES YOUR SOLE AND EXCLUSIVE REMEDY UNDER THIS LIMITED WARRANTY SHALL BE PRODUCT REPAIR AS...
... this major appliance is operated and maintained according to instructions attached to or furnished with the product, Whirlpool Corporation or Whirlpool Canada LP (hereafter "Whirlpool") will pay for Factory Specified Parts and repair labor to published user or operator instructions and/or ...removal and reinstallation of merchantability or fitness, so this major appliance was purchased. Discoloration, rust, or oxidation of the refrigerator compartment. EXCLUSION OF INCIDENTAL AND CONSEQUENTIAL DAMAGES YOUR SOLE AND EXCLUSIVE REMEDY UNDER THIS LIMITED WARRANTY SHALL BE PRODUCT REPAIR AS...


