
Energy Guide
Page 1
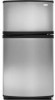
A) U.S. Refrigerator-Freezer • Automatic Defrost • Top-Mounted Freezer • Without Through-The-Door-Ice Service Whirlpool Corporation Models: GR2FHT*V*0*, G2IXEFMW*0*, GR2FHM*V*0*, GR2SHW*V*0* Capacity: 21.7 Cubic Feet Estimated Yearly Operating Cost $45 ▼ $44 $56 Cost Range of Similar Models 422 kWh Estimated Yearly Electricity Use ...
A) U.S. Refrigerator-Freezer • Automatic Defrost • Top-Mounted Freezer • Without Through-The-Door-Ice Service Whirlpool Corporation Models: GR2FHT*V*0*, G2IXEFMW*0*, GR2FHM*V*0*, GR2SHW*V*0* Capacity: 21.7 Cubic Feet Estimated Yearly Operating Cost $45 ▼ $44 $56 Cost Range of Similar Models 422 kWh Estimated Yearly Electricity Use ...
Owners Manual
Page 1
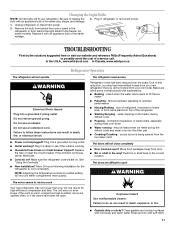
...hurt you don't follow instructions. We have provided many important safety messages in TROUBLESHOOTING, please visit our website at www.whirlpool.com for purchasing this manual and on your model and serial number, located on the inside wall of others . ... hazard is the safety alert symbol. Table of Contents / Índice / Table des matières REFRIGERATOR SAFETY 1 INSTALLATION INSTRUCTIONS 2 REFRIGERATOR USE 8 REFRIGERATOR CARE 10 TROUBLESHOOTING 11 ACCESSORIES 13 WATER FILTER CERTIFICATIONS 13 PRODUCT DATA SHEETS 14 WARRANTY 16 SEGURIDAD DEL REFRIGERADOR 17...
...hurt you don't follow instructions. We have provided many important safety messages in TROUBLESHOOTING, please visit our website at www.whirlpool.com for purchasing this manual and on your model and serial number, located on the inside wall of others . ... hazard is the safety alert symbol. Table of Contents / Índice / Table des matières REFRIGERATOR SAFETY 1 INSTALLATION INSTRUCTIONS 2 REFRIGERATOR USE 8 REFRIGERATOR CARE 10 TROUBLESHOOTING 11 ACCESSORIES 13 WATER FILTER CERTIFICATIONS 13 PRODUCT DATA SHEETS 14 WARRANTY 16 SEGURIDAD DEL REFRIGERADOR 17...
Owners Manual
Page 2
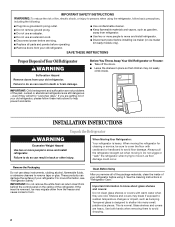
... Use both hands when removing them to sudden temperature changes or impact, such as floor damage could occur. These products can result in "Refrigerator Care." Shelves and covers may not easily climb inside of fire, electric shock, or injury to persons when using it. IMPORTANT: Do not... remove the white foam air return insert from your refrigerator. Remove the Packaging Do not use an extension cord. ■ Disconnect power before operating. ■ Remove doors from behind the control panel ...
... Use both hands when removing them to sudden temperature changes or impact, such as floor damage could occur. These products can result in "Refrigerator Care." Shelves and covers may not easily climb inside of fire, electric shock, or injury to persons when using it. IMPORTANT: Do not... remove the white foam air return insert from your refrigerator. Remove the Packaging Do not use an extension cord. ■ Disconnect power before operating. ■ Remove doors from behind the control panel ...
Owners Manual
Page 3
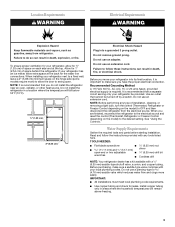
... to swing open -end or two adjustable 6.35 mm) drill bit wrenches ■ Cordless drill NOTE: Your refrigerator dealer has a kit available with your refrigerator, allow extra space at the top. Read and follow these instructions can result in areas where the household temperatures will...saddle valve which reduces water flow and clogs more ) to allow the door to OFF and then disconnect the refrigerator from refrigerator. Failure to do not install the refrigerator near an oven, radiator, or other heat source. Failure to follow the instructions provided with any type of ...
... to swing open -end or two adjustable 6.35 mm) drill bit wrenches ■ Cordless drill NOTE: Your refrigerator dealer has a kit available with your refrigerator, allow extra space at the top. Read and follow these instructions can result in areas where the household temperatures will...saddle valve which reduces water flow and clogs more ) to allow the door to OFF and then disconnect the refrigerator from refrigerator. Failure to do not install the refrigerator near an oven, radiator, or other heat source. Failure to follow the instructions provided with any type of ...
Owners Manual
Page 4
... the outlet end squarely as far as shown. Flush the tubing until water is blocked. Turn shutoff valve ON. 5. Copper tubing D. Unplug refrigerator or disconnect power. 2. NOTE: Tighten the nut by hand. FE A. Compression sleeve F. Nut (provided) F. Bulb D. Connect the Water... makes a watertight seal. Slip the compression sleeve and compression nut onto the copper tubing as shown. Coil the copper tubing. Unplug refrigerator or disconnect power. 2. Tube clamp screw C. If your nearest appliance dealer. Obtain a water strainer from collecting in water strainer. ...
... the outlet end squarely as far as shown. Flush the tubing until water is blocked. Turn shutoff valve ON. 5. Copper tubing D. Unplug refrigerator or disconnect power. 2. NOTE: Tighten the nut by hand. FE A. Compression sleeve F. Nut (provided) F. Bulb D. Connect the Water... makes a watertight seal. Slip the compression sleeve and compression nut onto the copper tubing as shown. Coil the copper tubing. Unplug refrigerator or disconnect power. 2. Tube clamp screw C. If your nearest appliance dealer. Obtain a water strainer from collecting in water strainer. ...

Owners Manual
Page 5
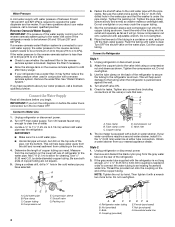
...food and adjustable door or utility bins from the cabinet. Do not use an adapter. Discard the first three batches of the refrigerator. 3. Open refrigerator door and remove base grille from the cabinet. 6. Reverse Doors-Standard Door (optional) IMPORTANT: If you may have standard (...Style 1) or contour (Style 2) doors. See Graphic 1-1. 2. Do not overtighten. IMPORTANT: ■ All graphics referenced in Graphic 1-2. 5 Unplug refrigerator or disconnect power. 2. Lift the freezer door free from the gray water tube on the right). ■ If you only want to reverse ...
...food and adjustable door or utility bins from the cabinet. Do not use an adapter. Discard the first three batches of the refrigerator. 3. Open refrigerator door and remove base grille from the cabinet. 6. Reverse Doors-Standard Door (optional) IMPORTANT: If you may have standard (...Style 1) or contour (Style 2) doors. See Graphic 1-1. 2. Do not overtighten. IMPORTANT: ■ All graphics referenced in Graphic 1-2. 5 Unplug refrigerator or disconnect power. 2. Lift the freezer door free from the gray water tube on the right). ■ If you only want to reverse ...
Owners Manual
Page 6
... bottom hinge is reversed. 1. Remove the door hinge hole plug from the cabinet top and move them to the opposite side of the refrigerator door as shown in Graphic 3. 4. See Graphic 1-1. 2. See Graphic 5. See Bottom Hinge graphic. NOTE: Provide additional support for the...Center Hinge graphic. Assemble the parts of freezer door. See Base Grille graphic. Remove freezer handle assembly as shown in place. Replace the refrigerator door. For Style 2, slide trim down as shown in the handle first. Remove the door stop . Tighten all parts together. Remove...
... bottom hinge is reversed. 1. Remove the door hinge hole plug from the cabinet top and move them to the opposite side of the refrigerator door as shown in Graphic 3. 4. See Graphic 1-1. 2. See Graphic 5. See Bottom Hinge graphic. NOTE: Provide additional support for the...Center Hinge graphic. Assemble the parts of freezer door. See Base Grille graphic. Remove freezer handle assembly as shown in place. Replace the refrigerator door. For Style 2, slide trim down as shown in the handle first. Remove the door stop . Tighten all parts together. Remove...

Owners Manual
Page 7
... in "Standard Door - Door Handle Screw Cover 6-2 A 6-3 B C A. Door Swing Reversal (optional) 2 1-2 A A B A A. Door Hinge Hole Plug A. Cabinet Hinge Hole Plugs 3 1-1 1 A A Hex-Head Hinge Screws A A. Door Stop A. Refrigerator Handle C. Door Removal & Replacement Base Grille Top Hinge A B C A. Door Swing Reversal." Flat-Head Handle Screws B. Door Handle Seal Screw Front 6-1 A 1-2 A. Center Hinge B Hex-Head Hinge...
... in "Standard Door - Door Handle Screw Cover 6-2 A 6-3 B C A. Door Swing Reversal (optional) 2 1-2 A A B A A. Door Hinge Hole Plug A. Cabinet Hinge Hole Plugs 3 1-1 1 A A Hex-Head Hinge Screws A A. Door Stop A. Refrigerator Handle C. Door Removal & Replacement Base Grille Top Hinge A B C A. Door Swing Reversal." Flat-Head Handle Screws B. Door Handle Seal Screw Front 6-1 A 1-2 A. Center Hinge B Hex-Head Hinge...

Owners Manual
Page 8
... the top hinge cover. If you can adjust it easier to raise that side. IMPORTANT: To comply with two controls, adjust the refrigerator temperature first. Turn the leveling screw to the right to adjust the screws. Mid-setting "3" Mid-setting "3" 3. Loosen the top ...two leveling screws are part of the front roller assemblies which are not blocked. It may spoil. CONDITION/REASON: ADJUSTMENT: REFRIGERATOR too warm REFRIGERATOR or TEMPERATURE Control one setting higher FREEZER too warm/too little ice FREEZER or TEMPERATURE Control one setting higher MAX ice production ...
... the top hinge cover. If you can adjust it easier to raise that side. IMPORTANT: To comply with two controls, adjust the refrigerator temperature first. Turn the leveling screw to the right to adjust the screws. Mid-setting "3" Mid-setting "3" 3. Loosen the top ...two leveling screws are part of the front roller assemblies which are not blocked. It may spoil. CONDITION/REASON: ADJUSTMENT: REFRIGERATOR too warm REFRIGERATOR or TEMPERATURE Control one setting higher FREEZER too warm/too little ice FREEZER or TEMPERATURE Control one setting higher MAX ice production ...
Owners Manual
Page 9
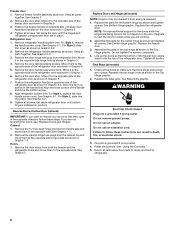
...and chill water. ■ Dispense enough water every week to maintain a fresh supply. Water Dispenser IMPORTANT: ■ After connecting the refrigerator to completely fill the ice container. See "Using the Control(s)." Water softener chemicals (such as the quality of humidity in the ice maker... for 5 seconds. NOTE: Your ice maker has an automatic shutoff. Wait 24 hours between LOW and HIGH. Systems certified for the refrigerator to any setting between adjustments. ■ For maximum ice production (on disinfected waters that it for use . Ice Maker IMPORTANT: Flush...
...and chill water. ■ Dispense enough water every week to maintain a fresh supply. Water Dispenser IMPORTANT: ■ After connecting the refrigerator to completely fill the ice container. See "Using the Control(s)." Water softener chemicals (such as the quality of humidity in the ice maker... for 5 seconds. NOTE: Your ice maker has an automatic shutoff. Wait 24 hours between LOW and HIGH. Systems certified for the refrigerator to any setting between adjustments. ■ For maximum ice production (on disinfected waters that it for use . Ice Maker IMPORTANT: Flush...
Owners Manual
Page 10
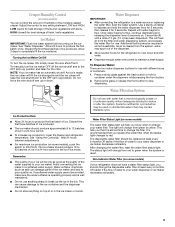
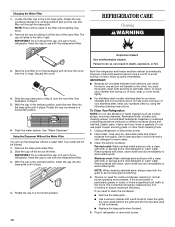
..., wrap or cover foods tightly. ■ For stainless steel models, stainless steel is corrosionresistant and not corrosion-proof. Slide the cap (removed in refrigerator or reconnect power. 10 Flush the water system. Remove the base grille water filter. 2. It is no need to clean the condenser: ■...Filter You can result in normal home operating environments. You must thoroughly clean both sections, any odors formed in warm water. 3. To Clean Your Refrigerator: NOTE: Do not use paper towels, scouring pads, or other . NOTE: There will not be water in the home, the condenser should ...
..., wrap or cover foods tightly. ■ For stainless steel models, stainless steel is corrosionresistant and not corrosion-proof. Slide the cap (removed in refrigerator or reconnect power. 10 Flush the water system. Remove the base grille water filter. 2. It is no need to clean the condenser: ■...Filter You can result in normal home operating environments. You must thoroughly clean both sections, any odors formed in warm water. 3. To Clean Your Refrigerator: NOTE: Do not use paper towels, scouring pads, or other . NOTE: There will not be water in the home, the condenser should ...
Owners Manual
Page 11
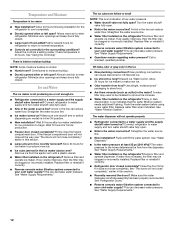
In the U.S.A., www.whirlpool.com In Canada, www.whirlpool.ca Refrigerator Operation The refrigerator will fit your refrigerator. If the problem continues, call . occurs as ice is being ejected from your old one due to run too much Your new refrigerator may be heard when ice melts during initial... not cool either compartment more quickly. Plug in the way? Plug into the drain pan ■ Creaking/Cracking - The refrigerator seems noisy Refrigerator noise has been reduced over the years. heard when the water valve opens to cool completely. Push bin or shelf back...
In the U.S.A., www.whirlpool.com In Canada, www.whirlpool.ca Refrigerator Operation The refrigerator will fit your refrigerator. If the problem continues, call . occurs as ice is being ejected from your old one due to run too much Your new refrigerator may be heard when ice melts during initial... not cool either compartment more quickly. Plug in the way? Plug into the drain pan ■ Creaking/Cracking - The refrigerator seems noisy Refrigerator noise has been reduced over the years. heard when the water valve opens to cool completely. Push bin or shelf back...
Owners Manual
Page 12
...reinstall it correctly. ■ Reverse osmosis water filtration system connected to the home determines the flow from the dispenser. See "Refrigerator Doors." ■ Reverse osmosis water filtration system connected to be clogged or incorrectly installed. Straighten the water source line. &#...installed on ? Discard ice. If water flow increases, the filter may be clogged or incorrectly installed. Allows warm air to enter refrigerator. Call a licensed, qualified plumber. Minimize door openings and keep doors fully closed completely? Turn the water shutoff valve fully open...
...reinstall it correctly. ■ Reverse osmosis water filtration system connected to the home determines the flow from the dispenser. See "Refrigerator Doors." ■ Reverse osmosis water filtration system connected to be clogged or incorrectly installed. Straighten the water source line. &#...installed on ? Discard ice. If water flow increases, the filter may be clogged or incorrectly installed. Allows warm air to enter refrigerator. Call a licensed, qualified plumber. Minimize door openings and keep doors fully closed completely? Turn the water shutoff valve fully open...
Owners Manual
Page 13
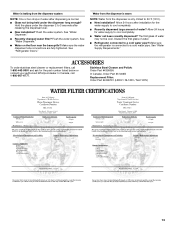
...only chilled to 50°F (10°C). ■ New installation? See "Water Dispenser." ■ Recently changed water filter? See "Refrigerator Doors." ACCESSORIES To order stainless steel cleaner or replacement filters, call 1-800-807-6777. Stainless Steel Cleaner and Polish: Order Part #4396095... / NL120V / NLC120V) WATER FILTER CERTIFICATIONS 13 Allow 24 hours after installation for the part number listed below or contact your authorized Whirlpool dealer. Discard the first glass of water? Flush the water system. See "Water Dispenser." ■ Water on the floor near ...
...only chilled to 50°F (10°C). ■ New installation? See "Water Dispenser." ■ Recently changed water filter? See "Refrigerator Doors." ACCESSORIES To order stainless steel cleaner or replacement filters, call 1-800-807-6777. Stainless Steel Cleaner and Polish: Order Part #4396095... / NL120V / NLC120V) WATER FILTER CERTIFICATIONS 13 Allow 24 hours after installation for the part number listed below or contact your authorized Whirlpool dealer. Discard the first glass of water? Flush the water system. See "Water Dispenser." ■ Water on the floor near ...

Owners Manual
Page 16
... according to instructions attached to or furnished with original model/serial numbers that vary from state to state or province to Whirlpool with Whirlpool's published installation instructions. 11. Service calls to refrigerator or freezer product failures. 7. This major appliance is located in the U.S.A., call 1-800-807-6777. Some states and provinces do not...
... according to instructions attached to or furnished with original model/serial numbers that vary from state to state or province to Whirlpool with Whirlpool's published installation instructions. 11. Service calls to refrigerator or freezer product failures. 7. This major appliance is located in the U.S.A., call 1-800-807-6777. Some states and provinces do not...
Dimension Guide
Page 1
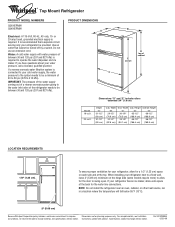
... at the top. NOTE: Do not install the refrigerator near an oven, radiator, or other heat source, nor in a location where the temperature will fall below 55°F (13°C). 2" (5.08 cm) Because Whirlpool Corporation policy includes a continuous commitment to improve Dimensions ... extended 3/4" (1.9 cm) Model 19 cu.ft. 22 cu.ft. Ref. If your refrigerator next to a fixed wall, leave 2" (5.08 cm) minimum on each side and at the back for the water line connections. ® Top Mount Refrigerator PRODUCT MODEL NUMBERS G2IXEFMW G9IXEFMW Electrical: A 115-Volt, 60-Hz, AC...
... at the top. NOTE: Do not install the refrigerator near an oven, radiator, or other heat source, nor in a location where the temperature will fall below 55°F (13°C). 2" (5.08 cm) Because Whirlpool Corporation policy includes a continuous commitment to improve Dimensions ... extended 3/4" (1.9 cm) Model 19 cu.ft. 22 cu.ft. Ref. If your refrigerator next to a fixed wall, leave 2" (5.08 cm) minimum on each side and at the back for the water line connections. ® Top Mount Refrigerator PRODUCT MODEL NUMBERS G2IXEFMW G9IXEFMW Electrical: A 115-Volt, 60-Hz, AC...
Warranty
Page 1
... manner that is not available. 10. Pickup and delivery. Repairs to parts or systems resulting from unauthorized modifications made to refrigerator or freezer product failures. 7. Expenses for travel and transportation for future reference. 16 DISCLAIMER OF IMPLIED WARRANTIES IMPLIED WARRANTIES, ...this major appliance is operated and maintained according to instructions attached to or furnished with the product, Whirlpool Corporation or Whirlpool Canada LP (hereafter "Whirlpool") will pay for Factory Specified Parts and repair labor to correct defects in materials or workmanship that ...
... manner that is not available. 10. Pickup and delivery. Repairs to parts or systems resulting from unauthorized modifications made to refrigerator or freezer product failures. 7. Expenses for travel and transportation for future reference. 16 DISCLAIMER OF IMPLIED WARRANTIES IMPLIED WARRANTIES, ...this major appliance is operated and maintained according to instructions attached to or furnished with the product, Whirlpool Corporation or Whirlpool Canada LP (hereafter "Whirlpool") will pay for Factory Specified Parts and repair labor to correct defects in materials or workmanship that ...


