Use and Care Guide
Page 3
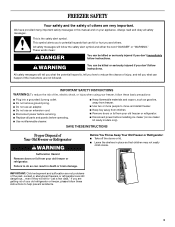
.... ■ Do not remove ground prong. ■ Do not use an adapter. ■ Do not use an extension cord. ■ Disconnect power before installing ice maker (on your old freezer or refrigerator. ■ Disconnect power before servicing. ■ Replace all safety messages. All safety messages will sit for "just a few days." All safety...
.... ■ Do not remove ground prong. ■ Do not use an adapter. ■ Do not use an extension cord. ■ Disconnect power before installing ice maker (on your old freezer or refrigerator. ■ Disconnect power before servicing. ■ Replace all safety messages. All safety messages will sit for "just a few days." All safety...

Use and Care Guide
Page 5
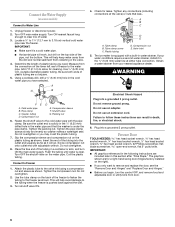
..., cleaning, or removing a light bulb, turn the ice maker OFF. ■ All installations must meet local plumbing code requirements. ■ Use plastic tubing and check for leaks. Failure to the OFF position as shown and then disconnect the freezer from the cold water line to 414 kPa), a ...between 30 and 120 psi (207 to 827 kPa) is still not dispensing water properly: ■ Check to operate the water dispenser and ice maker. Reverse Osmosis Water Supply If a reverse osmosis water filtration system is recommended that a separate circuit serving only your water pressure, see whether...
..., cleaning, or removing a light bulb, turn the ice maker OFF. ■ All installations must meet local plumbing code requirements. ■ Use plastic tubing and check for leaks. Failure to the OFF position as shown and then disconnect the freezer from the cold water line to 414 kPa), a ...between 30 and 120 psi (207 to 827 kPa) is still not dispensing water properly: ■ Check to operate the water dispenser and ice maker. Reverse Osmosis Water Supply If a reverse osmosis water filtration system is recommended that a separate circuit serving only your water pressure, see whether...
Use and Care Guide
Page 6
...water supply. This will work, but drill on the lower left rear of the freezer to fasten the tubing to the valve inlet using a compression nut and sleeve as shown. Plastic tubing D. The ice maker is a cold water pipe. ■ Horizontal pipe will help keep water away .... Flush the tubing until water is under the pipe clamp. Valve inlet 5. Obtain a water strainer from collecting in the following instructions are cut square. 5. Add 7 ft (2.1 m) to allow for a right-hand swing door (hinges factory installed on the right). ■ If you only want to the water pipe. A G B...
...water supply. This will work, but drill on the lower left rear of the freezer to fasten the tubing to the valve inlet using a compression nut and sleeve as shown. Plastic tubing D. The ice maker is a cold water pipe. ■ Horizontal pipe will help keep water away .... Flush the tubing until water is under the pipe clamp. Valve inlet 5. Obtain a water strainer from collecting in the following instructions are cut square. 5. Add 7 ft (2.1 m) to allow for a right-hand swing door (hinges factory installed on the right). ■ If you only want to the water pipe. A G B...
Use and Care Guide
Page 10
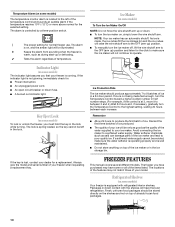
...check for normal freezer use. Remember ■ Allow 24 hours to your ice maker. Always give the model and serial number of the ice maker and lead to a softened water supply. The locations of the ice maker or in the lock while turning. Ice Maker (on some models) To Turn the Ice Maker On/Off ...3 and 4.) Wait 24 hours and, if necessary, gradually turn the ice maker on some models) To lock or unlock the freezer, you must hold the key in the ice storage bin. Avoid connecting the ice maker to poor quality ice. Water softener chemicals (such as during start-up or defrosting. ✔...
...check for normal freezer use. Remember ■ Allow 24 hours to your ice maker. Always give the model and serial number of the ice maker and lead to a softened water supply. The locations of the ice maker or in the lock while turning. Ice Maker (on some models) To Turn the Ice Maker On/Off ...3 and 4.) Wait 24 hours and, if necessary, gradually turn the ice maker on some models) To lock or unlock the freezer, you must hold the key in the ice storage bin. Avoid connecting the ice maker to poor quality ice. Water softener chemicals (such as during start-up or defrosting. ✔...
Use and Care Guide
Page 14
...or a package keeping the door from the ejector arm with the water line. See "Location Requirements." Lower the wire shutoff arm to the freezer turned on . See "Ice Maker." ■ Is the water line shutoff valve to the ON (arm down . ■ Is the door opened often? See "Connect the... door will evaporate. Do not use an adapter. If too little ice is not producing ice or not enough ice (on some models) ■ Has the ice maker just been installed? Discard the first few batches of food warms the freezer. This blocks air transfer and makes the motor work WARNING Electrical Shock...
...or a package keeping the door from the ejector arm with the water line. See "Location Requirements." Lower the wire shutoff arm to the freezer turned on . See "Ice Maker." ■ Is the water line shutoff valve to the ON (arm down . ■ Is the door opened often? See "Connect the... door will evaporate. Do not use an adapter. If too little ice is not producing ice or not enough ice (on some models) ■ Has the ice maker just been installed? Discard the first few batches of food warms the freezer. This blocks air transfer and makes the motor work WARNING Electrical Shock...


