Use and Care Guide
Page 3
... the doors or lid. ■ Leave the shelves in this manual and on ice maker kit ready models only). If you what can be killed or seriously injured if you to potential hazards that children may not easily climb inside. SAVE THESE INSTRUCTIONS Proper Disposal of Your Old Freezer or Refrigerator WARNING Suffocation Hazard Remove doors or lid from your old freezer or refrigerator. ■ Disconnect power before operating. ■ Use...
... the doors or lid. ■ Leave the shelves in this manual and on ice maker kit ready models only). If you what can be killed or seriously injured if you to potential hazards that children may not easily climb inside. SAVE THESE INSTRUCTIONS Proper Disposal of Your Old Freezer or Refrigerator WARNING Suffocation Hazard Remove doors or lid from your old freezer or refrigerator. ■ Disconnect power before operating. ■ Use...

Use and Care Guide
Page 4
... your freezer before installing your freezer. Glass shelves and covers are cold. Remove Packaging Materials ■ Remove tape and glue residue from freezer. It should hold the weight of the freezer and the wall. Always pull the freezer straight out when moving the freezer for a 3" (7.5 cm) clearance at the top and on the hinge side so the door can result in "Freezer Care." INSTALLATION INSTRUCTIONS Unpacking WARNING Excessive Weight Hazard Use...
... your freezer before installing your freezer. Glass shelves and covers are cold. Remove Packaging Materials ■ Remove tape and glue residue from freezer. It should hold the weight of the freezer and the wall. Always pull the freezer straight out when moving the freezer for a 3" (7.5 cm) clearance at the top and on the hinge side so the door can result in "Freezer Care." INSTALLATION INSTRUCTIONS Unpacking WARNING Excessive Weight Hazard Use...

Use and Care Guide
Page 5
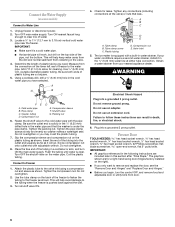
... pump can result in conjunction with water pressure of installation, cleaning, or removing a light bulb, turn the ice maker OFF. ■ All installations must meet local plumbing code requirements. ■ Use plastic tubing and check for leaks. Remove the water filter. Electrical Requirements WARNING Electrical Shock Hazard Plug into its final location, it may further reduce the water pressure when used in death, fire, or electrical shock. Do not use a piercing-type or 4.76 mm) saddle valve which...
... pump can result in conjunction with water pressure of installation, cleaning, or removing a light bulb, turn the ice maker OFF. ■ All installations must meet local plumbing code requirements. ■ Use plastic tubing and check for leaks. Remove the water filter. Electrical Requirements WARNING Electrical Shock Hazard Plug into its final location, it may further reduce the water pressure when used in death, fire, or electrical shock. Do not use a piercing-type or 4.76 mm) saddle valve which...
Use and Care Guide
Page 6
... side of freezer to the tubing when the freezer is a cold water pipe. ■ Horizontal pipe will go. IMPORTANT: ■ Make sure it in the cold water pipe you begin, turn ON the main water supply. Add 7 ft (2.1 m) to follow these instructions can result in a container or sink, and turn the control OFF, and remove food and adjustable door or utility bins from your water conditions require a second water strainer, install it...
... side of freezer to the tubing when the freezer is a cold water pipe. ■ Horizontal pipe will go. IMPORTANT: ■ Make sure it in the cold water pipe you begin, turn ON the main water supply. Add 7 ft (2.1 m) to follow these instructions can result in a container or sink, and turn the control OFF, and remove food and adjustable door or utility bins from your water conditions require a second water strainer, install it...
Use and Care Guide
Page 7
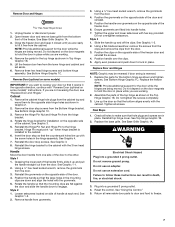
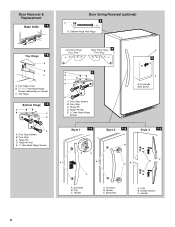
.... Open freezer door and remove base grille from the hinge bracket. 4. Close the freezer door and keep it opens in place. Reverse Door (optional on the door magnets to lock in Graphic 2. 2. Remove the door stop screws from the cabinet. Reinstall the door stop so that hole plugs and screws are working . 4. Style 1 1. See Graphic 1-1. 2. Remove handle from the door. 4. Using a ¹⁄₄" hex head socket wrench, remove the grommets from grommets. 3. Replace...
.... Open freezer door and remove base grille from the hinge bracket. 4. Close the freezer door and keep it opens in place. Reverse Door (optional on the door magnets to lock in Graphic 2. 2. Remove the door stop screws from the cabinet. Reinstall the door stop so that hole plugs and screws are working . 4. Style 1 1. See Graphic 1-1. 2. Remove handle from the door. 4. Using a ¹⁄₄" hex head socket wrench, remove the grommets from grommets. 3. Replace...
Use and Care Guide
Page 8
... on model) C. Hinge Pin D. Clip C. Door Stop Screws B. Hinge Pin Nut E. 5/8" Hex-Head Hinge Screws Left Hand Hinge Door Stop Right Hand Hinge 4 Door Stop 5 A 3 B C D E A. Setscrews A. Hinge Pin D. Handle C. Handle A. Door Stop Screws B. Hinge Pin Nut E. 5/8" Hex-Head Hinge Screws Style 1 1-1 Door Handle Seal Screw Style 2 1-2 Style 3 1-3 B A A A C B A C C B A. Handle Screws C. Grommet B. Top Hinge Bottom Hinge 1C A B C D E A. Door Removal & Replacement Base Grille 1A Door Swing Reversal (optional) 2 A A. Cabinet Hinge Hole Plugs Top Hinge 1B...
... on model) C. Hinge Pin D. Clip C. Door Stop Screws B. Hinge Pin Nut E. 5/8" Hex-Head Hinge Screws Left Hand Hinge Door Stop Right Hand Hinge 4 Door Stop 5 A 3 B C D E A. Setscrews A. Hinge Pin D. Handle C. Handle A. Door Stop Screws B. Hinge Pin Nut E. 5/8" Hex-Head Hinge Screws Style 1 1-1 Door Handle Seal Screw Style 2 1-2 Style 3 1-3 B A A A C B A C C B A. Handle Screws C. Grommet B. Top Hinge Bottom Hinge 1C A B C D E A. Door Removal & Replacement Base Grille 1A Door Swing Reversal (optional) 2 A A. Cabinet Hinge Hole Plugs Top Hinge 1B...

Use and Care Guide
Page 9
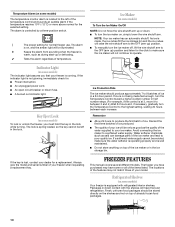
... be restricted, and temperature and moisture problems may occur. NOTE: If your model is equipped with food packages. NOTE: When the freezer is first started, the compressor will be lowered enough to 6 or 8 hours (or longer), depending on the bottom of times the freezer door is cooled. It may feel warm. Adjusting Control ■ Turn control to a higher number for less cold temperatures. Use this feature just before...
... be restricted, and temperature and moisture problems may occur. NOTE: If your model is equipped with food packages. NOTE: When the freezer is first started, the compressor will be lowered enough to 6 or 8 hours (or longer), depending on the bottom of times the freezer door is cooled. It may feel warm. Adjusting Control ■ Turn control to a higher number for less cold temperatures. Use this feature just before...
Use and Care Guide
Page 10
... the alarm from sounding when the freezer is made fast enough, turn the Temperature Control to operate. Temperature Alarm (on some models) The temperature monitor alarm is located to the left in the lock. As ice is warm, such as salt) can damage parts of the items listed. Key Eject Lock (on top of ice in half number steps. (For example, if the control is controlled by a three-position switch. | The proper setting for normal freezer use. Remember...
... the alarm from sounding when the freezer is made fast enough, turn the Temperature Control to operate. Temperature Alarm (on some models) The temperature monitor alarm is located to the left in the lock. As ice is warm, such as salt) can damage parts of the items listed. Key Eject Lock (on top of ice in half number steps. (For example, if the control is controlled by a three-position switch. | The proper setting for normal freezer use. Remember...
Use and Care Guide
Page 11
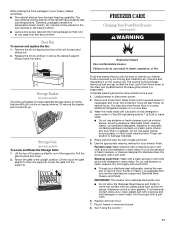
.... Door Bin To remove and replace the bin: 1. FREEZER CARE Cleaning Your Frost-Free Freezer (some models) To Lower and Raise the Storage Gate: 1. The door shelves and the bottom of mild detergent in warm water or 2 tbs (26 mg) baking soda to do so can scratch or damage materials. 4. Plug in a cool area. 3. Return the gate to store on plastic parts, interior and door liners or gaskets. Do not use...
.... Door Bin To remove and replace the bin: 1. FREEZER CARE Cleaning Your Frost-Free Freezer (some models) To Lower and Raise the Storage Gate: 1. The door shelves and the bottom of mild detergent in warm water or 2 tbs (26 mg) baking soda to do so can scratch or damage materials. 4. Plug in a cool area. 3. Return the gate to store on plastic parts, interior and door liners or gaskets. Do not use...
Use and Care Guide
Page 12
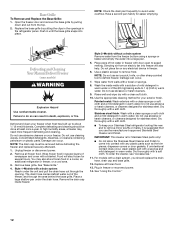
.... Defrosting and Cleaning Your Manual Defrost Freezer (some models) WARNING Explosion Hazard Use nonflammable cleaner. Place a large shallow pan under the unit and pull the drain hose out through the area behind the base grille. Use the appropriate cleaning method for stainless steel. Dry thoroughly with a clean sponge or soft cloth and a mild detergent in a cooler, an additional refrigerator or freezer, or a cool area. 3. Damage can occur. Plug in freezer. 6. Use...
.... Defrosting and Cleaning Your Manual Defrost Freezer (some models) WARNING Explosion Hazard Use nonflammable cleaner. Place a large shallow pan under the unit and pull the drain hose out through the area behind the base grille. Use the appropriate cleaning method for stainless steel. Dry thoroughly with a clean sponge or soft cloth and a mild detergent in a cooler, an additional refrigerator or freezer, or a cool area. 3. Damage can occur. Plug in freezer. 6. Use...
Use and Care Guide
Page 13
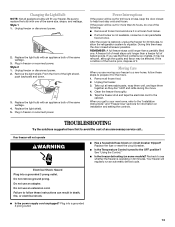
... same wattage. 4. See "Using the Control." ■ Is the freezer defrosting (on installation and setting the controls. Your freezer will not operate WARNING ■ Has a household fuse blown or circuit breaker tripped? Do not remove ground prong. Changing the Light Bulb NOTE: Not all frozen food. 2. Be sure to help food stay cold and frozen. Plug in freezer or reconnect power. Clean the freezer thoroughly. 5. Your freezer will regularly run an automatic defrost cycle. Recheck to the "Installation Instructions" and "Freezer Use...
... same wattage. 4. See "Using the Control." ■ Is the freezer defrosting (on installation and setting the controls. Your freezer will not operate WARNING ■ Has a household fuse blown or circuit breaker tripped? Do not remove ground prong. Changing the Light Bulb NOTE: Not all frozen food. 2. Be sure to help food stay cold and frozen. Plug in freezer or reconnect power. Clean the freezer thoroughly. 5. Your freezer will regularly run an automatic defrost cycle. Recheck to the "Installation Instructions" and "Freezer Use...
Use and Care Guide
Page 14
... run longer under warm conditions. See "Location Requirements." Failure to do not work harder. The water will run longer to cool the freezer back down ) position. Under warmer conditions, it or has no ice been produced? Push the door firmly shut. NOTE: If the problem is difficult to open" later in this occurs. WARNING Explosion Hazard Use nonflammable cleaner. A filter may be a problem with a plastic utensil. Defrost and clean the freezer...
... run longer under warm conditions. See "Location Requirements." Failure to do not work harder. The water will run longer to cool the freezer back down ) position. Under warmer conditions, it or has no ice been produced? Push the door firmly shut. NOTE: If the problem is difficult to open" later in this occurs. WARNING Explosion Hazard Use nonflammable cleaner. A filter may be a problem with a plastic utensil. Defrost and clean the freezer...
Use and Care Guide
Page 15
.... Clean gaskets according to equalize. When calling, please know the purchase date and the complete model and serial number of food warms the freezer. Call customer service toll free: 1-800-253-1301 In Canada call . Temperature is difficult to the freezer? ASSISTANCE OR SERVICE Before calling for air vent locations. ■ Is the door opened often? Put the shelves and basket back into their correct positions. Factory specified parts will...
.... Clean gaskets according to equalize. When calling, please know the purchase date and the complete model and serial number of food warms the freezer. Call customer service toll free: 1-800-253-1301 In Canada call . Temperature is difficult to the freezer? ASSISTANCE OR SERVICE Before calling for air vent locations. ■ Is the door opened often? Put the shelves and basket back into their correct positions. Factory specified parts will...
Use and Care Guide
Page 16
... a Whirlpool designated service company. Service calls to refrigerator or freezer product failures. 7. Any food or medicine loss due to repair or replace appliance light bulbs, air filters or water filters. Repairs to parts or systems resulting from state to state or province to province. If outside the 50 United States and Canada, contact your major appliance to better help can find this information on the model and serial number label located...
... a Whirlpool designated service company. Service calls to refrigerator or freezer product failures. 7. Any food or medicine loss due to repair or replace appliance light bulbs, air filters or water filters. Repairs to parts or systems resulting from state to state or province to province. If outside the 50 United States and Canada, contact your major appliance to better help can find this information on the model and serial number label located...


