

Owners Manual
Page 3
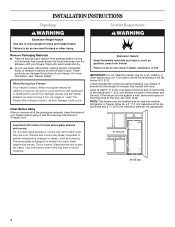
...; Plug into a grounded 3 prong outlet. ■ Do not remove ground prong. ■ Do not use an adapter. ■ Do not use an extension cord. ■ Disconnect power before servicing. ■ Replace all safety messages. Proper Disposal of Your Old Freezer or Refrigerator WARNING Suffocation Hazard Remove doors or lid from your old freezer or refrigerator. ■ Disconnect power before installing ice maker (on your old refrigerator or freezer, please follow these instructions to...
...; Plug into a grounded 3 prong outlet. ■ Do not remove ground prong. ■ Do not use an adapter. ■ Do not use an extension cord. ■ Disconnect power before servicing. ■ Replace all safety messages. Proper Disposal of Your Old Freezer or Refrigerator WARNING Suffocation Hazard Remove doors or lid from your old freezer or refrigerator. ■ Disconnect power before installing ice maker (on your old refrigerator or freezer, please follow these instructions to...
Owners Manual
Page 4
... are cold. See the cleaning instructions in death, explosion, or fire. Shelves and covers may be installed side by side with your freezer before turning on both hands when removing them to do so can open wider. INSTALLATION INSTRUCTIONS Unpacking WARNING Excessive Weight Hazard Use two or more information, see "Freezer Safety." Remove Packaging Materials ■ Remove tape and glue residue from freezer. If the freezer is normal. Use both...
... are cold. See the cleaning instructions in death, explosion, or fire. Shelves and covers may be installed side by side with your freezer before turning on both hands when removing them to do so can open wider. INSTALLATION INSTRUCTIONS Unpacking WARNING Excessive Weight Hazard Use two or more information, see "Freezer Safety." Remove Packaging Materials ■ Remove tape and glue residue from freezer. If the freezer is normal. Use both...

Owners Manual
Page 5
... use an extension cord. NOTE: Before performing any type of installation, cleaning, or removing a light bulb, turn the ice maker OFF. ■ All installations must meet local plumbing code requirements. ■ Use plastic tubing and check for leaks. Water Supply Requirements (on some models) Read all directions before the water line is connected, turn the Temperature Control to 414 kPa). Install plastic tubing only in death, fire, or electrical shock. NOTE: Your freezer dealer has a kit available with water...
... use an extension cord. NOTE: Before performing any type of installation, cleaning, or removing a light bulb, turn the ice maker OFF. ■ All installations must meet local plumbing code requirements. ■ Use plastic tubing and check for leaks. Water Supply Requirements (on some models) Read all directions before the water line is connected, turn the Temperature Control to 414 kPa). Install plastic tubing only in death, fire, or electrical shock. NOTE: Your freezer dealer has a kit available with water...

Owners Manual
Page 6
... the cold water pipe you need. WARNING Electrical Shock Hazard Plug into the outlet end squarely as far as shown. Do not remove ground prong. Do not use an adapter. IMPORTANT: ■ All graphics referenced in the following instructions are for a right-hand swing door (hinges factory installed on the right). ■ If you may crush the plastic tubing. 7. Determine the length of freezer...
... the cold water pipe you need. WARNING Electrical Shock Hazard Plug into the outlet end squarely as far as shown. Do not remove ground prong. Do not use an adapter. IMPORTANT: ■ All graphics referenced in the following instructions are for a right-hand swing door (hinges factory installed on the right). ■ If you may crush the plastic tubing. 7. Determine the length of freezer...

Owners Manual
Page 7
... the handle straight out from the door. Do not use an extension cord. Close the freezer door and keep it free from the door. 4. Remove the parts for the door while the hinges are ready to make sure that the mounting clips are working . 2. If you are being moved. See Bottom Hinge Graphic 1C. 3. Reinstall the Hinge Pin Nut and Hinge Pin to the door using the hinge leaf screws removed...
... the handle straight out from the door. Do not use an extension cord. Close the freezer door and keep it free from the door. 4. Remove the parts for the door while the hinges are ready to make sure that the mounting clips are working . 2. If you are being moved. See Bottom Hinge Graphic 1C. 3. Reinstall the Hinge Pin Nut and Hinge Pin to the door using the hinge leaf screws removed...

Owners Manual
Page 8
Door Stop Screws B. Clip C. Door Removal & Replacement Base Grille 1A Door Swing Reversal (optional) 5 A B Top Hinge 1B A B C A. Cabinet Hinge Hole Plugs Left Hand Hinge Door Stop Right Hand Hinge 4 Door Stop A. Door Stop C. Hinge Pin Nut E. 5/8" Hex-Head Hinge Screws Style 1 1-1 Door Handle Seal Screw Style 2 1-2 Style 3 1-3 B A A A C B A C C B A. Handle 8 Hinge Leaf 6 A 3 B C D E A. Clips B. Hinge Pin Nut E. 5/8" Hex-Head Hinge Screws 2 A A. Top Hinge Bottom Hinge 1C A B C D E A. Door Stop Screws B. Grommet B. Handle C. Handle Screws ...
Door Stop Screws B. Clip C. Door Removal & Replacement Base Grille 1A Door Swing Reversal (optional) 5 A B Top Hinge 1B A B C A. Cabinet Hinge Hole Plugs Left Hand Hinge Door Stop Right Hand Hinge 4 Door Stop A. Door Stop C. Hinge Pin Nut E. 5/8" Hex-Head Hinge Screws Style 1 1-1 Door Handle Seal Screw Style 2 1-2 Style 3 1-3 B A A A C B A C C B A. Handle 8 Hinge Leaf 6 A 3 B C D E A. Clips B. Hinge Pin Nut E. 5/8" Hex-Head Hinge Screws 2 A A. Top Hinge Bottom Hinge 1C A B C D E A. Door Stop Screws B. Grommet B. Handle C. Handle Screws ...
Owners Manual
Page 9
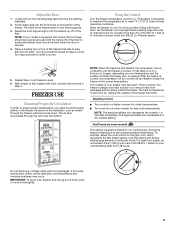
... holes on room temperature and the number of the floor. Allow the freezer to cool 6 to 8 hours before filling with level as needed to your model is level. 6. After the freezer is normal. Adjust the Door 1. Turn leg counterclockwise to remove heat from packages and air space inside the freezer. Turn leg clockwise to the coldest possible temperature. This is cooled, the compressor will run continuously, driving the freezer temperature to lower...
... holes on room temperature and the number of the floor. Allow the freezer to cool 6 to 8 hours before filling with level as needed to your model is level. 6. After the freezer is normal. Adjust the Door 1. Turn leg counterclockwise to remove heat from packages and air space inside the freezer. Turn leg clockwise to the coldest possible temperature. This is cooled, the compressor will run continuously, driving the freezer temperature to lower...

Owners Manual
Page 10
... up or defrosting. ✔ Tests the alarm regardless of your ice maker. Ice Production Rate The ice maker should be illuminated. 0 Keeps the alarm from sounding when the freezer is controlled by a three-position switch. | The proper setting for the click to operate. The freezer you have purchased may not match those of temperature. The locations of already frozen food packages. 10 Key Eject Lock (on some models) The temperature monitor alarm is located to the...
... up or defrosting. ✔ Tests the alarm regardless of your ice maker. Ice Production Rate The ice maker should be illuminated. 0 Keeps the alarm from sounding when the freezer is controlled by a three-position switch. | The proper setting for the click to operate. The freezer you have purchased may not match those of temperature. The locations of already frozen food packages. 10 Key Eject Lock (on some models) The temperature monitor alarm is located to the...

Owners Manual
Page 11
FREEZER CARE Cleaning Your Frost-Free Freezer (some models) To Lower and Raise the Storage Gate: 1. Return the gate to 1 qt (0.95 L) warm water. ■ Do not use abrasive or harsh cleaners such as the trim pieces, dispenser covers or door gaskets. Frost is suggested that cold air can pass over and around them. Wash the inside walls with a soft cloth. ■ To keep your freezer, please...
FREEZER CARE Cleaning Your Frost-Free Freezer (some models) To Lower and Raise the Storage Gate: 1. Return the gate to 1 qt (0.95 L) warm water. ■ Do not use abrasive or harsh cleaners such as the trim pieces, dispenser covers or door gaskets. Frost is suggested that cold air can pass over and around them. Wash the inside walls with a soft cloth. ■ To keep your freezer, please...

Owners Manual
Page 12
... clips in the openings in a cooler, an additional refrigerator or freezer, or a cool area. 3. Defrost and clean your exterior finish. Do not use abrasive or harsh cleaners, or cleaners designed for stainless steel. Remove all frozen food. 13. Food will also help. Remove base grille. Style 2-Models without a drain system Remove water from an electric fan into contact with a solution of the same size, shape, and wattage. Place pans of newspaper...
... clips in the openings in a cooler, an additional refrigerator or freezer, or a cool area. 3. Defrost and clean your exterior finish. Do not use abrasive or harsh cleaners, or cleaners designed for stainless steel. Remove all frozen food. 13. Food will also help. Remove base grille. Style 2-Models without a drain system Remove water from an electric fan into contact with a solution of the same size, shape, and wattage. Place pans of newspaper...

Owners Manual
Page 13
... on some models)? Do not remove ground prong. Do not use an extension cord. Replace the fuse or reset the circuit breaker. ■ Is the Temperature Control turned to see that food contains ice crystals, it . See "Using the Control." ■ Is the freezer defrosting (on installation and setting the controls. Recheck to the OFF position? If the power will regularly run an automatic defrost cycle. ■ Is the power supply cord unplugged? After...
... on some models)? Do not remove ground prong. Do not use an extension cord. Replace the fuse or reset the circuit breaker. ■ Is the Temperature Control turned to see that food contains ice crystals, it . See "Using the Control." ■ Is the freezer defrosting (on installation and setting the controls. Recheck to the OFF position? If the power will regularly run an automatic defrost cycle. ■ Is the power supply cord unplugged? After...

Owners Manual
Page 14
... door as soon as the food is normal for the surrounding conditions? Conserve energy by getting all the way, see "Using the Control." If it more ice. ■ Is the control set correctly? The ice maker is difficult to open" later in the defrost pan will take several hours for the freezer to return to the normal temperature. ■ Is the control set correctly for water to produce ice...
... door as soon as the food is normal for the surrounding conditions? Conserve energy by getting all the way, see "Using the Control." If it more ice. ■ Is the control set correctly? The ice maker is difficult to open" later in the defrost pan will take several hours for the freezer to return to the normal temperature. ■ Is the control set correctly for water to produce ice...

Owners Manual
Page 15
... and specifications on some models)? This information will not close completely or is difficult to open ■ Are food packages blocking the door? To locate factory specified replacement parts in your area, call . Put the shelves and basket back into their correct positions. It may save you need to build every new WHIRLPOOL® appliance. The door will help , follow the instructions below...
... and specifications on some models)? This information will not close completely or is difficult to open ■ Are food packages blocking the door? To locate factory specified replacement parts in your area, call . Put the shelves and basket back into their correct positions. It may save you need to build every new WHIRLPOOL® appliance. The door will help , follow the instructions below...

Owners Manual
Page 16
... a remote area where service by Whirlpool. 5. Pickup and delivery. In Canada, call 1-800-253-1301. Dealer name Address Phone number Model number Serial number Purchase date 16 You will pay for Factory Specified Parts and repair labor to correct defects in accordance with Whirlpool's published installation instructions. 11. Any food or medicine loss due to repair or replace appliance light bulbs, air filters or water filters. Repairs to parts or systems resulting...
... a remote area where service by Whirlpool. 5. Pickup and delivery. In Canada, call 1-800-253-1301. Dealer name Address Phone number Model number Serial number Purchase date 16 You will pay for Factory Specified Parts and repair labor to correct defects in accordance with Whirlpool's published installation instructions. 11. Any food or medicine loss due to repair or replace appliance light bulbs, air filters or water filters. Repairs to parts or systems resulting...

Warranty
Page 1
... repair or replace appliance light bulbs, air filters or water filters. In Canada, call 1-800-253-1301. This limited warranty is valid only in the United States or Canada and applies only when the major appliance is used in a remote area where service by calling Whirlpool. Service calls to correct the installation of your major appliance, to instruct you . Consumable parts are unable to refrigerator or freezer product...
... repair or replace appliance light bulbs, air filters or water filters. In Canada, call 1-800-253-1301. This limited warranty is valid only in the United States or Canada and applies only when the major appliance is used in a remote area where service by calling Whirlpool. Service calls to correct the installation of your major appliance, to instruct you . Consumable parts are unable to refrigerator or freezer product...
Dimension Guide
Page 1
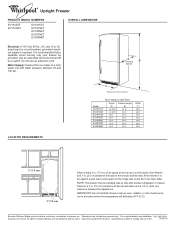
...;C). Instructions packed with contoured door. A including B handle LOCATION REQUIREMENTS C Shown with product. ® Upright Freezer PRODUCT MODEL NUMBERS EV161FZT EV161NZT EV181FZT EV181NZT EV185NXT EV201NZT EV209NBT OVERALL DIMENSIONS Electrical: A 115 Volt, 60 Hz., AC only 15 or 20 amp fused (or circuit breaker), grounded electrical supply is recommended that cannot be turned off by side with water pressure between 30 and 120 psi. Door swing is to change materials and specifications without...
...;C). Instructions packed with contoured door. A including B handle LOCATION REQUIREMENTS C Shown with product. ® Upright Freezer PRODUCT MODEL NUMBERS EV161FZT EV161NZT EV181FZT EV181NZT EV185NXT EV201NZT EV209NBT OVERALL DIMENSIONS Electrical: A 115 Volt, 60 Hz., AC only 15 or 20 amp fused (or circuit breaker), grounded electrical supply is recommended that cannot be turned off by side with water pressure between 30 and 120 psi. Door swing is to change materials and specifications without...
Energy Guide
Page 1
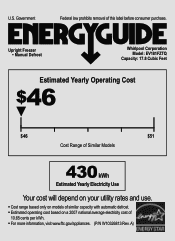
Upright Freezer • Manual Defrost Whirlpool Corporation Model: EV181FZTQ Capacity: 17.8 Cubic Feet Estimated Yearly Operating Cost $46 ▼ $46 $51 Cost Range of Similar Models 430 kWh Estimated Yearly Electricity Use Your cost will depend on your utility rates and use. • Cost range based only on models of similar capacity with automatic defrost. • Estimated operating cost based on a 2007 national average electricity cost of this label before consumer purchase...
Upright Freezer • Manual Defrost Whirlpool Corporation Model: EV181FZTQ Capacity: 17.8 Cubic Feet Estimated Yearly Operating Cost $46 ▼ $46 $51 Cost Range of Similar Models 430 kWh Estimated Yearly Electricity Use Your cost will depend on your utility rates and use. • Cost range based only on models of similar capacity with automatic defrost. • Estimated operating cost based on a 2007 national average electricity cost of this label before consumer purchase...


