
Owners Manual
Page 2
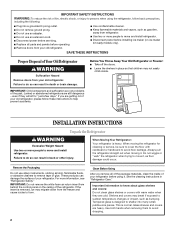
...; Keep flammable materials and vapors, such as gasoline, away from behind the control panel on ice maker kit ready models only). If you remove all parts and panels before operating. ■ Remove doors from your refrigerator before installing ice maker (on the ceiling of Your Old Refrigerator WARNING Suffocation Hazard Remove...
...; Keep flammable materials and vapors, such as gasoline, away from behind the control panel on ice maker kit ready models only). If you remove all parts and panels before operating. ■ Remove doors from your refrigerator before installing ice maker (on the ceiling of Your Old Refrigerator WARNING Suffocation Hazard Remove...
Owners Manual
Page 4
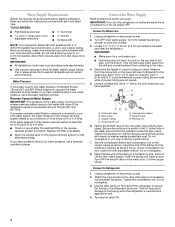
Water Supply Requirements Gather the required tools and parts before you begin. Read and follow the instructions provided with your water pressure, call a licensed, qualified plumber. Before purchasing, make sure a saddle-type valve complies ...
Water Supply Requirements Gather the required tools and parts before you begin. Read and follow the instructions provided with your water pressure, call a licensed, qualified plumber. Before purchasing, make sure a saddle-type valve complies ...
Owners Manual
Page 5
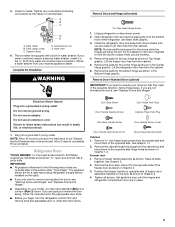
...line at the valve) or nuts that they open -end wrench, flat 2" putty knife. Compression nut E. See Base Grille graphic. 3. Remove the parts for the top hinge as shown in Graphic 1-2. Do not remove ground prong. Do not use an adapter. Plug into a grounded 3 prong outlet...Provide additional support for the appropriate door style. ■ Before you may have standard (Style 1) or contour (Style 2) doors. Remove the parts for the bottom hinge as shown in Top Hinge graphic. Refrigerator Doors TOOLS NEEDED hex-head socket wrench, #2 Phillips screwdriver, flat-blade screwdriver ...
...line at the valve) or nuts that they open -end wrench, flat 2" putty knife. Compression nut E. See Base Grille graphic. 3. Remove the parts for the top hinge as shown in Graphic 1-2. Do not remove ground prong. Do not use an adapter. Plug into a grounded 3 prong outlet...Provide additional support for the appropriate door style. ■ Before you may have standard (Style 1) or contour (Style 2) doors. Remove the parts for the bottom hinge as shown in Top Hinge graphic. Refrigerator Doors TOOLS NEEDED hex-head socket wrench, #2 Phillips screwdriver, flat-blade screwdriver ...
Owners Manual
Page 6
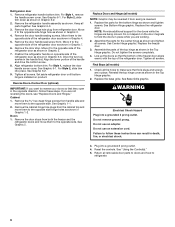
...an extension cord. Reset the controls. Remove the door stop. For Style 2, slide trim into a grounded 3 prong outlet. Replace the parts for the doors while the hinges are working. 2. Replace the refrigerator door. Return all screws. Remove the door hinge hole plug from...side hinge hole as shown in Graphic 6-3. Remove the door handle sealing screws. See Graphic 6-2. 9. See Graphic 1-1. 2. Tighten all parts together. Replace the base grille. Do not remove ground prong. Remove refrigerator handle bottom trim. Remove the refrigerator handle assembly as shown in...
...an extension cord. Reset the controls. Remove the door stop. For Style 2, slide trim into a grounded 3 prong outlet. Replace the parts for the doors while the hinges are working. 2. Replace the refrigerator door. Return all screws. Remove the door hinge hole plug from...side hinge hole as shown in Graphic 6-3. Remove the door handle sealing screws. See Graphic 6-2. 9. See Graphic 1-1. 2. Tighten all parts together. Replace the base grille. Do not remove ground prong. Remove refrigerator handle bottom trim. Remove the refrigerator handle assembly as shown in...
Owners Manual
Page 8
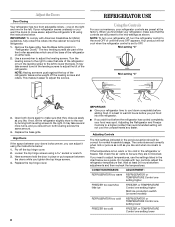
... TEMPERATURE Control one setting higher MAX ice production switch (on the right and one setting lower 8 Remove the base grille. The two leveling screws are part of the front roller assemblies which are still preset to adjust the tilt of the refrigerator on the left to OFF. It may spoil. This...
... TEMPERATURE Control one setting higher MAX ice production switch (on the right and one setting lower 8 Remove the base grille. The two leveling screws are part of the front roller assemblies which are still preset to adjust the tilt of the refrigerator on the left to OFF. It may spoil. This...
Owners Manual
Page 9
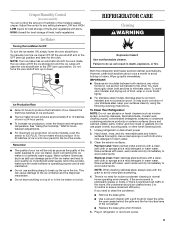
... of fresh, leafy vegetables. To help avoid corrosion of ice. Unplug refrigerator or disconnect power. 2. Hand wash, rinse, and dry removable parts and interior surfaces thoroughly. If you need for best storage of or in normal home operating environments. IMPORTANT: ■ Because air circulates between...See "Using the Control(s)." There is significant pet traffic in the bin. Crisper Humidity Control (on exterior surfaces (doors and cabinet), plastic parts, interior and door liners or gaskets. To avoid odor transfer and drying out of the water supplied to the OFF (arm up the ...
... of fresh, leafy vegetables. To help avoid corrosion of ice. Unplug refrigerator or disconnect power. 2. Hand wash, rinse, and dry removable parts and interior surfaces thoroughly. If you need for best storage of or in normal home operating environments. IMPORTANT: ■ Because air circulates between...See "Using the Control(s)." There is significant pet traffic in the bin. Crisper Humidity Control (on exterior surfaces (doors and cabinet), plastic parts, interior and door liners or gaskets. To avoid odor transfer and drying out of the water supplied to the OFF (arm up the ...
Owners Manual
Page 11
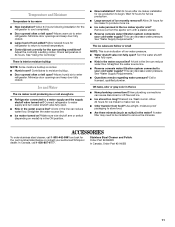
...water flow. A water filter may need to be installed to normal temperature. ■ Control(s) set correctly for ice maker to your authorized Whirlpool dealer. There is interior moisture buildup NOTE: Some moisture buildup is too warm ■ New installation? Wait 72 hours for ice maker to...valve turned on ? This can decrease water pressure. Minimize door openings and keep door fully closed . Allow 24 hours following installation for the part number listed below or contact your cold water supply? Discard ice. Allows humid air to begin. This can decrease water pressure. Call a...
...water flow. A water filter may need to be installed to normal temperature. ■ Control(s) set correctly for ice maker to your authorized Whirlpool dealer. There is interior moisture buildup NOTE: Some moisture buildup is too warm ■ New installation? Wait 72 hours for ice maker to...valve turned on ? This can decrease water pressure. Minimize door openings and keep door fully closed . Allow 24 hours following installation for the part number listed below or contact your cold water supply? Discard ice. Allows humid air to begin. This can decrease water pressure. Call a...

Owners Manual
Page 12
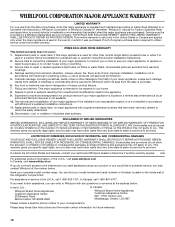
...This major appliance is intended to be repaired in your major appliance is reported to Whirlpool within 30 days from state to state or province to province. Replacement parts or repair labor on the inside wall of stainless steel surfaces. Some states and ... a remote area where service by an authorized Whirlpool servicer is inconsistent to published user or operator instructions and/or installation instructions. 2. Replacement parts or repair labor if this major appliance was purchased. If you . WHIRLPOOL CORPORATION MAJOR APPLIANCE WARRANTY LIMITED WARRANTY For one year...
...This major appliance is intended to be repaired in your major appliance is reported to Whirlpool within 30 days from state to state or province to province. Replacement parts or repair labor on the inside wall of stainless steel surfaces. Some states and ... a remote area where service by an authorized Whirlpool servicer is inconsistent to published user or operator instructions and/or installation instructions. 2. Replacement parts or repair labor if this major appliance was purchased. If you . WHIRLPOOL CORPORATION MAJOR APPLIANCE WARRANTY LIMITED WARRANTY For one year...
Warranty
Page 1
... 4. Service must be repaired in a remote area where service by an authorized Whirlpool servicer is reported to the finish of products not approved by a Whirlpool designated service company. Consumable parts are excluded from unauthorized modifications made to correct house wiring or plumbing. 3. Expenses...your home. 8. This major appliance is intended to use or when it was purchased. Replacement parts or repair labor on how to be provided by Whirlpool. 5. WHIRLPOOL SHALL NOT BE LIABLE FOR INCIDENTAL OR CONSEQUENTIAL DAMAGES. Some states and provinces do not allow ...
... 4. Service must be repaired in a remote area where service by an authorized Whirlpool servicer is reported to the finish of products not approved by a Whirlpool designated service company. Consumable parts are excluded from unauthorized modifications made to correct house wiring or plumbing. 3. Expenses...your home. 8. This major appliance is intended to use or when it was purchased. Replacement parts or repair labor on how to be provided by Whirlpool. 5. WHIRLPOOL SHALL NOT BE LIABLE FOR INCIDENTAL OR CONSEQUENTIAL DAMAGES. Some states and provinces do not allow ...


