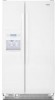
User Instructions
Page 1
...you and others are not followed. In Canada, visit our website at www.whirlpool.ca or call us at 1-800-253-1301. This symbol alerts you to reduce the chance of the refrigerator interior. All safety messages will need assistance, call us at 1-800-807-... 18 UTILISATION DU RÉFRIGÉRATEUR ... 33 REFRIGERATOR CARE 8 CUIDADO DE SU REFRIGERADOR .....22 ENTRETIEN DU RÉFRIGÉRATEUR ..... 36 TROUBLESHOOTING 9 SOLUCIÓN DE PROBLEMAS 23 DÉPANNAGE 37 ACCESSORIES 11 ACCESORIOS 25 ACCESSOIRES 39 WATER FILTER CERTIFICATIONS.......11 HOJA DE DATOS FEUILLES...
...you and others are not followed. In Canada, visit our website at www.whirlpool.ca or call us at 1-800-253-1301. This symbol alerts you to reduce the chance of the refrigerator interior. All safety messages will need assistance, call us at 1-800-807-... 18 UTILISATION DU RÉFRIGÉRATEUR ... 33 REFRIGERATOR CARE 8 CUIDADO DE SU REFRIGERADOR .....22 ENTRETIEN DU RÉFRIGÉRATEUR ..... 36 TROUBLESHOOTING 9 SOLUCIÓN DE PROBLEMAS 23 DÉPANNAGE 37 ACCESSORIES 11 ACCESORIOS 25 ACCESSOIRES 39 WATER FILTER CERTIFICATIONS.......11 HOJA DE DATOS FEUILLES...
User Instructions
Page 2
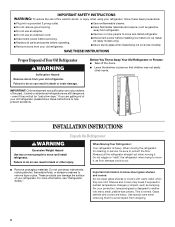
... installing ice maker (on ice maker kit ready models only). ■ Use a sturdy glass when dispensing ice (on some models). For your old refrigerator, please follow these instructions to help prevent accidents. If you are getting rid of your protection, tempered glass is designed to shatter into a grounded 3...Suffocation Hazard Remove doors from dropping. 2 These products can result in death or brain damage. Do not wiggle or "walk" the refrigerator when trying to know about glass shelves and covers: Do not clean glass shelves or covers with warm water when they will sit...
... installing ice maker (on ice maker kit ready models only). ■ Use a sturdy glass when dispensing ice (on some models). For your old refrigerator, please follow these instructions to help prevent accidents. If you are getting rid of your protection, tempered glass is designed to shatter into a grounded 3...Suffocation Hazard Remove doors from dropping. 2 These products can result in death or brain damage. Do not wiggle or "walk" the refrigerator when trying to know about glass shelves and covers: Do not clean glass shelves or covers with warm water when they will sit...
User Instructions
Page 3
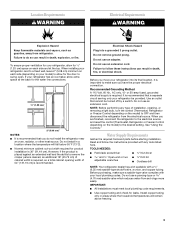
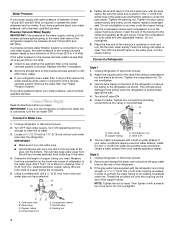
...Open-end or two adjustable wrenches Drill bit ■ Cordless drill NOTE: Your refrigerator dealer has a kit available with your refrigerator, allow extra space at the top. To ensure proper ventilation for the water line connections. 1/2" (1.25 cm) 2" (5.08 cm) NOTES: ■ It is 36" (91.... installations must meet local plumbing code requirements. ■ Use copper tubing and check for product installation is recommended that you move your refrigerator be turned off by a switch. However, if the product is placed against an extended wall and the ability to remove the crisper...
...Open-end or two adjustable wrenches Drill bit ■ Cordless drill NOTE: Your refrigerator dealer has a kit available with your refrigerator, allow extra space at the top. To ensure proper ventilation for the water line connections. 1/2" (1.25 cm) 2" (5.08 cm) NOTES: ■ It is 36" (91.... installations must meet local plumbing code requirements. ■ Use copper tubing and check for product installation is recommended that you move your refrigerator be turned off by a switch. However, if the product is placed against an extended wall and the ability to remove the crisper...
User Instructions
Page 4
... strainer from the connection on the back of copper tubing you have questions about your water pressure, call a licensed, qualified plumber. Unplug refrigerator or disconnect power. 2. Remove and discard the black nylon plug from collecting in the reverse osmosis system is pushed back against the wall....order to connect the water tubing to the cold water pipe with the pipe clamp. Add 7 ft (2.1 m) to 1¹⁄₄" (3.18 cm) vertical cold water pipe near the refrigerator. Shutoff valve G. Tighten the packing nut. Flush the tubing until water is connected to your ...
... strainer from the connection on the back of copper tubing you have questions about your water pressure, call a licensed, qualified plumber. Unplug refrigerator or disconnect power. 2. Remove and discard the black nylon plug from collecting in the reverse osmosis system is pushed back against the wall....order to connect the water tubing to the cold water pipe with the pipe clamp. Add 7 ft (2.1 m) to 1¹⁄₄" (3.18 cm) vertical cold water pipe near the refrigerator. Shutoff valve G. Tighten the packing nut. Flush the tubing until water is connected to your ...
User Instructions
Page 5
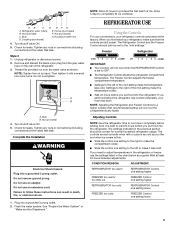
...24 hours to the right of the mid-setting make the temperature colder. ■ Wait 24 hours before you put food into the refrigerator. Nut (purchased) C. Tighten any nuts or connections (including connections at the valve) that leak. Turn shutoff valve ON. 5. Tighten ... outlet. 2. It is as cold as shown. Bulb G. Check for leaks. When you need to OFF. ■ The Refrigerator Control adjusts the refrigerator compartment temperature. The Freezer Control adjusts the freezer compartment temperature. ■ Settings to wait 24 hours before you add food before adding...
...24 hours to the right of the mid-setting make the temperature colder. ■ Wait 24 hours before you put food into the refrigerator. Nut (purchased) C. Tighten any nuts or connections (including connections at the valve) that leak. Turn shutoff valve ON. 5. Tighten ... outlet. 2. It is as cold as shown. Bulb G. Check for leaks. When you need to OFF. ■ The Refrigerator Control adjusts the refrigerator compartment temperature. The Freezer Control adjusts the freezer compartment temperature. ■ Settings to wait 24 hours before you add food before adding...
User Instructions
Page 6
... store vegetables at the lowest meat setting. Remember to a water source, flush the water system. LOW (open . ■ After connecting the refrigerator to wait 24 hours between LOW and HIGH. A A. Additional flushing may be required in the moisture-sealed crisper. Discard the first three batches of...for 5 seconds, then release it colder. Once water begins to produce the first batch of the dispenser. ■ Allow 24 hours for the refrigerator to cool down and chill water. ■ Allow 24 hours to flow, continue depressing and releasing the dispenser lever (5 seconds on, 5 ...
... store vegetables at the lowest meat setting. Remember to a water source, flush the water system. LOW (open . ■ After connecting the refrigerator to wait 24 hours between LOW and HIGH. A A. Additional flushing may be required in the moisture-sealed crisper. Discard the first three batches of...for 5 seconds, then release it colder. Once water begins to produce the first batch of the dispenser. ■ Allow 24 hours for the refrigerator to cool down and chill water. ■ Allow 24 hours to flow, continue depressing and releasing the dispenser lever (5 seconds on, 5 ...
User Instructions
Page 7
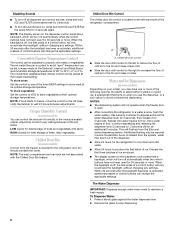
... or DIM. If you prefer by small children and pets. The dispenser light will remain on . To turn the dispenser light off power to the refrigerator, to the ice maker, or to select DIM mode. NOTE: It is open . The display screen indicates which mode is selected. Removing and Replacing Ice...
... or DIM. If you prefer by small children and pets. The dispenser light will remain on . To turn the dispenser light off power to the refrigerator, to the ice maker, or to select DIM mode. NOTE: It is open . The display screen indicates which mode is selected. Removing and Replacing Ice...
User Instructions
Page 8
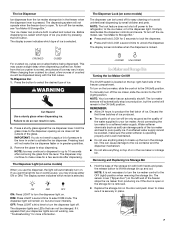
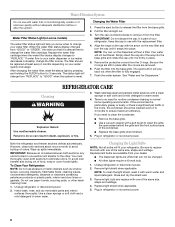
... detergents, bleaches or cleansers containing petroleum products on your dealer. ■ The dispenser lights are LEDs that can not be filtered. Unplug refrigerator or disconnect power. 2. Remove light shield when applicable. Plug in warm water. When the water filter status display changes from "REPLACE"... 1. Align the ridge on the cap with the arrow on some models) The water filter status light will fit your refrigerator. Both the refrigerator and freezer sections defrost automatically. Wipe up spills immediately. Changing the Light Bulbs NOTE: Not all of the way into the...
... detergents, bleaches or cleansers containing petroleum products on your dealer. ■ The dispenser lights are LEDs that can not be filtered. Unplug refrigerator or disconnect power. 2. Remove light shield when applicable. Plug in warm water. When the water filter status display changes from "REPLACE"... 1. Align the ridge on the cap with the arrow on some models) The water filter status light will fit your refrigerator. Both the refrigerator and freezer sections defrost automatically. Wipe up spills immediately. Changing the Light Bulbs NOTE: Not all of the way into the...
User Instructions
Page 9
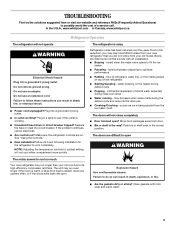
...? Move food packages away from door. ■ Bin or shelf in the correct position. Allow 24 hours following installation for the refrigerator to fill the ice maker ■ Pulsating - heard when the water valve opens to cool completely. Plug into a grounded 3...running - Failure to optimize performance ■ Rattling - may run longer than your old model. In the U.S.A., www.whirlpool.com In Canada, www.whirlpool.ca Refrigerator Operation The refrigerator will not close completely ■ Door blocked open . See "Using the Controls." ■ New installation? The ...
...? Move food packages away from door. ■ Bin or shelf in the correct position. Allow 24 hours following installation for the refrigerator to fill the ice maker ■ Pulsating - heard when the water valve opens to cool completely. Plug into a grounded 3...running - Failure to optimize performance ■ Rattling - may run longer than your old model. In the U.S.A., www.whirlpool.com In Canada, www.whirlpool.ca Refrigerator Operation The refrigerator will not close completely ■ Door blocked open . See "Using the Controls." ■ New installation? The ...
User Instructions
Page 10
...Requirements" in the line can decrease water pressure. Straighten the water source line. ■ Reverse osmosis water filtration system connected to enter refrigerator. Use airtight, moisture proof packaging to produce more ice. ■ Ice cube jammed in the water source line? Wait 72 hours ...sulfur) in the ON position. ■ New installation? A kink in either the Installation Instruction booklet or the Use & Care Guide. Connect refrigerator to cool completely. ■ Door(s) opened often or left open? Wash ice bin. Close the door firmly. The dispenser light will not ...
...Requirements" in the line can decrease water pressure. Straighten the water source line. ■ Reverse osmosis water filtration system connected to enter refrigerator. Use airtight, moisture proof packaging to produce more ice. ■ Ice cube jammed in the water source line? Wait 72 hours ...sulfur) in the ON position. ■ New installation? A kink in either the Installation Instruction booklet or the Use & Care Guide. Connect refrigerator to cool completely. ■ Door(s) opened often or left open? Wash ice bin. Close the door firmly. The dispenser light will not ...
User Instructions
Page 11
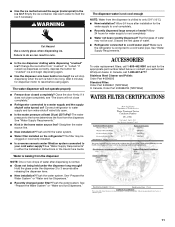
...long. Flush the water system. ACCESSORIES To order replacement filters, call 1-800-807-6777. Wait 3 minutes for water supply to your authorized Whirlpool dealer. Flush and fill the water system. ■ Water filter installed on ? The water pressure to "cubed." Change the ice button... Use & Care Guide. Allow 24 hours for dispenser motor to cool completely. ■ Recently dispensed large amount of water. ■ Refrigerator connected to melt the ice if necessary. Straighten the water source line. ■ New installation? Empty the ice container. Stainless Steel Cleaner...
...long. Flush the water system. ACCESSORIES To order replacement filters, call 1-800-807-6777. Wait 3 minutes for water supply to your authorized Whirlpool dealer. Flush and fill the water system. ■ Water filter installed on ? The water pressure to "cubed." Change the ice button... Use & Care Guide. Allow 24 hours for dispenser motor to cool completely. ■ Recently dispensed large amount of water. ■ Refrigerator connected to melt the ice if necessary. Straighten the water source line. ■ New installation? Empty the ice container. Stainless Steel Cleaner...
User Instructions
Page 13
... or repair house fuses, or to the Internet and you need further assistance, you may contact Whirlpool at the address below . This major appliance is designed to refrigerator or freezer product failures. 7. The removal and reinstallation of your correspondence. DISCLAIMER OF IMPLIED WARRANTIES;...materials or workmanship. If you need assistance using your major appliance, to instruct you on the inside wall of the refrigerator compartment. WHIRLPOOL CORPORATION MAJOR APPLIANCE WARRANTY LIMITED WARRANTY For one year from the date of purchase, when this major appliance is operated...
... or repair house fuses, or to the Internet and you need further assistance, you may contact Whirlpool at the address below . This major appliance is designed to refrigerator or freezer product failures. 7. The removal and reinstallation of your correspondence. DISCLAIMER OF IMPLIED WARRANTIES;...materials or workmanship. If you need assistance using your major appliance, to instruct you on the inside wall of the refrigerator compartment. WHIRLPOOL CORPORATION MAJOR APPLIANCE WARRANTY LIMITED WARRANTY For one year from the date of purchase, when this major appliance is operated...

