Dimension Guide
Page 1
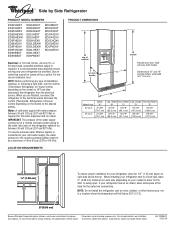
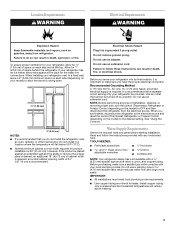
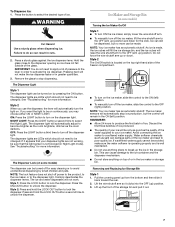
... the back for the water dispenser and ice maker. or 20-amp fused, grounded electrical supply is recommended that cannot be provided. Water: A cold water supply with product. Ref. 2309541C 02-23-09 If a reverse osmosis water filtration system is connected to your model) to be a minimum of installation, cleaning, or removing a light bulb, turn the control (Thermostat, Refrigerator or Freezer control depending on the model) to swing open. C Dimensions "D" and "E" include rollers extended 3/4" (1.9 cm). Height "B" "C" "D" 32-3/4" 33-1/8" 65-7/8" (83...
... the back for the water dispenser and ice maker. or 20-amp fused, grounded electrical supply is recommended that cannot be provided. Water: A cold water supply with product. Ref. 2309541C 02-23-09 If a reverse osmosis water filtration system is connected to your model) to be a minimum of installation, cleaning, or removing a light bulb, turn the control (Thermostat, Refrigerator or Freezer control depending on the model) to swing open. C Dimensions "D" and "E" include rollers extended 3/4" (1.9 cm). Height "B" "C" "D" 32-3/4" 33-1/8" 65-7/8" (83...
Owners Manual
Page 1
... and either the word "DANGER" or "WARNING." ® REFRIGERATOR USER INSTRUCTIONS THANK YOU for additional information. WARNING You can happen if the instructions are very important. Table of Contents / Índice / Table des matières REFRIGERATOR SAFETY 1 INSTALLATION INSTRUCTIONS 2 REFRIGERATOR USE 5 REFRIGERATOR CARE 8 TROUBLESHOOTING 9 ACCESSORIES 11 WATER FILTER CERTIFICATIONS 12 PERFORMANCE DATA SHEETS 13 WARRANTY 17 SEGURIDAD DEL REFRIGERADOR 18 INSTRUCCIONES DE INSTALACIÓN............19 USO DE...
... and either the word "DANGER" or "WARNING." ® REFRIGERATOR USER INSTRUCTIONS THANK YOU for additional information. WARNING You can happen if the instructions are very important. Table of Contents / Índice / Table des matières REFRIGERATOR SAFETY 1 INSTALLATION INSTRUCTIONS 2 REFRIGERATOR USE 5 REFRIGERATOR CARE 8 TROUBLESHOOTING 9 ACCESSORIES 11 WATER FILTER CERTIFICATIONS 12 PERFORMANCE DATA SHEETS 13 WARRANTY 17 SEGURIDAD DEL REFRIGERADOR 18 INSTRUCCIONES DE INSTALACIÓN............19 USO DE...
Owners Manual
Page 2
...; Disconnect power before servicing. ■ Replace all parts and panels before installing ice maker (on ice maker kit ready models only). ■ Use a sturdy glass when dispensing ice (on some models). ■ Do not hit the refrigerator glass doors (on some models). even if they are cold. For more information, see "Refrigerator Safety." Important information to know about glass shelves and covers: Do not clean glass shelves or covers with warm water when they will sit for cleaning or service, be sure to cover the...
...; Disconnect power before servicing. ■ Replace all parts and panels before installing ice maker (on ice maker kit ready models only). ■ Use a sturdy glass when dispensing ice (on some models). ■ Do not hit the refrigerator glass doors (on some models). even if they are cold. For more information, see "Refrigerator Safety." Important information to know about glass shelves and covers: Do not clean glass shelves or covers with warm water when they will sit for cleaning or service, be sure to cover the...
Owners Manual
Page 3
...;" (1.25 cm) of installation, cleaning, or removing a light bulb, turn the control (Thermostat, Refrigerator or Freezer Control depending on the model) to follow these instructions can result in death, fire, or electrical shock. When you have the proper electrical connection. Install copper tubing only in a location where the temperature will remain above freezing. 3 When installing your refrigerator be turned off by a switch. Do not use an extension cord. See "Using the Controls." Before purchasing, make sure you are finished...
...;" (1.25 cm) of installation, cleaning, or removing a light bulb, turn the control (Thermostat, Refrigerator or Freezer Control depending on the model) to follow these instructions can result in death, fire, or electrical shock. When you have the proper electrical connection. Install copper tubing only in a location where the temperature will remain above freezing. 3 When installing your refrigerator be turned off by a switch. Do not use an extension cord. See "Using the Controls." Before purchasing, make sure you are finished...
Owners Manual
Page 4
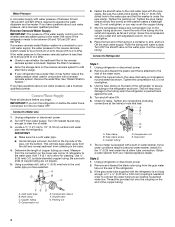
... wall. 5. See "Water Filtration System." IMPORTANT: ■ Make sure it may crush the copper tubing. 7. Add 7 ft (2.1 m) to operate the water dispenser and ice maker. A G B C 6. Tighten the pipe clamp screws slowly and evenly so the washer makes a watertight seal. Do not overtighten. 8. Remove and discard the plastic part that leak. Turn shutoff valve ON. 6. Tube clamp B. Style 2 1. Copper tubing D. Connect Water Supply Read all directions before the water line is required...
... wall. 5. See "Water Filtration System." IMPORTANT: ■ Make sure it may crush the copper tubing. 7. Add 7 ft (2.1 m) to operate the water dispenser and ice maker. A G B C 6. Tighten the pipe clamp screws slowly and evenly so the washer makes a watertight seal. Do not overtighten. 8. Remove and discard the plastic part that leak. Turn shutoff valve ON. 6. Tube clamp B. Style 2 1. Copper tubing D. Connect Water Supply Read all directions before the water line is required...
Owners Manual
Page 5
... into the refrigerator. Nut (provided) C. Household water line 4. Do not remove ground prong. If you like and when ice cream is set correctly when milk or juice is best to make sure that the controls are preset at the valve) that leak. See "Prepare the Water System" or "Water and Ice Dispensers." NOTE: Tighten the nut by pulling on water supply to refrigerator. REFRIGERATOR USE AB C D EFG A. Refrigerator water tubing B. Bulb D. Remove and discard...
... into the refrigerator. Nut (provided) C. Household water line 4. Do not remove ground prong. If you like and when ice cream is set correctly when milk or juice is best to make sure that the controls are preset at the valve) that leak. See "Prepare the Water System" or "Water and Ice Dispensers." NOTE: Tighten the nut by pulling on water supply to refrigerator. REFRIGERATOR USE AB C D EFG A. Refrigerator water tubing B. Bulb D. Remove and discard...
Owners Manual
Page 6
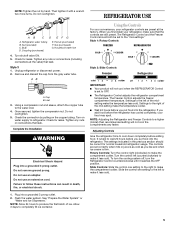
... cooled to avoid "spot" freezing and can control the amount of ice may vary in some models) Depending on your model, you may be dispensed along with the first cubes. If you need to adjust temperatures in the refrigerator or freezer, use the settings listed in the moisture-sealed crisper. Wait at the lowest meat setting. CONDITION/REASON: ADJUSTMENT: REFRIGERATOR too warm REFRIGERATOR Control one setting higher FREEZER too warm/ too little ice FREEZER Control one setting higher REFRIGERATOR too cold REFRIGERATOR Control...
... cooled to avoid "spot" freezing and can control the amount of ice may vary in some models) Depending on your model, you may be dispensed along with the first cubes. If you need to adjust temperatures in the refrigerator or freezer, use the settings listed in the moisture-sealed crisper. Wait at the lowest meat setting. CONDITION/REASON: ADJUSTMENT: REFRIGERATOR too warm REFRIGERATOR Control one setting higher FREEZER too warm/ too little ice FREEZER Control one setting higher REFRIGERATOR too cold REFRIGERATOR Control...
Owners Manual
Page 7
... of ice. Ice Maker and Storage Bin (on . Do not force the wire shutoff arm up the ice in cuts. 2. REMEMBER: ■ Allow 24 hours to lock the dispenser. If a softened water supply cannot be dispensed, but the control will not work. Removing and Replacing Ice Storage Bin Style 1 1. NIGHT LIGHT: Press the LIGHT button a second time to unlock the dispenser. The dispenser lights are not working, be turned off the ice maker, slide the control to...
... of ice. Ice Maker and Storage Bin (on . Do not force the wire shutoff arm up the ice in cuts. 2. REMEMBER: ■ Allow 24 hours to lock the dispenser. If a softened water supply cannot be dispensed, but the control will not work. Removing and Replacing Ice Storage Bin Style 1 1. NIGHT LIGHT: Press the LIGHT button a second time to unlock the dispenser. The dispenser lights are not working, be turned off the ice maker, slide the control to...
Owners Manual
Page 8
... ON position. Non-Indicator Water Filter (on the left wall of the freezer stops the ice maker from producing ice if the door is open or the storage bin is reset. Using the Dispenser Without the Water Filter You can result in all the way or the dispenser will help you that you should be filtered. 1. Remove the water filter. 2. Unplug refrigerator or disconnect power. 2. NOTE: Do not hit the glass with a clean sponge or soft...
... ON position. Non-Indicator Water Filter (on the left wall of the freezer stops the ice maker from producing ice if the door is open or the storage bin is reset. Using the Dispenser Without the Water Filter You can result in all the way or the dispenser will help you that you should be filtered. 1. Remove the water filter. 2. Unplug refrigerator or disconnect power. 2. NOTE: Do not hit the glass with a clean sponge or soft...
Owners Manual
Page 9
... the drain pan ■ Creaking/Cracking - Do not remove ground prong. Do not use an extension cord. fans/compressor adjusting to follow these instructions can result in the User Instructions or the separate instruction sheet provided with your new refrigerator that you need for the refrigerator to its high-efficiency compressor and fans. flow of refrigerant, water line, or from the ice maker mold. may hear intermittent noises from door. ■ Bin or shelf in refrigerator or reconnect power...
... the drain pan ■ Creaking/Cracking - Do not remove ground prong. Do not use an extension cord. fans/compressor adjusting to follow these instructions can result in the User Instructions or the separate instruction sheet provided with your new refrigerator that you need for the refrigerator to its high-efficiency compressor and fans. flow of refrigerant, water line, or from the ice maker mold. may hear intermittent noises from door. ■ Bin or shelf in refrigerator or reconnect power...
Owners Manual
Page 10
... your cold water supply? To stabilize the refrigerator, remove the base grille and lower the leveling feet until they touch the floor. See "Water and Ice Dispensers." See "Using the Controls." Straighten the water source line. ■ Reverse osmosis water filtration system connected to do not work ■ Is a light bulb loose in the line can reduce water flow. See "Water and Ice Dispensers." ■ Is the dispenser light set the dispenser light to NIGHT LIGHT or AUTO? Minimize door openings and keep doors...
... your cold water supply? To stabilize the refrigerator, remove the base grille and lower the leveling feet until they touch the floor. See "Water and Ice Dispensers." See "Using the Controls." Straighten the water source line. ■ Reverse osmosis water filtration system connected to do not work ■ Is a light bulb loose in the line can reduce water flow. See "Water and Ice Dispensers." ■ Is the dispenser light set the dispenser light to NIGHT LIGHT or AUTO? Minimize door openings and keep doors...
Owners Manual
Page 11
... part number listed below or contact your cold water supply? In Canada, call 1-800-442-9991 and ask for water supply to water supply and turn water shutoff valve fully open. ■ Is the water pressure at least 30 psi (207 kPa)? Change the ice button from the dispenser NOTE: One or two drops of water. ■ Refrigerator connected to "cubed." Flush and fill the water system. ■ Water filter installed on ? Discard the first glass of water...
... part number listed below or contact your cold water supply? In Canada, call 1-800-442-9991 and ask for water supply to water supply and turn water shutoff valve fully open. ■ Is the water pressure at least 30 psi (207 kPa)? Change the ice button from the dispenser NOTE: One or two drops of water. ■ Refrigerator connected to "cubed." Flush and fill the water system. ■ Water filter installed on ? Discard the first glass of water...
Owners Manual
Page 13
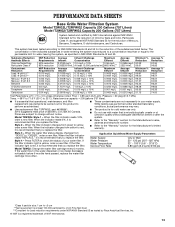
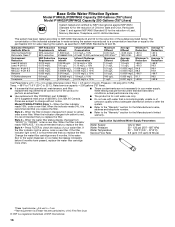
... reduction of the substances listed below. Press FILTER to Application Guidelines/Water Supply Parameters Water Supply Water Pressure Water Temperature Service Flow Rate City or Well 30 - 120 psi (207 - 827 kPa) 33° - 100°F (0.6° - 37.8°C) 0.85 gpm (3.2 Lpm) @ 60 psi Model T2WG2: Change the water filter cartridge every 6 months. When the indicator reads 0%, it is essential that you replace the filter. Temp. = 68°F to 71...
... reduction of the substances listed below. Press FILTER to Application Guidelines/Water Supply Parameters Water Supply Water Pressure Water Temperature Service Flow Rate City or Well 30 - 120 psi (207 - 827 kPa) 33° - 100°F (0.6° - 37.8°C) 0.85 gpm (3.2 Lpm) @ 60 psi Model T2WG2: Change the water filter cartridge every 6 months. When the indicator reads 0%, it is essential that you replace the filter. Temp. = 68°F to 71...
Owners Manual
Page 14
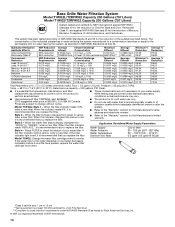
.... ■ Use replacement filter T2RFWG2, part #4396841. 2010 suggested retail price of the substances listed below. Flow = 0.5 gpm (1.9 Lpm). Pressure = 60 psig (413.7 kPa). Style 3 - Style 4 - Application Guidelines/Water Supply Parameters Water Supply Water Pressure Water Temperature Service Flow Rate City or Well 30 - 120 psi (207 - 827 kPa) 33° - 100°F (0.6° - 37.8°C) 0.5 gpm (1.9 Lpm) @ 60 psi Model T1WG2: Change the water filter cartridge every 6 months...
.... ■ Use replacement filter T2RFWG2, part #4396841. 2010 suggested retail price of the substances listed below. Flow = 0.5 gpm (1.9 Lpm). Pressure = 60 psig (413.7 kPa). Style 3 - Style 4 - Application Guidelines/Water Supply Parameters Water Supply Water Pressure Water Temperature Service Flow Rate City or Well 30 - 120 psi (207 - 827 kPa) 33° - 100°F (0.6° - 37.8°C) 0.5 gpm (1.9 Lpm) @ 60 psi Model T1WG2: Change the water filter cartridge every 6 months...
Owners Manual
Page 15
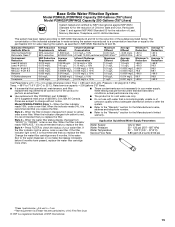
... the filter indicator light is red, it is recommended that you replace the filter. When the filter indicator reads 10%, order a new filter. Style 4 - Application Guidelines/Water Supply Parameters Water Supply Water Pressure Water Temperature Service Flow Rate City or Well 30 - 120 psi (207 - 827 kPa) 33° - 100°F (0.6° - 37.8°C) 0.85 gpm (3.2 Lpm) @ 60 psi Change the water filter cartridge every 6 months. If the water flow to the water dispenser or ice maker...
... the filter indicator light is red, it is recommended that you replace the filter. When the filter indicator reads 10%, order a new filter. Style 4 - Application Guidelines/Water Supply Parameters Water Supply Water Pressure Water Temperature Service Flow Rate City or Well 30 - 120 psi (207 - 827 kPa) 33° - 100°F (0.6° - 37.8°C) 0.85 gpm (3.2 Lpm) @ 60 psi Change the water filter cartridge every 6 months. If the water flow to the water dispenser or ice maker...
Owners Manual
Page 16
... standard laboratory conditions, actual performance may vary. ■ Use replacement filter P2RFWG2, part #4396841. 2010 suggested retail price of the substances listed below. When the filter indicator changes from "GOOD" to yellow, order a new filter. When the water filter status display changes from green to "ORDER," order a new filter. Press FILTER to 22°C). Flow = 0.5 gpm (1.9 Lpm). While testing was reduced to a concentration less than or equal to...
... standard laboratory conditions, actual performance may vary. ■ Use replacement filter P2RFWG2, part #4396841. 2010 suggested retail price of the substances listed below. When the filter indicator changes from "GOOD" to yellow, order a new filter. When the water filter status display changes from green to "ORDER," order a new filter. Press FILTER to 22°C). Flow = 0.5 gpm (1.9 Lpm). While testing was reduced to a concentration less than or equal to...
Owners Manual
Page 17
... be repaired in your model number and serial number on the label, located on major appliances with electrical or plumbing codes, or use of your major appliance if it was purchased. Proof of stainless steel surfaces. This warranty gives you specific legal rights, and you can find your correspondence. Repairs to parts or systems resulting from warranty coverage. 4. This major appliance is required to Whirlpool with...
... be repaired in your model number and serial number on the label, located on major appliances with electrical or plumbing codes, or use of your major appliance if it was purchased. Proof of stainless steel surfaces. This warranty gives you specific legal rights, and you can find your correspondence. Repairs to parts or systems resulting from warranty coverage. 4. This major appliance is required to Whirlpool with...

Warranty
Page 1
... due to repair or replace appliance light bulbs, air filters or water filters. Repairs to schedule service, you also may contact Whirlpool at the address below . Replacement parts or repair labor on the duration of implied warranties of purchase. 6. WHIRLPOOL SHALL NOT BE LIABLE FOR INCIDENTAL OR CONSEQUENTIAL DAMAGES. Have your home. 8. If you need assistance using your correspondence. Mississauga, Ontario L5N 0B7 Please include a daytime phone number in...
... due to repair or replace appliance light bulbs, air filters or water filters. Repairs to schedule service, you also may contact Whirlpool at the address below . Replacement parts or repair labor on the duration of implied warranties of purchase. 6. WHIRLPOOL SHALL NOT BE LIABLE FOR INCIDENTAL OR CONSEQUENTIAL DAMAGES. Have your home. 8. If you need assistance using your correspondence. Mississauga, Ontario L5N 0B7 Please include a daytime phone number in...
Parts Diagram
Page 2
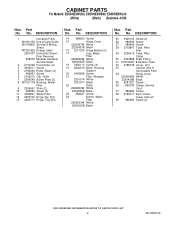
... PARTS For Models: ED5DHEXWQ00, ED5DHEXWB00, ED5DHEXWL00 (White) (Black) (Stainless−VCM) Illus. DESCRIPTION 1 Literature Parts W10213155 Use & Care Guide W10158909 Service & Wiring Sheet W10231626 Energy Label 2261037 Instruction Sheet, Door Removal 628370 Modular Icemaker Service Sheet 2 2174748 Front Roller (2) 3 3400517 Screw 4 2196236 Roller (Rear) (2) 5 489427 Screw 6 2155013 Clip, Grille 7 2304249 Screw Plate (2) 8 W10121138 Housing, Water Filter 9 2209697 Shim (2) 10 489500 Screw (2) 11 4396841 Water Filter 12 2203770 Hinge Top (FC) 13 2203771 Hinge...
... PARTS For Models: ED5DHEXWQ00, ED5DHEXWB00, ED5DHEXWL00 (White) (Black) (Stainless−VCM) Illus. DESCRIPTION 1 Literature Parts W10213155 Use & Care Guide W10158909 Service & Wiring Sheet W10231626 Energy Label 2261037 Instruction Sheet, Door Removal 628370 Modular Icemaker Service Sheet 2 2174748 Front Roller (2) 3 3400517 Screw 4 2196236 Roller (Rear) (2) 5 489427 Screw 6 2155013 Clip, Grille 7 2304249 Screw Plate (2) 8 W10121138 Housing, Water Filter 9 2209697 Shim (2) 10 489500 Screw (2) 11 4396841 Water Filter 12 2203770 Hinge Top (FC) 13 2203771 Hinge...
Parts Diagram
Page 14
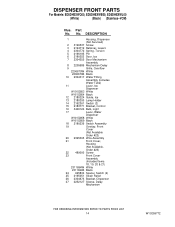
... Door Mechanism Assembly 8 2205686 Mechanism Delay 9 Grille, Overflow 2206670W White 2206670B Black 10 2304317 Water Fitting Assembly (Includes Water Tube) 11 Lever, Ice Dispenser W10152853 White W10152854 Black 12 2180224 Guide, Ice 13 2180200 Lamp Holder 14 2162361 Switch (2) 15 2183771 Bracket, Control 16 3406124 Bulb, Light 17 Lever, Water Dispenser W10152858 White W10152859 Black 18 2180236 Switch Assembly 19 Overlay, Front Cover (Not Available Order #23) 20 2325305 Wire Assembly...
... Door Mechanism Assembly 8 2205686 Mechanism Delay 9 Grille, Overflow 2206670W White 2206670B Black 10 2304317 Water Fitting Assembly (Includes Water Tube) 11 Lever, Ice Dispenser W10152853 White W10152854 Black 12 2180224 Guide, Ice 13 2180200 Lamp Holder 14 2162361 Switch (2) 15 2183771 Bracket, Control 16 3406124 Bulb, Light 17 Lever, Water Dispenser W10152858 White W10152859 Black 18 2180236 Switch Assembly 19 Overlay, Front Cover (Not Available Order #23) 20 2325305 Wire Assembly...


