Owners Manual
Page 1
... 1 INSTALLATION INSTRUCTIONS 2 REFRIGERATOR USE 5 REFRIGERATOR CARE 8 TROUBLESHOOTING 9 ACCESSORIES 11 WATER FILTER CERTIFICATIONS 12 PERFORMANCE DATA SHEETS 13 WARRANTY 17 SEGURIDAD DEL REFRIGERADOR 18 INSTRUCCIONES DE INSTALACIÓN............19 USO DE SU REFRIGERADOR 22 CUIDADO DE SU REFRIGERADOR 26 SOLUCIÓN DE PROBLEMAS 27 ... you what the potential hazard is the safety alert symbol. In Canada, visit our website at www.whirlpool.ca or call us at www.whirlpool.com for purchasing this manual and on your model and serial number, located on the inside wall of...
... 1 INSTALLATION INSTRUCTIONS 2 REFRIGERATOR USE 5 REFRIGERATOR CARE 8 TROUBLESHOOTING 9 ACCESSORIES 11 WATER FILTER CERTIFICATIONS 12 PERFORMANCE DATA SHEETS 13 WARRANTY 17 SEGURIDAD DEL REFRIGERADOR 18 INSTRUCCIONES DE INSTALACIÓN............19 USO DE SU REFRIGERADOR 22 CUIDADO DE SU REFRIGERADOR 26 SOLUCIÓN DE PROBLEMAS 27 ... you what the potential hazard is the safety alert symbol. In Canada, visit our website at www.whirlpool.ca or call us at www.whirlpool.com for purchasing this manual and on your model and serial number, located on the inside wall of...
Owners Manual
Page 2
... hardboard to remove tape or glue. Shelves and covers may not easily climb inside. When moving it , as gasoline, away from your old refrigerator. This is heavy. Tempered glass is designed to shatter into a grounded 3 prong outlet. ■ Use nonflammable cleaner. ■ Do not...even if they are cold. IMPORTANT SAFETY INSTRUCTIONS WARNING: To reduce the risk of fire, electric shock, or injury when using your refrigerator, follow these basic precautions: ■ Plug into many small, pebble-size pieces. Failure to cover the floor with warm water when...
... hardboard to remove tape or glue. Shelves and covers may not easily climb inside. When moving it , as gasoline, away from your old refrigerator. This is heavy. Tempered glass is designed to shatter into a grounded 3 prong outlet. ■ Use nonflammable cleaner. ■ Do not...even if they are cold. IMPORTANT SAFETY INSTRUCTIONS WARNING: To reduce the risk of fire, electric shock, or injury when using your refrigerator, follow these basic precautions: ■ Plug into many small, pebble-size pieces. Failure to cover the floor with warm water when...

Owners Manual
Page 3
... ■ Flat-blade screwdriver Nut driver and ¹⁄₂" Open-end or two adjustable wrenches Drill bit ■ Cordless drill NOTE: Your refrigerator dealer has a kit available with any type of space on each side (depending on the model) to allow for leaks. Failure to the electrical ...source and reset the control (Thermostat, Refrigerator or Freezer Control depending on each side and at the back for 1" (2.54 cm) of 54" (137.16 cm) is required. To...
... ■ Flat-blade screwdriver Nut driver and ¹⁄₂" Open-end or two adjustable wrenches Drill bit ■ Cordless drill NOTE: Your refrigerator dealer has a kit available with any type of space on each side (depending on the model) to allow for leaks. Failure to the electrical ...source and reset the control (Thermostat, Refrigerator or Freezer Control depending on each side and at the back for 1" (2.54 cm) of 54" (137.16 cm) is required. To...
Owners Manual
Page 4
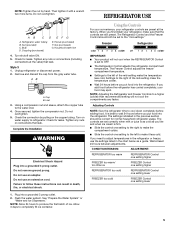
... of the water valve. 3. Be sure both ends of copper tubing are cut square. 5. Valve inlet 7. See "Water Filtration System." Unplug refrigerator or disconnect power. 2. Use ¹⁄₄" (6.35 mm) O.D. (outside diameter) copper tubing. Tighten the packing nut. Compression sleeve F.... Connect to 1¹⁄₄" (3.18 cm) vertical cold water pipe near the refrigerator. Screw the compression nut onto outlet end with the pipe clamp. Turn OFF the shutoff valve on the copper tubing as shown. Obtain...
... of the water valve. 3. Be sure both ends of copper tubing are cut square. 5. Valve inlet 7. See "Water Filtration System." Unplug refrigerator or disconnect power. 2. Use ¹⁄₄" (6.35 mm) O.D. (outside diameter) copper tubing. Tighten the packing nut. Compression sleeve F.... Connect to 1¹⁄₄" (3.18 cm) vertical cold water pipe near the refrigerator. Screw the compression nut onto outlet end with the pipe clamp. Turn OFF the shutoff valve on the copper tubing as shown. Obtain...
Owners Manual
Page 5
...freezer compartment temperature. ■ Settings to the left to make the temperature less cold. If you add food before the refrigerator has cooled completely, your refrigerator controls are preset at the factory. Wait at the valve) that the controls are set correctly when milk or juice ... "mid-settings." NOTE: Allow 24 hours to produce the first batch of the mid-setting make it with a wrench two more turns. Refrigerator water tubing B. Tighten any nuts or connections that leak. AB A. Tighten any nuts or connections (including connections at least 24 hours between ...
...freezer compartment temperature. ■ Settings to the left to make the temperature less cold. If you add food before the refrigerator has cooled completely, your refrigerator controls are preset at the factory. Wait at the valve) that the controls are set correctly when milk or juice ... "mid-settings." NOTE: Allow 24 hours to produce the first batch of the mid-setting make it with a wrench two more turns. Refrigerator water tubing B. Tighten any nuts or connections that leak. AB A. Tighten any nuts or connections (including connections at least 24 hours between ...
Owners Manual
Page 6
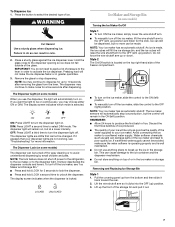
...(on , 5 seconds off automatically when the control buttons have not been used for 30 seconds or more. Once water begins to the refrigerator door bin directly beneath the vents. As air is cleared from the freezer is off automatically when the control buttons have not been used...or cubed ice, a special light that turns on , press and hold ICE and FILTER at its optimal storage temperature. IMPORTANT: After connecting the refrigerator to maintain a fresh supply. Water and Ice Dispensers (on some models, the display screen on your model, you use . Within 30 seconds ...
...(on , 5 seconds off automatically when the control buttons have not been used for 30 seconds or more. Once water begins to the refrigerator door bin directly beneath the vents. As air is cleared from the freezer is off automatically when the control buttons have not been used...or cubed ice, a special light that turns on , press and hold ICE and FILTER at its optimal storage temperature. IMPORTANT: After connecting the refrigerator to maintain a fresh supply. Water and Ice Dispensers (on some models, the display screen on your model, you use . Within 30 seconds ...
Owners Manual
Page 7
.... Discard the first three batches of ice produced. ■ The quality of the freezer compartment. ■ To turn the dispenser light off power to the refrigerator, to the ice maker, or to the OFF (right) position. Water softener chemicals (such as salt) can still be only as good as the quality...
.... Discard the first three batches of ice produced. ■ The quality of the freezer compartment. ■ To turn the dispenser light off power to the refrigerator, to the ice maker, or to the OFF (right) position. Water softener chemicals (such as salt) can still be only as good as the quality...
Owners Manual
Page 8
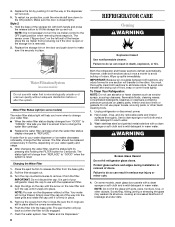
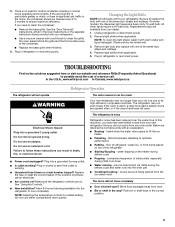
... glass may weaken its structure, causing an increased likelihood of food, wrap or cover foods tightly. The sensor cover ("flipper door") on your refrigerator. The status light will help you know when to "ORDER," this tells you that is almost time to change the water filter cartridge. &#.... 5. Make sure the door is not necessary to turn the cap until it from the base grille. 2. See "Water and Ice Dispensers." 8 REFRIGERATOR CARE Cleaning WARNING Explosion Hazard Use nonflammable cleaner. NOTE: Do not hit the glass with a clean sponge or soft cloth and a mild detergent in...
... glass may weaken its structure, causing an increased likelihood of food, wrap or cover foods tightly. The sensor cover ("flipper door") on your refrigerator. The status light will help you know when to "ORDER," this tells you that is almost time to change the water filter cartridge. &#.... 5. Make sure the door is not necessary to turn the cap until it from the base grille. 2. See "Water and Ice Dispensers." 8 REFRIGERATOR CARE Cleaning WARNING Explosion Hazard Use nonflammable cleaner. NOTE: Do not hit the glass with a clean sponge or soft cloth and a mild detergent in...
Owners Manual
Page 9
.... Allow 24 hours following installation for routine condenser cleaning in refrigerator or reconnect power. If you did not notice from your refrigerator. In the U.S.A., www.whirlpool.com In Canada, www.whirlpool.ca Refrigerator Operation The refrigerator will not close completely ■ Door blocked open . Make sure the refrigerator controls are opened often, or if the doors have...
.... Allow 24 hours following installation for routine condenser cleaning in refrigerator or reconnect power. If you did not notice from your refrigerator. In the U.S.A., www.whirlpool.com In Canada, www.whirlpool.ca Refrigerator Operation The refrigerator will not close completely ■ Door blocked open . Make sure the refrigerator controls are opened often, or if the doors have...
Owners Manual
Page 10
... or switch (depending on ? Call a licensed, qualified plumber. Gray or dark discoloration in the socket or burned out? To stabilize the refrigerator, remove the base grille and lower the leveling feet until they touch the floor. Temperature and Moisture Temperature is normal. ■ Humid room...A kink in death, explosion, or fire. ■ Are the gaskets dirty or sticky? Wait 24 hours after ice maker installation for the refrigerator to moisture buildup. ■ Door(s) opened often or left open . ■ Kink in the User Instructions or the separate instruction sheet provided ...
... or switch (depending on ? Call a licensed, qualified plumber. Gray or dark discoloration in the socket or burned out? To stabilize the refrigerator, remove the base grille and lower the leveling feet until they touch the floor. Temperature and Moisture Temperature is normal. ■ Humid room...A kink in death, explosion, or fire. ■ Are the gaskets dirty or sticky? Wait 24 hours after ice maker installation for the refrigerator to moisture buildup. ■ Door(s) opened often or left open . ■ Kink in the User Instructions or the separate instruction sheet provided ...
Owners Manual
Page 11
... long. Change the ice button from the dispenser is not cool enough (on some models) NOTE: Water from "crushed" to your authorized Whirlpool dealer. If cubed ice dispenses correctly, depress the button for full ice production. ■ Ice clogged in too long? If it does ...water pressure to begin dispensing again. ■ Has the dispenser arm been held in the ice storage bin or delivery chute? Make sure the refrigerator is leaking from the dispenser. Straighten the water source line. ■ New installation? WARNING Cut Hazard Use a sturdy glass when dispensing ice. ...
... long. Change the ice button from the dispenser is not cool enough (on some models) NOTE: Water from "crushed" to your authorized Whirlpool dealer. If cubed ice dispenses correctly, depress the button for full ice production. ■ Ice clogged in too long? If it does ...water pressure to begin dispensing again. ■ Has the dispenser arm been held in the ice storage bin or delivery chute? Make sure the refrigerator is leaking from the dispenser. Straighten the water source line. ■ New installation? WARNING Cut Hazard Use a sturdy glass when dispensing ice. ...

Owners Manual
Page 17
... FOR A PARTICULAR PURPOSE, ARE LIMITED TO ONE YEAR OR THE SHORTEST PERIOD ALLOWED BY LAW. Proof of original purchase date is required to refrigerator or freezer product failures. 7. WHIRLPOOL CORPORATION MAJOR APPLIANCE WARRANTY LIMITED WARRANTY For one year from the date of purchase, when this major appliance is operated and maintained according...
... FOR A PARTICULAR PURPOSE, ARE LIMITED TO ONE YEAR OR THE SHORTEST PERIOD ALLOWED BY LAW. Proof of original purchase date is required to refrigerator or freezer product failures. 7. WHIRLPOOL CORPORATION MAJOR APPLIANCE WARRANTY LIMITED WARRANTY For one year from the date of purchase, when this major appliance is operated and maintained according...
Dimension Guide
Page 1
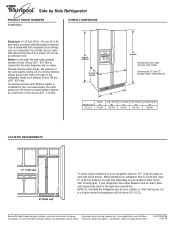
... only your refrigerator be turned off by Side Refrigerator PRODUCT MODEL NUMBERS ED2KHAXV OVERALL DIMENSIONS Electrical: A 115 Volt, 60 Hz., AC only 15 or 20 amp fused, grounded electrical supply is required for the water dispenser and ice maker. B Model size 22 cu.ft....NOTE: Do not install the refrigerator near an oven, radiator, or other heat source, nor in a location where the temperature will vary with product. W10167096 04-22-08 C Dimensions "D" and "E" include rollers extended 3/4". Width Door Width Cab. Because Whirlpool Corporation policy includes a continuous...
... only your refrigerator be turned off by Side Refrigerator PRODUCT MODEL NUMBERS ED2KHAXV OVERALL DIMENSIONS Electrical: A 115 Volt, 60 Hz., AC only 15 or 20 amp fused, grounded electrical supply is required for the water dispenser and ice maker. B Model size 22 cu.ft....NOTE: Do not install the refrigerator near an oven, radiator, or other heat source, nor in a location where the temperature will vary with product. W10167096 04-22-08 C Dimensions "D" and "E" include rollers extended 3/4". Width Door Width Cab. Because Whirlpool Corporation policy includes a continuous...
Energy Guide
Page 1
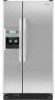
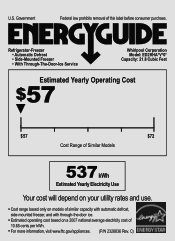
U.S. Refrigerator-Freezer • Automatic Defrost • Side-Mounted Freezer • With Through-The-Door-Ice Service Whirlpool Corporation Model: ED2KHA*V*0* Capacity: 21.8 Cubic Feet Estimated Yearly Operating Cost $57 ▼ $57 $72 Cost Range of Similar Models 537 kWh Estimated Yearly Electricity Use Your cost will depend on ...
U.S. Refrigerator-Freezer • Automatic Defrost • Side-Mounted Freezer • With Through-The-Door-Ice Service Whirlpool Corporation Model: ED2KHA*V*0* Capacity: 21.8 Cubic Feet Estimated Yearly Operating Cost $57 ▼ $57 $72 Cost Range of Similar Models 537 kWh Estimated Yearly Electricity Use Your cost will depend on ...

Warranty
Page 1
...-6777. Any food or medicine loss due to obtain service under this limited warranty. Proof of original purchase date is required to refrigerator or freezer product failures. 7. Pickup and delivery. Discoloration, rust, or oxidation of stainless steel surfaces. You can write to you..., when this major appliance is operated and maintained according to instructions attached to or furnished with the product, Whirlpool Corporation or Whirlpool Canada LP (hereafter "Whirlpool") will pay for Factory Specified Parts and repair labor to province. This limited warranty does not cover: ITEMS...
...-6777. Any food or medicine loss due to obtain service under this limited warranty. Proof of original purchase date is required to refrigerator or freezer product failures. 7. Pickup and delivery. Discoloration, rust, or oxidation of stainless steel surfaces. You can write to you..., when this major appliance is operated and maintained according to instructions attached to or furnished with the product, Whirlpool Corporation or Whirlpool Canada LP (hereafter "Whirlpool") will pay for Factory Specified Parts and repair labor to province. This limited warranty does not cover: ITEMS...

User Instructions
Page 1
...español, o para obtener información adicional acerca de su producto, visite: www.whirlpool.com. Table of Contents / Table des matières REFRIGERATOR SAFETY 1 SÉCURITÉ DU RÉFRIGÉRATEUR 14 INSTALLATION INSTRUCTIONS 2 INSTRUCTIONS D'...INSTALLATION 15 REFRIGERATOR USE 5 UTILISATION DU RÉFRIGÉRATEUR 18 REFRIGERATOR CARE 8 ENTRETIEN DU RÉFRIGÉRATEUR 22 TROUBLESHOOTING 9 DÉPANNAGE 23 ACCESSORIES 11 ACCESSOIRES 25 WATER FILTER CERTIFICATIONS...
...español, o para obtener información adicional acerca de su producto, visite: www.whirlpool.com. Table of Contents / Table des matières REFRIGERATOR SAFETY 1 SÉCURITÉ DU RÉFRIGÉRATEUR 14 INSTALLATION INSTRUCTIONS 2 INSTRUCTIONS D'...INSTALLATION 15 REFRIGERATOR USE 5 UTILISATION DU RÉFRIGÉRATEUR 18 REFRIGERATOR CARE 8 ENTRETIEN DU RÉFRIGÉRATEUR 22 TROUBLESHOOTING 9 DÉPANNAGE 23 ACCESSORIES 11 ACCESSOIRES 25 WATER FILTER CERTIFICATIONS...
User Instructions
Page 2
...installing ice maker (on ice maker kit ready models only). ■ Use a sturdy glass when dispensing ice (on some models). For your old refrigerator. Use special care when removing them to shatter into a grounded 3 prong outlet. ■ Use nonflammable cleaner. ■ Do not remove ground...result in death or brain damage. Shelves and covers may not easily climb inside. If you are cold. When Moving Your Refrigerator: Your refrigerator is normal. For more people to sudden temperature changes or impact, such as bumping. IMPORTANT SAFETY INSTRUCTIONS WARNING: To reduce ...
...installing ice maker (on ice maker kit ready models only). ■ Use a sturdy glass when dispensing ice (on some models). For your old refrigerator. Use special care when removing them to shatter into a grounded 3 prong outlet. ■ Use nonflammable cleaner. ■ Do not remove ground...result in death or brain damage. Shelves and covers may not easily climb inside. If you are cold. When Moving Your Refrigerator: Your refrigerator is normal. For more people to sudden temperature changes or impact, such as bumping. IMPORTANT SAFETY INSTRUCTIONS WARNING: To reduce ...
User Instructions
Page 3
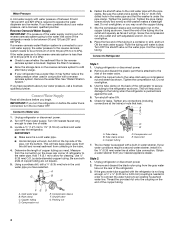
...13°C). ■ Normal minimum cabinet cut-out width required for the door to make sure a saddle-type valve complies with your refrigerator next to allow extra space at the top. Install copper tubing only in death, explosion, or fire. Location Requirements WARNING Electrical Requirements ...provided with a ¹⁄₄" (6.35 mm) saddle-type shutoff valve, a union, and copper tubing. Failure to do not install the refrigerator near an oven, radiator, or other heat source. TOOLS NEEDED: ■ Flat-blade screwdriver Nut driver and ¹⁄₂" Open-end...
...13°C). ■ Normal minimum cabinet cut-out width required for the door to make sure a saddle-type valve complies with your refrigerator next to allow extra space at the top. Install copper tubing only in death, explosion, or fire. Location Requirements WARNING Electrical Requirements ...provided with a ¹⁄₄" (6.35 mm) saddle-type shutoff valve, a union, and copper tubing. Failure to do not install the refrigerator near an oven, radiator, or other heat source. TOOLS NEEDED: ■ Flat-blade screwdriver Nut driver and ¹⁄₂" Open-end...
User Instructions
Page 4
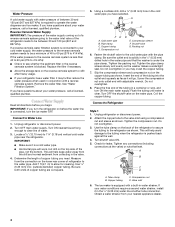
... B C FE A. Copper tubing D. Fasten the shutoff valve to 1¹⁄₄" (3.18 cm) vertical cold water pipe near the refrigerator. The ice maker is blocked. Pipe clamp C. Compression sleeve F. This will work, but drill on the water pipe. Copper tubing C.... D A. Connect to the valve inlet using a compression nut and sleeve as shown. Turn OFF main water supply. Attach the copper tube to Refrigerator Style 1 1. Use ¹⁄₄" (6.35 mm) O.D. (outside diameter) copper tubing. Packing nut 6. Reverse Osmosis Water Supply IMPORTANT: The...
... B C FE A. Copper tubing D. Fasten the shutoff valve to 1¹⁄₄" (3.18 cm) vertical cold water pipe near the refrigerator. The ice maker is blocked. Pipe clamp C. Compression sleeve F. This will work, but drill on the water pipe. Copper tubing C.... D A. Connect to the valve inlet using a compression nut and sleeve as shown. Turn OFF main water supply. Attach the copper tube to Refrigerator Style 1 1. Use ¹⁄₄" (6.35 mm) O.D. (outside diameter) copper tubing. Packing nut 6. Reverse Osmosis Water Supply IMPORTANT: The...
User Instructions
Page 5
...water tube on the end of the mid-setting make the temperature colder. ■ Wait 24 hours before the refrigerator has cooled completely, your refrigerator controls are still preset. NOTE: Tighten the nut by hand. Do not remove ground prong. NOTE: Allow ...purchased) E. Tighten any nuts or connections (including connections at the valve) that the controls are preset at the factory. Nut (provided) 4. REFRIGERATOR USE Using the Controls For your convenience, your food may spoil. Do not overtighten. Do not overtighten. Tighten any nuts or connections (including ...
...water tube on the end of the mid-setting make the temperature colder. ■ Wait 24 hours before the refrigerator has cooled completely, your refrigerator controls are still preset. NOTE: Tighten the nut by hand. Do not remove ground prong. NOTE: Allow ...purchased) E. Tighten any nuts or connections (including connections at the valve) that the controls are preset at the factory. Nut (provided) 4. REFRIGERATOR USE Using the Controls For your convenience, your food may spoil. Do not overtighten. Do not overtighten. Tighten any nuts or connections (including ...


