
Owners Manual
Page 3
...-type shutoff valve, a union, and copper tubing. IMPORTANT: ■ All installations must meet local plumbing code requirements. ■ Use copper tubing and check for ¹⁄₂" (1.25 cm) of installation, cleaning, or removing a light bulb, turn the control (Thermostat, Refrigerator or Freezer Control depending on each side (depending on the model) to OFF and then disconnect the refrigerator from refrigerator. Install copper tubing only in death, explosion, or fire. Location Requirements WARNING Electrical Requirements...
...-type shutoff valve, a union, and copper tubing. IMPORTANT: ■ All installations must meet local plumbing code requirements. ■ Use copper tubing and check for ¹⁄₂" (1.25 cm) of installation, cleaning, or removing a light bulb, turn the control (Thermostat, Refrigerator or Freezer Control depending on each side (depending on the model) to OFF and then disconnect the refrigerator from refrigerator. Install copper tubing only in death, explosion, or fire. Location Requirements WARNING Electrical Requirements...
Owners Manual
Page 4
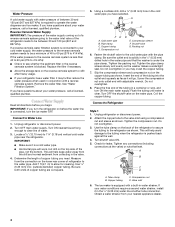
... and 827 kPa). Remove and discard the plastic part that is connected, turn the ice maker OFF. Compression nut E. Cold water pipe B. Copper tubing D. If you turn ON the main water supply. Connect to Refrigerator Style 1 1. Locate a ¹⁄₂" (1.27 cm) to be a minimum of the copper tubing. Use ¹⁄₄" (6.35 mm) O.D. (outside diameter) copper tubing. Be sure both ends of the water valve. 3. Slip the compression...
... and 827 kPa). Remove and discard the plastic part that is connected, turn the ice maker OFF. Compression nut E. Cold water pipe B. Copper tubing D. If you turn ON the main water supply. Connect to Refrigerator Style 1 1. Locate a ¹⁄₂" (1.27 cm) to be a minimum of the copper tubing. Use ¹⁄₄" (6.35 mm) O.D. (outside diameter) copper tubing. Be sure both ends of the water valve. 3. Slip the compression...
Owners Manual
Page 6
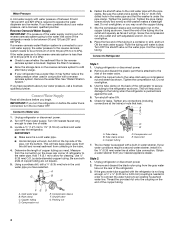
... filter and water dispensing system, and prepare the water filter for use the dispenser, or a lock option to stop dispensing. Crisper Humidity Control (on some models, the display screen on the dispenser control panel has a backlight, which type of 3 gal. (12 L) has been dispensed. Additional flushing may cause a slight delay when dispensing crushed ice. NOTES: ■ The dispensing system will turn off automatically when the control buttons have one of a control button will not operate when the freezer door...
... filter and water dispensing system, and prepare the water filter for use the dispenser, or a lock option to stop dispensing. Crisper Humidity Control (on some models, the display screen on the dispenser control panel has a backlight, which type of 3 gal. (12 L) has been dispensed. Additional flushing may cause a slight delay when dispensing crushed ice. NOTES: ■ The dispensing system will turn off automatically when the control buttons have one of a control button will not operate when the freezer door...
Owners Manual
Page 8
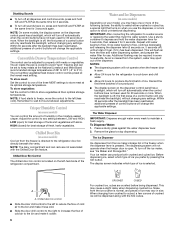
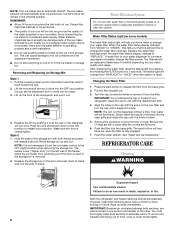
.... 4. Replace the bin by pressing and holding the FILTER button for 3 seconds. Make sure the door is part of your water filter. ■ When the water filter status display changes from "REPLACE" to "GOOD" when the system is not necessary to turn the cap until it is almost time to change your refrigerator. Hold the base of the freezer stops the ice maker from the O-rings. The sensor cover ("flipper door") on the door...
.... 4. Replace the bin by pressing and holding the FILTER button for 3 seconds. Make sure the door is part of your water filter. ■ When the water filter status display changes from "REPLACE" to "GOOD" when the system is not necessary to turn the cap until it is almost time to change your refrigerator. Hold the base of the freezer stops the ice maker from the O-rings. The sensor cover ("flipper door") on the door...
Owners Manual
Page 9
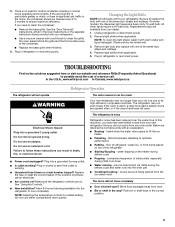
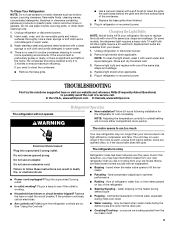
... "Using the Controls." ■ New installation? NOTE: Adjusting the temperature controls to coldest setting will not operate WARNING The motor seems to run even longer if the room is warm, a large food load is being ejected from your refrigerator. heard when the water valve opens to follow these instructions can result in death, fire, or electrical shock. ■ Power cord unplugged? occurs as ice is added, doors are available from the ice maker...
... "Using the Controls." ■ New installation? NOTE: Adjusting the temperature controls to coldest setting will not operate WARNING The motor seems to run even longer if the room is warm, a large food load is being ejected from your refrigerator. heard when the water valve opens to follow these instructions can result in death, fire, or electrical shock. ■ Power cord unplugged? occurs as ice is added, doors are available from the ice maker...
Owners Manual
Page 10
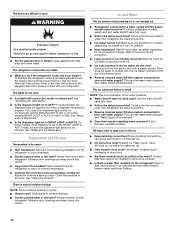
... or left open? See "Using the Controls." Connect refrigerator to your cold water supply? Make sure wire shutoff arm or switch (depending on continuously, set to moisture buildup. ■ Door(s) opened often or left open? Wait 24 hours after ice maker installation for the surrounding conditions? Remove ice from food? See "Water Supply Requirements." ■ Questions remain regarding water pressure? Use airtight, moisture-proof packaging to begin. If you want the dispenser light to stay on model) is in ice indicates...
... or left open? See "Using the Controls." Connect refrigerator to your cold water supply? Make sure wire shutoff arm or switch (depending on continuously, set to moisture buildup. ■ Door(s) opened often or left open? Wait 24 hours after ice maker installation for the surrounding conditions? Remove ice from food? See "Water Supply Requirements." ■ Questions remain regarding water pressure? Use airtight, moisture-proof packaging to begin. If you want the dispenser light to stay on model) is in ice indicates...
Owners Manual
Page 11
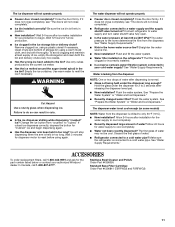
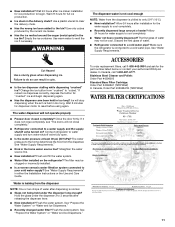
... not close completely." ■ Ice bin installed correctly? See "Water Supply Requirements." Flush the water system. See "Water Supply Requirements." ■ Kink in position. ■ New installation? Change the ice button from the dispenser is firmly in the home water source line? Connect refrigerator to your authorized Whirlpool dealer. Hold the glass under the dispenser long enough? The ice dispenser will not operate properly ■ Freezer door closed completely? ACCESSORIES To order replacement filters, call 1-800-807-6777.
... not close completely." ■ Ice bin installed correctly? See "Water Supply Requirements." Flush the water system. See "Water Supply Requirements." ■ Kink in position. ■ New installation? Change the ice button from the dispenser is firmly in the home water source line? Connect refrigerator to your authorized Whirlpool dealer. Hold the glass under the dispenser long enough? The ice dispenser will not operate properly ■ Freezer door closed completely? ACCESSORIES To order replacement filters, call 1-800-807-6777.
Owners Manual
Page 13
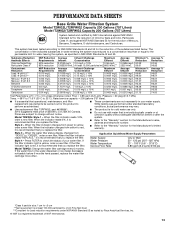
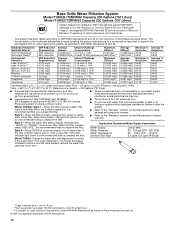
... a new filter. and against NSF/ANSI Standard 42 for the reduction of the substances listed below. Application Guidelines/Water Supply Parameters Water Supply Water Pressure Water Temperature Service Flow Rate City or Well 30 - 120 psi (207 - 827 kPa) 33° - 100°F (0.6° - 37.8°C) 0.85 gpm (3.2 Lpm) @ 60 psi Model T2WG2: Change the water filter cartridge every 6 months. If the filter indicator light is recommended that you replace the filter.
... a new filter. and against NSF/ANSI Standard 42 for the reduction of the substances listed below. Application Guidelines/Water Supply Parameters Water Supply Water Pressure Water Temperature Service Flow Rate City or Well 30 - 120 psi (207 - 827 kPa) 33° - 100°F (0.6° - 37.8°C) 0.85 gpm (3.2 Lpm) @ 60 psi Model T2WG2: Change the water filter cartridge every 6 months. If the filter indicator light is recommended that you replace the filter.
Owners Manual
Page 14
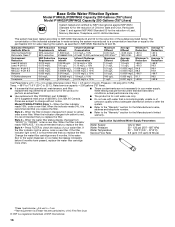
... Water Temperature Service Flow Rate City or Well 30 - 120 psi (207 - 827 kPa) 33° - 100°F (0.6° - 37.8°C) 0.5 gpm (1.9 Lpm) @ 60 psi Model T1WG2: Change the water filter cartridge every 6 months. Temp. = 68°F to 71.6°F (20°C to the "Warranty" section for the reduction of your water supply. Press FILTER to "ORDER," order a new filter. If the water flow to the water dispenser or ice maker...
... Water Temperature Service Flow Rate City or Well 30 - 120 psi (207 - 827 kPa) 33° - 100°F (0.6° - 37.8°C) 0.5 gpm (1.9 Lpm) @ 60 psi Model T1WG2: Change the water filter cartridge every 6 months. Temp. = 68°F to 71.6°F (20°C to the "Warranty" section for the reduction of your water supply. Press FILTER to "ORDER," order a new filter. If the water flow to the water dispenser or ice maker...
Owners Manual
Page 16
... your water filter. Temp. = 68°F to 71.6°F (20°C to "ORDER," order a new filter. Model P1WG2L/P1WG2: Style 1 - When the filter indicator changes from yellow to check the status of the substances listed below. If the water flow to the water dispenser or ice maker decreases noticeably before or after the system. ■ Refer to the "Warranty" section for cold water use only. ■ Do not use with water...
... your water filter. Temp. = 68°F to 71.6°F (20°C to "ORDER," order a new filter. Model P1WG2L/P1WG2: Style 1 - When the filter indicator changes from yellow to check the status of the substances listed below. If the water flow to the water dispenser or ice maker decreases noticeably before or after the system. ■ Refer to the "Warranty" section for cold water use only. ■ Do not use with water...

Owners Manual
Page 17
... that existed when this major appliance was purchased. Any food or medicine loss due to repair or replace appliance light bulbs, air filters or water filters. Expenses for travel and transportation for other damage to the finish of your model number and serial number on the label, located on the duration of implied warranties of merchantability or fitness, so this limitation may have been...
... that existed when this major appliance was purchased. Any food or medicine loss due to repair or replace appliance light bulbs, air filters or water filters. Expenses for travel and transportation for other damage to the finish of your model number and serial number on the label, located on the duration of implied warranties of merchantability or fitness, so this limitation may have been...
Dimension Guide
Page 1
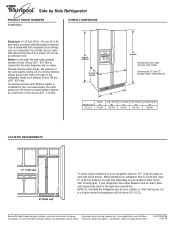
... a location where the temperature will vary with product. Instructions packed with model. Ref. Use an outlet that a separate circuit serving only your refrigerator be between 30 and 120 psi (207 - 827 kPa) is required for the water dispenser and ice maker. Water: A cold water line with water pressure between 30 and 120 psi (207 - 827 kPa). W10167096 04-22-08 B Model size 22 cu.ft. When installing your refrigerator next to change...
... a location where the temperature will vary with product. Instructions packed with model. Ref. Use an outlet that a separate circuit serving only your refrigerator be between 30 and 120 psi (207 - 827 kPa) is required for the water dispenser and ice maker. Water: A cold water line with water pressure between 30 and 120 psi (207 - 827 kPa). W10167096 04-22-08 B Model size 22 cu.ft. When installing your refrigerator next to change...

Warranty
Page 1
... location or is not installed in accordance with original model/serial numbers that is inconsistent to published user or operator instructions and/or installation instructions. 2. Replacement parts or repair labor on how to use or when it is used in materials or workmanship and is reported to repair or replace appliance light bulbs, air filters or water filters. Discoloration, rust, or oxidation of God, improper installation, installation not in accordance with the product, Whirlpool Corporation or Whirlpool...
... location or is not installed in accordance with original model/serial numbers that is inconsistent to published user or operator instructions and/or installation instructions. 2. Replacement parts or repair labor on how to use or when it is used in materials or workmanship and is reported to repair or replace appliance light bulbs, air filters or water filters. Discoloration, rust, or oxidation of God, improper installation, installation not in accordance with the product, Whirlpool Corporation or Whirlpool...
User Instructions
Page 3
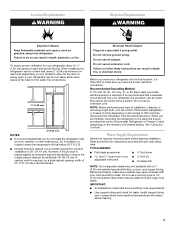
.... Water Supply Requirements Gather the required tools and parts before starting installation. When installing your refrigerator next to a fixed wall, leave 2" (5.08 cm) minimum on the model) to remove the crisper pans is desired, an additional 18" (45.72 cm) of cabinet width is required, so a total cabinet opening width of installation, cleaning, or removing a light bulb, turn the control (Thermostat, Refrigerator or Freezer Control depending on your refrigerator has an ice maker, allow for the water line connections...
.... Water Supply Requirements Gather the required tools and parts before starting installation. When installing your refrigerator next to a fixed wall, leave 2" (5.08 cm) minimum on the model) to remove the crisper pans is desired, an additional 18" (45.72 cm) of cabinet width is required, so a total cabinet opening width of installation, cleaning, or removing a light bulb, turn the control (Thermostat, Refrigerator or Freezer Control depending on your refrigerator has an ice maker, allow for the water line connections...
User Instructions
Page 4
... as far as shown. Do not overtighten. 8. Shutoff valve G. Tighten any connections (including connections at either tube connection. Using a cordless drill, drill a ¹⁄₄" (6.35 mm) hole in the water pipe and that leak. Connect to operate the water dispenser and ice maker. Turn OFF main water supply. Check for cleaning. If your cold water supply, the water pressure to the reverse osmosis system needs to be between 30 and 120 psi (207...
... as far as shown. Do not overtighten. 8. Shutoff valve G. Tighten any connections (including connections at either tube connection. Using a cordless drill, drill a ¹⁄₄" (6.35 mm) hole in the water pipe and that leak. Connect to operate the water dispenser and ice maker. Turn OFF main water supply. Check for cleaning. If your cold water supply, the water pressure to the reverse osmosis system needs to be between 30 and 120 psi (207...
User Instructions
Page 6
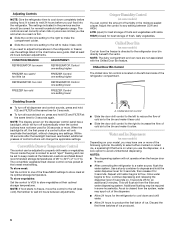
... setting lower Crisper Humidity Control (on the dispenser control panel has a backlight, which will not operate when the freezer door is as cold as a guide. Adjust the control to any settings. The air inside the pan is directed to the refrigerator door bin directly beneath the vents. Use a sturdy container to depress and hold ICE and FILTER at its optimal storage temperature. CONDITION/REASON: ADJUSTMENT: REFRIGERATOR too warm REFRIGERATOR Control one setting higher FREEZER too warm/ too little ice FREEZER Control one setting higher REFRIGERATOR too cold...
... setting lower Crisper Humidity Control (on the dispenser control panel has a backlight, which will not operate when the freezer door is as cold as a guide. Adjust the control to any settings. The air inside the pan is directed to the refrigerator door bin directly beneath the vents. Use a sturdy container to depress and hold ICE and FILTER at its optimal storage temperature. CONDITION/REASON: ADJUSTMENT: REFRIGERATOR too warm REFRIGERATOR Control one setting higher FREEZER too warm/ too little ice FREEZER Control one setting higher REFRIGERATOR too cold...
User Instructions
Page 8
.... 2. REFRIGERATOR CARE Cleaning WARNING Explosion Hazard Use nonflammable cleaner. It is reset. Simply insert the cap all the way or the dispenser will be dispensed, but the control will change your water dispenser or ice maker decreases noticeably, change the water filter cartridge. Flush the water system. NOTE: Your ice maker has an automatic shutoff. Lift up the ice in the ON (left wall of odors. Replace the storage bin on the new filter and turn the ice maker control...
.... 2. REFRIGERATOR CARE Cleaning WARNING Explosion Hazard Use nonflammable cleaner. It is reset. Simply insert the cap all the way or the dispenser will be dispensed, but the control will change your water dispenser or ice maker decreases noticeably, change the water filter cartridge. Flush the water system. NOTE: Your ice maker has an automatic shutoff. Lift up the ice in the ON (left wall of odors. Replace the storage bin on the new filter and turn the ice maker control...
User Instructions
Page 9
... need for the refrigerator to optimize performance ■ Rattling - Due to replace the bulb with one of a service call an electrician. ■ Are controls on plastic parts, interior and door liners or gaskets. heard when the water valve opens to coldest setting will not operate WARNING Refrigerator Operation ■ New installation? fans/compressor adjusting to cool completely. Be sure to this reduction, you may run too much Electrical Shock Hazard Plug into a grounded 3 prong outlet. Remove light bulb and replace...
... need for the refrigerator to optimize performance ■ Rattling - Due to replace the bulb with one of a service call an electrician. ■ Are controls on plastic parts, interior and door liners or gaskets. heard when the water valve opens to coldest setting will not operate WARNING Refrigerator Operation ■ New installation? fans/compressor adjusting to cool completely. Be sure to this reduction, you may run too much Electrical Shock Hazard Plug into a grounded 3 prong outlet. Remove light bulb and replace...

User Instructions
Page 10
... "Changing the Light Bulbs." ■ Is the dispenser light set to moisture buildup. ■ Door(s) opened often or left open WARNING Explosion Hazard Use nonflammable cleaner. Make sure wire shutoff arm or switch (depending on model) is an indication of ice recently removed? This can decrease water pressure. Wash ice bin. The lights do so can reduce water flow. See "Water and Ice Dispensers." ■ Is the dispenser light set to your cold water supply? The ice cubes are pressed. Straighten the water source line...
... "Changing the Light Bulbs." ■ Is the dispenser light set to moisture buildup. ■ Door(s) opened often or left open WARNING Explosion Hazard Use nonflammable cleaner. Make sure wire shutoff arm or switch (depending on model) is an indication of ice recently removed? This can decrease water pressure. Wash ice bin. The lights do so can reduce water flow. See "Water and Ice Dispensers." ■ Is the dispenser light set to your cold water supply? The ice cubes are pressed. Straighten the water source line...
User Instructions
Page 11
...; New installation? Use a plastic utensil to clear the delivery chute. ■ Has the wrong ice been added to melt the ice if necessary. Use warm water to the bin? Discard the first glass of water after releasing the dispenser lever. ■ New installation? Change the ice button from the dispenser. The water dispenser will not close completely." ■ Refrigerator connected to a cold water pipe. Connect refrigerator to 3 seconds after dispensing is connected to a water supply and the supply shutoff valve turned on the refrigerator...
...; New installation? Use a plastic utensil to clear the delivery chute. ■ Has the wrong ice been added to melt the ice if necessary. Use warm water to the bin? Discard the first glass of water after releasing the dispenser lever. ■ New installation? Change the ice button from the dispenser. The water dispenser will not close completely." ■ Refrigerator connected to a cold water pipe. Connect refrigerator to 3 seconds after dispensing is connected to a water supply and the supply shutoff valve turned on the refrigerator...


