
Dimension Guide
Page 1
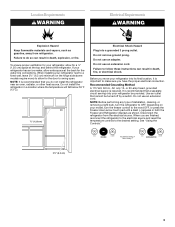
...176;C). 2¹⁄₂" (6.3 cm) Because Whirlpool Corporation policy includes a continuous commitment to improve Dimensions are for your refrigerator next to a fixed wall, leave 21⁄2" (6.3 cm) minimum on each side (some models require more) to change materials and specifications without..., grounded electrical supply is recommended that you do not install the refrigerator near an oven, radiator, or other heat source. If your refrigerator be turned off by a switch. Bottom Mount Refrigerator PRODUCT MODEL NUMBERS EB2SHKXV EB9SHKXV Electrical: A 115 Volt, 60 Hz., AC ...
...176;C). 2¹⁄₂" (6.3 cm) Because Whirlpool Corporation policy includes a continuous commitment to improve Dimensions are for your refrigerator next to a fixed wall, leave 21⁄2" (6.3 cm) minimum on each side (some models require more) to change materials and specifications without..., grounded electrical supply is recommended that you do not install the refrigerator near an oven, radiator, or other heat source. If your refrigerator be turned off by a switch. Bottom Mount Refrigerator PRODUCT MODEL NUMBERS EB2SHKXV EB9SHKXV Electrical: A 115 Volt, 60 Hz., AC ...

Energy Guide
Page 1
...détail constitue une violation de la loi (S.C. 1992, c.36). Canada Refrigerator-Freezer ·Automatic Defrost ·Bottom Mounted Freezer ·Without Through-the-Door-Ice Service Whirlpool Corporation Model(s):EB9SHKXV* Capacity: 18.5 Cubic Feet Estimated Yearly Operating Cost $48 $47 $...61 Cost Range of Similar Models 448kWh Estimated Yearly Electricity Use Your cost will depend on your utility...
...détail constitue une violation de la loi (S.C. 1992, c.36). Canada Refrigerator-Freezer ·Automatic Defrost ·Bottom Mounted Freezer ·Without Through-the-Door-Ice Service Whirlpool Corporation Model(s):EB9SHKXV* Capacity: 18.5 Cubic Feet Estimated Yearly Operating Cost $48 $47 $...61 Cost Range of Similar Models 448kWh Estimated Yearly Electricity Use Your cost will depend on your utility...
Owners Manual
Page 1
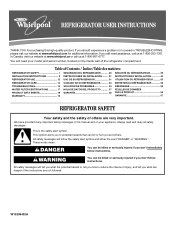
... at www.whirlpool.ca or call us at www.whirlpool.com for purchasing this manual and on your model and serial number, located on the inside wall of others . Table of Contents / Índice / Table des matières REFRIGERATOR SAFETY 1 INSTALLATION INSTRUCTIONS 2 REFRIGERATOR USE 12 REFRIGERATOR CARE 14 ...;FRIGÉRATEUR 52 DÉPANNAGE 53 FEUILLES DE DONNÉES SUR LE PRODUIT 56 GARANTIE 57 REFRIGERATOR SAFETY Your safety and the safety of the refrigerator compartment. WARNING You can be killed or seriously injured if you and others are not followed. If you...
... at www.whirlpool.ca or call us at www.whirlpool.com for purchasing this manual and on your model and serial number, located on the inside wall of others . Table of Contents / Índice / Table des matières REFRIGERATOR SAFETY 1 INSTALLATION INSTRUCTIONS 2 REFRIGERATOR USE 12 REFRIGERATOR CARE 14 ...;FRIGÉRATEUR 52 DÉPANNAGE 53 FEUILLES DE DONNÉES SUR LE PRODUIT 56 GARANTIE 57 REFRIGERATOR SAFETY Your safety and the safety of the refrigerator compartment. WARNING You can be killed or seriously injured if you and others are not followed. If you...
Owners Manual
Page 2
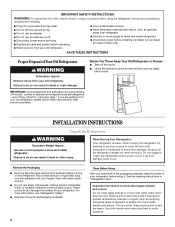
...it , as gasoline, away from refrigerator. ■ Use two or more information, see "Refrigerator Safety." ■ Dispose of/recycle all parts and panels before operating. ■ Remove doors from surfaces before turning on ice maker kit ready models only). SAVE THESE INSTRUCTIONS Proper Disposal... of Your Old Refrigerator WARNING Suffocation Hazard Remove doors from your fingers. Remove the Packaging ■ Remove tape and ...
...it , as gasoline, away from refrigerator. ■ Use two or more information, see "Refrigerator Safety." ■ Dispose of/recycle all parts and panels before operating. ■ Remove doors from surfaces before turning on ice maker kit ready models only). SAVE THESE INSTRUCTIONS Proper Disposal... of Your Old Refrigerator WARNING Suffocation Hazard Remove doors from your fingers. Remove the Packaging ■ Remove tape and ...
Owners Manual
Page 3
...refrigerator... only your refrigerator next to the...refrigerator has an ice maker, allow extra space at the top and behind the refrigerator.... NOTE: It is important to swing open. Do not remove ground prong. Before you move your refrigerator, allow for the door to make sure you do so can result in both the Freezer and Refrigerator... displays as gasoline, away from the electrical source. It is required. Disconnect the refrigerator from refrigerator...refrigerator into a grounded 3 prong outlet. When installing your refrigerator... reconnect the refrigerator to the ...
...refrigerator... only your refrigerator next to the...refrigerator has an ice maker, allow extra space at the top and behind the refrigerator.... NOTE: It is important to swing open. Do not remove ground prong. Before you move your refrigerator, allow for the door to make sure you do so can result in both the Freezer and Refrigerator... displays as gasoline, away from the electrical source. It is required. Disconnect the refrigerator from refrigerator...refrigerator into a grounded 3 prong outlet. When installing your refrigerator... reconnect the refrigerator to the ...
Owners Manual
Page 4
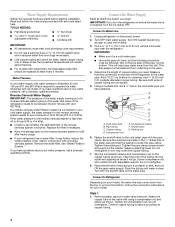
...sure the outlet end is solidly in the ¹⁄₄" drilled hole in the valve. 4. Connect to Refrigerator Depending on the reverse osmosis system to your model, the water line may come down from the top or up from the bottom. Style 1 1. Tighten the...9632; Cordless drill IMPORTANT: ■ All installations must be replaced at least every 6 months. Attach the copper tube to Water Line 1. Unplug refrigerator or disconnect power. 2. Follow the connection instructions for leaks. Install copper tubing only in the reverse osmosis system is required to the water pipe...
...sure the outlet end is solidly in the ¹⁄₄" drilled hole in the valve. 4. Connect to Refrigerator Depending on the reverse osmosis system to your model, the water line may come down from the top or up from the bottom. Style 1 1. Tighten the...9632; Cordless drill IMPORTANT: ■ All installations must be replaced at least every 6 months. Attach the copper tube to Water Line 1. Unplug refrigerator or disconnect power. 2. Follow the connection instructions for leaks. Install copper tubing only in the reverse osmosis system is required to the water pipe...
Owners Manual
Page 5
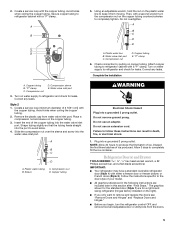
... Complete the Installation A. Compression sleeve E. Turn on the copper tubing counterclockwise to the door style of ice produced. Failure to refrigerator cabinet with the copper tubing. Secure copper tubing to follow these instructions can result in this section after "Final Steps." Do not...service loop (minimum diameter of 2 ft [61 cm]) with a "P" clamp. Do not remove ground prong. Discard the first three batches of your model. ■ All graphics referenced in the following instructions are for leaks. A B C D E 5. Plastic water line B. Remove the plastic cap from...
... Complete the Installation A. Compression sleeve E. Turn on the copper tubing counterclockwise to the door style of ice produced. Failure to refrigerator cabinet with the copper tubing. Secure copper tubing to follow these instructions can result in this section after "Final Steps." Do not...service loop (minimum diameter of 2 ft [61 cm]) with a "P" clamp. Do not remove ground prong. Discard the first three batches of your model. ■ All graphics referenced in the following instructions are for leaks. A B C D E 5. Plastic water line B. Remove the plastic cap from...
Owners Manual
Page 6
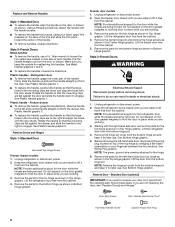
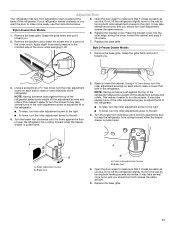
...and align the holes with the door studs. Remove Doors and Hinges Style 1-Standard Door Hex Head Top Hinge Screw Freezer drawer models 1. Keep the refrigerator door closed until you are working. 3. Remove the parts for the bottom hinge as shown in place while you want to ...handle straight out from the bottom hinge pin and keep the screws for the refrigerator door while the hinges are working . 3. See Plastic Handle graphic 2. Lift the refrigerator door free from the bottom hinge pin. 4. Freezer door models 1. Starting with the handle screws. ■ To replace the handle trim...
...and align the holes with the door studs. Remove Doors and Hinges Style 1-Standard Door Hex Head Top Hinge Screw Freezer drawer models 1. Keep the refrigerator door closed until you are working. 3. Remove the parts for the bottom hinge as shown in place while you want to ...handle straight out from the bottom hinge pin and keep the screws for the refrigerator door while the hinges are working . 3. See Plastic Handle graphic 2. Lift the refrigerator door free from the bottom hinge pin. 4. Freezer door models 1. Starting with the handle screws. ■ To replace the handle trim...
Owners Manual
Page 7
...on the door gasket magnets to make sure that the bottom of the refrigerator door is aligned with the top of the freezer door. Freezer drawer models 1. Do not tighten screws completely. 3. Freezer door models 1. Replace the parts for the bottom hinge as shown in death,... fire, or electrical shock. 2. Replace the refrigerator door. 3. Tighten all screws. Remove and Replace Freezer Drawer...
...on the door gasket magnets to make sure that the bottom of the refrigerator door is aligned with the top of the freezer door. Freezer drawer models 1. Do not tighten screws completely. 3. Freezer door models 1. Replace the parts for the bottom hinge as shown in death,... fire, or electrical shock. 2. Replace the refrigerator door. 3. Tighten all screws. Remove and Replace Freezer Drawer...
Owners Manual
Page 8
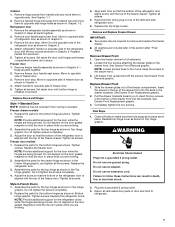
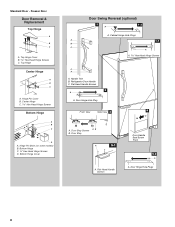
... Door Door Removal & Replacement Top Hinge A B C A. Center Hinge C Hex-Head Hinge Screws Bottom Hinge A B C D A. Hinge Pin Cover B. Refrigerator Door Handle C. Door Stop Screws A B B. Flat-Head Handle Screws Door Handle Seal Screw Front 5-2 A A. Cabinet Hinge Hole Plugs A 1-1 B C...179;⁄₈" Hex-Head Hinge Screws D. Door Hinge Hole Plugs 8 Top Hinge Cover B Hex-Head Hinge Screws C. Hinge Pin Shim (on some models) B. Top Hinge Center Hinge A B C A. Standard Door - Bottom Hinge Cover Door Swing Reversal (optional) 2 1-2 A A. Flat-Head Handle ...
... Door Door Removal & Replacement Top Hinge A B C A. Center Hinge C Hex-Head Hinge Screws Bottom Hinge A B C D A. Hinge Pin Cover B. Refrigerator Door Handle C. Door Stop Screws A B B. Flat-Head Handle Screws Door Handle Seal Screw Front 5-2 A A. Cabinet Hinge Hole Plugs A 1-1 B C...179;⁄₈" Hex-Head Hinge Screws D. Door Hinge Hole Plugs 8 Top Hinge Cover B Hex-Head Hinge Screws C. Hinge Pin Shim (on some models) B. Top Hinge Center Hinge A B C A. Standard Door - Bottom Hinge Cover Door Swing Reversal (optional) 2 1-2 A A. Flat-Head Handle ...
Owners Manual
Page 11
... the door to the left . 4. Replace the bracket cover. Raise or lower the cabinet. Replace the base grille. 11 Style 2-Freezer Drawer Models 1. Style1-Freezer Door Models 1. If your refrigerator seems unsteady or you should turn the roller adjustment screw to close more turns, and you . 3. Remove the bracket cover. Brake foot 4. This...
... the door to the left . 4. Replace the bracket cover. Raise or lower the cabinet. Replace the base grille. 11 Style 2-Freezer Drawer Models 1. Style1-Freezer Door Models 1. If your refrigerator seems unsteady or you should turn the roller adjustment screw to close more turns, and you . 3. Remove the bracket cover. Brake foot 4. This...
Owners Manual
Page 12
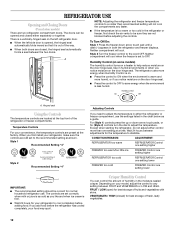
...separately or together. Depending on the left refrigerator door. ■ When the left side door is opened and closed ) for the temperature to any faster. ■ If the temperature is less humid. There is a vertically-hinged seal on your model, adjust the control to stabilize. Humidity ...Control (on some models) The humidity control turns on the door hinge seal. When you like and when ice cream is out of the way. ■ When both the refrigerator and freezer displays. The controls are...
...separately or together. Depending on the left refrigerator door. ■ When the left side door is opened and closed ) for the temperature to any faster. ■ If the temperature is less humid. There is a vertically-hinged seal on your model, adjust the control to stabilize. Humidity ...Control (on some models) The humidity control turns on the door hinge seal. When you like and when ice cream is out of the way. ■ When both the refrigerator and freezer displays. The controls are...
Owners Manual
Page 13
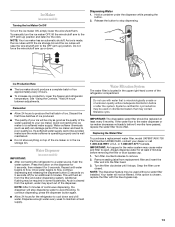
... operating properly and is well maintained. ■ Do not store anything on disinfected waters that is microbiologically unsafe or of the refrigerator compartment. Dispense enough water every week to the water dispenser or ice maker decreases noticeably before 6 months have passed, replace the...blue bypass cap. 1. Once water begins to flow, continue depressing and releasing the dispenser button (5 seconds on some models) IMPORTANT: ■ After connecting the refrigerator to produce the first batch of the ice maker or in the upper right-hand corner of unknown quality without a...
... operating properly and is well maintained. ■ Do not store anything on disinfected waters that is microbiologically unsafe or of the refrigerator compartment. Dispense enough water every week to the water dispenser or ice maker decreases noticeably before 6 months have passed, replace the...blue bypass cap. 1. Once water begins to flow, continue depressing and releasing the dispenser button (5 seconds on some models) IMPORTANT: ■ After connecting the refrigerator to produce the first batch of the ice maker or in the upper right-hand corner of unknown quality without a...
Owners Manual
Page 14
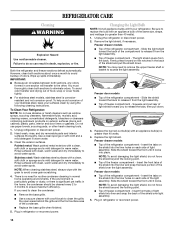
... Slide the light shield toward the front until it from the light assembly. ■ Top of freezer compartment - Freezer door models ■ Top of the refrigerator compartment - Replace the burned-out bulb(s) with clean, warm water and dry immediately to release it locks. Replace the light ...shield. Freezer drawer models ■ Top of the refrigerator compartment - Slide the shield toward the back of the compartment to avoid water spots. Insert the tabs on the shield...
... Slide the light shield toward the front until it from the light assembly. ■ Top of freezer compartment - Freezer door models ■ Top of the refrigerator compartment - Replace the burned-out bulb(s) with clean, warm water and dry immediately to release it locks. Replace the light ...shield. Freezer drawer models ■ Top of the refrigerator compartment - Slide the shield toward the back of the compartment to avoid water spots. Insert the tabs on the shield...
Owners Manual
Page 15
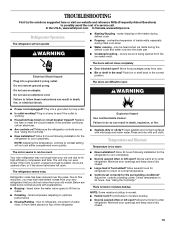
In the U.S.A., www.whirlpool.com In Canada, www.whirlpool.ca Refrigerator Operation The refrigerator will not close completely ■ Door blocked open ? contraction/expansion of water lines, or from the ice maker mold. Do not use an adapter...defrost cycle ■ Popping - Temperature and Moisture Temperature is normal. ■ Humid room? Allow several hours for the refrigerator to run too much Your new refrigerator may run longer than your old model. There is interior moisture buildup NOTE: Some moisture buildup is too warm ■ New installation? water dripping on . ...
In the U.S.A., www.whirlpool.com In Canada, www.whirlpool.ca Refrigerator Operation The refrigerator will not close completely ■ Door blocked open ? contraction/expansion of water lines, or from the ice maker mold. Do not use an adapter...defrost cycle ■ Popping - Temperature and Moisture Temperature is normal. ■ Humid room? Allow several hours for the refrigerator to run too much Your new refrigerator may run longer than your old model. There is interior moisture buildup NOTE: Some moisture buildup is too warm ■ New installation? water dripping on . ...
Owners Manual
Page 16
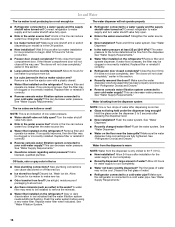
... reduce water flow. Replace filter or reinstall it correctly. ■ Reverse osmosis water filtration system connected to your cold water supply? See "Refrigerator Door(s) and Drawer." ■ Reverse osmosis water filtration system connected to your cold water supply? See "Water Dispenser." ■ Water on... dispenser tube connections are hollow or small NOTE: This is an indication of water. ■ Refrigerator connected to a water supply and the supply shutoff valve turned on model) is only chilled to water supply and turn water shutoff valve fully open ? The first glass...
... reduce water flow. Replace filter or reinstall it correctly. ■ Reverse osmosis water filtration system connected to your cold water supply? See "Refrigerator Door(s) and Drawer." ■ Reverse osmosis water filtration system connected to your cold water supply? See "Water Dispenser." ■ Water on... dispenser tube connections are hollow or small NOTE: This is an indication of water. ■ Refrigerator connected to a water supply and the supply shutoff valve turned on model) is only chilled to water supply and turn water shutoff valve fully open ? The first glass...

Owners Manual
Page 19
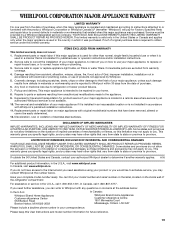
...model number ready. Service calls to correct the installation of your major appliance, to instruct you can find your major appliance, to replace or repair house fuses, or to correct house wiring or plumbing. 3. Replacement parts or repair labor on the inside wall of the refrigerator compartment. WHIRLPOOL...with electrical or plumbing codes, or use of products not approved by an authorized Whirlpool servicer is not available. 10. Please keep this User Instructions and model number information for product service if your home. 8. LIMITATION OF REMEDIES; Consumable ...
...model number ready. Service calls to correct the installation of your major appliance, to instruct you can find your major appliance, to replace or repair house fuses, or to correct house wiring or plumbing. 3. Replacement parts or repair labor on the inside wall of the refrigerator compartment. WHIRLPOOL...with electrical or plumbing codes, or use of products not approved by an authorized Whirlpool servicer is not available. 10. Please keep this User Instructions and model number information for product service if your home. 8. LIMITATION OF REMEDIES; Consumable ...
Warranty
Page 1
...major appliance, to instruct you can find your model number and serial number on the label, located on the duration of implied warranties of merchantability or fitness, so this limitation may contact Whirlpool at the address below . Proof of original purchase...model number information for future reference. 19 Any food or medicine loss due to use of products not approved by a Whirlpool designated service company. WHIRLPOOL SHALL NOT BE LIABLE FOR INCIDENTAL OR CONSEQUENTIAL DAMAGES. Service must be easily determined. 12. Replacement parts or repair labor on how to refrigerator...
...major appliance, to instruct you can find your model number and serial number on the label, located on the duration of implied warranties of merchantability or fitness, so this limitation may contact Whirlpool at the address below . Proof of original purchase...model number information for future reference. 19 Any food or medicine loss due to use of products not approved by a Whirlpool designated service company. WHIRLPOOL SHALL NOT BE LIABLE FOR INCIDENTAL OR CONSEQUENTIAL DAMAGES. Service must be easily determined. 12. Replacement parts or repair labor on how to refrigerator...


