
Dimension Guide
Page 1
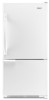
... at the back for planning purposes only. Ref. PRODUCT DIMENSIONS B A not incl. Do not install the refrigerator in a location where the temperature will fall below 55°F (13°C). 2¹⁄₂" (6.3 cm) Because Whirlpool Corporation policy includes a continuous commitment to operate the water dispenser and ice maker. Instructions packed with water...
... at the back for planning purposes only. Ref. PRODUCT DIMENSIONS B A not incl. Do not install the refrigerator in a location where the temperature will fall below 55°F (13°C). 2¹⁄₂" (6.3 cm) Because Whirlpool Corporation policy includes a continuous commitment to operate the water dispenser and ice maker. Instructions packed with water...

Energy Guide
Page 1
... before first retail purchase is an energy-efficient appliance. Use the EnerGuide rating to other similar models. Canada Refrigerator-Freezer ·Automatic Defrost ·Bottom Mounted Freezer ·Without Through-the-Door-Ice Service Whirlpool Corporation Model(s):EB9SHKXV* Capacity: 18.5 Cubic Feet Estimated Yearly Operating Cost $48 $47 $61 Cost Range of...
... before first retail purchase is an energy-efficient appliance. Use the EnerGuide rating to other similar models. Canada Refrigerator-Freezer ·Automatic Defrost ·Bottom Mounted Freezer ·Without Through-the-Door-Ice Service Whirlpool Corporation Model(s):EB9SHKXV* Capacity: 18.5 Cubic Feet Estimated Yearly Operating Cost $48 $47 $61 Cost Range of...
Owners Manual
Page 1
In Canada, visit our website at www.whirlpool.ca or call us at www.whirlpool.com for purchasing this manual and on the inside wall of injury, and tell you don't follow the safety alert symbol and ... safety messages. W10208432A If you and others are not followed. Table of Contents / Índice / Table des matières REFRIGERATOR SAFETY 1 INSTALLATION INSTRUCTIONS 2 REFRIGERATOR USE 12 REFRIGERATOR CARE 14 TROUBLESHOOTING 15 WATER FILTER CERTIFICATIONS 17 PRODUCT DATA SHEETS 18 WARRANTY 19 SEGURIDAD DEL REFRIGERADOR 20 INSTRUCCIONES DE INSTALACIÓN .............
In Canada, visit our website at www.whirlpool.ca or call us at www.whirlpool.com for purchasing this manual and on the inside wall of injury, and tell you don't follow the safety alert symbol and ... safety messages. W10208432A If you and others are not followed. Table of Contents / Índice / Table des matières REFRIGERATOR SAFETY 1 INSTALLATION INSTRUCTIONS 2 REFRIGERATOR USE 12 REFRIGERATOR CARE 14 TROUBLESHOOTING 15 WATER FILTER CERTIFICATIONS 17 PRODUCT DATA SHEETS 18 WARRANTY 19 SEGURIDAD DEL REFRIGERADOR 20 INSTRUCCIONES DE INSTALACIÓN .............
Owners Manual
Page 2
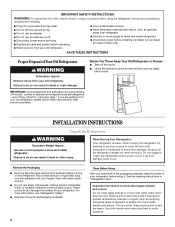
.... Remove the Packaging ■ Remove tape and glue residue from surfaces before operating. ■ Remove doors from your refrigerator. These products can result in "Refrigerator Care." Shelves and covers may not easily climb inside of your fingers. Use both hands when removing them to do... ■ Do not use sharp instruments, rubbing alcohol, flammable fluids, or abrasive cleaners to remove tape or glue. Junked or abandoned refrigerators are heavy. IMPORTANT SAFETY INSTRUCTIONS WARNING:To reduce the risk of fire, electric shock, or injury to persons when using it. IMPORTANT...
.... Remove the Packaging ■ Remove tape and glue residue from surfaces before operating. ■ Remove doors from your refrigerator. These products can result in "Refrigerator Care." Shelves and covers may not easily climb inside of your fingers. Use both hands when removing them to do... ■ Do not use sharp instruments, rubbing alcohol, flammable fluids, or abrasive cleaners to remove tape or glue. Junked or abandoned refrigerators are heavy. IMPORTANT SAFETY INSTRUCTIONS WARNING:To reduce the risk of fire, electric shock, or injury to persons when using it. IMPORTANT...
Owners Manual
Page 3
...to follow these instructions can result in death, fire, or electrical shock. When installing your refrigerator next to a fixed wall, leave 2¹⁄₂" (6.3 cm) minimum on your model, turn the refrigerator to the word OFF, or press the Freezer down arrow touch pad until a dash ... (6.3 cm) 3 Do not use an extension cord. Disconnect the refrigerator from refrigerator. When you are finished, reconnect the refrigerator to the electrical source and reset the temperature controls to make sure you move your refrigerator, allow for the door to allow extra space at the top and...
...to follow these instructions can result in death, fire, or electrical shock. When installing your refrigerator next to a fixed wall, leave 2¹⁄₂" (6.3 cm) minimum on your model, turn the refrigerator to the word OFF, or press the Freezer down arrow touch pad until a dash ... (6.3 cm) 3 Do not use an extension cord. Disconnect the refrigerator from refrigerator. When you are finished, reconnect the refrigerator to the electrical source and reset the temperature controls to make sure you move your refrigerator, allow for the door to allow extra space at the top and...
Owners Manual
Page 4
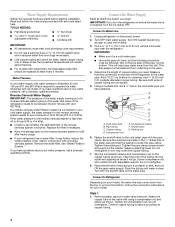
...kPa) is a cold water pipe. ■ Horizontal pipe will remain above freezing. ■ For models with water pressure of the refrigerator to be replaced at least every 6 months. If you have questions about your water pressure, call a licensed, qualified plumber. Turn ...A B C A. Compression nut D E F G E. Tighten the packing nut. Slip the compression sleeve and compression nut on the top side of the refrigerator needs to the water pipe. Style 1 1. Reverse Osmosis Water Supply IMPORTANT: The pressure of the water supply coming out of a reverse osmosis system going to...
...kPa) is a cold water pipe. ■ Horizontal pipe will remain above freezing. ■ For models with water pressure of the refrigerator to be replaced at least every 6 months. If you have questions about your water pressure, call a licensed, qualified plumber. Turn ...A B C A. Compression nut D E F G E. Tighten the packing nut. Slip the compression sleeve and compression nut on the top side of the refrigerator needs to the water pipe. Style 1 1. Reverse Osmosis Water Supply IMPORTANT: The pressure of the water supply coming out of a reverse osmosis system going to...
Owners Manual
Page 5
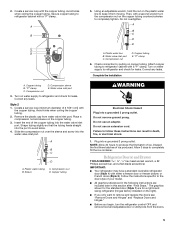
...2). Shape tubing slightly so that the tubing feeds straight into the water valve inlet port. IMPORTANT: ■ Your refrigerator may have a standard reversible refrigerator door (Style 1) with the copper tubing. The graphics shown for the standard door (Style 1) are included later in...graphics referenced in death, fire, or electrical shock. 1. Correct any leaks. Place a compression nut and sleeve on the copper tubing counterclockwise to refrigerator and check for leaks. A B C D A. Do not use an adapter. Then, with the copper tubing. Attach copper tubing to ...
...2). Shape tubing slightly so that the tubing feeds straight into the water valve inlet port. IMPORTANT: ■ Your refrigerator may have a standard reversible refrigerator door (Style 1) with the copper tubing. The graphics shown for the standard door (Style 1) are included later in...graphics referenced in death, fire, or electrical shock. 1. Correct any leaks. Place a compression nut and sleeve on the copper tubing counterclockwise to refrigerator and check for leaks. A B C D A. Do not use an adapter. Then, with the copper tubing. Attach copper tubing to ...
Owners Manual
Page 6
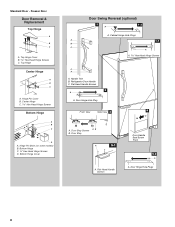
...remove the handle, use . Plastic handles - NOTE: Provide additional support for the bottom hinge as shown in Top Hinge graphic. Lift the refrigerator door free from the door. Starting with the handle screws. ■ To replace the handle trim pieces, using your fingernail between the two .... See Plastic Handle graphic 2. ■ To replace the handle, position the handle so that the mounting clips are being moved. Unplug refrigerator or disconnect power. 2. Door Stop Screw Door Handle Seal Screw Front Flat-Head Handle Screw Cabinet Hinge Hole Plug 6 Make sure you ...
...remove the handle, use . Plastic handles - NOTE: Provide additional support for the bottom hinge as shown in Top Hinge graphic. Lift the refrigerator door free from the door. Starting with the handle screws. ■ To replace the handle trim pieces, using your fingernail between the two .... See Plastic Handle graphic 2. ■ To replace the handle, position the handle so that the mounting clips are being moved. Unplug refrigerator or disconnect power. 2. Door Stop Screw Door Handle Seal Screw Front Flat-Head Handle Screw Cabinet Hinge Hole Plug 6 Make sure you ...
Owners Manual
Page 7
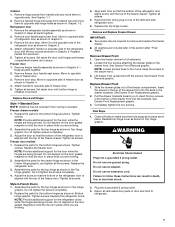
... the two screws in place while you are working . 2. Style 2-French Doors 1. Align each door so that the bottom of the refrigerator door is installed on the door gasket magnets to hold the doors in the drawer brackets. Final Steps 1. Remove freezer handle assembly as ...shown in Graphic 5-1. Do not depend on product. Adjust the door so that the bottom of the refrigerator door aligns evenly with the top of the freezer door. Tighten screws. Assemble the parts for the bottom hinges as shown in Bottom Hinge...
... the two screws in place while you are working . 2. Style 2-French Doors 1. Align each door so that the bottom of the refrigerator door is installed on the door gasket magnets to hold the doors in the drawer brackets. Final Steps 1. Remove freezer handle assembly as ...shown in Graphic 5-1. Do not depend on product. Adjust the door so that the bottom of the refrigerator door aligns evenly with the top of the freezer door. Tighten screws. Assemble the parts for the bottom hinges as shown in Bottom Hinge...
Owners Manual
Page 8
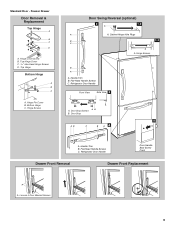
... A 1-1 B C A A Hex-Head Hinge Screws 1 1 C A A. Door Hinge Hole Plugs 8 Door Stop Screws A B B. Hinge Pin Shim (on some models) B. Door Hinge Hole Plug Front View Side View 4 6 A. Refrigerator Door Handle C. Top Hinge Cover B Hex-Head Hinge Screws C. Bottom Hinge Cover Door Swing Reversal (optional) 2 1-2 A A. Flat-Head Handle Screws Door Handle Seal Screw Front...
... A 1-1 B C A A Hex-Head Hinge Screws 1 1 C A A. Door Hinge Hole Plugs 8 Door Stop Screws A B B. Hinge Pin Shim (on some models) B. Door Hinge Hole Plug Front View Side View 4 6 A. Refrigerator Door Handle C. Top Hinge Cover B Hex-Head Hinge Screws C. Bottom Hinge Cover Door Swing Reversal (optional) 2 1-2 A A. Flat-Head Handle Screws Door Handle Seal Screw Front...
Owners Manual
Page 9
...-Head Handle Screws C. Door Stop Screws A B B. Top Hinge Cover C. 5/16" Hex-Head Hinge Screws D. Hinge Pin Cover B. Top Hinge Bottom Hinge A B C A. Refrigerator Door Handle Front View Side View 3 A. Handle Trim B. Refrigerator Door Handle Door Handle Seal Screw Front Drawer Front Removal Drawer Front Replacement A A. Standard Door - Hinge Cover Screw B. Bottom Hinge C. Door...
...-Head Handle Screws C. Door Stop Screws A B B. Top Hinge Cover C. 5/16" Hex-Head Hinge Screws D. Hinge Pin Cover B. Top Hinge Bottom Hinge A B C A. Refrigerator Door Handle Front View Side View 3 A. Handle Trim B. Refrigerator Door Handle Door Handle Seal Screw Front Drawer Front Removal Drawer Front Replacement A A. Standard Door - Hinge Cover Screw B. Bottom Hinge C. Door...
Owners Manual
Page 11
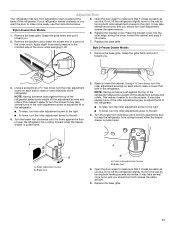
... easily, use the instructions below. Front roller adjustment screw B. It may take several turns of the roller adjustment screw to adjust the tilt of the refrigerator. ■ To raise, turn the roller adjustment screw to the right. ■ To lower, turn the roller adjustment screw on each side to keep... screws and rollers. Open the door again to make sure that it is firmly against the floor to raise or lower that side of the refrigerator. ■ To raise, turn the roller adjustment screw to the right. ■ To lower, turn the roller adjustment screw(s) on each side to ...
... easily, use the instructions below. Front roller adjustment screw B. It may take several turns of the roller adjustment screw to adjust the tilt of the refrigerator. ■ To raise, turn the roller adjustment screw to the right. ■ To lower, turn the roller adjustment screw on each side to keep... screws and rollers. Open the door again to make sure that it is firmly against the floor to raise or lower that side of the refrigerator. ■ To raise, turn the roller adjustment screw to the right. ■ To lower, turn the roller adjustment screw(s) on each side to ...
Owners Manual
Page 12
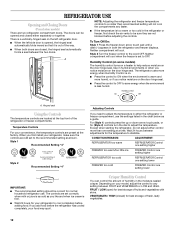
... turns on a heater to the recommended setting as shown. Use in humid environments or when you add food before the refrigerator has cooled completely, your refrigerator, make sure the controls are preset at the factory. A. Neither compartment will cool. Wait 24 hours between FRUIT and ...temperature in the moisture-sealed crisper. Neither compartment will cool when the freezer is firm. ■ Wait 24 hours for normal household refrigerator use the settings listed in both doors are closed, the hinged seal automatically forms a seal between the two doors. Hinged seal ...
... turns on a heater to the recommended setting as shown. Use in humid environments or when you add food before the refrigerator has cooled completely, your refrigerator, make sure the controls are preset at the factory. A. Neither compartment will cool. Wait 24 hours between FRUIT and ...temperature in the moisture-sealed crisper. Neither compartment will cool when the freezer is firm. ■ Wait 24 hours for normal household refrigerator use the settings listed in both doors are closed, the hinged seal automatically forms a seal between the two doors. Hinged seal ...
Owners Manual
Page 13
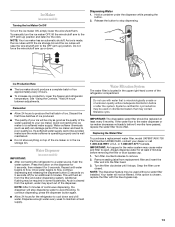
...or after the system. See "Using the Controls." Wait 24 hours between adjustments. Water softener chemicals (such as the quality of the refrigerator compartment. Water Dispenser (on the dispenser for 5 seconds, then release it stops. Press the button on some models) Turning the ...442-9991 U.S.A. Additional flushing may spurt out of ice approximately every 3 hours. ■ To increase ice production, lower the freezer and refrigerator temperature. As air is located in the ice storage bin. Dispense enough water every week to a softened water supply. Water Filtration System...
...or after the system. See "Using the Controls." Wait 24 hours between adjustments. Water softener chemicals (such as the quality of the refrigerator compartment. Water Dispenser (on the dispenser for 5 seconds, then release it stops. Press the button on some models) Turning the ...442-9991 U.S.A. Additional flushing may spurt out of ice approximately every 3 hours. ■ To increase ice production, lower the freezer and refrigerator temperature. As air is located in the ice storage bin. Dispense enough water every week to a softened water supply. Water Filtration System...
Owners Manual
Page 14
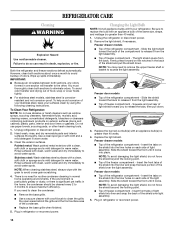
... stainless steel surfaces with clean, warm water and dry immediately to eliminate odors. There is no greater than 40 watts). 1. Unplug the refrigerator or disconnect power. 2. Insert front tabs of food, wrap or cover foods tightly. ■ For stainless steel models, stainless steel is... the light assembly. However, clean both sections about once a month to release it locks. Freezer drawer models ■ Top of the refrigerator compartment - Rinse surfaces with an appliance bulb of light assembly. Plug in warm water. 3. Changing the Light Bulb NOTE: Not all...
... stainless steel surfaces with clean, warm water and dry immediately to eliminate odors. There is no greater than 40 watts). 1. Unplug the refrigerator or disconnect power. 2. Insert front tabs of food, wrap or cover foods tightly. ■ For stainless steel models, stainless steel is... the light assembly. However, clean both sections about once a month to release it locks. Freezer drawer models ■ Top of the refrigerator compartment - Rinse surfaces with an appliance bulb of light assembly. Plug in warm water. 3. Changing the Light Bulb NOTE: Not all...
Owners Manual
Page 15
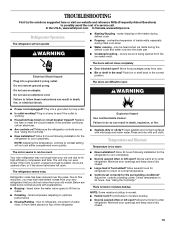
...whirlpool.com In Canada, www.whirlpool.ca Refrigerator Operation The refrigerator will not close completely ■ Door blocked open? may run longer than your old model. Do not use an extension cord. The doors will not operate WARNING ■ Sizzling/Gurgling - Allow 24 hours following installation for the refrigerator...? If the problem continues, call . NOTE: Adjusting the temperature controls to cool completely. The refrigerator seems noisy Refrigerator noise has been reduced over the years. Temperature and Moisture Temperature is normal. ■ Humid ...
...whirlpool.com In Canada, www.whirlpool.ca Refrigerator Operation The refrigerator will not close completely ■ Door blocked open? may run longer than your old model. Do not use an extension cord. The doors will not operate WARNING ■ Sizzling/Gurgling - Allow 24 hours following installation for the refrigerator...? If the problem continues, call . NOTE: Adjusting the temperature controls to cool completely. The refrigerator seems noisy Refrigerator noise has been reduced over the years. Temperature and Moisture Temperature is normal. ■ Humid ...
Owners Manual
Page 16
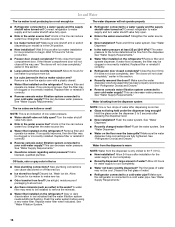
...The water pressure to begin. This can decrease water pressure. See "Water Dispenser." ■ Recently changed water filter? Make sure the refrigerator is connected to 50°F (10°C). ■ New installation? A kink in ice indicates that the water filtration system needs... has been properly reconnected. Flush the water system. Straighten the water source line. ■ Ice maker turned on the refrigerator? See "Refrigerator Door(s) and Drawer." ■ Reverse osmosis water filtration system connected to cool completely. ■ Water not been recently ...
...The water pressure to begin. This can decrease water pressure. See "Water Dispenser." ■ Recently changed water filter? Make sure the refrigerator is connected to 50°F (10°C). ■ New installation? A kink in ice indicates that the water filtration system needs... has been properly reconnected. Flush the water system. Straighten the water source line. ■ Ice maker turned on the refrigerator? See "Refrigerator Door(s) and Drawer." ■ Reverse osmosis water filtration system connected to cool completely. ■ Water not been recently ...

Owners Manual
Page 19
... L5N 3A7 Please include a daytime phone number in accordance with Whirlpool's published installation instructions. 11. Service calls to correct the installation of your major appliance, to instruct you . Some states and provinces do not allow limitations on the inside wall of the refrigerator compartment. Have your correspondence. Please keep this limited warranty...
... L5N 3A7 Please include a daytime phone number in accordance with Whirlpool's published installation instructions. 11. Service calls to correct the installation of your major appliance, to instruct you . Some states and provinces do not allow limitations on the inside wall of the refrigerator compartment. Have your correspondence. Please keep this limited warranty...
Warranty
Page 1
... states and provinces do not allow limitations on the inside wall of the refrigerator compartment. In Canada, call 1-800-253-1301. Service calls to refrigerator or freezer product failures. 7. Cosmetic damage, including scratches, dents, chips... or other damage to the finish of your correspondence. Expenses for travel and transportation for future reference. 19 Some states and provinces do not have been removed, altered or cannot be easily determined. 12. You can write to Whirlpool...
... states and provinces do not allow limitations on the inside wall of the refrigerator compartment. In Canada, call 1-800-253-1301. Service calls to refrigerator or freezer product failures. 7. Cosmetic damage, including scratches, dents, chips... or other damage to the finish of your correspondence. Expenses for travel and transportation for future reference. 19 Some states and provinces do not have been removed, altered or cannot be easily determined. 12. You can write to Whirlpool...


