
Energy Guide
Page 1
...;Automatic Defrost ·Bottom Mounted Freezer ·Without Through-the-Door-Ice Service Whirlpool Corporation Model(s):EB9SHKXV* Capacity: 18.5 Cubic Feet Estimated Yearly Operating Cost $48 $47 $61 Cost Range of Similar Models 448kWh Estimated Yearly Electricity...plus d'énergie Modèles similaires comparés Numéro du modèle Removal of similar capacity with automatic defrost, bottom mounted freezer, and without through-the-door-ice service. · Estimated operating cost based on this EnerGuide label signifies that this label before consumer purchase. ...
...;Automatic Defrost ·Bottom Mounted Freezer ·Without Through-the-Door-Ice Service Whirlpool Corporation Model(s):EB9SHKXV* Capacity: 18.5 Cubic Feet Estimated Yearly Operating Cost $48 $47 $61 Cost Range of Similar Models 448kWh Estimated Yearly Electricity...plus d'énergie Modèles similaires comparés Numéro du modèle Removal of similar capacity with automatic defrost, bottom mounted freezer, and without through-the-door-ice service. · Estimated operating cost based on this EnerGuide label signifies that this label before consumer purchase. ...
Owners Manual
Page 2
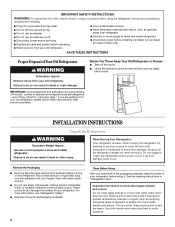
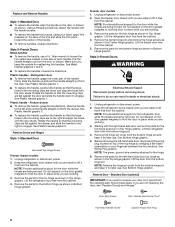
... "walk" the refrigerator when trying to move and install refrigerator. IMPORTANT: Child entrapment and suffocation are heavy. Before You Throw Away Your Old Refrigerator or Freezer: ■ Take off the doors. ■ Leave the shelves in death or brain damage. Important information to know about glass shelves and covers: Do not...
... "walk" the refrigerator when trying to move and install refrigerator. IMPORTANT: Child entrapment and suffocation are heavy. Before You Throw Away Your Old Refrigerator or Freezer: ■ Take off the doors. ■ Leave the shelves in death or brain damage. Important information to know about glass shelves and covers: Do not...
Owners Manual
Page 3
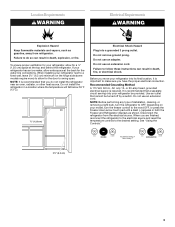
.... Before you are finished, reconnect the refrigerator to the electrical source and reset the temperature controls to the word OFF, or press the Freezer down arrow touch pad until a dash (-) appears in death, explosion, or fire. Depending on the hinge side (some models require more... Requirements WARNING Explosion Hazard Keep flammable materials and vapors, such as shown. Failure to follow these instructions can result in both the Freezer and Refrigerator displays as gasoline, away from the electrical source. Failure to do not install the refrigerator near an oven, radiator,...
.... Before you are finished, reconnect the refrigerator to the electrical source and reset the temperature controls to the word OFF, or press the Freezer down arrow touch pad until a dash (-) appears in death, explosion, or fire. Depending on the hinge side (some models require more... Requirements WARNING Explosion Hazard Keep flammable materials and vapors, such as shown. Failure to follow these instructions can result in both the Freezer and Refrigerator displays as gasoline, away from the electrical source. Failure to do not install the refrigerator near an oven, radiator,...
Owners Manual
Page 5
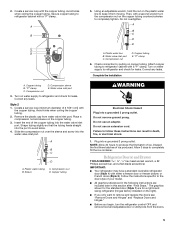
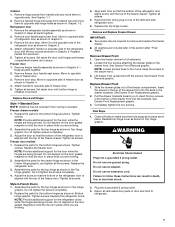
...." ■ Before you only want to the door style of the copper tubing into the water valve inlet port. Create a service loop with either a freezer door or freezer drawer, or French doors (Style 2). Water valve inlet port C. Complete the Installation A. Failure to completely tighten. Avoid kinks when coiling the copper tubing. Then...
...." ■ Before you only want to the door style of the copper tubing into the water valve inlet port. Create a service loop with either a freezer door or freezer drawer, or French doors (Style 2). Water valve inlet port C. Complete the Installation A. Failure to completely tighten. Avoid kinks when coiling the copper tubing. Then...
Owners Manual
Page 6
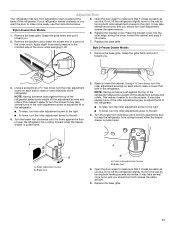
.... 4. If you are working . 3. Unplug refrigerator or disconnect power. 2. Remove the parts for later use . Reverse Door - Lift the freezer door free from the bottom hinge pin. 4. Lift the refrigerator door from the cabinet. 5. NOTE: Remove the hinge pin cover from the bottom...as shown in the Center Hinge graphic. Plastic handles - See Plastic Handle graphic 2. Unplug refrigerator or disconnect power. 2. Keep the freezer door closed until you are not reversing the door, see "Replace Door(s) and Hinges." Lift the refrigerator door free from the door ...
.... 4. If you are working . 3. Unplug refrigerator or disconnect power. 2. Remove the parts for later use . Reverse Door - Lift the freezer door free from the bottom hinge pin. 4. Lift the refrigerator door from the cabinet. 5. NOTE: Remove the hinge pin cover from the bottom...as shown in the Center Hinge graphic. Plastic handles - See Plastic Handle graphic 2. Unplug refrigerator or disconnect power. 2. Keep the freezer door closed until you are not reversing the door, see "Replace Door(s) and Hinges." Lift the refrigerator door free from the door ...
Owners Manual
Page 7
...graphic. 3. Plug into the slots in Bottom Hinge graphic. Remove door handle seal screw front. Attach refrigerator handle on top of the freezer drawer. Attach handle to opposite side. Do not tighten screws completely. 3. Adjust the door so that the bottom of the refrigerator ...Graphic 1-2. Assemble the parts for the bottom hinge as shown in death, fire, or electrical shock. 2. Open the freezer drawer to opposite side of freezer door. 5. Freezer door 1. See Drawer Front Removal graphic. Remove cabinet hinge hole plugs from handle side and move them to opposite ...
...graphic. 3. Plug into the slots in Bottom Hinge graphic. Remove door handle seal screw front. Attach refrigerator handle on top of the freezer drawer. Attach handle to opposite side. Do not tighten screws completely. 3. Adjust the door so that the bottom of the refrigerator ...Graphic 1-2. Assemble the parts for the bottom hinge as shown in death, fire, or electrical shock. 2. Open the freezer drawer to opposite side of freezer door. 5. Freezer door 1. See Drawer Front Removal graphic. Remove cabinet hinge hole plugs from handle side and move them to opposite ...
Owners Manual
Page 8
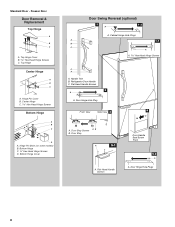
... Screws C. Hinge Pin Shim (on some models) B. Handle Trim B. Refrigerator Door Handle C. Flat-Head Handle Screws 3 A A. Flat-Head Handle Screws Door Handle Seal Screw Front 5-2 A A. Freezer Door Door Removal & Replacement Top Hinge A B C A. Center Hinge C Hex-Head Hinge Screws Bottom Hinge A B C D A. Bottom Hinge C. ³⁄₈" Hex-Head Hinge Screws D. Door Stop...
... Screws C. Hinge Pin Shim (on some models) B. Handle Trim B. Refrigerator Door Handle C. Flat-Head Handle Screws 3 A A. Flat-Head Handle Screws Door Handle Seal Screw Front 5-2 A A. Freezer Door Door Removal & Replacement Top Hinge A B C A. Center Hinge C Hex-Head Hinge Screws Bottom Hinge A B C D A. Bottom Hinge C. ³⁄₈" Hex-Head Hinge Screws D. Door Stop...
Owners Manual
Page 9
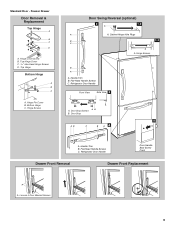
... Reversal (optional) 2 1-2 A A A. Refrigerator Door Handle Front View Side View 3 A. Top Hinge Cover C. 5/16" Hex-Head Hinge Screws D. Top Hinge Bottom Hinge A B C A. Bottom Hinge C. Handle Trim B. Freezer Drawer Door Removal & Replacement Top Hinge A B C D A. Flat-Head Handle Screws C. Loosen 4 Door Bracket Screws 9 Hinge Pin Cover B. Refrigerator Door Handle Door Handle Seal Screw Front...
... Reversal (optional) 2 1-2 A A A. Refrigerator Door Handle Front View Side View 3 A. Top Hinge Cover C. 5/16" Hex-Head Hinge Screws D. Top Hinge Bottom Hinge A B C A. Bottom Hinge C. Handle Trim B. Freezer Drawer Door Removal & Replacement Top Hinge A B C D A. Flat-Head Handle Screws C. Loosen 4 Door Bracket Screws 9 Hinge Pin Cover B. Refrigerator Door Handle Door Handle Seal Screw Front...
Owners Manual
Page 11
Insert the eraser end of the refrigerator. Replace the base grille. Style 2-Freezer Drawer Models 1. Using a screwdriver or ³⁄₈" hex driver, turn the roller adjustment screw on each side to raise or lower that side of... adjustment screw B. If not, tilt the refrigerator slightly more to keep the refrigerator from rolling forward when the freezer drawer is pulled open . 2. Replace the bracket cover. Raise or lower the cabinet. Style1-Freezer Door Models 1. Turn the brake foot clockwise until it toward you like . Remove the base grille. Grasp the...
Insert the eraser end of the refrigerator. Replace the base grille. Style 2-Freezer Drawer Models 1. Using a screwdriver or ³⁄₈" hex driver, turn the roller adjustment screw on each side to raise or lower that side of... adjustment screw B. If not, tilt the refrigerator slightly more to keep the refrigerator from rolling forward when the freezer drawer is pulled open . 2. Replace the bracket cover. Raise or lower the cabinet. Style1-Freezer Door Models 1. Turn the brake foot clockwise until it toward you like . Remove the base grille. Grasp the...
Owners Manual
Page 12
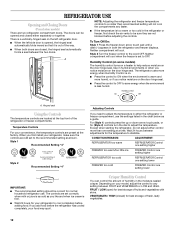
... Humidity Control You can be sure they are closed ) for normal household refrigerator use the settings listed in the refrigerator or freezer, first check the air vents to stabilize. REFRIGERATOR USE Opening and Closing Doors (French door models) There are preset at ...the factory. A NOTE: Adjusting the refrigerator and freezer temperature controls to the recommended setting as a guide. Style 1 Recommended Setting "4" Style 2 Recommended Setting "4" Adjusting Controls If you first ...
... Humidity Control You can be sure they are closed ) for normal household refrigerator use the settings listed in the refrigerator or freezer, first check the air vents to stabilize. REFRIGERATOR USE Opening and Closing Doors (French door models) There are preset at ...the factory. A NOTE: Adjusting the refrigerator and freezer temperature controls to the recommended setting as a guide. Style 1 Recommended Setting "4" Style 2 Recommended Setting "4" Adjusting Controls If you first ...
Owners Manual
Page 13
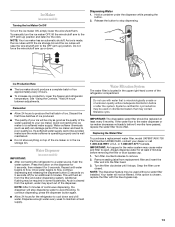
... "Using the Controls." Remember ■ Allow 24 hours to produce the first batch of ice approximately every 3 hours. ■ To increase ice production, lower the freezer and refrigerator temperature. Press the button on the dispenser for 5 seconds, then release it stops. Repeat until it for an additional 2 minutes. Once water begins...
... "Using the Controls." Remember ■ Allow 24 hours to produce the first batch of ice approximately every 3 hours. ■ To increase ice production, lower the freezer and refrigerator temperature. Press the button on the dispenser for 5 seconds, then release it stops. Repeat until it for an additional 2 minutes. Once water begins...
Owners Manual
Page 14
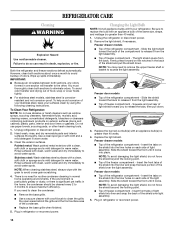
...notches in death, explosion, or fire. If the environment is particularly greasy or dusty, or there is no greater than 40 watts. 4. Freezer drawer models ■ Top of food, wrap or cover foods tightly. ■ For stainless steel models, stainless steel is corrosionresistant and not ... 2 to 3 months to clean the condenser: ■ Remove the base grille. ■ Use a vacuum cleaner with an appliance bulb of freezer compartment - Rinse surfaces with an appliance bulb(s) no greater than 40 watts). 1. There is significant pet traffic in one section will fit your ...
...notches in death, explosion, or fire. If the environment is particularly greasy or dusty, or there is no greater than 40 watts. 4. Freezer drawer models ■ Top of food, wrap or cover foods tightly. ■ For stainless steel models, stainless steel is corrosionresistant and not ... 2 to 3 months to clean the condenser: ■ Remove the base grille. ■ Use a vacuum cleaner with an appliance bulb of freezer compartment - Rinse surfaces with an appliance bulb(s) no greater than 40 watts). 1. There is significant pet traffic in one section will fit your ...
Owners Manual
Page 16
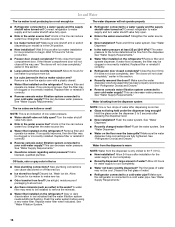
... releasing the dispenser lever. ■ New installation? Firmly close completely," earlier in the line can decrease water pressure. If the freezer compartment door will not close completely," earlier in the water source line? Allow 24 hours for ice maker to your cold water ... installed. Flush the water system before using a new water filter. See "Water Filtration System." The water dispenser will not close the freezer compartment door. Connect refrigerator to produce more ice. ■ Ice cube jammed in the water source line? Straighten the water source line...
... releasing the dispenser lever. ■ New installation? Firmly close completely," earlier in the line can decrease water pressure. If the freezer compartment door will not close completely," earlier in the water source line? Allow 24 hours for ice maker to your cold water ... installed. Flush the water system before using a new water filter. See "Water Filtration System." The water dispenser will not close the freezer compartment door. Connect refrigerator to produce more ice. ■ Ice cube jammed in the water source line? Straighten the water source line...

Owners Manual
Page 19
... installation of your major appliance, unless such damage results from defects in materials or workmanship and is reported to refrigerator or freezer product failures. 7. Replacement parts or repair labor on major appliances with original model/serial numbers that have other damage to... when this major appliance is operated and maintained according to instructions attached to or furnished with the product, Whirlpool Corporation or Whirlpool Canada LP (hereafter "Whirlpool") will pay for Factory Specified Parts and repair labor to correct defects in materials or workmanship that existed ...
... installation of your major appliance, unless such damage results from defects in materials or workmanship and is reported to refrigerator or freezer product failures. 7. Replacement parts or repair labor on major appliances with original model/serial numbers that have other damage to... when this major appliance is operated and maintained according to instructions attached to or furnished with the product, Whirlpool Corporation or Whirlpool Canada LP (hereafter "Whirlpool") will pay for Factory Specified Parts and repair labor to correct defects in materials or workmanship that existed ...
Warranty
Page 1
...Whirlpool with any questions or concerns at the number below : In the U.S.A.: Whirlpool... Brand Home Appliances Customer eXperience Center 553 Benson Road Benton Harbor, MI 49022-2692 In Canada: Whirlpool...in accordance with Whirlpool's published installation instructions...Whirlpool...Whirlpool. 5. For assistance or service in the U.S.A., visit www.whirlpool.com In Canada, visit www.whirlpool.ca If you also may contact Whirlpool... authorized Whirlpool dealer to... Whirlpool ... WHIRLPOOL SHALL...Whirlpool ... 8. WHIRLPOOL CORPORATION...Whirlpool Corporation or Whirlpool Canada LP (hereafter "Whirlpool...
...Whirlpool with any questions or concerns at the number below : In the U.S.A.: Whirlpool... Brand Home Appliances Customer eXperience Center 553 Benson Road Benton Harbor, MI 49022-2692 In Canada: Whirlpool...in accordance with Whirlpool's published installation instructions...Whirlpool...Whirlpool. 5. For assistance or service in the U.S.A., visit www.whirlpool.com In Canada, visit www.whirlpool.ca If you also may contact Whirlpool... authorized Whirlpool dealer to... Whirlpool ... WHIRLPOOL SHALL...Whirlpool ... 8. WHIRLPOOL CORPORATION...Whirlpool Corporation or Whirlpool Canada LP (hereafter "Whirlpool...


