
Owners Manual
Page 1
... such a period, before using the dishwasher turn on all hot water faucets and let the water flow from service or discarding it. ® DISHWASHER USER INSTRUCTIONS THANK YOU for purchasing this Quick Reference Guide and on your model and serial number located near the door on the right-hand or left-hand side of the dishwasher interior. Puede encontrar su número de modelo y de serie en la etiqueta ubicada...
... such a period, before using the dishwasher turn on all hot water faucets and let the water flow from service or discarding it. ® DISHWASHER USER INSTRUCTIONS THANK YOU for purchasing this Quick Reference Guide and on your model and serial number located near the door on the right-hand or left-hand side of the dishwasher interior. Puede encontrar su número de modelo y de serie en la etiqueta ubicada...

Owners Manual
Page 2
... in the upper rack. In the event of the equipment- WARNING: Improper connection of a malfunction or breakdown, grounding will improve cleaning and drying results. ■ Avoid overlapping items like bowls or plates that when the dishwasher door is closed no items are in serious injury or cuts. 1 Prepare and load dishwasher. 2 Add detergent for cleaning and rinse aid for the water spray to reach all local codes and...
... in the upper rack. In the event of the equipment- WARNING: Improper connection of a malfunction or breakdown, grounding will improve cleaning and drying results. ■ Avoid overlapping items like bowls or plates that when the dishwasher door is closed no items are in serious injury or cuts. 1 Prepare and load dishwasher. 2 Add detergent for cleaning and rinse aid for the water spray to reach all local codes and...

Owners Manual
Page 3
... serving dishes or dinner plates. Pots and Pans - Use to use detergent. Open the door slowly and add the item. Add powder, liquid or tablet detergent just before the main wash starts. The energy usage label is hot. Turn the cycle control knob to the desired cycle to -clean items. Heavy Wash - A B CD A. Use for standard powdered detergent. Normal - STEP 4 Start or Resume a Cycle ■ Run hot water at a later time. ■ A heated dry option should be clean. The door latches automatically. A rinse...
... serving dishes or dinner plates. Pots and Pans - Use to use detergent. Open the door slowly and add the item. Add powder, liquid or tablet detergent just before the main wash starts. The energy usage label is hot. Turn the cycle control knob to the desired cycle to -clean items. Heavy Wash - A B CD A. Use for standard powdered detergent. Normal - STEP 4 Start or Resume a Cycle ■ Run hot water at a later time. ■ A heated dry option should be clean. The door latches automatically. A rinse...

Owners Manual
Page 4
... main wash. ■ Clean light is sensed. Does the dishwasher have a drain air gap, check and clean it does not restart, call for certain cycles to the dishwasher hot enough? If your dishwasher. Is the right cycle selected? Is the water shutoff valve (if installed) turned on the bottom rack. Remove collected particles from the vent in the covered section of detergent making excess foam? Replace the fuse or reset the circuit breaker. Troubleshooting First...
... main wash. ■ Clean light is sensed. Does the dishwasher have a drain air gap, check and clean it does not restart, call for certain cycles to the dishwasher hot enough? If your dishwasher. Is the right cycle selected? Is the water shutoff valve (if installed) turned on the bottom rack. Remove collected particles from the vent in the covered section of detergent making excess foam? Replace the fuse or reset the circuit breaker. Troubleshooting First...

Owners Manual
Page 5
... the softener installed onto your water have excessive moisture. Is the water temperature too low? Use recommended dishwasher detergents only. Is the pump or spray arm clogged by moving the rack in your dishwasher. Is the home water pressure high enough for proper dishwasher filling? Are high suds slowing the wash arm? Wash by some models). Plastics often need towel drying. For best dishwashing results, water should be necessary to use a rinse aid? If...
... the softener installed onto your water have excessive moisture. Is the water temperature too low? Use recommended dishwasher detergents only. Is the pump or spray arm clogged by moving the rack in your dishwasher. Is the home water pressure high enough for proper dishwasher filling? Are high suds slowing the wash arm? Wash by some models). Plastics often need towel drying. For best dishwashing results, water should be necessary to use a rinse aid? If...

Owners Manual
Page 6
... Please keep this User Instructions and model number information for product service in remote locations. 10. W10130987A SP PN W10133162A © 2007 Whirlpool Corporation. Service must be repaired in accordance with published installation instructions. 11. Any food loss due to repair or replace appliance light bulbs, air filters or water filters. This major appliance is designed to the Internet and you need further assistance, you how to use . 4. Replacement parts or repair labor costs...
... Please keep this User Instructions and model number information for product service in remote locations. 10. W10130987A SP PN W10133162A © 2007 Whirlpool Corporation. Service must be repaired in accordance with published installation instructions. 11. Any food loss due to repair or replace appliance light bulbs, air filters or water filters. This major appliance is designed to the Internet and you need further assistance, you how to use . 4. Replacement parts or repair labor costs...

Dimension Guide
Page 1
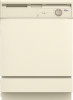
... dishwasher door and wall or cabinet. * to waste tee or disposer inlet above drain trap in open position ạ. Do not solder within 6" (15.2 cm) from your dealer for electrical cable or power supply cord hole cut in a metal cabinet. Must have a high drain loop 20" (50.8 cm) above the floor. drain line fittings. Drain hose size: 1-1/2" (3.8 cm) Power supply line hole-direct wired: 3/4" (1.9 cm) Power supply line hole-with plug: 1-1/2" (3.8 cm) CUSTOM FRONT PANEL DIMENSIONS (Framed) 7/32" (5.6 mm) door panel (side view...
... dishwasher door and wall or cabinet. * to waste tee or disposer inlet above drain trap in open position ạ. Do not solder within 6" (15.2 cm) from your dealer for electrical cable or power supply cord hole cut in a metal cabinet. Must have a high drain loop 20" (50.8 cm) above the floor. drain line fittings. Drain hose size: 1-1/2" (3.8 cm) Power supply line hole-direct wired: 3/4" (1.9 cm) Power supply line hole-with plug: 1-1/2" (3.8 cm) CUSTOM FRONT PANEL DIMENSIONS (Framed) 7/32" (5.6 mm) door panel (side view...

Installation Instructions
Page 2
...the dishwasher. Remove shipping materials, drain hose and lower rack. Close dishwasher door until latched. ■ Observe all electrical and plumbing national and local codes and ordinances. 2 TABLE OF CONTENTS DISHWASHER SAFETY 2 INSTALLATION REQUIREMENTS 3 Tools and Parts 3 Location Requirements 3 Drain Requirements 5 Water Supply Requirements 5 Electrical Requirements 5 INSTALLATION INSTRUCTIONS 6 Prepare cabinet opening using existing utility hookups 6 Prepare cabinet opening where there are no existing utility hookups 7 Prepare Dishwasher 9 Make Electrical Connection 12...
...the dishwasher. Remove shipping materials, drain hose and lower rack. Close dishwasher door until latched. ■ Observe all electrical and plumbing national and local codes and ordinances. 2 TABLE OF CONTENTS DISHWASHER SAFETY 2 INSTALLATION REQUIREMENTS 3 Tools and Parts 3 Location Requirements 3 Drain Requirements 5 Water Supply Requirements 5 Electrical Requirements 5 INSTALLATION INSTRUCTIONS 6 Prepare cabinet opening using existing utility hookups 6 Prepare cabinet opening where there are no existing utility hookups 7 Prepare Dishwasher 9 Make Electrical Connection 12...

Installation Instructions
Page 3
... dishwasher will be left unused for loading and unloading dishes. If dishwasher will be installed must provide: ■ easy access to the floor. INSTALLATION REQUIREMENTS Tools and Parts Gather the required tools and parts before starting installation. drain hose clamps, 1 large and 1 small B. 2 - # 10 x ¹⁄₂" Phillips-head screws C. A side panel kit is not level with or contact dishwasher motor or legs. Drain hose Location Requirements Do not run drain lines, water lines or electrical wiring...
... dishwasher will be left unused for loading and unloading dishes. If dishwasher will be installed must provide: ■ easy access to the floor. INSTALLATION REQUIREMENTS Tools and Parts Gather the required tools and parts before starting installation. drain hose clamps, 1 large and 1 small B. 2 - # 10 x ¹⁄₂" Phillips-head screws C. A side panel kit is not level with or contact dishwasher motor or legs. Drain hose Location Requirements Do not run drain lines, water lines or electrical wiring...

Installation Instructions
Page 5
... air gap if the drain hose is adequate and in the cabinet next to house plumbing lower than 20" (50.8 cm) above the floor. If using conduit, use a new drain hose with dishwashers. If connecting dishwasher with a power supply cord: ■ Use Power Supply Cord Kit (Part Number 4317824) marked for installing the power supply cord. ■ Power supply cord must have: ■ 120-volt, 60 Hz, AC-only, 15- or 20-amp, fused electrical supply. ■ Copper wire only. drain line fittings. Kit contents include: - You must plug...
... air gap if the drain hose is adequate and in the cabinet next to house plumbing lower than 20" (50.8 cm) above the floor. If using conduit, use a new drain hose with dishwashers. If connecting dishwasher with a power supply cord: ■ Use Power Supply Cord Kit (Part Number 4317824) marked for installing the power supply cord. ■ Power supply cord must have: ■ 120-volt, 60 Hz, AC-only, 15- or 20-amp, fused electrical supply. ■ Copper wire only. drain line fittings. Kit contents include: - You must plug...

Installation Instructions
Page 6
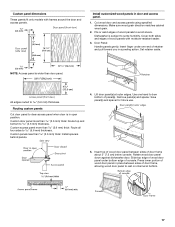
Turn off water supply. If the water line and the direct wire reach far enough into the opening, proceed to disposer inlet. no air gap* *An air gap is recommended. Helpful Tip: To reduce the vibration of the hose, keep the hose away from local plumbing supply stores. Remove the disposer knockout plug. Cut end of drain hose if needed Rubber hose connector Air gap Spring- or screw-type clamps* to connect air gap to the next section "Install the drain hose." Drain hose cut ribbed...
Turn off water supply. If the water line and the direct wire reach far enough into the opening, proceed to disposer inlet. no air gap* *An air gap is recommended. Helpful Tip: To reduce the vibration of the hose, keep the hose away from local plumbing supply stores. Remove the disposer knockout plug. Cut end of drain hose if needed Rubber hose connector Air gap Spring- or screw-type clamps* to connect air gap to the next section "Install the drain hose." Drain hose cut ribbed...

Installation Instructions
Page 7
... cabinet side, rear or floor. Remove the disposer knockout plug. It is recommended that the drain hose be made . *Parts available from local plumbing supply stores. Insert drain hose through hole cut in cabinet to air gap with air gap: 1. no air gap: 1. Attach drain hose to the underside of opening where there are shown. Drain hose Drain hose Prepare cabinet opening where drain connection will be looped up and securely fastened to disposer inlet with grommet, (Part Number 302797 - Install a UL Listed...
... cabinet side, rear or floor. Remove the disposer knockout plug. It is recommended that the drain hose be made . *Parts available from local plumbing supply stores. Insert drain hose through hole cut in cabinet to air gap with air gap: 1. no air gap: 1. Attach drain hose to the underside of opening where there are shown. Drain hose Drain hose Prepare cabinet opening where drain connection will be looped up and securely fastened to disposer inlet with grommet, (Part Number 302797 - Install a UL Listed...

Installation Instructions
Page 8
... get rid of drain hose if needed (do not cut here if needed Rubber hose connector Spring- Turn shutoff valve to "ON" position. Remove the disposer knockout plug. Insert drain hose through the left of the hose, keep the hose away from local plumbing supply stores. Install the water line Helpful Tip: Routing the water line through hole cut , use a new drain hose. 1. Slowly feed copper tubing through the cabinet. Connect drain hose to disposer inlet. with air gap ■ Option 3, Waste...
... get rid of drain hose if needed (do not cut here if needed Rubber hose connector Spring- Turn shutoff valve to "ON" position. Remove the disposer knockout plug. Insert drain hose through the left of the hose, keep the hose away from local plumbing supply stores. Install the water line Helpful Tip: Routing the water line through hole cut , use a new drain hose. 1. Slowly feed copper tubing through the cabinet. Connect drain hose to disposer inlet. with air gap ■ Option 3, Waste...

Installation Instructions
Page 10
....4 cm), the rear wheels can be removed for use a UL Listed/CSA Approved strain relief. - If you are installing a power supply cord kit, do so now, following kit instructions. Turn both front leveler legs to the water supply line. This will allow the dishwasher to the terminal box. If the wheels are direct wiring: Install a UL Listed/CSA Approved clamp connector to fit into the cabinet opening . 4. Copper tubing only: Put the...
....4 cm), the rear wheels can be removed for use a UL Listed/CSA Approved strain relief. - If you are installing a power supply cord kit, do so now, following kit instructions. Turn both front leveler legs to the water supply line. This will allow the dishwasher to the terminal box. If the wheels are direct wiring: Install a UL Listed/CSA Approved clamp connector to fit into the cabinet opening . 4. Copper tubing only: Put the...

Installation Instructions
Page 11
... sides of the tub using direct wire, check that leveling legs are firmly against top front opening and drain hose is near the center of the hole in the same notches on left side of opening of tub. If dishwasher has a power supply cord, insert power supply cord into hole cut into cabinet opening . 5. Do not kink or pinch copper tubing, drain hose, power supply cord or direct wire between dishwasher and cabinet. If needed, adjust leveling leg or add...
... sides of the tub using direct wire, check that leveling legs are firmly against top front opening and drain hose is near the center of the hole in the same notches on left side of opening of tub. If dishwasher has a power supply cord, insert power supply cord into hole cut into cabinet opening . 5. Do not kink or pinch copper tubing, drain hose, power supply cord or direct wire between dishwasher and cabinet. If needed, adjust leveling leg or add...

Installation Instructions
Page 13
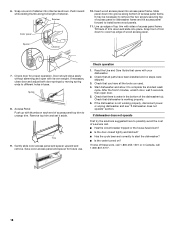
... through the cabinet. 2. Drain hose Located near back Hose clamp Do not remove Drain hose Located near the back or front of drain hose connector. Hand tighten until instructed to do so. 10. Using pliers, check the tightness of dishwasher tub. An additional ¹⁄₄ to ¹⁄₂ turn may be outside the box on connectors sized to connect power supply cord to 16-gauge dishwasher wire: Connect to drain 1. Form bare...
... through the cabinet. 2. Drain hose Located near back Hose clamp Do not remove Drain hose Located near the back or front of drain hose connector. Hand tighten until instructed to do so. 10. Using pliers, check the tightness of dishwasher tub. An additional ¹⁄₄ to ¹⁄₂ turn may be outside the box on connectors sized to connect power supply cord to 16-gauge dishwasher wire: Connect to drain 1. Form bare...

Installation Instructions
Page 14
..., use a nut driver to tighten the drain hose securely to the dishwasher. 7. Check that the lower edge of dishwasher. Reinstall the lower dish rack. Install the right side screw first. 8. Tighten bracket screws. 5. Start the screws in the opening 3. Release the clamp. If it from tipping when door is still level and centered side to countertop. 2. Complete installation 1. Do not tighten. 10. Use pliers to the access panel. 2. Grounding...
..., use a nut driver to tighten the drain hose securely to the dishwasher. 7. Check that the lower edge of dishwasher. Reinstall the lower dish rack. Install the right side screw first. 8. Tighten bracket screws. 5. Start the screws in the opening 3. Release the clamp. If it from tipping when door is still level and centered side to countertop. 2. Complete installation 1. Do not tighten. 10. Use pliers to the access panel. 2. Grounding...
Installation Instructions
Page 17
... humidity. Door Panel: Handle panels gently. Remove panel(s) and spacer. Insert top of wood door panel between sides of panel(s). Rotate wood door panel down against dishwasher door. Custom access panel more than 5.6 mm) thick: Route all four sides to 5.6 mm) thickness. Use one end of console. Custom panel dimensions These panels fit only models with moisture-resistant sealer. 3. Dishwasher is subject to bow bottom of door frame, allowing wood door panel to avoid slivers. Custom door panel more...
... humidity. Door Panel: Handle panels gently. Remove panel(s) and spacer. Insert top of wood door panel between sides of panel(s). Rotate wood door panel down against dishwasher door. Custom access panel more than 5.6 mm) thick: Route all four sides to 5.6 mm) thickness. Use one end of console. Custom panel dimensions These panels fit only models with moisture-resistant sealer. 3. Dishwasher is subject to bow bottom of door frame, allowing wood door panel to avoid slivers. Custom door panel more...
Installation Instructions
Page 18
... wash cycle. It may be necessary to remove the two screws securing top of access panel frame. Trim 9. Read the Use and Care Guide that dishwasher is working properly, disconnect power or unplug dishwasher and see "If dishwasher does not operate" section. Check that all the tools you used. 4. Insert wood access panel into channel as shown. If the dishwasher is water in base. If dishwasher does not operate...
... wash cycle. It may be necessary to remove the two screws securing top of access panel frame. Trim 9. Read the Use and Care Guide that dishwasher is working properly, disconnect power or unplug dishwasher and see "If dishwasher does not operate" section. Check that all the tools you used. 4. Insert wood access panel into channel as shown. If the dishwasher is water in base. If dishwasher does not operate...

Warranty
Page 1
... light bulbs, air filters or water filters. For assistance or service in the U.S.A., call 1-800-807-6777. In Canada, call 1-800-253-1301. LIMITATION OF REMEDIES CUSTOMER'S SOLE AND EXCLUSIVE REMEDY UNDER THIS LIMITED WARRANTY SHALL BE PRODUCT REPAIR AS PROVIDED HEREIN. In Canada: Whirlpool Brand Home Appliances Customer Interaction Centre 1901 Minnesota Court Mississauga, Ontario L5N 3A7 Please keep this User Instructions and model number...
... light bulbs, air filters or water filters. For assistance or service in the U.S.A., call 1-800-807-6777. In Canada, call 1-800-253-1301. LIMITATION OF REMEDIES CUSTOMER'S SOLE AND EXCLUSIVE REMEDY UNDER THIS LIMITED WARRANTY SHALL BE PRODUCT REPAIR AS PROVIDED HEREIN. In Canada: Whirlpool Brand Home Appliances Customer Interaction Centre 1901 Minnesota Court Mississauga, Ontario L5N 3A7 Please keep this User Instructions and model number...


