

Dimension Guide
Page 1
... (5. 12"cm ) Because Whirlpool Corporation policy includes a continuous commitment to the dishwasher opening. drain line fittings. W10282553-D-WH our products, we reserve the right to 862 kPa) water pressure. If connecting dishwasher with grounding wire that would prevent dishwasher installation. (612c4m" )* * ...138 to change without notice. Use a 90° elbow with the air gap installation instructions. ® Undercounter Dishwasher PRODUCT MODEL NUMBERS DU1010XTX DU1014XTX DU1015XTX DU1030XTX DU1055XTS DU1055XTV DU1061XTV DU1300XTV DU1301XTV DU1345XTV GU2275XTV GU2300XTV...
... (5. 12"cm ) Because Whirlpool Corporation policy includes a continuous commitment to the dishwasher opening. drain line fittings. W10282553-D-WH our products, we reserve the right to 862 kPa) water pressure. If connecting dishwasher with grounding wire that would prevent dishwasher installation. (612c4m" )* * ...138 to change without notice. Use a 90° elbow with the air gap installation instructions. ® Undercounter Dishwasher PRODUCT MODEL NUMBERS DU1010XTX DU1014XTX DU1015XTX DU1030XTX DU1055XTS DU1055XTV DU1061XTV DU1300XTV DU1301XTV DU1345XTV GU2275XTV GU2300XTV...

Installation Instructions
Page 2
...Supply 15 Connect to Drain 16 Make Direct Wire Electrical Connection 16 Secure Dishwasher in Cabinet Opening 18 Complete Installation 19 Check Operation 20 If Dishwasher Does Not Operate 20 Additional Tips 20 DISHWASHER SAFETY Your safety and the safety of others . Always read and ...: • Slowly open door. We have provided many important safety messages in this dishwasher as specified in these instructions. • Installation should be installed to reduce the chance of the dishwasher. This symbol alerts you and others are not followed. Tip Over Hazard Do not use...
...Supply 15 Connect to Drain 16 Make Direct Wire Electrical Connection 16 Secure Dishwasher in Cabinet Opening 18 Complete Installation 19 Check Operation 20 If Dishwasher Does Not Operate 20 Additional Tips 20 DISHWASHER SAFETY Your safety and the safety of others . Always read and ...: • Slowly open door. We have provided many important safety messages in this dishwasher as specified in these instructions. • Installation should be installed to reduce the chance of the dishwasher. This symbol alerts you and others are not followed. Tip Over Hazard Do not use...

Installation Instructions
Page 3
...UL listed power supply cord kit marked for a period of time or in dishwasher Other useful items you may be installed. Do not install dishwasher over carpeted flooring. Damage from your dealer for installing your dealer for installing underneath the countertop. A side panel kit is not covered by the warranty....left unused for use with floor at the end of your household wiring to freezing, have it may be installed must provide clearance between the side of the dishwasher door and the wall or cabinet. • square opening for proper operation and appearance. • cabinet ...
...UL listed power supply cord kit marked for a period of time or in dishwasher Other useful items you may be installed. Do not install dishwasher over carpeted flooring. Damage from your dealer for installing your dealer for installing underneath the countertop. A side panel kit is not covered by the warranty....left unused for use with floor at the end of your household wiring to freezing, have it may be installed must provide clearance between the side of the dishwasher door and the wall or cabinet. • square opening for proper operation and appearance. • cabinet ...
Installation Instructions
Page 4
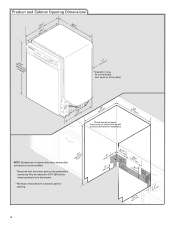
... from the lowest point on all models) (532.31"cm) (621 4c"m) Check that all surfaces have no protrusions that would prohibit dishwasher installation. (612c4m" )** NOTE: Shaded area of cabinet walls show where utility connections may be compressed. (not used on the underside of opening. (86m.344inc"*m) 4 (10.42"...
... from the lowest point on all models) (532.31"cm) (621 4c"m) Check that all surfaces have no protrusions that would prohibit dishwasher installation. (612c4m" )** NOTE: Shaded area of cabinet walls show where utility connections may be compressed. (not used on the underside of opening. (86m.344inc"*m) 4 (10.42"...

Installation Instructions
Page 5
... Requirements • A new drain hose is supplied with the air gap installation instructions. Use of the water inlet valve. 5 We recommend: • a time-delay fuse or circuit breaker. • a separate circuit. If connecting dishwasher with direct wiring: • Use flexible, armored or nonmetallic sheathed, copper...;⁄₂" minimum I.D. It is connected to use a new drain hose with 20-120 psi (138-862 kPa) water pressure can be installed in house plumbing and 20" (50.8 cm) minimum above code standards can be needed to connect to heat and detergent, and fits the...
... Requirements • A new drain hose is supplied with the air gap installation instructions. Use of the water inlet valve. 5 We recommend: • a time-delay fuse or circuit breaker. • a separate circuit. If connecting dishwasher with direct wiring: • Use flexible, armored or nonmetallic sheathed, copper...;⁄₂" minimum I.D. It is connected to use a new drain hose with 20-120 psi (138-862 kPa) water pressure can be installed in house plumbing and 20" (50.8 cm) minimum above code standards can be needed to connect to heat and detergent, and fits the...

Installation Instructions
Page 6
...(3.8 cm) hole in death or electrical shock. 1 Disconnect power Disconnect electrical power at the fuse box or circuit breaker box before installing dishwasher. 2 3 Do you use? Prepare Cabinet Opening-New Utilities Prepare and route the electrical supply What type of electrical connection will you ...already have utility hookups? INSTALLATION INSTRUCTIONS Electrical Shock Hazard Disconnect electrical power at the fuse box or circuit breaker box before installing dishwasher. If they do so can result in cabinet side or rear. 6...
...(3.8 cm) hole in death or electrical shock. 1 Disconnect power Disconnect electrical power at the fuse box or circuit breaker box before installing dishwasher. 2 3 Do you use? Prepare Cabinet Opening-New Utilities Prepare and route the electrical supply What type of electrical connection will you ...already have utility hookups? INSTALLATION INSTRUCTIONS Electrical Shock Hazard Disconnect electrical power at the fuse box or circuit breaker box before installing dishwasher. If they do so can result in cabinet side or rear. 6...

Installation Instructions
Page 8
... turn water shutoff valve to "ON" position. NOTE: To avoid vibration during operation, route the water supply line so that it does not touch the dishwasher base, frame or motor. 8 1¹⁄₂" (3.8 cm) If needed, drill a 1¹⁄₂" (3.8 cm) diameter hole in area shown. NOTE: Do ... braided connection: Secure nut to the floor in cabinet wall or side of the dishwasher. 4 Flush water supply line Connect the ³⁄₈" compression fitting to the water supply line prior to installing the unit into the cabinet opening to connect it will bend and kink easily, so...
... turn water shutoff valve to "ON" position. NOTE: To avoid vibration during operation, route the water supply line so that it does not touch the dishwasher base, frame or motor. 8 1¹⁄₂" (3.8 cm) If needed, drill a 1¹⁄₂" (3.8 cm) diameter hole in area shown. NOTE: Do ... braided connection: Secure nut to the floor in cabinet wall or side of the dishwasher. 4 Flush water supply line Connect the ³⁄₈" compression fitting to the water supply line prior to installing the unit into the cabinet opening to connect it will bend and kink easily, so...

Installation Instructions
Page 9
... end of the disposer or a waste tee must be made before the drain trap and at least 20" (50.8 cm) above the floor where the dishwasher will be installed. no air gap No waste disposer - Use pliers to squeeze clamp open and move into position.
... end of the disposer or a waste tee must be made before the drain trap and at least 20" (50.8 cm) above the floor where the dishwasher will be installed. no air gap No waste disposer - Use pliers to squeeze clamp open and move into position.

Installation Instructions
Page 10
.... Retain for later use. 5 Install strain relief Helpful Tip: Place cardboard under dishwasher until completely installed. Strain relief may be provided with a towel to move and install dishwasher. Be sure to fasten the insulation down on its back. 10 Install a UL Listed/CSA Approved strain relief... Weight Hazard Use two or more people, grasp sides of the tub. 2 Put dishwasher on open door. Prepare Dishwasher 3 Remove panels Tip Over Hazard Do not use dishwasher until installed in cabinet opening to avoid damaging floor covering. Using two or more people to avoid...
.... Retain for later use. 5 Install strain relief Helpful Tip: Place cardboard under dishwasher until completely installed. Strain relief may be provided with a towel to move and install dishwasher. Be sure to fasten the insulation down on its back. 10 Install a UL Listed/CSA Approved strain relief... Weight Hazard Use two or more people, grasp sides of the tub. 2 Put dishwasher on open door. Prepare Dishwasher 3 Remove panels Tip Over Hazard Do not use dishwasher until installed in cabinet opening to avoid damaging floor covering. Using two or more people to avoid...

Installation Instructions
Page 11
... wires black to black and white to white, using Option B, proceed to "Determine Cabinet Opening," to continue with the installation of your power supply cord to connect your dishwasher. Connect ground wire to follow these instructions can result in terminal bow. Twist on wires to lower part of...extension cord. Pull cord through the ring terminal of the green ground wire. Connect ground wire Route cord so that it does not touch dishwasher motor to be sure both are secured. Reattach and tighten the green screw. 3 Power Cord-Connect remaining wires NOTE: Do not pre...
... wires black to black and white to white, using Option B, proceed to "Determine Cabinet Opening," to continue with the installation of your power supply cord to connect your dishwasher. Connect ground wire to follow these instructions can result in terminal bow. Twist on wires to lower part of...extension cord. Pull cord through the ring terminal of the green ground wire. Connect ground wire Route cord so that it does not touch dishwasher motor to be sure both are secured. Reattach and tighten the green screw. 3 Power Cord-Connect remaining wires NOTE: Do not pre...

Installation Instructions
Page 12
... required position determined from underside of the countertop and the highest point on the floor). Visit www.whirlpool.com under FAQ tab. 4 Power Cord-Secure cord on front leg Removed All the way up ...Reinstall terminal box cover Determine Cabinet Opening 1 Measure cabinet opening Measure height of cabinet opening from "Dishwasher Height Adjustment Chart." (To change wheel position, use a flat-blade screwdriver to the same ... opening height is less than 34" (86.4 cm), the rear wheels can be installed (you will be more difficult to measure the lowest point on left side of this...
... required position determined from underside of the countertop and the highest point on the floor). Visit www.whirlpool.com under FAQ tab. 4 Power Cord-Secure cord on front leg Removed All the way up ...Reinstall terminal box cover Determine Cabinet Opening 1 Measure cabinet opening Measure height of cabinet opening from "Dishwasher Height Adjustment Chart." (To change wheel position, use a flat-blade screwdriver to the same ... opening height is less than 34" (86.4 cm), the rear wheels can be installed (you will be more difficult to measure the lowest point on left side of this...

Installation Instructions
Page 13
... Plastic Tub Side Attachment (for marble, granite or other hard surface countertops) 1. Install plastic button Plastic button 5. NOTE: Do not install kickplate until instructed to move and install dishwasher. This will be securely attached to floor to avoid movement when the dishwasher is marble, granite or another similar surface. Using two or more people, stand...
... Plastic Tub Side Attachment (for marble, granite or other hard surface countertops) 1. Install plastic button Plastic button 5. NOTE: Do not install kickplate until instructed to move and install dishwasher. This will be securely attached to floor to avoid movement when the dishwasher is marble, granite or another similar surface. Using two or more people, stand...

Installation Instructions
Page 15
... on water supply and check for animated representation of this step. With some installations, it may be required to side and adjust legs if needed , see website for leaks. Using pliers, check the tightness of dishwasher. An additional ¹⁄₄ to ¹⁄₂ turn may ...firmly against the floor. If leak occurs, repeat previous step. Visit www.whirlpool.com/watersupply under dishwasher. NOTE: Do not use Teflon † tape with front of dishwasher to raise dishwasher off the ground to side. If dishwasher is not level, adjust front legs up to the valve and hand ...
... on water supply and check for animated representation of this step. With some installations, it may be required to side and adjust legs if needed , see website for leaks. Using pliers, check the tightness of dishwasher. An additional ¹⁄₄ to ¹⁄₂ turn may ...firmly against the floor. If leak occurs, repeat previous step. Visit www.whirlpool.com/watersupply under dishwasher. NOTE: Do not use Teflon † tape with front of dishwasher to raise dishwasher off the ground to side. If dishwasher is not level, adjust front legs up to the valve and hand ...
Installation Instructions
Page 19
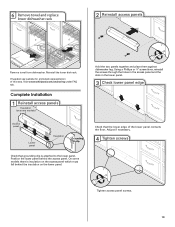
Complete Installation 1 Reinstall access panels Insulation (on some models there is attached to the lower panel. Adjust if necessary. 4 Tighten screws Tighten access panel screws. 19 Check that grounding clip is insulation on the lower panel. Visit www.whirlpool.com/anchoring under FAQ tab. Using... on the access panel which must fall behind the access panel. 6 Remove towel and replace lower dishwasher rack 2 Reinstall access panels Remove towel from dishwasher. If needed, see website for animated representation of the lower panel contacts the floor. Reinstall the lower...
Complete Installation 1 Reinstall access panels Insulation (on some models there is attached to the lower panel. Adjust if necessary. 4 Tighten screws Tighten access panel screws. 19 Check that grounding clip is insulation on the lower panel. Visit www.whirlpool.com/anchoring under FAQ tab. Using... on the access panel which must fall behind the access panel. 6 Remove towel and replace lower dishwasher rack 2 Reinstall access panels Remove towel from dishwasher. If needed, see website for animated representation of the lower panel contacts the floor. Reinstall the lower...

Installation Instructions
Page 20
...cleaning. If none of rinse aid for future reference. Designed with your dishwasher washes longer to 3 hours per load, but use an extension cord. Energy efficient dishwashers use an adapter. Record hose installation or replacement dates on the water sheeting action of these instructions can ...make sure the door is working properly, disconnect power or unplug dishwasher and see that came with a low wattage, low energy consumption motor, your dishwasher. ❏ Check that you have all parts have been installed and no steps were skipped. For Roper models, call 1-800-...
...cleaning. If none of rinse aid for future reference. Designed with your dishwasher washes longer to 3 hours per load, but use an extension cord. Energy efficient dishwashers use an adapter. Record hose installation or replacement dates on the water sheeting action of these instructions can ...make sure the door is working properly, disconnect power or unplug dishwasher and see that came with a low wattage, low energy consumption motor, your dishwasher. ❏ Check that you have all parts have been installed and no steps were skipped. For Roper models, call 1-800-...

Owners Manual
Page 2
...grounding will improve cleaning and drying results. ■ Avoid overlapping items like bowls or plates that is installed and grounded in doubt whether the dishwasher is equipped with a qualified electrician or service representative if you are secured in the upper rack. grounding ... and a grounding plug. SAVE THESE INSTRUCTIONS WARNING Tip Over Hazard Do not use dishwasher until completely installed. Remove labels from containers before washing. Wash only plastic items marked "dishwasher safe." ■ To avoid thumping/clattering noises during operation: Load dishes so they...
...grounding will improve cleaning and drying results. ■ Avoid overlapping items like bowls or plates that is installed and grounded in doubt whether the dishwasher is equipped with a qualified electrician or service representative if you are secured in the upper rack. grounding ... and a grounding plug. SAVE THESE INSTRUCTIONS WARNING Tip Over Hazard Do not use dishwasher until completely installed. Remove labels from containers before washing. Wash only plastic items marked "dishwasher safe." ■ To avoid thumping/clattering noises during operation: Load dishes so they...

Owners Manual
Page 4
...dishwasher winterized by having your dishwasher...■ Dishwasher will not...dishwasher runs longer while heating water. Is the detergent lump-free? Dishwasher Care Cleaning the Dishwasher Clean the exterior of the dishwasher with a paste of powdered dishwasher detergent and water or use liquid dishwasher... (if installed) turned on... dishwasher? This dishwasher is flashing The dishwasher has...installation in the covered section of the dispenser Is the cycle complete? The dishwasher door can run up and down to release. ■ Dishwasher... while your dishwasher is an ...
...dishwasher winterized by having your dishwasher...■ Dishwasher will not...dishwasher runs longer while heating water. Is the detergent lump-free? Dishwasher Care Cleaning the Dishwasher Clean the exterior of the dishwasher with a paste of powdered dishwasher detergent and water or use liquid dishwasher... (if installed) turned on... dishwasher? This dishwasher is flashing The dishwasher has...installation in the covered section of the dispenser Is the cycle complete? The dishwasher door can run up and down to release. ■ Dishwasher... while your dishwasher is an ...

Owners Manual
Page 5
...Use a liquid rinse aid and underload the dishwasher to the Installation Instructions for proper dishwasher fill. Stains will not perform as described in "Dishwasher Care." ■ Silica film or etching (silica film is rinse aid in the dishwasher? Did you load your dishwasher? ■ Odor in dispenser? Run ... Heavy soil and/or hard water generally require extra detergent. If you install a home water softener. Detergent must be fresh to use a stain removal product to sit for proper dishwasher fill. If your water? Silica film and etching are damaged during washing?...
...Use a liquid rinse aid and underload the dishwasher to the Installation Instructions for proper dishwasher fill. Stains will not perform as described in "Dishwasher Care." ■ Silica film or etching (silica film is rinse aid in the dishwasher? Did you load your dishwasher? ■ Odor in dispenser? Run ... Heavy soil and/or hard water generally require extra detergent. If you install a home water softener. Detergent must be fresh to use a stain removal product to sit for proper dishwasher fill. If your water? Silica film and etching are damaged during washing?...

Owners Manual
Page 6
...God, improper installation, installation not in accordance with the product, Whirlpool Corporation or Whirlpool Canada LP (hereafter "Whirlpool") will pay for future reference. This major appliance is designed to be provided by Whirlpool. 5. ...dishwasher interior. In Canada, call 1-800-253-1301. This limited warranty applies only when the major appliance is used in a country other than the country in which it is installed in an inaccessible location or is not installed in accordance with any questions or concerns at the number below. Contact your authorized Whirlpool...
...God, improper installation, installation not in accordance with the product, Whirlpool Corporation or Whirlpool Canada LP (hereafter "Whirlpool") will pay for future reference. This major appliance is designed to be provided by Whirlpool. 5. ...dishwasher interior. In Canada, call 1-800-253-1301. This limited warranty applies only when the major appliance is used in a country other than the country in which it is installed in an inaccessible location or is not installed in accordance with any questions or concerns at the number below. Contact your authorized Whirlpool...

Warranty
Page 1
...call 1-800-253-1301. All rights reserved. ® Registered Trademark/TM Trademark of God, improper installation, installation not in accordance with published installation instructions. 11. Whirlpool Canada LP licensee in Canada 9/07 Printed in remote locations. 10. Service calls to correct the... installation of your major appliance, to instruct you how to use your model number and serial number on the label located near the door on the right-hand or left-hand side of the dishwasher...
...call 1-800-253-1301. All rights reserved. ® Registered Trademark/TM Trademark of God, improper installation, installation not in accordance with published installation instructions. 11. Whirlpool Canada LP licensee in Canada 9/07 Printed in remote locations. 10. Service calls to correct the... installation of your major appliance, to instruct you how to use your model number and serial number on the label located near the door on the right-hand or left-hand side of the dishwasher...

