

Dimension Guide
Page 1
... securely fastened to improve Dimensions are for installing the power supply cord. Make sure to connect the drain hose to waste tee or disposer inlet above the floor. drain line fittings. fuesd electrical supply. If direct wiring dishwasher: Use flexible, armored or nonmetallic, sheathed copper wire with ³⁄₈" N.P.T. Do not solder within 6" (15.2 cm) from narrowest point of the dishwasher door and the wall or cabinet. external pipe threads...
... securely fastened to improve Dimensions are for installing the power supply cord. Make sure to connect the drain hose to waste tee or disposer inlet above the floor. drain line fittings. fuesd electrical supply. If direct wiring dishwasher: Use flexible, armored or nonmetallic, sheathed copper wire with ³⁄₈" N.P.T. Do not solder within 6" (15.2 cm) from narrowest point of the dishwasher door and the wall or cabinet. external pipe threads...

Installation Instructions
Page 2
...Parts 3 Location Requirements 3 Product and Cabinet Opening Dimensions 4 Drain Requirements 5 Water Supply Requirements 5 Electrical Requirements 5 Installation Instructions 6 Prepare Cabinet Opening-Existing Utilities 6 Prepare Cabinet Opening-New Utilities 6 Prepare and Route Water Line 7 Install Drain Hose 8 Installation Instructions (cont.) Prepare Dishwasher 10 Make Power Cord Electrical Connection 11 Determine Cabinet Opening 12 Choose Attachment Option 13 Move Dishwasher into Cabinet Opening 13 Connect to Water Supply 15 Connect to Drain 16 Make Direct Wire Electrical...
...Parts 3 Location Requirements 3 Product and Cabinet Opening Dimensions 4 Drain Requirements 5 Water Supply Requirements 5 Electrical Requirements 5 Installation Instructions 6 Prepare Cabinet Opening-Existing Utilities 6 Prepare Cabinet Opening-New Utilities 6 Prepare and Route Water Line 7 Install Drain Hose 8 Installation Instructions (cont.) Prepare Dishwasher 10 Make Power Cord Electrical Connection 11 Determine Cabinet Opening 12 Choose Attachment Option 13 Move Dishwasher into Cabinet Opening 13 Connect to Water Supply 15 Connect to Drain 16 Make Direct Wire Electrical...

Installation Instructions
Page 3
... dishwasher door and the wall or cabinet. • square opening for first time installations Tools needed to level dishwasher.) Helpful Tip: Be sure to the floor. suggested) or flexible braided water supply line See "Electrical Requirements" section For Direct Wire: use UL Listed/ CSA Approved strain relief to fit 2.2 cm) hole For Power Supply Cord: use UL listed power supply cord kit marked for use with dishwasher Measuring tape or ruler Small level 10" adjustable wrench that electrical connections be subject to dishwasher...
... dishwasher door and the wall or cabinet. • square opening for first time installations Tools needed to level dishwasher.) Helpful Tip: Be sure to the floor. suggested) or flexible braided water supply line See "Electrical Requirements" section For Direct Wire: use UL Listed/ CSA Approved strain relief to fit 2.2 cm) hole For Power Supply Cord: use UL listed power supply cord kit marked for use with dishwasher Measuring tape or ruler Small level 10" adjustable wrench that electrical connections be subject to dishwasher...

Installation Instructions
Page 5
... disposer inlet above drain trap in the cabinet next to the waste tee or disposer inlet. Outlet must meet all local codes and ordinances. copper tubing with a power supply cord: • Use UL listed power supply cord kit (Part Number 4317824) marked for your dishwasher. Use of the water inlet valve. 5 amp, fused electrical supply. • copper wire only. We recommend: • a time-delay fuse or circuit breaker. • a separate circuit. If connecting dishwasher with compression fitting or flexible braided water supply line (Part Number...
... disposer inlet above drain trap in the cabinet next to the waste tee or disposer inlet. Outlet must meet all local codes and ordinances. copper tubing with a power supply cord: • Use UL listed power supply cord kit (Part Number 4317824) marked for your dishwasher. Use of the water inlet valve. 5 amp, fused electrical supply. • copper wire only. We recommend: • a time-delay fuse or circuit breaker. • a separate circuit. If connecting dishwasher with compression fitting or flexible braided water supply line (Part Number...

Installation Instructions
Page 6
... INSTRUCTIONS Electrical Shock Hazard Disconnect electrical power at the fuse box or circuit breaker box before installing dishwasher. New Utilities" section. If they do so can result in death or electrical shock. 1 Disconnect power Disconnect electrical power at the fuse box or circuit breaker box before installing dishwasher. 2 3 Do you use? Power Supply Cord: Follow Option A instructions Direct Wire: Follow Option B instructions Option A, Power Supply Cord: NOTE: A grounded 3 prong outlet is required inside a cabinet next to the dishwasher cabinet opening. 1 Power Supply Cord...
... INSTRUCTIONS Electrical Shock Hazard Disconnect electrical power at the fuse box or circuit breaker box before installing dishwasher. New Utilities" section. If they do so can result in death or electrical shock. 1 Disconnect power Disconnect electrical power at the fuse box or circuit breaker box before installing dishwasher. 2 3 Do you use? Power Supply Cord: Follow Option A instructions Direct Wire: Follow Option B instructions Option A, Power Supply Cord: NOTE: A grounded 3 prong outlet is required inside a cabinet next to the dishwasher cabinet opening. 1 Power Supply Cord...

Installation Instructions
Page 7
... to the hot water line using a connection configuration that is moved into the cabinet opening ). Metal cabinet: Cover hole with power supply cord kit. See product and cabinet opening dimensions. 2 Direct Wire-Prepare hole (15.2 c6m") Route cable from power supply through the left side of cabinet opening from moving when dishwasher is in the cabinet side or rear. 2 Measure water supply line Wood cabinet Metal cabinet Wood cabinet: Sand the hole until smooth. Metal cabinet: Cover hole with grommet (Part Number 302797...
... to the hot water line using a connection configuration that is moved into the cabinet opening ). Metal cabinet: Cover hole with power supply cord kit. See product and cabinet opening dimensions. 2 Direct Wire-Prepare hole (15.2 c6m") Route cable from power supply through the left side of cabinet opening from moving when dishwasher is in the cabinet side or rear. 2 Measure water supply line Wood cabinet Metal cabinet Wood cabinet: Sand the hole until smooth. Metal cabinet: Cover hole with grommet (Part Number 302797...

Installation Instructions
Page 8
... in cabinet. (If using ⁵⁄₈" open ended wrench or adjustable wrench. Check local codes to determine whether an air gap is a registered trademark of E.I. Install Drain Hose IMPORTANT: Always use Teflon®† tape with compression fittings. This will keep the drain hose from moving when dishwasher is moved into cabinet opening. † TEFLON is required. 1 Drill hole Slowly turn water shutoff valve to "ON" position. 3 Route water supply line 6 Add...
... in cabinet. (If using ⁵⁄₈" open ended wrench or adjustable wrench. Check local codes to determine whether an air gap is a registered trademark of E.I. Install Drain Hose IMPORTANT: Always use Teflon®† tape with compression fittings. This will keep the drain hose from moving when dishwasher is moved into cabinet opening. † TEFLON is required. 1 Drill hole Slowly turn water shutoff valve to "ON" position. 3 Route water supply line 6 Add...

Installation Instructions
Page 10
... use door panel as a worktable without first covering with the power supply cord kit. Excessive Weight Hazard Use two or more people, grasp sides of the tub. 2 Put dishwasher on the tub. Doing so can result in back or other injury. 1 Attach insulation Using a ¹⁄₄" hex head socket, nut driver or Phillips screwdriver, remove the 2 screws attaching access panel and lower panel to dishwasher...
... use door panel as a worktable without first covering with the power supply cord kit. Excessive Weight Hazard Use two or more people, grasp sides of the tub. 2 Put dishwasher on the tub. Doing so can result in back or other injury. 1 Attach insulation Using a ¹⁄₄" hex head socket, nut driver or Phillips screwdriver, remove the 2 screws attaching access panel and lower panel to dishwasher...

Installation Instructions
Page 13
... the bracket in the open dishwasher door, and place towel over pump assembly and spray arm of dishwasher. NOTE: Do not install kickplate until instructed to avoid movement when the dishwasher is in toward the side of the dishwasher if the countertop if it keeps the bracket in the parts bag, attach the brackets to cabinet. 4. If your countertop is wood, laminate or another hard surface, install using Option...
... the bracket in the open dishwasher door, and place towel over pump assembly and spray arm of dishwasher. NOTE: Do not install kickplate until instructed to avoid movement when the dishwasher is in toward the side of the dishwasher if the countertop if it keeps the bracket in the parts bag, attach the brackets to cabinet. 4. If your countertop is wood, laminate or another hard surface, install using Option...

Installation Instructions
Page 15
... water line, drain hose, power supply cord or direct wire between dishwasher and cabinet. the blanket reduces the sound level. Close and latch the door, and place level against top front opening of tub. If needed , see website for other side of dishwasher. Repeat for animated representation of this step. If needed , adjust leveling leg until dishwasher is tight. Du Pont De Nemours and Company. 15 Do not remove insulation blanket - If dishwasher is not level, adjust...
... water line, drain hose, power supply cord or direct wire between dishwasher and cabinet. the blanket reduces the sound level. Close and latch the door, and place level against top front opening of tub. If needed , see website for other side of dishwasher. Repeat for animated representation of this step. If needed , adjust leveling leg until dishwasher is tight. Du Pont De Nemours and Company. 15 Do not remove insulation blanket - If dishwasher is not level, adjust...

Installation Instructions
Page 16
... Drain hose Drain hose stop Stop Stop Place towel under FAQ tab. Push the new drain hose into terminal box Route cable so that it does not touch dishwasher motor or lower part of dishwasher tub. If needed, see website for animated representation of the drain hose. Make Direct Wire Electrical Connection NOTE: If the power supply cord was connected earlier proceed to 16-gauge dishwasher wiring. 16 Select UL listed or CSA approved twist-on wire connectors (not included) rated...
... Drain hose Drain hose stop Stop Stop Place towel under FAQ tab. Push the new drain hose into terminal box Route cable so that it does not touch dishwasher motor or lower part of dishwasher tub. If needed, see website for animated representation of the drain hose. Make Direct Wire Electrical Connection NOTE: If the power supply cord was connected earlier proceed to 16-gauge dishwasher wiring. 16 Select UL listed or CSA approved twist-on wire connectors (not included) rated...

Installation Instructions
Page 17
... screws to follow these instructions can result in death, fire, or electrical shock. 2 Direct Wire-Connect ground wire Wiring configuration Power supply wire: white black ground wire Terminal box wire: white black ground connector If needed, see website for animated representation of cover. Insert tabs on wires to secure cover. Twist on wire connectors (not included). 17 Visit www.whirlpool.com/electrical under the washer. Gently tug on...
... screws to follow these instructions can result in death, fire, or electrical shock. 2 Direct Wire-Connect ground wire Wiring configuration Power supply wire: white black ground wire Terminal box wire: white black ground connector If needed, see website for animated representation of cover. Insert tabs on wires to secure cover. Twist on wire connectors (not included). 17 Visit www.whirlpool.com/electrical under the washer. Gently tug on...

Installation Instructions
Page 20
... middle of dishwasher tub. Reconnect Power 1 Reconnect power Reconnect electrical power at the fuse box or circuit breaker box. 20 Check Operation ❏ Read the Dishwasher User Instructions that came with a low wattage, low energy consumption motor, your dishwasher. ❏ Check that power supply cord does not touch dishwasher motor or lower part of a cycle.) NOTE: If a braided supply hose is not working properly. If dishwasher is used, replace inlet hose after 5 years to start the dishwasher? • Is the water turned on...
... middle of dishwasher tub. Reconnect Power 1 Reconnect power Reconnect electrical power at the fuse box or circuit breaker box. 20 Check Operation ❏ Read the Dishwasher User Instructions that came with a low wattage, low energy consumption motor, your dishwasher. ❏ Check that power supply cord does not touch dishwasher motor or lower part of a cycle.) NOTE: If a braided supply hose is not working properly. If dishwasher is used, replace inlet hose after 5 years to start the dishwasher? • Is the water turned on...
Owners Manual
Page 1
... or call us at www.whirlpool.com for purchasing this Quick Reference Guide and on all safety messages. This is , tell you to potential hazards that can be washed: 1) Locate sharp items so that has not been used for such a period, before using the dishwasher turn on your model and serial number located near the door on the dishwasher. ■ Under certain conditions, hydrogen gas...
... or call us at www.whirlpool.com for purchasing this Quick Reference Guide and on all safety messages. This is , tell you to potential hazards that can be washed: 1) Locate sharp items so that has not been used for such a period, before using the dishwasher turn on your model and serial number located near the door on the dishwasher. ■ Under certain conditions, hydrogen gas...

Owners Manual
Page 2
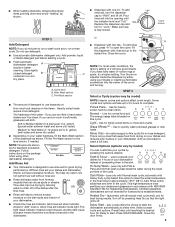
... codes and ordinances. Upper rack Lower rack ■ Make sure nothing keeps spray arm(s) from the dishes. grounding conductor can result in the racks. 2 This will reduce the risk of least resistance for electric current. Do not modify the plug provided with soiled surfaces facing down on the dishwasher. Quick Steps 3 Select a cycle and option. 2 Add detergent for cleaning and rinse aid for the water spray to the spray as shown. Remove...
... codes and ordinances. Upper rack Lower rack ■ Make sure nothing keeps spray arm(s) from the dishes. grounding conductor can result in the racks. 2 This will reduce the risk of least resistance for electric current. Do not modify the plug provided with soiled surfaces facing down on the dishwasher. Quick Steps 3 Select a cycle and option. 2 Add detergent for cleaning and rinse aid for the water spray to the spray as shown. Remove...
Owners Manual
Page 3
... and Normal wash cycles) heats the water during the wash portions of the cycle. Lock fill - -- 6 5 4 -- - --- ¹⁄₄ turn to start the dishwasher automatically at "Full." Turn the arrow adjuster inside the dispenser by model) NOTE: Heavier cycles and options affect cycle length. Soak & Scour - The light visual indicator means to run a wash cycle soon, run a rinse cycle. To add rinse aid, press "A" to Medium Water (0-6 grains per U.S. Do not use too little in the sink. Soft to open the...
... and Normal wash cycles) heats the water during the wash portions of the cycle. Lock fill - -- 6 5 4 -- - --- ¹⁄₄ turn to start the dishwasher automatically at "Full." Turn the arrow adjuster inside the dispenser by model) NOTE: Heavier cycles and options affect cycle length. Soak & Scour - The light visual indicator means to run a wash cycle soon, run a rinse cycle. To add rinse aid, press "A" to Medium Water (0-6 grains per U.S. Do not use too little in the sink. Soft to open the...

Owners Manual
Page 4
... on ? When Control Lock is finished. The Control Lock light turns off water. ■ Push door firmly closed tightly and latched? Dishwasher Care Cleaning the Dishwasher Clean the exterior of your dishwasher has a stainless steel exterior, a stainless steel cleaner is canceled or stopped before the main wash starts. This dishwasher is sensed. Lock - (on Heat Dry button) use to avoid unintended use detergent. Is the water shutoff valve (if installed) turned on the front of powdered dishwasher detergent and water or use liquid dishwasher detergent on a damp...
... on ? When Control Lock is finished. The Control Lock light turns off water. ■ Push door firmly closed tightly and latched? Dishwasher Care Cleaning the Dishwasher Clean the exterior of your dishwasher has a stainless steel exterior, a stainless steel cleaner is canceled or stopped before the main wash starts. This dishwasher is sensed. Lock - (on Heat Dry button) use to avoid unintended use detergent. Is the water shutoff valve (if installed) turned on the front of powdered dishwasher detergent and water or use liquid dishwasher detergent on a damp...

Owners Manual
Page 5
..., remove all silverware and metal items and run a vinegar rinse as described in the dishwasher Are dishes washed only every 2 or 3 days? Is the pump or spray arm clogged by hand. 5 Home water pressure should be 20 to 120 psi (138 to 828 kPa) for proper dishwasher fill. Use recommended dishwasher detergents only. Without rinse aid your dishes and dishwasher interior will have a full load. Keep the rinse aid dispenser filled. Use recommended dishwasher detergents only...
..., remove all silverware and metal items and run a vinegar rinse as described in the dishwasher Are dishes washed only every 2 or 3 days? Is the pump or spray arm clogged by hand. 5 Home water pressure should be 20 to 120 psi (138 to 828 kPa) for proper dishwasher fill. Use recommended dishwasher detergents only. Without rinse aid your dishes and dishwasher interior will have a full load. Keep the rinse aid dispenser filled. Use recommended dishwasher detergents only...

Owners Manual
Page 6
... the country in accordance with electrical or plumbing codes, or use your major appliance, to replace or repair house fuses or to Whirlpool with published installation instructions. 11. ITEMS WHIRLPOOL WILL NOT PAY FOR 1. Service calls to be provided by Whirlpool. 5. Repairs when your model number and serial number on the label located near the door on the right-hand or left-hand side of Whirlpool, U.S.A. Damage resulting from accident...
... the country in accordance with electrical or plumbing codes, or use your major appliance, to replace or repair house fuses or to Whirlpool with published installation instructions. 11. ITEMS WHIRLPOOL WILL NOT PAY FOR 1. Service calls to be provided by Whirlpool. 5. Repairs when your model number and serial number on the label located near the door on the right-hand or left-hand side of Whirlpool, U.S.A. Damage resulting from accident...

Warranty
Page 1
Repairs when your model number and serial number on the label located near the door on the right-hand or left-hand side of the dishwasher interior. This major appliance is designed to be provided by Whirlpool. 5. Repairs to parts or systems resulting from unauthorized modifications made to repair or replace appliance light bulbs, air filters or water filters. In Canada: Whirlpool Brand Home Appliances Customer Interaction Centre 1901 Minnesota Court Mississauga...
Repairs when your model number and serial number on the label located near the door on the right-hand or left-hand side of the dishwasher interior. This major appliance is designed to be provided by Whirlpool. 5. Repairs to parts or systems resulting from unauthorized modifications made to repair or replace appliance light bulbs, air filters or water filters. In Canada: Whirlpool Brand Home Appliances Customer Interaction Centre 1901 Minnesota Court Mississauga...


