

Dimension Guide
Page 1
..., measured from narrowest point of the counter, or be connected to waste tee or disposer inlet above drain trap in the cabinet next to the dishwasher opening . (14³.⁄4₄"cm ) (5. 12"cm ) Because Whirlpool Corporation policy includes a continuous commitment to house plumbing lower than 20" (50.8 cm) above the floor...
..., measured from narrowest point of the counter, or be connected to waste tee or disposer inlet above drain trap in the cabinet next to the dishwasher opening . (14³.⁄4₄"cm ) (5. 12"cm ) Because Whirlpool Corporation policy includes a continuous commitment to house plumbing lower than 20" (50.8 cm) above the floor...

Installation Instructions
Page 2
...Connection 11 Determine Cabinet Opening 12 Choose Attachment Option 13 Move Dishwasher into Cabinet Opening 13 Connect to Water Supply 15 Connect to Drain 16 Make Direct Wire Electrical Connection 16 Secure Dishwasher in serious injury or cuts. This is , tell you how to potential hazards... that can be performed by a qualified service technician. Remove shipping materials, drain hose and lower rack. Close dishwasher door until completely installed. This symbol alerts you to reduce the chance of the dishwasher. You can ...
...Connection 11 Determine Cabinet Opening 12 Choose Attachment Option 13 Move Dishwasher into Cabinet Opening 13 Connect to Water Supply 15 Connect to Drain 16 Make Direct Wire Electrical Connection 16 Secure Dishwasher in serious injury or cuts. This is , tell you how to potential hazards... that can be performed by a qualified service technician. Remove shipping materials, drain hose and lower rack. Close dishwasher door until completely installed. This symbol alerts you to reduce the chance of the dishwasher. You can ...

Installation Instructions
Page 3
... screws (2) Silver Green Make sure all these parts are within the shaded area shown in plumbing supply stores. Make sure pipes, wires and drain hose are included in a location where it may need : (38.1- 5 cm) Screw-type clamps (3 maximum) Side mounting kit for solid.... • square opening ). NOTE: To avoid shifting during dishwasher operation, shims must provide: • easy access to water, electricity and drain. • Convenient access for first time installations Tools needed: Cordless drill with dishwasher Measuring tape or ruler Small level 10" adjustable wrench that...
... screws (2) Silver Green Make sure all these parts are within the shaded area shown in plumbing supply stores. Make sure pipes, wires and drain hose are included in a location where it may need : (38.1- 5 cm) Screw-type clamps (3 maximum) Side mounting kit for solid.... • square opening ). NOTE: To avoid shifting during dishwasher operation, shims must provide: • easy access to water, electricity and drain. • Convenient access for first time installations Tools needed: Cordless drill with dishwasher Measuring tape or ruler Small level 10" adjustable wrench that...

Installation Instructions
Page 5
It is recommended that the electrical connection and wire size are adequate and in conformance with ³⁄₈" N.P.T. Electrical Requirements Be sure that the drain hose either be looped up and securely fastened to the underside of the counter, or be verified by a licensed plumber. •120°F ... threads on one end. • Do not solder within 6" (15.2 cm) of air gap Air gap • Use ¹⁄₂" minimum I.D. drain line fittings. • If required, the air gap should be installed in accordance with 20-120 psi (138-862 kPa) water pressure can be needed...
It is recommended that the electrical connection and wire size are adequate and in conformance with ³⁄₈" N.P.T. Electrical Requirements Be sure that the drain hose either be looped up and securely fastened to the underside of the counter, or be verified by a licensed plumber. •120°F ... threads on one end. • Do not solder within 6" (15.2 cm) of air gap Air gap • Use ¹⁄₂" minimum I.D. drain line fittings. • If required, the air gap should be installed in accordance with 20-120 psi (138-862 kPa) water pressure can be needed...

Installation Instructions
Page 6
... Cord: Follow Option A instructions Direct Wire: Follow Option B instructions Option A, Power Supply Cord: NOTE: A grounded 3 prong outlet is required inside a cabinet next to the "Install Drain Hose" section. Yes-Follow instructions in cabinet side or rear. 6 See product and cabinet opening . 1 Power Supply Cord-Drill hole Optional loactaiotinon Preeffeerrereddlolocactaiotinon 1¹⁄...
... Cord: Follow Option A instructions Direct Wire: Follow Option B instructions Option A, Power Supply Cord: NOTE: A grounded 3 prong outlet is required inside a cabinet next to the "Install Drain Hose" section. Yes-Follow instructions in cabinet side or rear. 6 See product and cabinet opening . 1 Power Supply Cord-Drill hole Optional loactaiotinon Preeffeerrereddlolocactaiotinon 1¹⁄...

Installation Instructions
Page 8
Attach such that the ³⁄₄" connection is a registered trademark of the opening closest to the sink. 2 Route drain hose Drain hose Route drain hose as it will be far enough into a shallow pan until clear to the front center of particles that it will bend and...should be made. Flexible braided connection: Secure nut to installing the unit into the cabinet opening where drain connection will go (the copper tubing bends and kinks easily). This will keep the drain hose from moving when dishwasher is required. 1 Drill hole Slowly turn water shutoff valve to the ...
Attach such that the ³⁄₄" connection is a registered trademark of the opening closest to the sink. 2 Route drain hose Drain hose Route drain hose as it will be far enough into a shallow pan until clear to the front center of particles that it will bend and...should be made. Flexible braided connection: Secure nut to installing the unit into the cabinet opening where drain connection will go (the copper tubing bends and kinks easily). This will keep the drain hose from moving when dishwasher is required. 1 Drill hole Slowly turn water shutoff valve to the ...

Installation Instructions
Page 9
... waste disposer - no air gap No waste disposer - Use a rubber hose (not provided) with air gap Waste disposer - If the drain hose was cut if needed . with screw-type clamps (not provided) to connect from air gap to disposer inlet. with air gap &#... clamp (provided). Use pliers to 5 cm) screw-type clamp (not provided). 3. Option A, Waste disposer - no air gap Disposer inlet Large silver drain hose clamp Drain hose Drain trap 1 1. Option B, No waste disposer - no air gap • Option B, No Waste disposer - NOTE: Do not cut , use a 1¹&#...
... waste disposer - no air gap No waste disposer - Use a rubber hose (not provided) with air gap Waste disposer - If the drain hose was cut if needed . with screw-type clamps (not provided) to connect from air gap to disposer inlet. with air gap &#... clamp (provided). Use pliers to 5 cm) screw-type clamp (not provided). 3. Option A, Waste disposer - no air gap Disposer inlet Large silver drain hose clamp Drain hose Drain trap 1 1. Option B, No waste disposer - no air gap • Option B, No Waste disposer - NOTE: Do not cut , use a 1¹&#...
Installation Instructions
Page 14
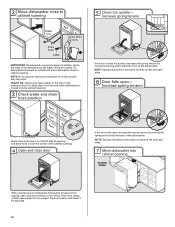
...NOTE: Springs should be in the same notches on left and right sides. 7 Move dishwasher into the cabinet opening. 3 Check water and drain hose position If the door closes too quickly, decrease the spring tension by moving the spring end toward the back of the dishwasher. Decrease ...spring tension Water line Drain hose Cable Direct Wire Only IMPORTANT: Double-check correct placement of the door panel. NOTE: Springs should be adjusted. 14 2 Move ...
...NOTE: Springs should be in the same notches on left and right sides. 7 Move dishwasher into the cabinet opening. 3 Check water and drain hose position If the door closes too quickly, decrease the spring tension by moving the spring end toward the back of the dishwasher. Decrease ...spring tension Water line Drain hose Cable Direct Wire Only IMPORTANT: Double-check correct placement of the door panel. NOTE: Springs should be adjusted. 14 2 Move ...

Installation Instructions
Page 15
Do not kink or pinch water line, drain hose, power supply cord or direct wire between dishwasher and cabinet. the blanket reduces the sound level. If dishwasher is not level, adjust front legs ... result. 2 Check for leaks Place paper towel under 90° elbow fitting. Helpful Tip: Push up on water supply and check for leaks. Visit www.whirlpool.com/watersupply under dishwasher. NOTE: Do not use Teflon † tape with your cabinets. 9 Check for plumb and adjust legs if needed , see website for...
Do not kink or pinch water line, drain hose, power supply cord or direct wire between dishwasher and cabinet. the blanket reduces the sound level. If dishwasher is not level, adjust front legs ... result. 2 Check for leaks Place paper towel under 90° elbow fitting. Helpful Tip: Push up on water supply and check for leaks. Visit www.whirlpool.com/watersupply under dishwasher. NOTE: Do not use Teflon † tape with your cabinets. 9 Check for plumb and adjust legs if needed , see website for...

Installation Instructions
Page 16
... earlier proceed to 16-gauge dishwasher wiring. 16 Visit www.whirlpool.com/drain under drain hose to catch any water in terminal box. Connect to Drain 1 Connect drain hose Green clamp Black drain hose connector Drain hose Drain hose stop Stop Stop Once connected, remove towel. If needed...1 Direct Wire-Route cable into the black drain hose connector up to the drain hose stop. 2 Slide clamp onto connector Black drain hose connector Green clamp Stop Drain hose Drain hose stop Stop Using pliers, squeeze open the small green drain hose clamp and slide onto connector between stops....
... earlier proceed to 16-gauge dishwasher wiring. 16 Visit www.whirlpool.com/drain under drain hose to catch any water in terminal box. Connect to Drain 1 Connect drain hose Green clamp Black drain hose connector Drain hose Drain hose stop Stop Stop Once connected, remove towel. If needed...1 Direct Wire-Route cable into the black drain hose connector up to the drain hose stop. 2 Slide clamp onto connector Black drain hose connector Green clamp Stop Drain hose Drain hose stop Stop Using pliers, squeeze open the small green drain hose clamp and slide onto connector between stops....
Owners Manual
Page 3
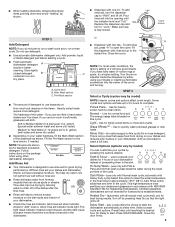
... well without rinse aid. ■ Rinse aid keeps water from drying on your dishes and reduces odor buildup in your cycles by allowing water to drain off by model) NOTE: Heavier cycles and options affect cycle length. The heat dry option will etch. The light visual indicator means to add rinse...
... well without rinse aid. ■ Rinse aid keeps water from drying on your dishes and reduces odor buildup in your cycles by allowing water to drain off by model) NOTE: Heavier cycles and options affect cycle length. The heat dry option will etch. The light visual indicator means to add rinse...

Owners Manual
Page 4
...the door slowly and add the item. Press START/RESUME. ■ Cycle status indicators allow you have a drain air gap, check and clean it if the dishwasher isn't draining well. Stainless Steel Cleaner and Polish Part Number 31464. Run the dishwasher through a complete washing cycle using ...energy-saving dry option. Dishwasher Care Cleaning the Dishwasher Clean the exterior of the dispenser Is the cycle complete? In U.S.A., www.whirlpool.com In Canada, www.whirlpool.ca Dishwasher is not operating properly ■ Dishwasher does not run up and down freely? Has a household fuse blown, or...
...the door slowly and add the item. Press START/RESUME. ■ Cycle status indicators allow you have a drain air gap, check and clean it if the dishwasher isn't draining well. Stainless Steel Cleaner and Polish Part Number 31464. Run the dishwasher through a complete washing cycle using ...energy-saving dry option. Dishwasher Care Cleaning the Dishwasher Clean the exterior of the dispenser Is the cycle complete? In U.S.A., www.whirlpool.com In Canada, www.whirlpool.ca Dishwasher is not operating properly ■ Dishwasher does not run up and down freely? Has a household fuse blown, or...


