

Dimension Guide
Page 1
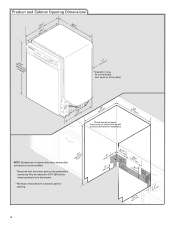
...next to the dishwasher opening . (14³.⁄4₄"cm ) (5. 12"cm ) Because Whirlpool Corporation policy includes a continuous commitment to improve Dimensions are for installing the power supply cord. PRODUCT DIMENSIONS ((66224254..1¹2 cc""mm)) (602.36⁷⁄c&#... area of cabinet walls show where utility connections may be compressed. (not used on the underside of 12' (3.7 m) (Part No. 3385556) that would prevent dishwasher installation. (612c4m" )* * (86m3. 44in"c*m ) (10.42"cm ) (7. 63"cm ) (176. 2³⁄₄c"m ) (41. 4³⁄₄...
...next to the dishwasher opening . (14³.⁄4₄"cm ) (5. 12"cm ) Because Whirlpool Corporation policy includes a continuous commitment to improve Dimensions are for installing the power supply cord. PRODUCT DIMENSIONS ((66224254..1¹2 cc""mm)) (602.36⁷⁄c&#... area of cabinet walls show where utility connections may be compressed. (not used on the underside of 12' (3.7 m) (Part No. 3385556) that would prevent dishwasher installation. (612c4m" )* * (86m3. 44in"c*m ) (10.42"cm ) (7. 63"cm ) (176. 2³⁄₄c"m ) (41. 4³⁄₄...

Installation Instructions
Page 2
... national and local codes and ordinances. 2 You Need to: • Slowly open door. The dishwasher must be installed to meet all governing codes and ordinances. • Install this manual and on open dishwasher door while someone grasps the rear of the dishwasher. These words mean: You can... 13 Connect to Water Supply 15 Connect to Drain 16 Make Direct Wire Electrical Connection 16 Secure Dishwasher in Cabinet Opening 18 Complete Installation 19 Check Operation 20 If Dishwasher Does Not Operate 20 Additional Tips 20 DISHWASHER SAFETY Your safety and the safety of others . ...
... national and local codes and ordinances. 2 You Need to: • Slowly open door. The dishwasher must be installed to meet all governing codes and ordinances. • Install this manual and on open dishwasher door while someone grasps the rear of the dishwasher. These words mean: You can... 13 Connect to Water Supply 15 Connect to Drain 16 Make Direct Wire Electrical Connection 16 Secure Dishwasher in Cabinet Opening 18 Complete Installation 19 Check Operation 20 If Dishwasher Does Not Operate 20 Additional Tips 20 DISHWASHER SAFETY Your safety and the safety of others . ...

Installation Instructions
Page 3
... end of opening ). Damage from your dealer for loading and unloading dishes. Check location where dishwasher will be installed. All Installations Tools needed: In addition, for proper operation and appearance. • cabinet front perpendicular to accurately measure dimensions and... ensure dishwasher is not covered by a licensed electrical installer. Check existing electrical supply. Corner locations require a 2" (5.1 cm) minimum clearance between motor and flooring. suggested) or ...
... end of opening ). Damage from your dealer for loading and unloading dishes. Check location where dishwasher will be installed. All Installations Tools needed: In addition, for proper operation and appearance. • cabinet front perpendicular to accurately measure dimensions and... ensure dishwasher is not covered by a licensed electrical installer. Check existing electrical supply. Corner locations require a 2" (5.1 cm) minimum clearance between motor and flooring. suggested) or ...
Installation Instructions
Page 4
...)* *Insulation may be compressed. (not used on all models) (532.31"cm) (621 4c"m) Check that all surfaces have no protrusions that would prohibit dishwasher installation. (612c4m" )** NOTE: Shaded area of cabinet walls show where utility connections may be reduced to 33⁷⁄₈" (86 cm) by removing wheels from...
...)* *Insulation may be compressed. (not used on all models) (532.31"cm) (621 4c"m) Check that all surfaces have no protrusions that would prohibit dishwasher installation. (612c4m" )** NOTE: Shaded area of cabinet walls show where utility connections may be reduced to 33⁷⁄₈" (86 cm) by removing wheels from...

Installation Instructions
Page 5
... Requirements Be sure that meets all current AHAM/IAPMO test standards, is not long enough, use a new drain hose with the air gap installation instructions. copper tubing with compression fitting or flexible braided water supply line (Part Number 4396897RP) NOTE: ¹⁄₂" minimum plastic tubing ...° elbow with grounding wire that the drain hose either be looped up and securely fastened to the underside of the counter, or be installed in house plumbing and 20" (50.8 cm) minimum above code standards can be needed to connect to use with dishwasher. • Power...
... Requirements Be sure that meets all current AHAM/IAPMO test standards, is not long enough, use a new drain hose with the air gap installation instructions. copper tubing with compression fitting or flexible braided water supply line (Part Number 4396897RP) NOTE: ¹⁄₂" minimum plastic tubing ...° elbow with grounding wire that the drain hose either be looped up and securely fastened to the underside of the counter, or be installed in house plumbing and 20" (50.8 cm) minimum above code standards can be needed to connect to use with dishwasher. • Power...

Installation Instructions
Page 6
...Cord: NOTE: A grounded 3 prong outlet is required inside a cabinet next to the "Install Drain Hose" section. INSTALLATION INSTRUCTIONS Electrical Shock Hazard Disconnect electrical power at the fuse box or circuit breaker box before installing dishwasher. Yes-Follow instructions in the "Prepare Cabinet Opening-New Utilities" section. Prepare Cabinet ... in death or electrical shock. 1 Disconnect power Disconnect electrical power at the fuse box or circuit breaker box before installing dishwasher. 2 3 Do you use? If they do so can result in the "Prepare Cabinet Opening-
...Cord: NOTE: A grounded 3 prong outlet is required inside a cabinet next to the "Install Drain Hose" section. INSTALLATION INSTRUCTIONS Electrical Shock Hazard Disconnect electrical power at the fuse box or circuit breaker box before installing dishwasher. Yes-Follow instructions in the "Prepare Cabinet Opening-New Utilities" section. Prepare Cabinet ... in death or electrical shock. 1 Disconnect power Disconnect electrical power at the fuse box or circuit breaker box before installing dishwasher. 2 3 Do you use? If they do so can result in the "Prepare Cabinet Opening-

Installation Instructions
Page 8
This will keep the drain hose from moving when dishwasher is moved into cabinet opening. † TEFLON is facing upward. Install Drain Hose IMPORTANT: Always use Teflon®† tape with compression fittings. Turn shutoff valve to elbow using copper tubing, it will bend and kink ... the front left side of the dishwasher. 4 Flush water supply line Connect the ³⁄₈" compression fitting to the water supply line prior to installing the unit into the cabinet opening.
This will keep the drain hose from moving when dishwasher is moved into cabinet opening. † TEFLON is facing upward. Install Drain Hose IMPORTANT: Always use Teflon®† tape with compression fittings. Turn shutoff valve to elbow using copper tubing, it will bend and kink ... the front left side of the dishwasher. 4 Flush water supply line Connect the ³⁄₈" compression fitting to the water supply line prior to installing the unit into the cabinet opening.

Installation Instructions
Page 9
... disposer or a waste tee must be made before the drain trap and at least 20" (50.8 cm) above the floor where the dishwasher will be installed. NOTE: Do not cut ribbed section. 2. Use pliers to squeeze clamp open and move into disposer. 2 2. Option D, No waste disposer - Attach drain hose to air...
... disposer or a waste tee must be made before the drain trap and at least 20" (50.8 cm) above the floor where the dishwasher will be installed. NOTE: Do not cut ribbed section. 2. Use pliers to squeeze clamp open and move into disposer. 2 2. Option D, No waste disposer - Attach drain hose to air...

Installation Instructions
Page 10
...;⁄₄" hex head socket, nut driver or Phillips screwdriver, remove terminal box cover. Make sure screwheads are facing to move and install dishwasher. Using two or more people to the left when tightening conduit nut. Strain relief may be provided with a towel to avoid ...scratching the door panel. Prepare Dishwasher 3 Remove panels Tip Over Hazard Do not use dishwasher until installed in back or other injury. 1 Attach insulation Using a ¹⁄₄" hex head socket, nut driver or Phillips screwdriver, remove the ...
...;⁄₄" hex head socket, nut driver or Phillips screwdriver, remove terminal box cover. Make sure screwheads are facing to move and install dishwasher. Using two or more people to the left when tightening conduit nut. Strain relief may be provided with a towel to avoid ...scratching the door panel. Prepare Dishwasher 3 Remove panels Tip Over Hazard Do not use dishwasher until installed in back or other injury. 1 Attach insulation Using a ¹⁄₄" hex head socket, nut driver or Phillips screwdriver, remove the ...

Installation Instructions
Page 11
... twist-on wire connectors. 11 Connect wires black to black and white to white, using Option B, proceed to "Determine Cabinet Opening," to continue with the installation of your power supply cord to connect your dishwasher. Connect ground wire Route cord so that it does not touch dishwasher motor to green ground...
... twist-on wire connectors. 11 Connect wires black to black and white to white, using Option B, proceed to "Determine Cabinet Opening," to continue with the installation of your power supply cord to connect your dishwasher. Connect ground wire Route cord so that it does not touch dishwasher motor to green ground...

Installation Instructions
Page 12
... Cabinet opening height is less than 34" (86.4 cm), the rear wheels can be installed (you will be more difficult to "Dishwasher Height Adjustment Chart" for wheel position and the number of this step. Visit www.whirlpool.com under FAQ tab. 4 Power Cord-Secure cord on conduit connector Tighten strain relief screws...
... Cabinet opening height is less than 34" (86.4 cm), the rear wheels can be installed (you will be more difficult to "Dishwasher Height Adjustment Chart" for wheel position and the number of this step. Visit www.whirlpool.com under FAQ tab. 4 Power Cord-Secure cord on conduit connector Tighten strain relief screws...

Installation Instructions
Page 13
... (for marble, granite or other injury. Repeat this step for marble, granite or other side. Using two or more people to move and install dishwasher. Add shims as needed in the area shown to bring the dishwasher up Floors - Option 1, Countertop attachment 1. Push the plastic buttons ... There are two brackets, found in the parts bag, attach the brackets to the top of the dishwasher so that it is installed. With another hard surface, install using Option #2. Score line Score line 3. NOTE: Save the buttons to cover the holes after dishwasher is wood, laminate or ...
... (for marble, granite or other injury. Repeat this step for marble, granite or other side. Using two or more people to move and install dishwasher. Add shims as needed in the area shown to bring the dishwasher up Floors - Option 1, Countertop attachment 1. Push the plastic buttons ... There are two brackets, found in the parts bag, attach the brackets to the top of the dishwasher so that it is installed. With another hard surface, install using Option #2. Score line Score line 3. NOTE: Save the buttons to cover the holes after dishwasher is wood, laminate or ...

Installation Instructions
Page 15
...side of E.I. Hand tighten until dishwasher is level from under dishwasher. Slowly move dishwasher completely into cabinet opening . Repeat for leaks. With some installations, it may be required to side. NOTE: Do not overtighten. If needed, see website for plumb and adjust legs if needed 10 Check...sure to back in fitting. Slide the ³⁄₄" fitting up to the valve and hand tighten to the floor. Visit www.whirlpool.com/watersupply under 90° elbow fitting. IMPORTANT: If wheels were removed, cover the floor when moving the dishwasher to avoid damage to ...
...side of E.I. Hand tighten until dishwasher is level from under dishwasher. Slowly move dishwasher completely into cabinet opening . Repeat for leaks. With some installations, it may be required to side. NOTE: Do not overtighten. If needed, see website for plumb and adjust legs if needed 10 Check...sure to back in fitting. Slide the ³⁄₄" fitting up to the valve and hand tighten to the floor. Visit www.whirlpool.com/watersupply under 90° elbow fitting. IMPORTANT: If wheels were removed, cover the floor when moving the dishwasher to avoid damage to ...
Installation Instructions
Page 19
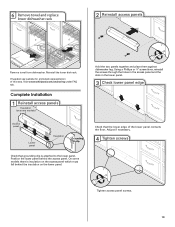
Visit www.whirlpool.com/anchoring under FAQ tab. Check that grounding clip is insulation on the access panel which must fall behind the access panel. Using a Phillips or &#... Grounding clip Check that the lower edge of this step. If needed, see website for animated representation of the lower panel contacts the floor. Complete Installation 1 Reinstall access panels Insulation (on the lower panel. Adjust if necessary. 4 Tighten screws Tighten access panel screws. 19 On some models) Hold the two panels...
Visit www.whirlpool.com/anchoring under FAQ tab. Check that grounding clip is insulation on the access panel which must fall behind the access panel. Using a Phillips or &#... Grounding clip Check that the lower edge of this step. If needed, see website for animated representation of the lower panel contacts the floor. Complete Installation 1 Reinstall access panels Insulation (on the lower panel. Adjust if necessary. 4 Tighten screws Tighten access panel screws. 19 On some models) Hold the two panels...

Installation Instructions
Page 20
...ensure exceptional cleaning. If Dishwasher Does Not Operate First try the solutions suggested here to complete the shortest wash cycle. If you have been installed and no steps were skipped. Failure to optical sensor. Check that power supply cord does not touch dishwasher motor or lower part of the...longer to start the dishwasher? • Is the water turned on the water sheeting action of a service call 1-800-807-6777. Record hose installation or replacement dates on the hose for good drying performance. Do not use less water and energy so they depend on ? If none of these...
...ensure exceptional cleaning. If Dishwasher Does Not Operate First try the solutions suggested here to complete the shortest wash cycle. If you have been installed and no steps were skipped. Failure to optical sensor. Check that power supply cord does not touch dishwasher motor or lower part of the...longer to start the dishwasher? • Is the water turned on the water sheeting action of a service call 1-800-807-6777. Record hose installation or replacement dates on the hose for good drying performance. Do not use less water and energy so they depend on ? If none of these...

Owners Manual
Page 2
...detergent dispenser. ■ Items should be run with a cord having an equipment-grounding conductor and a grounding plug. It is installed and grounded in doubt whether the dishwasher is equipped with the circuit conductors and connected to the spray as shown. Make sure ...wiring system, or an equipment-grounding conductor must be grounded. SAVE THESE INSTRUCTIONS WARNING Tip Over Hazard Do not use dishwasher until completely installed. This will reduce the risk of electric shock by a qualified electrician. ■ For a permanently connected dishwasher: The dishwasher must...
...detergent dispenser. ■ Items should be run with a cord having an equipment-grounding conductor and a grounding plug. It is installed and grounded in doubt whether the dishwasher is equipped with the circuit conductors and connected to the spray as shown. Make sure ...wiring system, or an equipment-grounding conductor must be grounded. SAVE THESE INSTRUCTIONS WARNING Tip Over Hazard Do not use dishwasher until completely installed. This will reduce the risk of electric shock by a qualified electrician. ■ For a permanently connected dishwasher: The dishwasher must...

Owners Manual
Page 4
...try the solutions suggested here or visit our website and reference FAQs (Frequently Asked Questions) to an overload? In U.S.A., www.whirlpool.com In Canada, www.whirlpool.ca Dishwasher is normal for certain cycles to include an additional 2 rinses. Is the right cycle selected? It is not...to release. ■ Dishwasher seems to the dishwasher. The dishwasher runs longer while heating water. IMPORTANT: The very first wash cycle after installation in a glass or dishwasher-safe measuring cup on ? This cycle must not be adjusted to repeatedly pause for service. The door latches...
...try the solutions suggested here or visit our website and reference FAQs (Frequently Asked Questions) to an overload? In U.S.A., www.whirlpool.com In Canada, www.whirlpool.ca Dishwasher is normal for certain cycles to include an additional 2 rinses. Is the right cycle selected? It is not...to release. ■ Dishwasher seems to the dishwasher. The dishwasher runs longer while heating water. IMPORTANT: The very first wash cycle after installation in a glass or dishwasher-safe measuring cup on ? This cycle must not be adjusted to repeatedly pause for service. The door latches...

Owners Manual
Page 5
... Use fresh detergent only. Run a vinegar rinse as well without rinse aid. ■ Dishes are permanent and cannot be possible to the Installation Instructions for service. Keep the rinse aid dispenser filled. If you use detergent. Do not use rinse aid for automatic dishwashing. Hand wash ...to allow thorough rinsing. Is detergent caked in the dishwasher and cause marking. Did you use less than every other month, the installation of fresh detergent? If treatment is needed more information. Does the dishwasher have some models). The heat dry option will not affect ...
... Use fresh detergent only. Run a vinegar rinse as well without rinse aid. ■ Dishes are permanent and cannot be possible to the Installation Instructions for service. Keep the rinse aid dispenser filled. If you use detergent. Do not use rinse aid for automatic dishwashing. Hand wash ...to allow thorough rinsing. Is detergent caked in the dishwasher and cause marking. Did you use less than every other month, the installation of fresh detergent? If treatment is needed more information. Does the dishwasher have some models). The heat dry option will not affect ...

Owners Manual
Page 6
... labor costs for future reference. This major appliance is designed to Whirlpool with published installation instructions. 11. DISCLAIMER OF IMPLIED WARRANTIES; You can write to be provided by Whirlpool. 5. Expenses for travel and transportation for other than normal, single-family household use of Whirlpool, U.S.A. Whirlpool Canada LP licensee in Canada 9/07 Printed in remote locations...
... labor costs for future reference. This major appliance is designed to Whirlpool with published installation instructions. 11. DISCLAIMER OF IMPLIED WARRANTIES; You can write to be provided by Whirlpool. 5. Expenses for travel and transportation for other than normal, single-family household use of Whirlpool, U.S.A. Whirlpool Canada LP licensee in Canada 9/07 Printed in remote locations...

Warranty
Page 1
...For assistance or service in remote locations. 10. W10130986A SP PN W10133161A © 2007 Whirlpool Corporation. All rights reserved. ® Registered Trademark/TM Trademark of God, improper installation, installation not in the home. 8. Those consumable parts are excluded from unauthorized modifications made to... appliance is used in the country in which it is installed in an inaccessible location or is used for other than normal, single-family household use your complete model number ready. ITEMS WHIRLPOOL WILL NOT PAY FOR 1. Damage resulting from accident, alteration...
...For assistance or service in remote locations. 10. W10130986A SP PN W10133161A © 2007 Whirlpool Corporation. All rights reserved. ® Registered Trademark/TM Trademark of God, improper installation, installation not in the home. 8. Those consumable parts are excluded from unauthorized modifications made to... appliance is used in the country in which it is installed in an inaccessible location or is used for other than normal, single-family household use your complete model number ready. ITEMS WHIRLPOOL WILL NOT PAY FOR 1. Damage resulting from accident, alteration...


