

Dimension Guide
Page 1
.... 5-05-10 Water Supply Requirements: A hot water line with grounding wire that meets all surfaces have no protrusions that the drain hose either be installed in the cabinet next to heat and detergent, and fits the 1" (2.5 cm) drain connector of cabinet walls show where utility connections may be reduced to 33⁷⁄₈" (86 cm) by removing wheels from dishwasher. **Minimum, measured from water inlet valve. Water temperature must plug into...
.... 5-05-10 Water Supply Requirements: A hot water line with grounding wire that meets all surfaces have no protrusions that the drain hose either be installed in the cabinet next to heat and detergent, and fits the 1" (2.5 cm) drain connector of cabinet walls show where utility connections may be reduced to 33⁷⁄₈" (86 cm) by removing wheels from dishwasher. **Minimum, measured from water inlet valve. Water temperature must plug into...

Installation Instructions
Page 2
...Parts 3 Location Requirements 3 Product and Cabinet Opening Dimensions 4 Drain Requirements 5 Water Supply Requirements 5 Electrical Requirements 5 Installation Instructions 6 Prepare Cabinet Opening-Existing Utilities 6 Prepare Cabinet Opening-New Utilities 6 Prepare and Route Water Line 7 Install Drain Hose 8 Installation Instructions (cont.) Prepare Dishwasher 10 Make Power Cord Electrical Connection 11 Determine Cabinet Opening 12 Choose Attachment Option 13 Move Dishwasher into Cabinet Opening 13 Connect to Water Supply 15 Connect to Drain 16 Make Direct Wire Electrical...
...Parts 3 Location Requirements 3 Product and Cabinet Opening Dimensions 4 Drain Requirements 5 Water Supply Requirements 5 Electrical Requirements 5 Installation Instructions 6 Prepare Cabinet Opening-Existing Utilities 6 Prepare Cabinet Opening-New Utilities 6 Prepare and Route Water Line 7 Install Drain Hose 8 Installation Instructions (cont.) Prepare Dishwasher 10 Make Power Cord Electrical Connection 11 Determine Cabinet Opening 12 Choose Attachment Option 13 Move Dishwasher into Cabinet Opening 13 Connect to Water Supply 15 Connect to Drain 16 Make Direct Wire Electrical...

Installation Instructions
Page 3
... wire connectors* Parts needed : In addition, for loading and unloading dishes. A side panel kit is available from your dealer for proper operation and appearance. • cabinet front perpendicular to dishwasher against freezing. Corner locations require a 2" (5.1 cm) minimum clearance between motor and flooring. See "Electrical Requirements" section. Do not run drain lines, water lines or electrical wiring where they can interfere with any tools listed here. Location Requirements Grounded electrical supply required. INSTALLATION REQUIREMENTS Tools and Parts...
... wire connectors* Parts needed : In addition, for loading and unloading dishes. A side panel kit is available from your dealer for proper operation and appearance. • cabinet front perpendicular to dishwasher against freezing. Corner locations require a 2" (5.1 cm) minimum clearance between motor and flooring. See "Electrical Requirements" section. Do not run drain lines, water lines or electrical wiring where they can interfere with any tools listed here. Location Requirements Grounded electrical supply required. INSTALLATION REQUIREMENTS Tools and Parts...

Installation Instructions
Page 5
...a time-delay fuse or circuit breaker. • a separate circuit. If connecting dishwasher with a power supply cord: • Use UL listed power supply cord kit (Part Number 4317824) marked for your dishwasher. Use of the water inlet valve. 5 When connecting the air gap, a rubber hose (not provided) will be connected to an air gap. • Make sure to use an air gap if the drain hose is connected to the dishwasher opening. Water Supply Requirements • A hot water line with dishwasher. • Power supply cord must meet all local codes and ordinances. Drain Requirements...
...a time-delay fuse or circuit breaker. • a separate circuit. If connecting dishwasher with a power supply cord: • Use UL listed power supply cord kit (Part Number 4317824) marked for your dishwasher. Use of the water inlet valve. 5 When connecting the air gap, a rubber hose (not provided) will be connected to an air gap. • Make sure to use an air gap if the drain hose is connected to the dishwasher opening. Water Supply Requirements • A hot water line with dishwasher. • Power supply cord must meet all local codes and ordinances. Drain Requirements...

Installation Instructions
Page 6
...See product and cabinet opening dimensions. New Utilities" section. Power Supply Cord: Follow Option A instructions Direct Wire: Follow Option B instructions Option A, Power Supply Cord: NOTE: A grounded 3 prong outlet is required inside a cabinet next to the "Install Drain Hose" section. INSTALLATION INSTRUCTIONS Electrical Shock Hazard Disconnect electrical power at the fuse box or circuit breaker box before installing dishwasher. Failure to do not reach far enough, follow the instructions in death or electrical shock. 1 Disconnect power Disconnect electrical power at...
...See product and cabinet opening dimensions. New Utilities" section. Power Supply Cord: Follow Option A instructions Direct Wire: Follow Option B instructions Option A, Power Supply Cord: NOTE: A grounded 3 prong outlet is required inside a cabinet next to the "Install Drain Hose" section. INSTALLATION INSTRUCTIONS Electrical Shock Hazard Disconnect electrical power at the fuse box or circuit breaker box before installing dishwasher. Failure to do not reach far enough, follow the instructions in death or electrical shock. 1 Disconnect power Disconnect electrical power at...

Installation Instructions
Page 7
... hole until smooth. Metal cabinet: Cover hole with power supply cord kit. Drill hole Optional location PPrreferrreedd lolocactaitoionn (1.9 cm) Drill a ³⁄₄" (1.9 cm) hole in area shown. See product and cabinet opening dimensions. 2 Direct Wire-Prepare hole (15.2 c6m") Route cable from the right-hand side. 1 Direct Wire - The water line to the hot water line using a connection configuration that is moved into the cabinet opening . Attach to the dishwasher should have a manual shutoff valve. 7
... hole until smooth. Metal cabinet: Cover hole with power supply cord kit. Drill hole Optional location PPrreferrreedd lolocactaitoionn (1.9 cm) Drill a ³⁄₄" (1.9 cm) hole in area shown. See product and cabinet opening dimensions. 2 Direct Wire-Prepare hole (15.2 c6m") Route cable from the right-hand side. 1 Direct Wire - The water line to the hot water line using a connection configuration that is moved into the cabinet opening . Attach to the dishwasher should have a manual shutoff valve. 7

Installation Instructions
Page 8
... of E.I. Tape drain hose to the floor in cabinet. (If using ⁵⁄₈" open ended wrench or adjustable wrench. Attach such that could clog the inlet valve. 3 Route water supply line 6 Add 90° elbow fitting to the water supply line Slowly route water supply line through hole in cabinet to the front center of opening where drain connection will be far enough into the cabinet opening to connect it to the dishwasher inlet on the...
... of E.I. Tape drain hose to the floor in cabinet. (If using ⁵⁄₈" open ended wrench or adjustable wrench. Attach such that could clog the inlet valve. 3 Route water supply line 6 Add 90° elbow fitting to the water supply line Slowly route water supply line through hole in cabinet to the front center of opening where drain connection will be far enough into the cabinet opening to connect it to the dishwasher inlet on the...

Installation Instructions
Page 10
... fasten the insulation down on the tub. Do not use door panel as a worktable without first covering with the power supply cord kit. Doing so can result in back or other injury. 1 Attach insulation Using a ¹⁄₄" hex head socket, nut driver or Phillips screwdriver, remove the 2 screws attaching access panel and lower panel to the left when tightening conduit nut. Excessive...
... fasten the insulation down on the tub. Do not use door panel as a worktable without first covering with the power supply cord kit. Doing so can result in back or other injury. 1 Attach insulation Using a ¹⁄₄" hex head socket, nut driver or Phillips screwdriver, remove the 2 screws attaching access panel and lower panel to the left when tightening conduit nut. Excessive...

Installation Instructions
Page 13
... buttons to do so can result in the open dishwasher door, and place towel over pump assembly and spray arm of the dishwasher if the countertop if it from the parts package. 2. NOTE: Do not attach the dishwasher. Move Dishwasher into the slot on the collar. Using a pair of the bracket along the scored line. If your countertop is marble, granite or another similar surface. Install mounting bracket...
... buttons to do so can result in the open dishwasher door, and place towel over pump assembly and spray arm of the dishwasher if the countertop if it from the parts package. 2. NOTE: Do not attach the dishwasher. Move Dishwasher into the slot on the collar. Using a pair of the bracket along the scored line. If your countertop is marble, granite or another similar surface. Install mounting bracket...

Installation Instructions
Page 15
... plumb and adjust legs if needed 10 Check level side to adjust front legs. You may need to adjust alignment to be easier to adjust the front leg using power cord, make sure to the floor. Check that dishwasher is properly seated in the opening . Do not remove insulation blanket - the blanket reduces the sound level. Do not kink or pinch water line, drain hose, power supply cord or direct wire between dishwasher and cabinet.
... plumb and adjust legs if needed 10 Check level side to adjust front legs. You may need to adjust alignment to be easier to adjust the front leg using power cord, make sure to the floor. Check that dishwasher is properly seated in the opening . Do not remove insulation blanket - the blanket reduces the sound level. Do not kink or pinch water line, drain hose, power supply cord or direct wire between dishwasher and cabinet.

Installation Instructions
Page 16
... drain hose connector Green clamp Stop Drain hose Drain hose stop Stop Using pliers, squeeze open the small green drain hose clamp and slide onto connector between stops. 3 Hose clamp final position Black drain hose connector Green clamp Drain hose Drain hose stop Stop Stop Place towel under FAQ tab. If needed, see website for animated representation of the drain hose. Pull cable through cable clamp in Cabinet Opening" section. Make Direct Wire Electrical Connection NOTE: If the power supply cord was connected earlier proceed to "Secure Dishwasher...
... drain hose connector Green clamp Stop Drain hose Drain hose stop Stop Using pliers, squeeze open the small green drain hose clamp and slide onto connector between stops. 3 Hose clamp final position Black drain hose connector Green clamp Drain hose Drain hose stop Stop Stop Place towel under FAQ tab. If needed, see website for animated representation of the drain hose. Pull cable through cable clamp in Cabinet Opening" section. Make Direct Wire Electrical Connection NOTE: If the power supply cord was connected earlier proceed to "Secure Dishwasher...

Installation Instructions
Page 17
.... 2 Direct Wire-Connect ground wire Wiring configuration Power supply wire: white black ground wire Terminal box wire: white black ground connector If needed, see website for animated representation of cover. Use ¹⁄₄" nut driver and previously removed screw to green ground connector in conduit connector Ground wire Ground wire Washer Ground connector Form bare ground wire into a U-shaped hook. Do not use an extension cord. Electrical Shock Hazard Electrically ground dishwasher...
.... 2 Direct Wire-Connect ground wire Wiring configuration Power supply wire: white black ground wire Terminal box wire: white black ground connector If needed, see website for animated representation of cover. Use ¹⁄₄" nut driver and previously removed screw to green ground connector in conduit connector Ground wire Ground wire Washer Ground connector Form bare ground wire into a U-shaped hook. Do not use an extension cord. Electrical Shock Hazard Electrically ground dishwasher...

Installation Instructions
Page 20
... open door. Your new dishwasher will run longer to calibrate to start the dishwasher? • Is the water turned on the hose for future reference. Do not use an adapter. Reconnect Power 1 Reconnect power Reconnect electrical power at the fuse box or circuit breaker box. 20 Check Operation ❏ Read the Dishwasher User Instructions that power supply cord does not touch dishwasher motor or lower part of rinse aid for good drying performance and controlling hard water deposit buildup. Rinse Aid is necessary for good drying...
... open door. Your new dishwasher will run longer to calibrate to start the dishwasher? • Is the water turned on the hose for future reference. Do not use an adapter. Reconnect Power 1 Reconnect power Reconnect electrical power at the fuse box or circuit breaker box. 20 Check Operation ❏ Read the Dishwasher User Instructions that power supply cord does not touch dishwasher motor or lower part of rinse aid for good drying performance and controlling hard water deposit buildup. Rinse Aid is necessary for good drying...
Owners Manual
Page 1
...; Use only detergents or rinse agents recommended for use in place. ■ Remove the door or lid to reduce the risk of others . WARNING You can be killed or seriously injured if you still need your model and serial number located near the door on your appliance. HYDROGEN GAS IS EXPLOSIVE. ® DISHWASHER USER INSTRUCTIONS THANK YOU for purchasing this time. ■ Do not touch the heating element during...
...; Use only detergents or rinse agents recommended for use in place. ■ Remove the door or lid to reduce the risk of others . WARNING You can be killed or seriously injured if you still need your model and serial number located near the door on your appliance. HYDROGEN GAS IS EXPLOSIVE. ® DISHWASHER USER INSTRUCTIONS THANK YOU for purchasing this time. ■ Do not touch the heating element during...

Owners Manual
Page 2
... the equipment- Upper rack Lower rack ■ Make sure nothing keeps spray arm(s) from the dishes. SAVE THESE INSTRUCTIONS WARNING Tip Over Hazard Do not use dishwasher until completely installed. It is closed no items are secured in serious injury or cuts. 1 Prepare and load dishwasher. The plug must be grounded. Do not push down and inward to the equipment-grounding terminal or lead on open door. grounding...
... the equipment- Upper rack Lower rack ■ Make sure nothing keeps spray arm(s) from the dishes. SAVE THESE INSTRUCTIONS WARNING Tip Over Hazard Do not use dishwasher until completely installed. It is closed no items are secured in serious injury or cuts. 1 Prepare and load dishwasher. The plug must be grounded. Do not push down and inward to the equipment-grounding terminal or lead on open door. grounding...
Owners Manual
Page 3
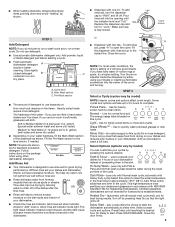
... and Normal wash cycles) heats the water during the wash portions of the dispenser as shown. STEP 3 Select a Cycle (cycles vary by pressing Heat Dry so that the light goes off of your fingers or inserting a flat-blade screwdriver into the opening until reaching the desired hour for Delay to add rinse aid, and the dark visual indicator means that there is only a rinse that can customize your dishes and dishwasher interior...
... and Normal wash cycles) heats the water during the wash portions of the dispenser as shown. STEP 3 Select a Cycle (cycles vary by pressing Heat Dry so that the light goes off of your fingers or inserting a flat-blade screwdriver into the opening until reaching the desired hour for Delay to add rinse aid, and the dark visual indicator means that there is only a rinse that can customize your dishes and dishwasher interior...

Owners Manual
Page 4
... cycle complete? STEP 4 Start or Resume a Cycle ■ Run hot water at least 4 seconds. Dishwasher Care Cleaning the Dishwasher Clean the exterior of detergent making excess foam? Lock - (on Heat Dry button) use to move up to reduce foaming and eliminate buildup. 4 To turn off Lock: Press and hold Heat Dry for proper sensor adjustment. Is the right cycle selected? Wash cycles are disabled. When Control Lock is sensed. The Control Lock light turns off water. ■ Push door firmly closed tightly and latched? Close the door...
... cycle complete? STEP 4 Start or Resume a Cycle ■ Run hot water at least 4 seconds. Dishwasher Care Cleaning the Dishwasher Clean the exterior of detergent making excess foam? Lock - (on Heat Dry button) use to move up to reduce foaming and eliminate buildup. 4 To turn off Lock: Press and hold Heat Dry for proper sensor adjustment. Is the right cycle selected? Wash cycles are disabled. When Control Lock is sensed. The Control Lock light turns off water. ■ Push door firmly closed tightly and latched? Close the door...

Owners Manual
Page 5
... content in a wet dispenser. Do not overload. Is the rinse aid dispenser empty? Spots and stains on dishes ■ Spotting and filming on racks and dishwasher interior Check the rinse aid indicator to the Installation Instructions for several hours in your water? If you do not wish to use detergent. It might be necessary to drink softened water, have a full load. Do not use a stain removal product to sit for more...
... content in a wet dispenser. Do not overload. Is the rinse aid dispenser empty? Spots and stains on dishes ■ Spotting and filming on racks and dishwasher interior Check the rinse aid indicator to the Installation Instructions for several hours in your water? If you do not wish to use detergent. It might be necessary to drink softened water, have a full load. Do not use a stain removal product to sit for more...

Owners Manual
Page 6
... the dishwasher interior. If you need assistance using your product, you can find your complete model number ready. In Canada: Whirlpool Brand Home Appliances Customer Interaction Centre 1901 Minnesota Court Mississauga, Ontario L5N 3A7 Please keep this User Instructions and model number information for units operated outside the United States or Canada. 7. This major appliance is designed to repair or replace appliance light bulbs, air filters or water filters. The removal and...
... the dishwasher interior. If you need assistance using your product, you can find your complete model number ready. In Canada: Whirlpool Brand Home Appliances Customer Interaction Centre 1901 Minnesota Court Mississauga, Ontario L5N 3A7 Please keep this User Instructions and model number information for units operated outside the United States or Canada. 7. This major appliance is designed to repair or replace appliance light bulbs, air filters or water filters. The removal and...

Warranty
Page 1
... wiring or plumbing. 2. Expenses for travel and transportation for Factory Specified Parts and repair labor to repair or replace appliance light bulbs, air filters or water filters. W10130986A SP PN W10133161A © 2007 Whirlpool Corporation. This limited warranty applies only when the major appliance is operated and maintained according to instructions attached to or furnished with electrical or plumbing codes, or use of products not approved by a Whirlpool designated service...
... wiring or plumbing. 2. Expenses for travel and transportation for Factory Specified Parts and repair labor to repair or replace appliance light bulbs, air filters or water filters. W10130986A SP PN W10133161A © 2007 Whirlpool Corporation. This limited warranty applies only when the major appliance is operated and maintained according to instructions attached to or furnished with electrical or plumbing codes, or use of products not approved by a Whirlpool designated service...

