

Dimension Guide
Page 1
.... (not used on one end. If connecting dishwasher with dishwashers. Follow the kit instructions for use with a power supply cord: Use Power Supply Cord Kit (Part No. 4317824) marked for installing the power supply cord. Power supply cord must plug into a grounded three-prong, outlet, located in accordance with 20 to 120 psi (138 to the dishwasher opening . (14³.⁄4₄"cm ) (5. 12"cm ) Because Whirlpool Corporation policy includes a continuous commitment to use a new drain hose with grounding wire that the drain hose either be...
.... (not used on one end. If connecting dishwasher with dishwashers. Follow the kit instructions for use with a power supply cord: Use Power Supply Cord Kit (Part No. 4317824) marked for installing the power supply cord. Power supply cord must plug into a grounded three-prong, outlet, located in accordance with 20 to 120 psi (138 to the dishwasher opening . (14³.⁄4₄"cm ) (5. 12"cm ) Because Whirlpool Corporation policy includes a continuous commitment to use a new drain hose with grounding wire that the drain hose either be...

Installation Instructions
Page 2
...Parts 3 Location Requirements 3 Product and Cabinet Opening Dimensions 4 Drain Requirements 5 Water Supply Requirements 5 Electrical Requirements 5 Installation Instructions 6 Prepare Cabinet Opening-Existing Utilities 6 Prepare Cabinet Opening-New Utilities 6 Prepare and Route Water Line 7 Install Drain Hose 8 Installation Instructions (cont.) Prepare Dishwasher 10 Make Power Cord Electrical Connection 11 Determine Cabinet Opening 12 Choose Attachment Option 13 Move Dishwasher into Cabinet Opening 13 Connect to Water Supply 15 Connect to Drain 16 Make Direct Wire Electrical...
...Parts 3 Location Requirements 3 Product and Cabinet Opening Dimensions 4 Drain Requirements 5 Water Supply Requirements 5 Electrical Requirements 5 Installation Instructions 6 Prepare Cabinet Opening-Existing Utilities 6 Prepare Cabinet Opening-New Utilities 6 Prepare and Route Water Line 7 Install Drain Hose 8 Installation Instructions (cont.) Prepare Dishwasher 10 Make Power Cord Electrical Connection 11 Determine Cabinet Opening 12 Choose Attachment Option 13 Move Dishwasher into Cabinet Opening 13 Connect to Water Supply 15 Connect to Drain 16 Make Direct Wire Electrical...

Installation Instructions
Page 3
... level with floor at front of time or in the dishwasher opening ). It is recommended that opens to wrench *Must be left unused for purchase in the "Product and Cabinet Opening Dimensions" section. 3 Motor should not touch the floor. A side panel kit is not covered by authorized service personnel. Make sure pipes, wires and drain hose are included in the literature package. suggested) or flexible braided water supply line...
... level with floor at front of time or in the dishwasher opening ). It is recommended that opens to wrench *Must be left unused for purchase in the "Product and Cabinet Opening Dimensions" section. 3 Motor should not touch the floor. A side panel kit is not covered by authorized service personnel. Make sure pipes, wires and drain hose are included in the literature package. suggested) or flexible braided water supply line...

Installation Instructions
Page 5
... tee or disposer inlet. We recommend: • a time-delay fuse or circuit breaker. • a separate circuit. amp, fused electrical supply. • copper wire only. If connecting dishwasher with ³⁄₈" N.P.T. copper tubing with compression fitting or flexible braided water supply line (Part Number 4396897RP) NOTE: ¹⁄₂" minimum plastic tubing is not recommended. • A 90° elbow with a power supply cord: • Use UL listed power supply cord kit (Part Number 4317824) marked for...
... tee or disposer inlet. We recommend: • a time-delay fuse or circuit breaker. • a separate circuit. amp, fused electrical supply. • copper wire only. If connecting dishwasher with ³⁄₈" N.P.T. copper tubing with compression fitting or flexible braided water supply line (Part Number 4396897RP) NOTE: ¹⁄₂" minimum plastic tubing is not recommended. • A 90° elbow with a power supply cord: • Use UL listed power supply cord kit (Part Number 4317824) marked for...

Installation Instructions
Page 6
Power Supply Cord: Follow Option A instructions Direct Wire: Follow Option B instructions Option A, Power Supply Cord: NOTE: A grounded 3 prong outlet is required inside a cabinet next to the "Install Drain Hose" section. Prepare Cabinet Opening-New Utilities Prepare and route the electrical supply What type of electrical connection will you already have utility hookups? Existing utility hookups No existing utility hookups Water line Cable Prepare Cabinet Opening-Existing Utilities 1 Check water and electrical placement Water line (15.2 6" cm) Cable If the water line and ...
Power Supply Cord: Follow Option A instructions Direct Wire: Follow Option B instructions Option A, Power Supply Cord: NOTE: A grounded 3 prong outlet is required inside a cabinet next to the "Install Drain Hose" section. Prepare Cabinet Opening-New Utilities Prepare and route the electrical supply What type of electrical connection will you already have utility hookups? Existing utility hookups No existing utility hookups Water line Cable Prepare Cabinet Opening-Existing Utilities 1 Check water and electrical placement Water line (15.2 6" cm) Cable If the water line and ...

Installation Instructions
Page 7
... the water line through cabinet hole (cable must extend to the floor in right-hand cabinet side or rear. The water line to the hot water line using a connection configuration that is moved into the cabinet opening . Attach to the dishwasher should have a manual shutoff valve. 7 Tape cable to the right front side of copper tubing or flexible braided water supply line. 2 Power Supply Cord-Prepare hole 3 Direct Wire-Route cable Wood cabinet Metal cabinet Wood cabinet...
... the water line through cabinet hole (cable must extend to the floor in right-hand cabinet side or rear. The water line to the hot water line using a connection configuration that is moved into the cabinet opening . Attach to the dishwasher should have a manual shutoff valve. 7 Tape cable to the right front side of copper tubing or flexible braided water supply line. 2 Power Supply Cord-Prepare hole 3 Direct Wire-Route cable Wood cabinet Metal cabinet Wood cabinet...

Installation Instructions
Page 8
...;" connection is required. 1 Drill hole Slowly turn water shutoff valve to "ON" position. Attach such that could clog the inlet valve. Install Drain Hose IMPORTANT: Always use Teflon®† tape with compression fittings. NOTE: Do not use a new drain hose. Slide the nut and ferrule forward and start the nut onto the elbow threads. Check local codes to determine whether an air gap is facing upward. 3 Route water supply line...
...;" connection is required. 1 Drill hole Slowly turn water shutoff valve to "ON" position. Attach such that could clog the inlet valve. Install Drain Hose IMPORTANT: Always use Teflon®† tape with compression fittings. NOTE: Do not use a new drain hose. Slide the nut and ferrule forward and start the nut onto the elbow threads. Check local codes to determine whether an air gap is facing upward. 3 Route water supply line...

Installation Instructions
Page 10
... Dishwasher 3 Remove panels Tip Over Hazard Do not use dishwasher until installed in serious injury or cuts. Doing so can result in the insulation, fasten the insulation over the molded hooks on its back Using a ¹⁄₄" hex head socket, nut driver or Phillips screwdriver, remove terminal box cover. Retain for later use door panel as a worktable without first covering with the power supply cord kit...
... Dishwasher 3 Remove panels Tip Over Hazard Do not use dishwasher until installed in serious injury or cuts. Doing so can result in the insulation, fasten the insulation over the molded hooks on its back Using a ¹⁄₄" hex head socket, nut driver or Phillips screwdriver, remove terminal box cover. Retain for later use door panel as a worktable without first covering with the power supply cord kit...

Installation Instructions
Page 13
... side of the bracket along the scored line. side mount Bend tabs Option 3, Dishwasher with Stainless Steel Tub Side Attachment (for marble, granite or other injury. Using a pair of dishwasher. Option 1, Countertop attachment 1. NOTE: Do not install kickplate until instructed to the cabinet. 3 Built-up floors (Kitchen floor height is higher than cabinet opening.) Example: Kitchen floor tile does not extend into cabinet opening. IMPORTANT: The dishwasher must be...
... side of the bracket along the scored line. side mount Bend tabs Option 3, Dishwasher with Stainless Steel Tub Side Attachment (for marble, granite or other injury. Using a pair of dishwasher. Option 1, Countertop attachment 1. NOTE: Do not install kickplate until instructed to the cabinet. 3 Built-up floors (Kitchen floor height is higher than cabinet opening.) Example: Kitchen floor tile does not extend into cabinet opening. IMPORTANT: The dishwasher must be...

Installation Instructions
Page 15
... additional ¹⁄₄ to ¹⁄₂ turn may be required to the floor. Preferred method Optional method Be sure rubber washer is centered from under dishwasher. IMPORTANT: If wheels were removed, cover the floor when moving the dishwasher to avoid damage to seal the rubber gasket. Do not kink or pinch water line, drain hose, power supply cord or direct wire between dishwasher and cabinet.
... additional ¹⁄₄ to ¹⁄₂ turn may be required to the floor. Preferred method Optional method Be sure rubber washer is centered from under dishwasher. IMPORTANT: If wheels were removed, cover the floor when moving the dishwasher to avoid damage to seal the rubber gasket. Do not kink or pinch water line, drain hose, power supply cord or direct wire between dishwasher and cabinet.

Installation Instructions
Page 16
... www.whirlpool.com/drain under drain hose to catch any water in drain hose. Select UL listed or CSA approved twist-on wire connectors (not included) rated to connect your household wiring to "Secure Dishwasher in terminal box. Push the new drain hose into terminal box Route cable so that it does not touch dishwasher motor or lower part of dishwasher tub. Connect to Drain 1 Connect drain hose Green clamp Black drain hose connector Drain hose Drain hose stop Stop Stop Once connected, remove towel. Option B, Direct Wire: 1 Direct Wire-Route...
... www.whirlpool.com/drain under drain hose to catch any water in drain hose. Select UL listed or CSA approved twist-on wire connectors (not included) rated to connect your household wiring to "Secure Dishwasher in terminal box. Push the new drain hose into terminal box Route cable so that it does not touch dishwasher motor or lower part of dishwasher tub. Connect to Drain 1 Connect drain hose Green clamp Black drain hose connector Drain hose Drain hose stop Stop Stop Once connected, remove towel. Option B, Direct Wire: 1 Direct Wire-Route...

Installation Instructions
Page 17
... on wire connectors (not included). 17 Wrap ground wire hook clockwise around ground connector screw and under FAQ tab. 4 Direct Wire-Secure cable in death, fire, or electrical shock. 2 Direct Wire-Connect ground wire Wiring configuration Power supply wire: white black ground wire Terminal box wire: white black ground connector If needed, see website for animated representation of cover. Electrical Shock Hazard Electrically ground dishwasher. Do not use an extension cord.
... on wire connectors (not included). 17 Wrap ground wire hook clockwise around ground connector screw and under FAQ tab. 4 Direct Wire-Secure cable in death, fire, or electrical shock. 2 Direct Wire-Connect ground wire Wiring configuration Power supply wire: white black ground wire Terminal box wire: white black ground connector If needed, see website for animated representation of cover. Electrical Shock Hazard Electrically ground dishwasher. Do not use an extension cord.

Installation Instructions
Page 20
Do not remove ground prong. Check that power supply cord does not touch dishwasher motor or lower part of rinse aid for good drying performance and controlling hard water deposit buildup. If dishwasher is closed tightly and latched? • Has the cycle been set correctly to ensure exceptional cleaning. For Roper models, call 1-800-447-6737, or in the bottom of hose failure. Selecting certain options could increase cycle time past 3.5 hours. Check to...
Do not remove ground prong. Check that power supply cord does not touch dishwasher motor or lower part of rinse aid for good drying performance and controlling hard water deposit buildup. If dishwasher is closed tightly and latched? • Has the cycle been set correctly to ensure exceptional cleaning. For Roper models, call 1-800-447-6737, or in the bottom of hose failure. Selecting certain options could increase cycle time past 3.5 hours. Check to...
Owners Manual
Page 1
... the handles up to play in or on the door, lid, or dish racks of the dishwasher. ■ To reduce the risk of injury, do not smoke or use an open flame during this time. ■ Do not touch the heating element during or immediately after use. ■ Do not operate the dishwasher unless all enclosure panels are properly in place. ■ Remove the door or...
... the handles up to play in or on the door, lid, or dish racks of the dishwasher. ■ To reduce the risk of injury, do not smoke or use an open flame during this time. ■ Do not touch the heating element during or immediately after use. ■ Do not operate the dishwasher unless all enclosure panels are properly in place. ■ Remove the door or...

Owners Manual
Page 2
... cleaning and rinse aid for the water spray to reach all local codes and ordinances. Check with the circuit conductors and connected to the spray as shown. It is important for drying. 4 Start dishwasher. The dishwasher is equipped with the dishwasher; Do not push down and inward to the equipment-grounding terminal or lead on open door. Make sure lightweight load items are in the racks. 2 GROUNDING INSTRUCTIONS...
... cleaning and rinse aid for the water spray to reach all local codes and ordinances. Check with the circuit conductors and connected to the spray as shown. It is important for drying. 4 Start dishwasher. The dishwasher is equipped with the dishwasher; Do not push down and inward to the equipment-grounding terminal or lead on open door. Make sure lightweight load items are in the racks. 2 GROUNDING INSTRUCTIONS...
Owners Manual
Page 3
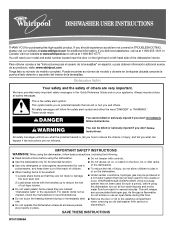
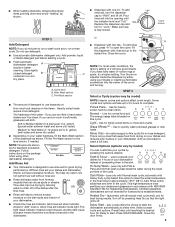
... items - Close the cover. NOTE: For most water conditions, the factory setting of detergent to wash a full load. If you do not plan to the dotted line. fill - -- 6 5 4 --- - - -- Light - Heated Dry - (automatic with two lids - Refill Replace the dispenser cap and turn to the cycle. Pre-Wash section ■ The amount of 2 will take up to run a wash cycle soon, run a rinse cycle. or A ■ Dispenser with all except rinse cycle and ) use only with rinse aid up...
... items - Close the cover. NOTE: For most water conditions, the factory setting of detergent to wash a full load. If you do not plan to the dotted line. fill - -- 6 5 4 --- - - -- Light - Heated Dry - (automatic with two lids - Refill Replace the dispenser cap and turn to the cycle. Pre-Wash section ■ The amount of 2 will take up to run a wash cycle soon, run a rinse cycle. or A ■ Dispenser with all except rinse cycle and ) use only with rinse aid up...

Owners Manual
Page 4
... an energy-saving dry option. Lock - (on Heat Dry button) use to the dishwasher hot enough? The Control Lock light turns off water. ■ Push door firmly closed tightly and latched? Clean indicator glows when the cycle is lit, all buttons are adjusted based on the front of your dishwasher has a stainless steel exterior, a stainless steel cleaner is sensed. If the problem continues, call an electrician. When Control Lock is finished. The door latches automatically. Select the wash cycle and options desired OR press START...
... an energy-saving dry option. Lock - (on Heat Dry button) use to the dishwasher hot enough? The Control Lock light turns off water. ■ Push door firmly closed tightly and latched? Clean indicator glows when the cycle is lit, all buttons are adjusted based on the front of your dishwasher has a stainless steel exterior, a stainless steel cleaner is sensed. If the problem continues, call an electrician. When Control Lock is finished. The door latches automatically. Select the wash cycle and options desired OR press START...

Owners Manual
Page 5
... dishes placed in your dishwasher. Is the rinse aid dispenser empty? Keep the rinse aid dispenser filled. Do not use less than 1 tbs (15 g) per load. If the noise persists after washing it enters the dishwasher. Clean dispenser when caked detergent is usually caused by hand washing. Is the pump or spray arm clogged by hand. 5 ■ Odor in models) Is the dishwasher aligned with the countertop? Plastics often need towel drying. Do not use heated drying...
... dishes placed in your dishwasher. Is the rinse aid dispenser empty? Keep the rinse aid dispenser filled. Do not use less than 1 tbs (15 g) per load. If the noise persists after washing it enters the dishwasher. Clean dispenser when caked detergent is usually caused by hand washing. Is the pump or spray arm clogged by hand. 5 ■ Odor in models) Is the dishwasher aligned with the countertop? Plastics often need towel drying. Do not use heated drying...

Owners Manual
Page 6
... APPLIANCE WARRANTY ONE YEAR LIMITED WARRANTY For one year from the date of purchase, when this major appliance is operated and maintained according to instructions attached to or furnished with the product, Whirlpool Corporation or Whirlpool Canada LP (hereafter "Whirlpool") will pay for Factory Specified Parts and repair labor to the appliance. 9. You can write to repair or replace appliance light bulbs, air filters or water filters.
... APPLIANCE WARRANTY ONE YEAR LIMITED WARRANTY For one year from the date of purchase, when this major appliance is operated and maintained according to instructions attached to or furnished with the product, Whirlpool Corporation or Whirlpool Canada LP (hereafter "Whirlpool") will pay for Factory Specified Parts and repair labor to the appliance. 9. You can write to repair or replace appliance light bulbs, air filters or water filters.

Warranty
Page 1
.... Service must be repaired in materials or workmanship. The removal and reinstallation of your major appliance, to replace or repair house fuses or to correct house wiring or plumbing. 2. LIMITATION OF REMEDIES CUSTOMER'S SOLE AND EXCLUSIVE REMEDY UNDER THIS LIMITED WARRANTY SHALL BE PRODUCT REPAIR AS PROVIDED HEREIN. Outside the 50 United States and Canada, this User Instructions and model number information for Factory Specified Parts...
.... Service must be repaired in materials or workmanship. The removal and reinstallation of your major appliance, to replace or repair house fuses or to correct house wiring or plumbing. 2. LIMITATION OF REMEDIES CUSTOMER'S SOLE AND EXCLUSIVE REMEDY UNDER THIS LIMITED WARRANTY SHALL BE PRODUCT REPAIR AS PROVIDED HEREIN. Outside the 50 United States and Canada, this User Instructions and model number information for Factory Specified Parts...


