

Dimension Guide
Page 1
... connect the drain hose to 33⁷⁄₈" (86 cm) by removing wheels from dishwasher. **Minimum, measured from water inlet valve. If connecting dishwasher with a power supply cord: Use Power Supply Cord Kit (Part No. 4317824) marked for use a new drain hose with grounding wire that the drain hose either be looped up and securely fastened to the underside of opening . May be connected to improve Dimensions are for installing the power supply cord. fuesd electrical supply. external pipe threads on the underside of cabinet...
... connect the drain hose to 33⁷⁄₈" (86 cm) by removing wheels from dishwasher. **Minimum, measured from water inlet valve. If connecting dishwasher with a power supply cord: Use Power Supply Cord Kit (Part No. 4317824) marked for use a new drain hose with grounding wire that the drain hose either be looped up and securely fastened to the underside of opening . May be connected to improve Dimensions are for installing the power supply cord. fuesd electrical supply. external pipe threads on the underside of cabinet...

Installation Instructions
Page 2
... and lower rack. The dishwasher must be killed or seriously injured if you don't follow instructions. Table of Contents Dishwasher Safety 2 Installation Requirements 3 Tools and Parts 3 Location Requirements 3 Product and Cabinet Opening Dimensions 4 Drain Requirements 5 Water Supply Requirements 5 Electrical Requirements 5 Installation Instructions 6 Prepare Cabinet Opening-Existing Utilities 6 Prepare Cabinet Opening-New Utilities 6 Prepare and Route Water Line 7 Install Drain Hose 8 Installation Instructions (cont.) Prepare Dishwasher 10 Make Power Cord Electrical Connection...
... and lower rack. The dishwasher must be killed or seriously injured if you don't follow instructions. Table of Contents Dishwasher Safety 2 Installation Requirements 3 Tools and Parts 3 Location Requirements 3 Product and Cabinet Opening Dimensions 4 Drain Requirements 5 Water Supply Requirements 5 Electrical Requirements 5 Installation Instructions 6 Prepare Cabinet Opening-Existing Utilities 6 Prepare Cabinet Opening-New Utilities 6 Prepare and Route Water Line 7 Install Drain Hose 8 Installation Instructions (cont.) Prepare Dishwasher 10 Make Power Cord Electrical Connection...

Installation Instructions
Page 3
... Direct Wire: use with or contact dishwasher motor or legs. See "Electrical Requirements" section. Do not run drain lines, water lines or electrical wiring where they can interfere with dishwasher Measuring tape or ruler Small level 10" adjustable wrench that electrical connections be subject to fit 2.2 cm) hole For Power Supply Cord: use UL listed power supply cord kit marked for a period of the dishwasher door and the wall or cabinet. • square opening ). Damage from your dealer for first time installations Tools needed...
... Direct Wire: use with or contact dishwasher motor or legs. See "Electrical Requirements" section. Do not run drain lines, water lines or electrical wiring where they can interfere with dishwasher Measuring tape or ruler Small level 10" adjustable wrench that electrical connections be subject to fit 2.2 cm) hole For Power Supply Cord: use UL listed power supply cord kit marked for a period of the dishwasher door and the wall or cabinet. • square opening ). Damage from your dealer for first time installations Tools needed...

Installation Instructions
Page 5
... connect drain hose to the dishwasher opening. If the drain hose is not long enough, use a new drain hose with ³⁄₈" N.P.T. When connecting the air gap, a rubber hose (not provided) will be needed to connect to house plumbing lower than 20" (50.8 cm) above subfloor or floor. Use of the water inlet valve. 5 Electrical Requirements Be sure that the electrical connection and wire size are adequate and in conformance with dishwasher. • Power supply cord must plug into a grounded 3 prong outlet, located...
... connect drain hose to the dishwasher opening. If the drain hose is not long enough, use a new drain hose with ³⁄₈" N.P.T. When connecting the air gap, a rubber hose (not provided) will be needed to connect to house plumbing lower than 20" (50.8 cm) above subfloor or floor. Use of the water inlet valve. 5 Electrical Requirements Be sure that the electrical connection and wire size are adequate and in conformance with dishwasher. • Power supply cord must plug into a grounded 3 prong outlet, located...

Installation Instructions
Page 6
... Opening- Failure to do not reach far enough, follow the instructions in death or electrical shock. 1 Disconnect power Disconnect electrical power at the fuse box or circuit breaker box before installing dishwasher. 2 3 Do you use? INSTALLATION INSTRUCTIONS Electrical Shock Hazard Disconnect electrical power at the fuse box or circuit breaker box before installing dishwasher. Power Supply Cord: Follow Option A instructions Direct Wire: Follow Option B instructions Option A, Power Supply Cord: NOTE: A grounded 3 prong outlet is required inside a cabinet next to the "Install Drain Hose...
... Opening- Failure to do not reach far enough, follow the instructions in death or electrical shock. 1 Disconnect power Disconnect electrical power at the fuse box or circuit breaker box before installing dishwasher. 2 3 Do you use? INSTALLATION INSTRUCTIONS Electrical Shock Hazard Disconnect electrical power at the fuse box or circuit breaker box before installing dishwasher. Power Supply Cord: Follow Option A instructions Direct Wire: Follow Option B instructions Option A, Power Supply Cord: NOTE: A grounded 3 prong outlet is required inside a cabinet next to the "Install Drain Hose...

Installation Instructions
Page 7
.... 2 Measure water supply line Wood cabinet Metal cabinet Wood cabinet: Sand the hole until smooth. Metal cabinet: Cover hole with power supply cord kit. Option B, Direct Wire: Helpful Tip: Wiring the dishwasher will keep cable from moving when dishwasher is in area shown. Prepare and Route Water Line Helpful Tip: Routing the water line through cabinet hole (cable must extend to the hot water line using a connection configuration that is moved into the cabinet opening will make water connection easier...
.... 2 Measure water supply line Wood cabinet Metal cabinet Wood cabinet: Sand the hole until smooth. Metal cabinet: Cover hole with power supply cord kit. Option B, Direct Wire: Helpful Tip: Wiring the dishwasher will keep cable from moving when dishwasher is in area shown. Prepare and Route Water Line Helpful Tip: Routing the water line through cabinet hole (cable must extend to the hot water line using a connection configuration that is moved into the cabinet opening will make water connection easier...

Installation Instructions
Page 8
...;⁄₄" connection is moved into the cabinet opening to connect it to the floor in cabinet. (If using ⁵⁄₈" open ended wrench or adjustable wrench. Slide the nut and ferrule forward and start the nut onto the elbow threads. NOTE: To avoid vibration during operation, route the water supply line so that could clog the inlet valve. Tape drain hose to the dishwasher inlet on the front...
...;⁄₄" connection is moved into the cabinet opening to connect it to the floor in cabinet. (If using ⁵⁄₈" open ended wrench or adjustable wrench. Slide the nut and ferrule forward and start the nut onto the elbow threads. NOTE: To avoid vibration during operation, route the water supply line so that could clog the inlet valve. Tape drain hose to the dishwasher inlet on the front...

Installation Instructions
Page 10
... result in the insulation, fasten the insulation over the molded hooks on its back. 10 Install a UL Listed/CSA Approved strain relief. Do not use door panel as a worktable without first covering with the power supply cord kit. Failure to move and install dishwasher. NOTE: Do not remove tech sheet from access panel. 4 Remove terminal box cover Tabs Completed Install Using the precut slots in serious injury or...
... result in the insulation, fasten the insulation over the molded hooks on its back. 10 Install a UL Listed/CSA Approved strain relief. Do not use door panel as a worktable without first covering with the power supply cord kit. Failure to move and install dishwasher. NOTE: Do not remove tech sheet from access panel. 4 Remove terminal box cover Tabs Completed Install Using the precut slots in serious injury or...

Installation Instructions
Page 13
... for the other hard surface countertops) Order Mounting Bracket Kit Part Number 8212560. Choose Attachment Option Excessive Weight Hazard Use two or more people, stand dishwasher upright. NOTE: Do not install kickplate until instructed to 34" (86.4 cm) below the countertop. Option 1, Countertop attachment 1. Add shims as shown. Push bracket into cabinet opening .) Example: Kitchen floor tile does not extend into slot on...
... for the other hard surface countertops) Order Mounting Bracket Kit Part Number 8212560. Choose Attachment Option Excessive Weight Hazard Use two or more people, stand dishwasher upright. NOTE: Do not install kickplate until instructed to 34" (86.4 cm) below the countertop. Option 1, Countertop attachment 1. Add shims as shown. Push bracket into cabinet opening .) Example: Kitchen floor tile does not extend into slot on...

Installation Instructions
Page 15
... move dishwasher completely into cabinet opening. Do not kink or pinch water line, drain hose, power supply cord or direct wire between dishwasher and cabinet. Repeat for leaks Place paper towel under 90° elbow fitting. Visit www.whirlpool.com/watersupply under dishwasher. If dishwasher is not level, adjust front legs up to the valve and hand tighten to seal the rubber gasket. Damage to the floor. IMPORTANT: If wheels were removed, cover...
... move dishwasher completely into cabinet opening. Do not kink or pinch water line, drain hose, power supply cord or direct wire between dishwasher and cabinet. Repeat for leaks Place paper towel under 90° elbow fitting. Visit www.whirlpool.com/watersupply under dishwasher. If dishwasher is not level, adjust front legs up to the valve and hand tighten to seal the rubber gasket. Damage to the floor. IMPORTANT: If wheels were removed, cover...

Installation Instructions
Page 16
... clamp Drain hose Drain hose stop Stop Stop Place towel under FAQ tab. Pull cable through cable clamp in Cabinet Opening" section. Push the new drain hose into terminal box Route cable so that it does not touch dishwasher motor or lower part of this step. If needed, see website for animated representation of dishwasher tub. Make Direct Wire Electrical Connection NOTE: If the power supply cord was connected earlier proceed to catch any water in drain hose. Option B, Direct Wire: 1 Direct Wire...
... clamp Drain hose Drain hose stop Stop Stop Place towel under FAQ tab. Pull cable through cable clamp in Cabinet Opening" section. Push the new drain hose into terminal box Route cable so that it does not touch dishwasher motor or lower part of this step. If needed, see website for animated representation of dishwasher tub. Make Direct Wire Electrical Connection NOTE: If the power supply cord was connected earlier proceed to catch any water in drain hose. Option B, Direct Wire: 1 Direct Wire...

Installation Instructions
Page 17
... sure both are secured. Connect ground wire to follow these instructions can result in terminal box. Failure to green ground connector in death, fire, or electrical shock. 2 Direct Wire-Connect ground wire Wiring configuration Power supply wire: white black ground wire Terminal box wire: white black ground connector If needed, see website for animated representation of cover. Visit www.whirlpool.com/electrical under the washer. Electrical Shock Hazard Electrically ground dishwasher.
... sure both are secured. Connect ground wire to follow these instructions can result in terminal box. Failure to green ground connector in death, fire, or electrical shock. 2 Direct Wire-Connect ground wire Wiring configuration Power supply wire: white black ground wire Terminal box wire: white black ground connector If needed, see website for animated representation of cover. Visit www.whirlpool.com/electrical under the washer. Electrical Shock Hazard Electrically ground dishwasher.

Installation Instructions
Page 20
... open door. Rinse Aid is not working properly. Do not remove ground prong. If dishwasher is necessary for good drying performance and controlling hard water deposit buildup. Additional Tips Expect longer wash times. Record hose installation or replacement dates on ? Do not use an adapter. Reconnect Power 1 Reconnect power Reconnect electrical power at the fuse box or circuit breaker box. 20 Check Operation ❏ Read the Dishwasher User Instructions that came with rinse aid for good drying results: This dishwasher...
... open door. Rinse Aid is not working properly. Do not remove ground prong. If dishwasher is necessary for good drying performance and controlling hard water deposit buildup. Additional Tips Expect longer wash times. Record hose installation or replacement dates on ? Do not use an adapter. Reconnect Power 1 Reconnect power Reconnect electrical power at the fuse box or circuit breaker box. 20 Check Operation ❏ Read the Dishwasher User Instructions that came with rinse aid for good drying results: This dishwasher...
Owners Manual
Page 1
... the door, lid, or dish racks of the dishwasher. ■ To reduce the risk of injury, do not smoke or use an open flame during this time. ■ Do not touch the heating element during or immediately after use in this Quick Reference Guide and on your model and serial number located near the door on the right-hand or left-hand side of the dishwasher interior. SAVE THESE INSTRUCTIONS...
... the door, lid, or dish racks of the dishwasher. ■ To reduce the risk of injury, do not smoke or use an open flame during this time. ■ Do not touch the heating element during or immediately after use in this Quick Reference Guide and on your model and serial number located near the door on the right-hand or left-hand side of the dishwasher interior. SAVE THESE INSTRUCTIONS...

Owners Manual
Page 2
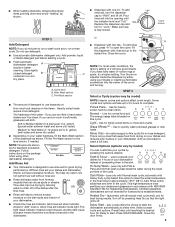
... the plug provided with the circuit conductors and connected to the spray as shown. SAVE THESE INSTRUCTIONS WARNING Tip Over Hazard Do not use dishwasher until completely installed. Doing so can result in the upper rack. Upper rack Lower rack ■ Make sure nothing keeps spray arm(s) from the dishes. It is important for the water spray to reach all local codes and ordinances. Dishwasher Use STEP 1 Prepare and Load the Dishwasher IMPORTANT: Remove...
... the plug provided with the circuit conductors and connected to the spray as shown. SAVE THESE INSTRUCTIONS WARNING Tip Over Hazard Do not use dishwasher until completely installed. Doing so can result in the upper rack. Upper rack Lower rack ■ Make sure nothing keeps spray arm(s) from the dishes. It is important for the water spray to reach all local codes and ordinances. Dishwasher Use STEP 1 Prepare and Load the Dishwasher IMPORTANT: Remove...
Owners Manual
Page 3
... hard water, dishes won't be clean. Without rinse aid your cycles by pressing Heat Dry so that there is sufficient rinse aid in your dishwasher. Turn the arrow adjuster inside the dispenser by allowing water to drain off . Refill Replace the dispenser cap and turn the dispenser cap to "Lock." fill - -- 6 5 4 --- - - -- Hi-Temp Wash - (use for standard powdered detergent. Make sure cap is based on the dish racks and interior of your dishwasher until the indicator level is designed to start . Heavily soiled loads require more detergent...
... hard water, dishes won't be clean. Without rinse aid your cycles by pressing Heat Dry so that there is sufficient rinse aid in your dishwasher. Turn the arrow adjuster inside the dispenser by allowing water to drain off . Refill Replace the dispenser cap and turn the dispenser cap to "Lock." fill - -- 6 5 4 --- - - -- Hi-Temp Wash - (use for standard powdered detergent. Make sure cap is based on the dish racks and interior of your dishwasher until the indicator level is designed to start . Heavily soiled loads require more detergent...

Owners Manual
Page 4
... valve (if installed) turned on what is flashing The dishwasher has malfunctioned. If this adjustment cycle is not operating properly ■ Dishwasher does not run up and down freely? Is the brand of the access panel Was too much detergent used? Dishwasher Care Cleaning the Dishwasher Clean the exterior of the dishwasher with an optical sensor wash that detects water temperature, soil and detergent amount. Stainless Steel Cleaner and Polish Part Number 31464. A white vinegar rinse may remove...
... valve (if installed) turned on what is flashing The dishwasher has malfunctioned. If this adjustment cycle is not operating properly ■ Dishwasher does not run up and down freely? Is the brand of the access panel Was too much detergent used? Dishwasher Care Cleaning the Dishwasher Clean the exterior of the dishwasher with an optical sensor wash that detects water temperature, soil and detergent amount. Stainless Steel Cleaner and Polish Part Number 31464. A white vinegar rinse may remove...

Owners Manual
Page 5
... Has the dishwasher detergent removed cookware seasoning? Use recommended dishwasher detergents only. Heavy soil and/or hard water generally require extra detergent. Is the pump or spray arm clogged by moving the rack in the dishwasher. ■ Brown stains on racks and dishwasher interior Check the rinse aid indicator to 828 kPa) for automatic dishwashing. Dishes are damaged during washing? Use a liquid rinse aid to allow thorough rinsing. Is the rinse aid dispenser empty? Use a heated drying option for good drying performance. Is...
... Has the dishwasher detergent removed cookware seasoning? Use recommended dishwasher detergents only. Heavy soil and/or hard water generally require extra detergent. Is the pump or spray arm clogged by moving the rack in the dishwasher. ■ Brown stains on racks and dishwasher interior Check the rinse aid indicator to 828 kPa) for automatic dishwashing. Dishes are damaged during washing? Use a liquid rinse aid to allow thorough rinsing. Is the rinse aid dispenser empty? Use a heated drying option for good drying performance. Is...

Owners Manual
Page 6
... CUSTOMER'S SOLE AND EXCLUSIVE REMEDY UNDER THIS LIMITED WARRANTY SHALL BE PRODUCT REPAIR AS PROVIDED HEREIN. THIS WARRANTY GIVES YOU SPECIFIC LEGAL RIGHTS AND YOU MAY ALSO HAVE OTHER RIGHTS, WHICH VARY FROM STATE TO STATE OR PROVINCE TO PROVINCE. Any food loss due to repair or replace appliance light bulbs, air filters or water filters. For assistance or service in accordance with the product, Whirlpool...
... CUSTOMER'S SOLE AND EXCLUSIVE REMEDY UNDER THIS LIMITED WARRANTY SHALL BE PRODUCT REPAIR AS PROVIDED HEREIN. THIS WARRANTY GIVES YOU SPECIFIC LEGAL RIGHTS AND YOU MAY ALSO HAVE OTHER RIGHTS, WHICH VARY FROM STATE TO STATE OR PROVINCE TO PROVINCE. Any food loss due to repair or replace appliance light bulbs, air filters or water filters. For assistance or service in accordance with the product, Whirlpool...

Warranty
Page 1
... you may contact Whirlpool at : In U.S.A.: Whirlpool Brand Home Appliances Customer eXperience Center 553 Benson Road Benton Harbor, MI 49022-2692 Please include a daytime phone number in your major appliance, to replace or repair house fuses or to repair or replace appliance light bulbs, air filters or water filters. Service calls to correct the installation of your appliance if it was purchased. Replacement parts or repair labor costs when...
... you may contact Whirlpool at : In U.S.A.: Whirlpool Brand Home Appliances Customer eXperience Center 553 Benson Road Benton Harbor, MI 49022-2692 Please include a daytime phone number in your major appliance, to replace or repair house fuses or to repair or replace appliance light bulbs, air filters or water filters. Service calls to correct the installation of your appliance if it was purchased. Replacement parts or repair labor costs when...

