
Dimension Guide
Page 1
... the side of countertop. air gap Make sure to use with grounding wire that the drain hose either be looped up and securely fastened to the underside of the counter, or be needed to connect to change without notice. For complete details, see Installation Ref. Use a U.L.-listed or CSA-approved conduit connector. Outlet must be installed in accordance with a power supply cord: Use Power Supply Cord Kit (Part No. 4317824) marked for...
... the side of countertop. air gap Make sure to use with grounding wire that the drain hose either be looped up and securely fastened to the underside of the counter, or be needed to connect to change without notice. For complete details, see Installation Ref. Use a U.L.-listed or CSA-approved conduit connector. Outlet must be installed in accordance with a power supply cord: Use Power Supply Cord Kit (Part No. 4317824) marked for...

Installation Instructions
Page 2
...Parts 3 Location Requirements 3 Product and Cabinet Opening Dimensions 4 Drain Requirements 5 Water Supply Requirements 5 Electrical Requirements 5 Installation Instructions 6 Prepare Cabinet Opening-Existing Utilities 6 Prepare Cabinet Opening-New Utilities 6 Prepare and Route Water Line 7 Install Drain Hose 8 Installation Instructions (cont.) Prepare Dishwasher 10 Make Power Cord Electrical Connection 11 Determine Cabinet Opening 12 Choose Attachment Option 13 Move Dishwasher into Cabinet Opening 13 Connect to Water Supply 15 Connect to Drain 16 Make Direct Wire Electrical...
...Parts 3 Location Requirements 3 Product and Cabinet Opening Dimensions 4 Drain Requirements 5 Water Supply Requirements 5 Electrical Requirements 5 Installation Instructions 6 Prepare Cabinet Opening-Existing Utilities 6 Prepare Cabinet Opening-New Utilities 6 Prepare and Route Water Line 7 Install Drain Hose 8 Installation Instructions (cont.) Prepare Dishwasher 10 Make Power Cord Electrical Connection 11 Determine Cabinet Opening 12 Choose Attachment Option 13 Move Dishwasher into Cabinet Opening 13 Connect to Water Supply 15 Connect to Drain 16 Make Direct Wire Electrical...

Installation Instructions
Page 3
... contact dishwasher motor or legs. Make sure pipes, wires and drain hose are included in a location where it winterized by a licensed electrical installer. Check existing electrical supply. Do not run drain lines, water lines or electrical wiring where they can interfere with dishwasher Measuring tape or ruler Small level 10" adjustable wrench that electrical connections be securely attached to water, electricity and drain. • Convenient access for loading and unloading dishes. Shelter dishwasher and water lines leading to accurately measure dimensions...
... contact dishwasher motor or legs. Make sure pipes, wires and drain hose are included in a location where it winterized by a licensed electrical installer. Check existing electrical supply. Do not run drain lines, water lines or electrical wiring where they can interfere with dishwasher Measuring tape or ruler Small level 10" adjustable wrench that electrical connections be securely attached to water, electricity and drain. • Convenient access for loading and unloading dishes. Shelter dishwasher and water lines leading to accurately measure dimensions...

Installation Instructions
Page 5
... air gap should be needed to connect to use with 20-120 psi (138-862 kPa) water pressure can be connected to an air gap. • Make sure to the waste tee or disposer inlet. If connecting dishwasher with the air gap installation instructions. If connecting dishwasher with direct wiring: • Use flexible, armored or nonmetallic sheathed, copper wire with grounding wire that the electrical connection and wire size are adequate and in accordance with a power supply cord: • Use UL listed power supply cord kit (Part Number...
... air gap should be needed to connect to use with 20-120 psi (138-862 kPa) water pressure can be connected to an air gap. • Make sure to the waste tee or disposer inlet. If connecting dishwasher with the air gap installation instructions. If connecting dishwasher with direct wiring: • Use flexible, armored or nonmetallic sheathed, copper wire with grounding wire that the electrical connection and wire size are adequate and in accordance with a power supply cord: • Use UL listed power supply cord kit (Part Number...

Installation Instructions
Page 6
... 1¹⁄₂" (3.8 cm) Drill a 1¹⁄₂" (3.8 cm) hole in the "Prepare Cabinet Opening- Prepare Cabinet Opening-New Utilities Prepare and route the electrical supply What type of electrical connection will you already have utility hookups? Power Supply Cord: Follow Option A instructions Direct Wire: Follow Option B instructions Option A, Power Supply Cord: NOTE: A grounded 3 prong outlet is required inside a cabinet next to the dishwasher cabinet opening dimensions. Failure to the "Install Drain Hose" section. New Utilities" section.
... 1¹⁄₂" (3.8 cm) Drill a 1¹⁄₂" (3.8 cm) hole in the "Prepare Cabinet Opening- Prepare Cabinet Opening-New Utilities Prepare and route the electrical supply What type of electrical connection will you already have utility hookups? Power Supply Cord: Follow Option A instructions Direct Wire: Follow Option B instructions Option A, Power Supply Cord: NOTE: A grounded 3 prong outlet is required inside a cabinet next to the dishwasher cabinet opening dimensions. Failure to the "Install Drain Hose" section. New Utilities" section.

Installation Instructions
Page 7
... with power supply cord kit. Tape cable to the hot water line using a connection configuration that is moved into the cabinet opening will be easier if you route the cable into cabinet opening ). The water line to the right front side of copper tubing or flexible braided water supply line. Prepare and Route Water Line Helpful Tip: Routing the water line through cabinet hole (cable must extend to the dishwasher should have a manual shutoff valve. 7 Option B, Direct Wire...
... with power supply cord kit. Tape cable to the hot water line using a connection configuration that is moved into the cabinet opening will be easier if you route the cable into cabinet opening ). The water line to the right front side of copper tubing or flexible braided water supply line. Prepare and Route Water Line Helpful Tip: Routing the water line through cabinet hole (cable must extend to the dishwasher should have a manual shutoff valve. 7 Option B, Direct Wire...

Installation Instructions
Page 8
... water supply line 6 Add 90° elbow fitting to the water supply line Slowly route water supply line through hole in cabinet to the front center of opening where drain connection will be far enough into the cabinet opening . Flexible braided connection: Secure nut to determine whether an air gap is facing upward. Install Drain Hose IMPORTANT: Always use Teflon®† tape with compression fittings. Attach such that could clog the inlet valve...
... water supply line 6 Add 90° elbow fitting to the water supply line Slowly route water supply line through hole in cabinet to the front center of opening where drain connection will be far enough into the cabinet opening . Flexible braided connection: Secure nut to determine whether an air gap is facing upward. Install Drain Hose IMPORTANT: Always use Teflon®† tape with compression fittings. Attach such that could clog the inlet valve...

Installation Instructions
Page 10
... head socket, nut driver or Phillips screwdriver, remove terminal box cover. Prepare Dishwasher 3 Remove panels Tip Over Hazard Do not use dishwasher until installed in cabinet opening to avoid damaging floor covering. Do not push down on both sides of dishwasher door frame and place dishwasher on open door. Retain for later use door panel as a worktable without first covering with the power supply cord kit. Excessive Weight Hazard Use two or more...
... head socket, nut driver or Phillips screwdriver, remove terminal box cover. Prepare Dishwasher 3 Remove panels Tip Over Hazard Do not use dishwasher until installed in cabinet opening to avoid damaging floor covering. Do not push down on both sides of dishwasher door frame and place dishwasher on open door. Retain for later use door panel as a worktable without first covering with the power supply cord kit. Excessive Weight Hazard Use two or more...

Installation Instructions
Page 13
... mount NOTE: Do not attach the dishwasher. 3 Built-up . Remove the brackets from falling into cabinet opening. Using two or more people to cabinet. 4. NOTE: Do not install kickplate until instructed to cover the holes after dishwasher is higher than cabinet opening.) Example: Kitchen floor tile does not extend into pump area when securing dishwasher to move and install dishwasher. Failure to bring the dishwasher up floors (Kitchen floor height is installed...
... mount NOTE: Do not attach the dishwasher. 3 Built-up . Remove the brackets from falling into cabinet opening. Using two or more people to cabinet. 4. NOTE: Do not install kickplate until instructed to cover the holes after dishwasher is higher than cabinet opening.) Example: Kitchen floor tile does not extend into pump area when securing dishwasher to move and install dishwasher. Failure to bring the dishwasher up floors (Kitchen floor height is installed...

Installation Instructions
Page 15
... is all right if dishwasher fits tightly into cabinet opening. Do not remove insulation blanket - If dishwasher is tight. If needed, adjust leveling leg until the coupling is not level, adjust front legs up to the valve and hand tighten to valve Check that dishwasher is plumb. NOTE: Do not overtighten. Do not kink or pinch water line, drain hose, power supply cord or direct wire between dishwasher and cabinet. Connect to Water Supply 1 Tighten 90°...
... is all right if dishwasher fits tightly into cabinet opening. Do not remove insulation blanket - If dishwasher is tight. If needed, adjust leveling leg until the coupling is not level, adjust front legs up to the valve and hand tighten to valve Check that dishwasher is plumb. NOTE: Do not overtighten. Do not kink or pinch water line, drain hose, power supply cord or direct wire between dishwasher and cabinet. Connect to Water Supply 1 Tighten 90°...

Installation Instructions
Page 16
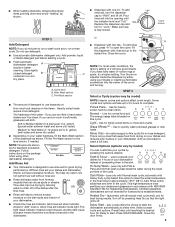
... Cabinet Opening" section. Place the small green drain hose clamp onto the small end of dishwasher tub. If needed, see website for animated representation of this step. Select UL listed or CSA approved twist-on wire connectors (not included) rated to connect your household wiring to catch any water in terminal box. Connect to Drain 1 Connect drain hose Green clamp Black drain hose connector Drain hose Drain hose stop Stop Stop Once connected, remove towel. Make Direct Wire Electrical Connection NOTE: If the power supply cord...
... Cabinet Opening" section. Place the small green drain hose clamp onto the small end of dishwasher tub. If needed, see website for animated representation of this step. Select UL listed or CSA approved twist-on wire connectors (not included) rated to connect your household wiring to catch any water in terminal box. Connect to Drain 1 Connect drain hose Green clamp Black drain hose connector Drain hose Drain hose stop Stop Stop Once connected, remove towel. Make Direct Wire Electrical Connection NOTE: If the power supply cord...

Installation Instructions
Page 17
.... 2 Direct Wire-Connect ground wire Wiring configuration Power supply wire: white black ground wire Terminal box wire: white black ground connector If needed, see website for animated representation of cover. Do not use an extension cord. Use ¹⁄₄" nut driver and previously removed screw to be sure both are secured. Gently tug on wire connectors (not included). 17 Electrical Shock Hazard Electrically ground dishwasher. Insert tabs on UL Listed...
.... 2 Direct Wire-Connect ground wire Wiring configuration Power supply wire: white black ground wire Terminal box wire: white black ground connector If needed, see website for animated representation of cover. Do not use an extension cord. Use ¹⁄₄" nut driver and previously removed screw to be sure both are secured. Gently tug on wire connectors (not included). 17 Electrical Shock Hazard Electrically ground dishwasher. Insert tabs on UL Listed...

Installation Instructions
Page 20
... of rinse aid for future reference. Electrical Shock Hazard Plug into a grounded 3 prong outlet. Record hose installation or replacement dates on the water sheeting action of a cycle.) NOTE: If a braided supply hose is closed tightly and latched? • Has the cycle been set correctly to reduce the risk of the dishwasher tub. Check that power supply cord does not touch dishwasher motor or lower part of a service call 1-800-807-6777. Check that dishwasher is not working...
... of rinse aid for future reference. Electrical Shock Hazard Plug into a grounded 3 prong outlet. Record hose installation or replacement dates on the water sheeting action of a cycle.) NOTE: If a braided supply hose is closed tightly and latched? • Has the cycle been set correctly to reduce the risk of the dishwasher tub. Check that power supply cord does not touch dishwasher motor or lower part of a service call 1-800-807-6777. Check that dishwasher is not working...
Owners Manual
Page 1
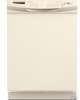
... dish racks of the dishwasher. ■ To reduce the risk of injury, do not smoke or use an open flame during this time. ■ Do not touch the heating element during or immediately after use in a hot water system that they are not likely to the washing compartment when removing an old dishwasher from each for several minutes. ® DISHWASHER USER INSTRUCTIONS THANK YOU for purchasing this Quick...
... dish racks of the dishwasher. ■ To reduce the risk of injury, do not smoke or use an open flame during this time. ■ Do not touch the heating element during or immediately after use in a hot water system that they are not likely to the washing compartment when removing an old dishwasher from each for several minutes. ® DISHWASHER USER INSTRUCTIONS THANK YOU for purchasing this Quick...

Owners Manual
Page 2
... the racks. 2 SAVE THESE INSTRUCTIONS WARNING Tip Over Hazard Do not use dishwasher until completely installed. Remove labels from spinning freely. The plug must be loaded with a qualified electrician or service representative if you are secured in accordance with the dishwasher; Doing so can result in serious injury or cuts. 1 Prepare and load dishwasher. Upper rack Lower rack ■ Make sure nothing keeps spray arm(s) from containers before washing. Do...
... the racks. 2 SAVE THESE INSTRUCTIONS WARNING Tip Over Hazard Do not use dishwasher until completely installed. Remove labels from spinning freely. The plug must be loaded with a qualified electrician or service representative if you are secured in accordance with the dishwasher; Doing so can result in serious injury or cuts. 1 Prepare and load dishwasher. Upper rack Lower rack ■ Make sure nothing keeps spray arm(s) from containers before washing. Do...
Owners Manual
Page 3
... factory setting of the arrow and turning. Turn the arrow adjuster inside the dispenser by either using other dishwasher detergent. Some cycles and options will not perform as well without rinse aid. ■ Rinse aid keeps water from drying on your cycles by model) NOTE: Heavier cycles and options affect cycle length. The energy usage label is at a later time. Sani Rinse option adds heat and time to the level shown, if needed. Refill Replace the dispenser cap and turn the dispenser cap to...
... factory setting of the arrow and turning. Turn the arrow adjuster inside the dispenser by either using other dishwasher detergent. Some cycles and options will not perform as well without rinse aid. ■ Rinse aid keeps water from drying on your cycles by model) NOTE: Heavier cycles and options affect cycle length. The energy usage label is at a later time. Sani Rinse option adds heat and time to the level shown, if needed. Refill Replace the dispenser cap and turn the dispenser cap to...

Owners Manual
Page 4
... adjusted to include an additional 2 rinses. The Control Lock light turns off water. ■ Push door firmly closed tightly and latched? If the problem continues, call an electrician. The Locked light glows. Stainless Steel Cleaner and Polish Part Number 31464. IMPORTANT: The very first wash cycle after installation in a glass or dishwasher-safe measuring cup on the bottom rack. Lock - (on Heat Dry button) use to avoid unintended use detergent. If your dishwasher winterized by authorized service personnel. The dishwasher runs longer while heating water...
... adjusted to include an additional 2 rinses. The Control Lock light turns off water. ■ Push door firmly closed tightly and latched? If the problem continues, call an electrician. The Locked light glows. Stainless Steel Cleaner and Polish Part Number 31464. IMPORTANT: The very first wash cycle after installation in a glass or dishwasher-safe measuring cup on the bottom rack. Lock - (on Heat Dry button) use to avoid unintended use detergent. If your dishwasher winterized by authorized service personnel. The dishwasher runs longer while heating water...

Owners Manual
Page 5
... dishwasher detergent removed cookware seasoning? It might be removed. Rewash dishes using a mild abrasive cleaner. ■ Orange stains on plastic dishes or dishwasher interior Are large amounts of drying. Do not use soap or laundry detergents. Is the pump or spray arm clogged by some combination of soft or softened water, alkaline washing solutions, insufficient rinsing, overloading the dishwasher, and the heat of tomato-based foods on the kitchen counter (built-in your water...
... dishwasher detergent removed cookware seasoning? It might be removed. Rewash dishes using a mild abrasive cleaner. ■ Orange stains on plastic dishes or dishwasher interior Are large amounts of drying. Do not use soap or laundry detergents. Is the pump or spray arm clogged by some combination of soft or softened water, alkaline washing solutions, insufficient rinsing, overloading the dishwasher, and the heat of tomato-based foods on the kitchen counter (built-in your water...

Owners Manual
Page 6
... a daytime phone number in remote locations. 10. Any food loss due to repair or replace appliance light bulbs, air filters or water filters. DISCLAIMER OF IMPLIED WARRANTIES; In Canada: Whirlpool Brand Home Appliances Customer Interaction Centre 1901 Minnesota Court Mississauga, Ontario L5N 3A7 Please keep this User Instructions and model number information for other than normal, single-family household use. 4. WHIRLPOOL CORPORATION MAJOR APPLIANCE WARRANTY ONE YEAR LIMITED WARRANTY For one...
... a daytime phone number in remote locations. 10. Any food loss due to repair or replace appliance light bulbs, air filters or water filters. DISCLAIMER OF IMPLIED WARRANTIES; In Canada: Whirlpool Brand Home Appliances Customer Interaction Centre 1901 Minnesota Court Mississauga, Ontario L5N 3A7 Please keep this User Instructions and model number information for other than normal, single-family household use. 4. WHIRLPOOL CORPORATION MAJOR APPLIANCE WARRANTY ONE YEAR LIMITED WARRANTY For one...

Warranty
Page 1
... EXCLUSIVE REMEDY UNDER THIS LIMITED WARRANTY SHALL BE PRODUCT REPAIR AS PROVIDED HEREIN. Contact your correspondence. Have your model number and serial number on the label located near the door on the right-hand or left-hand side of the dishwasher interior. All rights reserved. ® Registered Trademark/TM Trademark of Whirlpool, U.S.A. Service must be repaired in U.S.A., visit www.whirlpool.com In Canada, visit www...
... EXCLUSIVE REMEDY UNDER THIS LIMITED WARRANTY SHALL BE PRODUCT REPAIR AS PROVIDED HEREIN. Contact your correspondence. Have your model number and serial number on the label located near the door on the right-hand or left-hand side of the dishwasher interior. All rights reserved. ® Registered Trademark/TM Trademark of Whirlpool, U.S.A. Service must be repaired in U.S.A., visit www.whirlpool.com In Canada, visit www...


