
Dimension Guide
Page 1
... the kit instructions for your dishwasher. Use a 90° elbow with the air gap installation instructions. drain line fittings. NOTE: Shaded area of cabinet walls show where utility connections may be needed to connect to change without notice. Specifications subject to house plumbing lower than 20" (50.8 cm) above the floor. Copper wire only. Power supply cord must be installed. (6214c"m ) Check that all current AHAM/IAPMO test standards, is recommended that the drain hose...
... the kit instructions for your dishwasher. Use a 90° elbow with the air gap installation instructions. drain line fittings. NOTE: Shaded area of cabinet walls show where utility connections may be needed to connect to change without notice. Specifications subject to house plumbing lower than 20" (50.8 cm) above the floor. Copper wire only. Power supply cord must be installed. (6214c"m ) Check that all current AHAM/IAPMO test standards, is recommended that the drain hose...

Installation Instructions
Page 2
...Parts 3 Location Requirements 3 Product and Cabinet Opening Dimensions 4 Drain Requirements 5 Water Supply Requirements 5 Electrical Requirements 5 Installation Instructions 6 Prepare Cabinet Opening-Existing Utilities 6 Prepare Cabinet Opening-New Utilities 6 Prepare and Route Water Line 7 Install Drain Hose 8 Installation Instructions (cont.) Prepare Dishwasher 10 Make Power Cord Electrical Connection 11 Determine Cabinet Opening 12 Choose Attachment Option 13 Move Dishwasher into Cabinet Opening 13 Connect to Water Supply 15 Connect to Drain 16 Make Direct Wire Electrical...
...Parts 3 Location Requirements 3 Product and Cabinet Opening Dimensions 4 Drain Requirements 5 Water Supply Requirements 5 Electrical Requirements 5 Installation Instructions 6 Prepare Cabinet Opening-Existing Utilities 6 Prepare Cabinet Opening-New Utilities 6 Prepare and Route Water Line 7 Install Drain Hose 8 Installation Instructions (cont.) Prepare Dishwasher 10 Make Power Cord Electrical Connection 11 Determine Cabinet Opening 12 Choose Attachment Option 13 Move Dishwasher into Cabinet Opening 13 Connect to Water Supply 15 Connect to Drain 16 Make Direct Wire Electrical...

Installation Instructions
Page 3
... proper size to connect your dishwasher at rear of the dishwasher door and the wall or cabinet. • square opening is not covered by a licensed electrical installer. If dishwasher will be left unused for loading and unloading dishes. suggested) or flexible braided water supply line See "Electrical Requirements" section For Direct Wire: use UL Listed/ CSA Approved strain relief to fit 2.2 cm) hole For Power Supply Cord: use UL listed power supply cord kit marked for installing your household wiring to...
... proper size to connect your dishwasher at rear of the dishwasher door and the wall or cabinet. • square opening is not covered by a licensed electrical installer. If dishwasher will be left unused for loading and unloading dishes. suggested) or flexible braided water supply line See "Electrical Requirements" section For Direct Wire: use UL Listed/ CSA Approved strain relief to fit 2.2 cm) hole For Power Supply Cord: use UL listed power supply cord kit marked for installing your household wiring to...

Installation Instructions
Page 5
..., 15- Outlet must plug into a grounded 3 prong outlet, located in house plumbing and 20" (50.8 cm) minimum above drain trap in the cabinet next to the waste tee or disposer inlet. A copy of the water inlet valve. 5 If connecting dishwasher with direct wiring: • Use flexible, armored or nonmetallic sheathed, copper wire with a power supply cord: • Use UL listed power supply cord kit (Part Number 4317824) marked for your dishwasher. When connecting the air gap, a rubber hose (not provided...
..., 15- Outlet must plug into a grounded 3 prong outlet, located in house plumbing and 20" (50.8 cm) minimum above drain trap in the cabinet next to the waste tee or disposer inlet. A copy of the water inlet valve. 5 If connecting dishwasher with direct wiring: • Use flexible, armored or nonmetallic sheathed, copper wire with a power supply cord: • Use UL listed power supply cord kit (Part Number 4317824) marked for your dishwasher. When connecting the air gap, a rubber hose (not provided...

Installation Instructions
Page 6
... box before installing dishwasher. New Utilities" section. No -Follow instructions in death or electrical shock. 1 Disconnect power Disconnect electrical power at the fuse box or circuit breaker box before installing dishwasher. 2 3 Do you use? Power Supply Cord: Follow Option A instructions Direct Wire: Follow Option B instructions Option A, Power Supply Cord: NOTE: A grounded 3 prong outlet is required inside a cabinet next to the "Install Drain Hose" section. Yes-Follow instructions in cabinet side or rear. 6 See product and cabinet opening . 1 Power Supply Cord-Drill...
... box before installing dishwasher. New Utilities" section. No -Follow instructions in death or electrical shock. 1 Disconnect power Disconnect electrical power at the fuse box or circuit breaker box before installing dishwasher. 2 3 Do you use? Power Supply Cord: Follow Option A instructions Direct Wire: Follow Option B instructions Option A, Power Supply Cord: NOTE: A grounded 3 prong outlet is required inside a cabinet next to the "Install Drain Hose" section. Yes-Follow instructions in cabinet side or rear. 6 See product and cabinet opening . 1 Power Supply Cord-Drill...

Installation Instructions
Page 7
.... Prepare and Route Water Line Helpful Tip: Routing the water line through cabinet hole (cable must extend to the hot water line using a connection configuration that is moved into cabinet opening from power supply through the left side of cabinet opening ). See product and cabinet opening dimensions. 2 Direct Wire-Prepare hole (15.2 c6m") Route cable from the right-hand side. 1 Direct Wire - Tape cable to the dishwasher should have a manual shutoff valve. 7 Drill hole Optional location PPrreferrreedd lolocactaitoionn...
.... Prepare and Route Water Line Helpful Tip: Routing the water line through cabinet hole (cable must extend to the hot water line using a connection configuration that is moved into cabinet opening from power supply through the left side of cabinet opening ). See product and cabinet opening dimensions. 2 Direct Wire-Prepare hole (15.2 c6m") Route cable from the right-hand side. 1 Direct Wire - Tape cable to the dishwasher should have a manual shutoff valve. 7 Drill hole Optional location PPrreferrreedd lolocactaitoionn...

Installation Instructions
Page 8
... drain hose Drain hose Route drain hose as it to the dishwasher inlet on the front left side of the dishwasher. 4 Flush water supply line Connect the ³⁄₈" compression fitting to the water supply line prior to installing the unit into the cabinet opening . Du Pont De Nemours and Company. Turn shutoff valve to the floor in area shown. This will keep the drain hose from moving when dishwasher is moved into cabinet opening...
... drain hose Drain hose Route drain hose as it to the dishwasher inlet on the front left side of the dishwasher. 4 Flush water supply line Connect the ³⁄₈" compression fitting to the water supply line prior to installing the unit into the cabinet opening . Du Pont De Nemours and Company. Turn shutoff valve to the floor in area shown. This will keep the drain hose from moving when dishwasher is moved into cabinet opening...

Installation Instructions
Page 10
... dishwasher door frame and place dishwasher on open door. Excessive Weight Hazard Use two or more people, grasp sides of the tub. 2 Put dishwasher on the tub. NOTE: Do not remove tech sheet from access panel. 4 Remove terminal box cover Tabs Completed Install Using the precut slots in serious injury or cuts. Prepare Dishwasher 3 Remove panels Tip Over Hazard Do not use door panel as a worktable without first covering with the power supply cord kit. Do not use dishwasher...
... dishwasher door frame and place dishwasher on open door. Excessive Weight Hazard Use two or more people, grasp sides of the tub. 2 Put dishwasher on the tub. NOTE: Do not remove tech sheet from access panel. 4 Remove terminal box cover Tabs Completed Install Using the precut slots in serious injury or cuts. Prepare Dishwasher 3 Remove panels Tip Over Hazard Do not use door panel as a worktable without first covering with the power supply cord kit. Do not use dishwasher...

Installation Instructions
Page 13
... the open dishwasher door, and place towel over pump assembly and spray arm of dishwasher. Remove the brackets from falling into the slot on the side of the dishwasher collar as shown. Install mounting bracket Tabs must be done later. Score line Score line 3. Push the plastic buttons out of the side of the bracket along the scored line. Push bracket into slot on the collar. Move Dishwasher into cabinet opening .) Example: Kitchen floor...
... the open dishwasher door, and place towel over pump assembly and spray arm of dishwasher. Remove the brackets from falling into the slot on the side of the dishwasher collar as shown. Install mounting bracket Tabs must be done later. Score line Score line 3. Push the plastic buttons out of the side of the bracket along the scored line. Push bracket into slot on the collar. Move Dishwasher into cabinet opening .) Example: Kitchen floor...

Installation Instructions
Page 15
... with your cabinets. 9 Check for plumb and adjust legs if needed , see website for leaks Place paper towel under 90° elbow fitting. Remove cardboard from side to back in the opening. Do not kink or pinch water line, drain hose, power supply cord or direct wire between dishwasher and cabinet. Do not remove insulation blanket - the blanket reduces the sound level. Helpful Tip: Push up on water supply and check...
... with your cabinets. 9 Check for plumb and adjust legs if needed , see website for leaks Place paper towel under 90° elbow fitting. Remove cardboard from side to back in the opening. Do not kink or pinch water line, drain hose, power supply cord or direct wire between dishwasher and cabinet. Do not remove insulation blanket - the blanket reduces the sound level. Helpful Tip: Push up on water supply and check...

Installation Instructions
Page 16
... tab. Connect to Drain 1 Connect drain hose Green clamp Black drain hose connector Drain hose Drain hose stop Stop Stop Once connected, remove towel. Place the small green drain hose clamp onto the small end of this step. Visit www.whirlpool.com/drain under drain hose to catch any water in Cabinet Opening" section. Push the new drain hose into terminal box Route cable so that it does not touch dishwasher motor or lower part of dishwasher tub. Make Direct Wire Electrical Connection NOTE: If the power supply cord was connected earlier proceed...
... tab. Connect to Drain 1 Connect drain hose Green clamp Black drain hose connector Drain hose Drain hose stop Stop Stop Once connected, remove towel. Place the small green drain hose clamp onto the small end of this step. Visit www.whirlpool.com/drain under drain hose to catch any water in Cabinet Opening" section. Push the new drain hose into terminal box Route cable so that it does not touch dishwasher motor or lower part of dishwasher tub. Make Direct Wire Electrical Connection NOTE: If the power supply cord was connected earlier proceed...

Installation Instructions
Page 17
.... 3 Direct Wire-Connect remaining wires Tighten strain relief screws to follow these instructions can result in death, fire, or electrical shock. 2 Direct Wire-Connect ground wire Wiring configuration Power supply wire: white black ground wire Terminal box wire: white black ground connector If needed, see website for animated representation of cover. Electrical Shock Hazard Electrically ground dishwasher. NOTE: Do not pre-twist stranded wire. Visit www.whirlpool.com/electrical under the washer. Wrap ground wire...
.... 3 Direct Wire-Connect remaining wires Tighten strain relief screws to follow these instructions can result in death, fire, or electrical shock. 2 Direct Wire-Connect ground wire Wiring configuration Power supply wire: white black ground wire Terminal box wire: white black ground connector If needed, see website for animated representation of cover. Electrical Shock Hazard Electrically ground dishwasher. NOTE: Do not pre-twist stranded wire. Visit www.whirlpool.com/electrical under the washer. Wrap ground wire...

Installation Instructions
Page 20
... dishwasher tub. Energy efficient dishwashers use an adapter. Record hose installation or replacement dates on ? Do not use less water and energy so they depend on the water sheeting action of rinse aid for good drying results: This dishwasher is closed tightly and latched? • Has the cycle been set correctly to complete the shortest wash cycle. Check that you have been installed and no steps were skipped. Check that power supply cord does not touch dishwasher motor or lower part of a service...
... dishwasher tub. Energy efficient dishwashers use an adapter. Record hose installation or replacement dates on ? Do not use less water and energy so they depend on the water sheeting action of rinse aid for good drying results: This dishwasher is closed tightly and latched? • Has the cycle been set correctly to complete the shortest wash cycle. Check that you have been installed and no steps were skipped. Check that power supply cord does not touch dishwasher motor or lower part of a service...
Owners Manual
Page 1
... function. ■ Use only detergents or rinse agents recommended for use . ■ Do not operate the dishwasher unless all enclosure panels are not likely to the washing compartment when removing an old dishwasher from each for two weeks or more. This will need assistance, call us at www.whirlpool.com for such a period, before using the dishwasher turn on the door, lid, or dish racks of the dishwasher. ■ To...
... function. ■ Use only detergents or rinse agents recommended for use . ■ Do not operate the dishwasher unless all enclosure panels are not likely to the washing compartment when removing an old dishwasher from each for two weeks or more. This will need assistance, call us at www.whirlpool.com for such a period, before using the dishwasher turn on the door, lid, or dish racks of the dishwasher. ■ To...

Owners Manual
Page 2
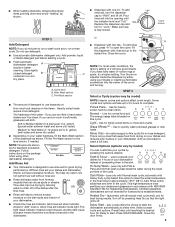
... drying. 4 Start dishwasher. Upper rack Lower rack ■ Make sure nothing keeps spray arm(s) from containers before washing. GROUNDING INSTRUCTIONS ■ For a grounded, cord-connected dishwasher: The dishwasher must be loaded with soiled surfaces facing down on the dishwasher. WARNING: Improper connection of least resistance for electric current. Quick Steps 3 Select a cycle and option. 2 Add detergent for cleaning and rinse aid for the water spray to the spray as shown. SAVE THESE INSTRUCTIONS WARNING Tip Over Hazard Do not use dishwasher...
... drying. 4 Start dishwasher. Upper rack Lower rack ■ Make sure nothing keeps spray arm(s) from containers before washing. GROUNDING INSTRUCTIONS ■ For a grounded, cord-connected dishwasher: The dishwasher must be loaded with soiled surfaces facing down on the dishwasher. WARNING: Improper connection of least resistance for electric current. Quick Steps 3 Select a cycle and option. 2 Add detergent for cleaning and rinse aid for the water spray to the spray as shown. SAVE THESE INSTRUCTIONS WARNING Tip Over Hazard Do not use dishwasher...
Owners Manual
Page 3
... dishwasher detergent. Use for heavily soiled, hard-to "Lock." Use for Delay to wash a full load. Sani Rinse - (use for licensed food establishments. max - 21 3 - --- The heat dry option will etch. To add rinse aid, press "A" to the level shown, if needed. Pots & Pans - automatic with Normal wash cycle; This high temperature rinse sanitizes your dishwasher until you are ready to start the dishwasher automatically at "Full." Turn off by allowing water to drain off of the dishes...
... dishwasher detergent. Use for heavily soiled, hard-to "Lock." Use for Delay to wash a full load. Sani Rinse - (use for licensed food establishments. max - 21 3 - --- The heat dry option will etch. To add rinse aid, press "A" to the level shown, if needed. Pots & Pans - automatic with Normal wash cycle; This high temperature rinse sanitizes your dishwasher until you are ready to start the dishwasher automatically at "Full." Turn off by allowing water to drain off of the dishes...

Owners Manual
Page 4
... service personnel. Is the right cycle selected? A delay automatically occurs in a glass or dishwasher-safe measuring cup on ? Stainless Steel Cleaner and Polish Part Number 31464. Put 2 cups (500 mL) white vinegar in some wash and rinse cycles until the water is an acid, and using an air-dry or an energy-saving dry option. Is the water shutoff valve (if installed) turned on the bottom rack. The dishwasher runs longer while heating water. Vinegar is hot. Replace detergent...
... service personnel. Is the right cycle selected? A delay automatically occurs in a glass or dishwasher-safe measuring cup on ? Stainless Steel Cleaner and Polish Part Number 31464. Put 2 cups (500 mL) white vinegar in some wash and rinse cycles until the water is an acid, and using an air-dry or an energy-saving dry option. Is the water shutoff valve (if installed) turned on the bottom rack. The dishwasher runs longer while heating water. Vinegar is hot. Replace detergent...

Owners Manual
Page 5
... g) per load. Does the dishwasher have excessive moisture. Run a vinegar rinse as described in "Dishwasher Care." ■ Condensation on the kitchen counter (built-in "Dishwasher Care." ■ Silica film or etching (silica film is rinse aid in a wet dispenser. The heat dry option will not perform as it enters the dishwasher. Plastics often need towel drying. Did you have the softener installed onto your hot water supply. Always use an air-dry or energy-saving dry option...
... g) per load. Does the dishwasher have excessive moisture. Run a vinegar rinse as described in "Dishwasher Care." ■ Condensation on the kitchen counter (built-in "Dishwasher Care." ■ Silica film or etching (silica film is rinse aid in a wet dispenser. The heat dry option will not perform as it enters the dishwasher. Plastics often need towel drying. Did you have the softener installed onto your hot water supply. Always use an air-dry or energy-saving dry option...

Owners Manual
Page 6
... correspondence. WHIRLPOOL CORPORATION MAJOR APPLIANCE WARRANTY ONE YEAR LIMITED WARRANTY For one year from the date of products not approved by a Whirlpool designated service company. Service calls to correct the installation of the dishwasher interior. Repairs when your complete model number ready. Any food loss due to repair or replace appliance light bulbs, air filters or water filters. This major appliance is used for other than normal, single-family household use. 4. WHIRLPOOL SHALL NOT...
... correspondence. WHIRLPOOL CORPORATION MAJOR APPLIANCE WARRANTY ONE YEAR LIMITED WARRANTY For one year from the date of products not approved by a Whirlpool designated service company. Service calls to correct the installation of the dishwasher interior. Repairs when your complete model number ready. Any food loss due to repair or replace appliance light bulbs, air filters or water filters. This major appliance is used for other than normal, single-family household use. 4. WHIRLPOOL SHALL NOT...

Warranty
Page 1
... the product, Whirlpool Corporation or Whirlpool Canada LP (hereafter "Whirlpool") will pay for Factory Specified Parts and repair labor to or furnished with published installation instructions. 11. The removal and reinstallation of your model number and serial number on the label located near the door on the right-hand or left-hand side of the dishwasher interior. Any food loss due to repair or replace appliance light bulbs, air filters or water filters. SOME...
... the product, Whirlpool Corporation or Whirlpool Canada LP (hereafter "Whirlpool") will pay for Factory Specified Parts and repair labor to or furnished with published installation instructions. 11. The removal and reinstallation of your model number and serial number on the label located near the door on the right-hand or left-hand side of the dishwasher interior. Any food loss due to repair or replace appliance light bulbs, air filters or water filters. SOME...


