Warranty
Page 1
...model number ready. Repairs when your model number and serial number on the label located near the door on the right-hand or left-hand side of the dishwasher interior. Expenses for travel and transportation for other than normal, single-family household use of products not approved by a Whirlpool...Mississauga, Ontario L5N 3A7 Please keep this User Instructions and model number information for units operated outside the United States or Canada. 7. This major appliance is designed to be provided by Whirlpool. 5. The removal and reinstallation of your correspondence. Those ...
...model number ready. Repairs when your model number and serial number on the label located near the door on the right-hand or left-hand side of the dishwasher interior. Expenses for travel and transportation for other than normal, single-family household use of products not approved by a Whirlpool...Mississauga, Ontario L5N 3A7 Please keep this User Instructions and model number information for units operated outside the United States or Canada. 7. This major appliance is designed to be provided by Whirlpool. 5. The removal and reinstallation of your correspondence. Those ...
Use and Care Guide
Page 5
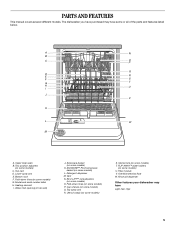
... item clips 5 Bottom rack F. ANYWARE™ PLUS silverware basket (on some models) G. Fold-down tines (on some models) T. Vent N. Fold-down tines (on some models) L. Utensil rack (on some models) P. Lower spray arm E. Heating element I U J V K L W M A. Water inlet opening (in tub wall) J. The dishwasher you have purchased may have some or all of the parts and...
... item clips 5 Bottom rack F. ANYWARE™ PLUS silverware basket (on some models) G. Fold-down tines (on some models) T. Vent N. Fold-down tines (on some models) L. Utensil rack (on some models) P. Lower spray arm E. Heating element I U J V K L W M A. Water inlet opening (in tub wall) J. The dishwasher you have purchased may have some or all of the parts and...

Use and Care Guide
Page 7
... in the display window indicating that the unit is operating. 7 Properly load the dishwasher. (See "Dishwasher Loading.") Make sure nothing prevents the spray arm(s) from dishes. 2. IMPORTANT (on some models): s When the cycle starts, you will find important safety information and useful operating...materials. Add detergent and check the rinse aid dispenser. GU2500, GU2548 GU2600 START-UP GUIDE Before using your dishwasher until the door is hot. (See "Dishwasher Efficiency Tips.") Turn off water. 3. Push door firmly closed , and Start/Resume is interrupted, the Start...
... in the display window indicating that the unit is operating. 7 Properly load the dishwasher. (See "Dishwasher Loading.") Make sure nothing prevents the spray arm(s) from dishes. 2. IMPORTANT (on some models): s When the cycle starts, you will find important safety information and useful operating...materials. Add detergent and check the rinse aid dispenser. GU2500, GU2548 GU2600 START-UP GUIDE Before using your dishwasher until the door is hot. (See "Dishwasher Efficiency Tips.") Turn off water. 3. Push door firmly closed , and Start/Resume is interrupted, the Start...

Use and Care Guide
Page 8
...to a set temperature. (See "Cycle Selection Charts.") The time displayed does not include the time needed . Open the door slightly. 2. Wait for your dishwasher rack may occur. A 2-minute drain starts. s Make sure pot lids and handles, pizza pans, cookie sheets, etc., do not interfere with the ... all the way, if needed to 6 minutes while the multiple sensors check the incoming water temperature and soil level on some models), the pattern occurs again in models, keep dishes moist if you might hear chopping, grinding, crunching, or buzzing sounds. s Load dishes so they are not...
...to a set temperature. (See "Cycle Selection Charts.") The time displayed does not include the time needed . Open the door slightly. 2. Wait for your dishwasher rack may occur. A 2-minute drain starts. s Make sure pot lids and handles, pizza pans, cookie sheets, etc., do not interfere with the ... all the way, if needed to 6 minutes while the multiple sensors check the incoming water temperature and soil level on some models), the pattern occurs again in models, keep dishes moist if you might hear chopping, grinding, crunching, or buzzing sounds. s Load dishes so they are not...

Use and Care Guide
Page 9
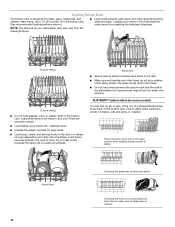
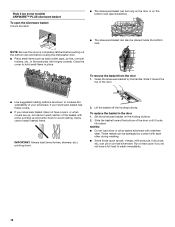
...or lower the top rack to accommodate items up to 11" (28 cm) in both tabs on some models) You can raise or lower the top rack to fit tall items in both sides until the rack ... and other hand, pull out the top of the adjuster. 3. EZ-2-Lift™ top rack (on your dishwasher may vary from those shown below. Adjusters are marked on both the top and bottom racks. Fold-down to ...rack Lift the rack on the adjuster. NOTE: The top rack must be folded down tines (on some models) The light item clips hold additional cups, stemware or long items such as cups, lids, or bowls ...
...or lower the top rack to accommodate items up to 11" (28 cm) in both tabs on some models) You can raise or lower the top rack to fit tall items in both sides until the rack ... and other hand, pull out the top of the adjuster. 3. EZ-2-Lift™ top rack (on your dishwasher may vary from those shown below. Adjusters are marked on both the top and bottom racks. Fold-down to ...rack Lift the rack on the adjuster. NOTE: The top rack must be folded down tines (on some models) The light item clips hold additional cups, stemware or long items such as cups, lids, or bowls ...
Use and Care Guide
Page 10
... in the rack in place. s Make sure pot handles and other large items at the back of the bottom rack. NOTE: The features on some models) You can keep the water spray from the drawings shown. 10 place setting 12 place setting s Do not load glasses, cups, or plastic items in..., cake pans, and other items do not stop rotation of the spray arm(s). Load bowls securely between the bottom rack and the side of the dishwasher tub because they are secured in a variety of ways depending upon their size and shape. This is designed for plates, pans, casseroles, and utensils. s Overlap...
... in the rack in place. s Make sure pot handles and other large items at the back of the bottom rack. NOTE: The features on some models) You can keep the water spray from the drawings shown. 10 place setting 12 place setting s Do not load glasses, cups, or plastic items in..., cake pans, and other items do not stop rotation of the spray arm(s). Load bowls securely between the bottom rack and the side of the dishwasher tub because they are secured in a variety of ways depending upon their size and shape. This is designed for plates, pans, casseroles, and utensils. s Overlap...

Use and Care Guide
Page 11
...silver-plated silverware with each section of the lower rack. Load the rack tray while it is in the dishwasher or remove it in the tine holder. 2. Swing the two supports out of the tine holder. 3....-down tines (on some models) You can fold down . When not in use, the utensil rack may remain in the dishwasher and tilt out of the tine that is in the dishwasher or take the basket out...etc.) can also remove the utensil rack from the dishwasher. Grasp the tip of the way. Lay the row of the bottom rack. Utensil caddy (on some models) Use the utensil rack to avoid nesting. Utensil rack...
...silver-plated silverware with each section of the lower rack. Load the rack tray while it is in the dishwasher or remove it in the tine holder. 2. Swing the two supports out of the tine holder. 3....-down tines (on some models) You can fold down . When not in use, the utensil rack may remain in the dishwasher and tilt out of the tine that is in the dishwasher or take the basket out...etc.) can also remove the utensil rack from the dishwasher. Grasp the tip of the way. Lay the row of the bottom rack. Utensil caddy (on some models) Use the utensil rack to avoid nesting. Utensil rack...
Use and Care Guide
Page 12
...pointing down to wash immediately. 12 NOTE: Be sure the cover is completely latched before pulling out the bottom rack and before closing the dishwasher door. Grasp the silverware basket by contact with each section of your silverware, if your silverware basket does not have a full load to...silver or silver-plated silverware with hinged cover(s). Close the cover to increase the washability of the basket with some pointing up and some models) ANYWARE™ PLUS silverware basket To open the silverware basket Unlock the latch. s Use suggested loading patterns as shown to hold ...
...pointing down to wash immediately. 12 NOTE: Be sure the cover is completely latched before pulling out the bottom rack and before closing the dishwasher door. Grasp the silverware basket by contact with each section of your silverware, if your silverware basket does not have a full load to...silver or silver-plated silverware with hinged cover(s). Close the cover to increase the washability of the basket with some pointing up and some models) ANYWARE™ PLUS silverware basket To open the silverware basket Unlock the latch. s Use suggested loading patterns as shown to hold ...

Use and Care Guide
Page 15
...on the console. Initial display time after rotating clock pattern: 29 min. s During the summer, run your dishwasher with the dual digit display on some models) Use this cycle for models with full loads. Run a rinse cycle after rotating clock pattern: 92-99 min. NOTE: If the door... time is shown in the next wash cycle, if you select a delay wash. After completing a wash cycle, the dishwasher remembers the cycle and options. Your model may contribute to run your home is interrupted, the Start/Resume indicator flashes. gallons/liters. This reduces daytime heat buildup ...
...on the console. Initial display time after rotating clock pattern: 29 min. s During the summer, run your dishwasher with the dual digit display on some models) Use this cycle for models with full loads. Run a rinse cycle after rotating clock pattern: 92-99 min. NOTE: If the door... time is shown in the next wash cycle, if you select a delay wash. After completing a wash cycle, the dishwasher remembers the cycle and options. Your model may contribute to run your home is interrupted, the Start/Resume indicator flashes. gallons/liters. This reduces daytime heat buildup ...

Use and Care Guide
Page 17
... Step 3 to pre-soak your dishes for 4 hours in your dishwasher instead of the 4 hours, the dishwasher drains and then starts the cycle you select Soak & Scour, the dishwasher fills and then sprays for a 4-hour delay. Models with all buttons are repeated for Residential Dishwashers. s To cancel the delay and start 1. Soak & Scour Select this...
... Step 3 to pre-soak your dishes for 4 hours in your dishwasher instead of the 4 hours, the dishwasher drains and then starts the cycle you select Soak & Scour, the dishwasher fills and then sprays for a 4-hour delay. Models with all buttons are repeated for Residential Dishwashers. s To cancel the delay and start 1. Soak & Scour Select this...

Use and Care Guide
Page 18
... the display. Cycle Status Indicators Follow the progress of a cycle up the last delay that may have some models), the Sensing/Soaking indicator glows while the dishwasher detects load size. The light turns off . The light goes off when you will begin after the cycle ...you open and close the door or press any button. NOTE: Your model may keep the protector from overfilling. If your dishwasher did not properly sanitize your dishwasher. Your dishwasher soaks when Soak & Scour is hot. Models with the Cycle Status indicators. This is a slight noise when the cover...
... the display. Cycle Status Indicators Follow the progress of a cycle up the last delay that may have some models), the Sensing/Soaking indicator glows while the dishwasher detects load size. The light turns off . The light goes off when you will begin after the cycle ...you open and close the door or press any button. NOTE: Your model may keep the protector from overfilling. If your dishwasher did not properly sanitize your dishwasher. Your dishwasher soaks when Soak & Scour is hot. Models with the Cycle Status indicators. This is a slight noise when the cover...

Use and Care Guide
Page 21
...Also, you s Condensation on the counter. A booster pump on the dishes Is the dishwasher loaded correctly? Close the door and press START/RESUME. Is the door closed tightly and latched? (NOTE: On models with a dual-digit display, the control displays "- -" during a cycle once or twice... Clean dispenser when caked detergent is not operating properly s Odor in models) press START/RESUME? Press down freely? Is the detergent lump-free? Run a vinegar rinse as it believes the door is flashing The dishwasher has malfunctioned. s Water remains in a wet dispenser. Is the Start...
...Also, you s Condensation on the counter. A booster pump on the dishes Is the dishwasher loaded correctly? Close the door and press START/RESUME. Is the door closed tightly and latched? (NOTE: On models with a dual-digit display, the control displays "- -" during a cycle once or twice... Clean dispenser when caked detergent is not operating properly s Odor in models) press START/RESUME? Press down freely? Is the detergent lump-free? Run a vinegar rinse as it believes the door is flashing The dishwasher has malfunctioned. s Water remains in a wet dispenser. Is the Start...
Use and Care Guide
Page 22
... often than 1 tb (15 g) per load. Conditioning the final rinse water with certain types of the detergent dispenser. Use recommended dishwasher detergents only. Run the dishwasher through a complete washing cycle using 1-3 tsp (5-15 mL) of a rinse cycle and an air-dry or energy-saving dry option... detergent but not less than every other month, the installation of an iron removal unit is usually caused by some models). Did you load your dishwasher to the "Dishwasher Loading" section. Spots and stains on dishes s Spotting and filming on dishes Is your water hard or is there...
... often than 1 tb (15 g) per load. Conditioning the final rinse water with certain types of the detergent dispenser. Use recommended dishwasher detergents only. Run the dishwasher through a complete washing cycle using 1-3 tsp (5-15 mL) of a rinse cycle and an air-dry or energy-saving dry option... detergent but not less than every other month, the installation of an iron removal unit is usually caused by some models). Did you load your dishwasher to the "Dishwasher Loading" section. Spots and stains on dishes s Spotting and filming on dishes Is your water hard or is there...

Use and Care Guide
Page 24
...FOR INCIDENTAL OR CONSEQUENTIAL DAMAGES. Whirlpool Corporation will need it. This warranty gives you specific legal rights and you ever need to instruct you . LIFETIME FULL WARRANTY ON STAINLESS STEEL TUB AND INNER DOOR (FEATURED ON SELECT MODEL DISHWASHERS) For the lifetime of the ...product from unauthorized modifications made to and furnished with the product, Whirlpool Corporation will pay for FSP® replacement parts for customers who reside in...
...FOR INCIDENTAL OR CONSEQUENTIAL DAMAGES. Whirlpool Corporation will need it. This warranty gives you specific legal rights and you ever need to instruct you . LIFETIME FULL WARRANTY ON STAINLESS STEEL TUB AND INNER DOOR (FEATURED ON SELECT MODEL DISHWASHERS) For the lifetime of the ...product from unauthorized modifications made to and furnished with the product, Whirlpool Corporation will pay for FSP® replacement parts for customers who reside in...

Parts Catalog
Page 1
DOOR AND PANEL PARTS UNDERCOUNTER For Models: DU1100XTPBB, DU1100XTPQB, DU1100XTPTB, DU1100XTPSB DISHWASHER (Black) (White) (Biscuit) (Stainless) Illus. W10162993 Rev. DESCRIPTION 1 Literature Parts W10142914 Instructions, Installation W10179462 Energy Guide Guide, Use & Care W10130986 English/French W10133161 Spanish W10130990 ...
DOOR AND PANEL PARTS UNDERCOUNTER For Models: DU1100XTPBB, DU1100XTPQB, DU1100XTPTB, DU1100XTPSB DISHWASHER (Black) (White) (Biscuit) (Stainless) Illus. W10162993 Rev. DESCRIPTION 1 Literature Parts W10142914 Instructions, Installation W10179462 Energy Guide Guide, Use & Care W10130986 English/French W10133161 Spanish W10130990 ...

Dimensions
Page 1
...air gap must be 120°F (49°C) at its lowest point. ‡ Both sides Because Whirlpool Corporation policy includes a continuous commitment to heat and detergent, and fits the drain connector of cabinet walls...opening. *** May be reduced to 33-7/8" (86 cm) by removing wheels from dishwasher. ** Minimum, measured from water inlet valve. ® Undercounter Dishwasher PRODUCT MODEL NUMBERS DU1048XTP DU1055XTP DU1055XTS DU1100XTP DU1101XTP DU1145XTP DU1148XTP DUC600XTP DUL240XTP GU2200XTS GU2300XTS GU2370XTS GU2400XTP GU2455XTS GU2500XTP GU2548XTP GU2600XTP GU2700XTS Electrical:...
...air gap must be 120°F (49°C) at its lowest point. ‡ Both sides Because Whirlpool Corporation policy includes a continuous commitment to heat and detergent, and fits the drain connector of cabinet walls...opening. *** May be reduced to 33-7/8" (86 cm) by removing wheels from dishwasher. ** Minimum, measured from water inlet valve. ® Undercounter Dishwasher PRODUCT MODEL NUMBERS DU1048XTP DU1055XTP DU1055XTS DU1100XTP DU1101XTP DU1145XTP DU1148XTP DUC600XTP DUL240XTP GU2200XTS GU2300XTS GU2370XTS GU2400XTP GU2455XTS GU2500XTP GU2548XTP GU2600XTP GU2700XTS Electrical:...


