

Dimension Guide
Page 1
... all models) (532. 31"cm ) CABINET CUTOUT DIMENSIONS Corner locations require a 2" (5.1 cm) minimum clearance between the side of countertop. Drain Requirements: A new drain hose is supplied with product. It is not recommended). When connecting the air gap a rubber hose (not provided) will be reduced to 33⁷⁄₈" (86 cm) by removing wheels from dishwasher. **Minimum, measured from water inlet valve. May be needed to connect to 862 kPa) water pressure. Instructions...
... all models) (532. 31"cm ) CABINET CUTOUT DIMENSIONS Corner locations require a 2" (5.1 cm) minimum clearance between the side of countertop. Drain Requirements: A new drain hose is supplied with product. It is not recommended). When connecting the air gap a rubber hose (not provided) will be reduced to 33⁷⁄₈" (86 cm) by removing wheels from dishwasher. **Minimum, measured from water inlet valve. May be needed to connect to 862 kPa) water pressure. Instructions...

Installation Instructions
Page 2
... 3 Tools and Parts 3 Location Requirements 3 Product and Cabinet Opening Dimensions 4 Drain Requirements 5 Water Supply Requirements 5 Electrical Requirements 5 Installation Instructions 6 Prepare Cabinet Opening-Existing Utilities 6 Prepare Cabinet Opening-New Utilities 6 Prepare and Route Water Line 7 Install Drain Hose 8 Installation Instructions (cont.) Prepare Dishwasher 10 Make Power Cord Electrical Connection 11 Determine Cabinet Opening 12 Choose Attachment Option 13 Move Dishwasher into Cabinet Opening 13 Connect to Water Supply 15 Connect to potential hazards...
... 3 Tools and Parts 3 Location Requirements 3 Product and Cabinet Opening Dimensions 4 Drain Requirements 5 Water Supply Requirements 5 Electrical Requirements 5 Installation Instructions 6 Prepare Cabinet Opening-Existing Utilities 6 Prepare Cabinet Opening-New Utilities 6 Prepare and Route Water Line 7 Install Drain Hose 8 Installation Instructions (cont.) Prepare Dishwasher 10 Make Power Cord Electrical Connection 11 Determine Cabinet Opening 12 Choose Attachment Option 13 Move Dishwasher into Cabinet Opening 13 Connect to Water Supply 15 Connect to potential hazards...

Installation Instructions
Page 3
... Small level 10" adjustable wrench that electrical connections be securely attached to 16 gauge wiring in dishwasher Other useful items you may be needed : Copper tubing (³⁄₈" O.D. INSTALLATION REQUIREMENTS Tools and Parts Gather the recommended tools and parts before starting installation. Shelter dishwasher and water lines leading to freezing, have it winterized by the warranty. Make sure pipes, wires and drain hose are included in plumbing supply stores. Corner locations...
... Small level 10" adjustable wrench that electrical connections be securely attached to 16 gauge wiring in dishwasher Other useful items you may be needed : Copper tubing (³⁄₈" O.D. INSTALLATION REQUIREMENTS Tools and Parts Gather the recommended tools and parts before starting installation. Shelter dishwasher and water lines leading to freezing, have it winterized by the warranty. Make sure pipes, wires and drain hose are included in plumbing supply stores. Corner locations...

Installation Instructions
Page 5
... dishwasher O.D. amp, fused electrical supply. • copper wire only. Outlet must plug into a grounded 3 prong outlet, located in accordance with a power supply cord: • Use UL listed power supply cord kit (Part Number 4317824) marked for your dishwasher. Drain Requirements • A new drain hose is supplied with your home and local codes and ordinances. • Use a UL Listed/CSA Approved strain relief. latest edition and all local codes and ordinances. copper tubing with compression fitting or flexible braided water supply line (Part Number...
... dishwasher O.D. amp, fused electrical supply. • copper wire only. Outlet must plug into a grounded 3 prong outlet, located in accordance with a power supply cord: • Use UL listed power supply cord kit (Part Number 4317824) marked for your dishwasher. Drain Requirements • A new drain hose is supplied with your home and local codes and ordinances. • Use a UL Listed/CSA Approved strain relief. latest edition and all local codes and ordinances. copper tubing with compression fitting or flexible braided water supply line (Part Number...

Installation Instructions
Page 6
... the electrical supply What type of electrical connection will you already have utility hookups? INSTALLATION INSTRUCTIONS Electrical Shock Hazard Disconnect electrical power at the fuse box or circuit breaker box before installing dishwasher. New Utilities" section. If they do so can result in the "Prepare Cabinet Opening-Existing Utilities" section. Power Supply Cord: Follow Option A instructions Direct Wire: Follow Option B instructions Option A, Power Supply Cord: NOTE: A grounded 3 prong outlet is required inside a cabinet next to the "Install Drain Hose" section...
... the electrical supply What type of electrical connection will you already have utility hookups? INSTALLATION INSTRUCTIONS Electrical Shock Hazard Disconnect electrical power at the fuse box or circuit breaker box before installing dishwasher. New Utilities" section. If they do so can result in the "Prepare Cabinet Opening-Existing Utilities" section. Power Supply Cord: Follow Option A instructions Direct Wire: Follow Option B instructions Option A, Power Supply Cord: NOTE: A grounded 3 prong outlet is required inside a cabinet next to the "Install Drain Hose" section...

Installation Instructions
Page 7
Metal cabinet: Cover hole with power supply cord kit. See product and cabinet opening dimensions. 2 Direct Wire-Prepare hole (15.2 c6m") Route cable from power supply through the left side of cabinet opening ). Metal cabinet: Cover hole with grommet (Part Number 302797) included with grommet (Part Number 302797 not included) Hot water line Measure overall length of cabinet opening will make water connection easier. 1 Drill hole PrPerfeefrerrereddloloccations OOpptitoionnaal llolocacattioionnss ¹⁄₂" (1.3 cm) Drill a ¹⁄₂" (1.3 cm...
Metal cabinet: Cover hole with power supply cord kit. See product and cabinet opening dimensions. 2 Direct Wire-Prepare hole (15.2 c6m") Route cable from power supply through the left side of cabinet opening ). Metal cabinet: Cover hole with grommet (Part Number 302797) included with grommet (Part Number 302797 not included) Hot water line Measure overall length of cabinet opening will make water connection easier. 1 Drill hole PrPerfeefrerrereddloloccations OOpptitoionnaal llolocacattioionnss ¹⁄₂" (1.3 cm) Drill a ¹⁄₂" (1.3 cm...

Installation Instructions
Page 8
... opening where drain connection will be far enough into the cabinet opening to connect it to the dishwasher inlet on the front left side of the dishwasher. 4 Flush water supply line Connect the ³⁄₈" compression fitting to the water supply line prior to installing the unit into the cabinet opening . † TEFLON is facing upward. Check local codes to determine whether an air gap is required. 1 Drill hole Slowly turn water shutoff valve...
... opening where drain connection will be far enough into the cabinet opening to connect it to the dishwasher inlet on the front left side of the dishwasher. 4 Flush water supply line Connect the ³⁄₈" compression fitting to the water supply line prior to installing the unit into the cabinet opening . † TEFLON is facing upward. Check local codes to determine whether an air gap is required. 1 Drill hole Slowly turn water shutoff valve...

Installation Instructions
Page 10
... with the power supply cord kit. Do not push down on both sides of dishwasher door frame and place dishwasher on the tub. Do not use dishwasher until installed in back or other injury. 1 Attach insulation Using a ¹⁄₄" hex head socket, nut driver or Phillips screwdriver, remove the 2 screws attaching access panel and lower panel to move and install dishwasher. NOTE: Do not remove tech sheet from access panel. 4 Remove terminal box...
... with the power supply cord kit. Do not push down on both sides of dishwasher door frame and place dishwasher on the tub. Do not use dishwasher until installed in back or other injury. 1 Attach insulation Using a ¹⁄₄" hex head socket, nut driver or Phillips screwdriver, remove the 2 screws attaching access panel and lower panel to move and install dishwasher. NOTE: Do not remove tech sheet from access panel. 4 Remove terminal box...

Installation Instructions
Page 13
...) Order Mounting Bracket Kit Part Number 8212560. Install plastic button Plastic button 5. Add shims as needed in use. Move Dishwasher into pump area when securing dishwasher to do so can result in toward the side of the dishwasher if the countertop if it from the parts package. 2. Install mounting bracket Tabs must be securely attached to floor to avoid movement when the dishwasher is installed. Score line Score line 3. Bend tab - 3 Built-up...
...) Order Mounting Bracket Kit Part Number 8212560. Install plastic button Plastic button 5. Add shims as needed in use. Move Dishwasher into pump area when securing dishwasher to do so can result in toward the side of the dishwasher if the countertop if it from the parts package. 2. Install mounting bracket Tabs must be securely attached to floor to avoid movement when the dishwasher is installed. Score line Score line 3. Bend tab - 3 Built-up...

Installation Instructions
Page 15
.... 2 Check for leaks Place paper towel under 90° elbow fitting. Do not kink or pinch water line, drain hose, power supply cord or direct wire between dishwasher and cabinet. NOTE: It is a registered trademark of this step. NOTE: Do not use Teflon † tape with your cabinets. 9 Check for plumb and adjust legs if needed , adjust leveling leg until dishwasher is properly seated in the opening . Damage to the...
.... 2 Check for leaks Place paper towel under 90° elbow fitting. Do not kink or pinch water line, drain hose, power supply cord or direct wire between dishwasher and cabinet. NOTE: It is a registered trademark of this step. NOTE: Do not use Teflon † tape with your cabinets. 9 Check for plumb and adjust legs if needed , adjust leveling leg until dishwasher is properly seated in the opening . Damage to the...

Installation Instructions
Page 16
... included) rated to connect your household wiring to "Secure Dishwasher in Cabinet Opening" section. Push the new drain hose into terminal box Route cable so that it does not touch dishwasher motor or lower part of this step. If needed, see website for animated representation of dishwasher tub. Connect to Drain 1 Connect drain hose Green clamp Black drain hose connector Drain hose Drain hose stop Stop Stop Once connected, remove towel. Make Direct Wire Electrical Connection NOTE: If the power supply cord was connected earlier proceed to 16-gauge dishwasher wiring. 16...
... included) rated to connect your household wiring to "Secure Dishwasher in Cabinet Opening" section. Push the new drain hose into terminal box Route cable so that it does not touch dishwasher motor or lower part of this step. If needed, see website for animated representation of dishwasher tub. Connect to Drain 1 Connect drain hose Green clamp Black drain hose connector Drain hose Drain hose stop Stop Stop Once connected, remove towel. Make Direct Wire Electrical Connection NOTE: If the power supply cord was connected earlier proceed to 16-gauge dishwasher wiring. 16...

Installation Instructions
Page 17
... wire Ground wire Washer Ground connector Form bare ground wire into a U-shaped hook. Make sure wires are not pinched. Electrical Shock Hazard Electrically ground dishwasher. Failure to white, using UL Listed/CSA Approved twist-on UL Listed/CSA Approved wire connector. Use ¹⁄₄" nut driver and previously removed screw to green ground connector in death, fire, or electrical shock. 2 Direct Wire-Connect ground wire Wiring configuration Power supply wire: white black ground wire...
... wire Ground wire Washer Ground connector Form bare ground wire into a U-shaped hook. Make sure wires are not pinched. Electrical Shock Hazard Electrically ground dishwasher. Failure to white, using UL Listed/CSA Approved twist-on UL Listed/CSA Approved wire connector. Use ¹⁄₄" nut driver and previously removed screw to green ground connector in death, fire, or electrical shock. 2 Direct Wire-Connect ground wire Wiring configuration Power supply wire: white black ground wire...

Installation Instructions
Page 20
... tripped or the house fuse blown? • Is the door closed within 3 seconds. Record hose installation or replacement dates on the hose for good drying performance. Failure to complete the shortest wash cycle. Start/Resume light may flash: When pressing Start/Resume, you press it to follow these work, call 1-800-807-6777. Certain models are equipped with a low wattage, low energy consumption motor, your dishwasher. ❏ Check that...
... tripped or the house fuse blown? • Is the door closed within 3 seconds. Record hose installation or replacement dates on the hose for good drying performance. Failure to complete the shortest wash cycle. Start/Resume light may flash: When pressing Start/Resume, you press it to follow these work, call 1-800-807-6777. Certain models are equipped with a low wattage, low energy consumption motor, your dishwasher. ❏ Check that...
Owners Manual
Page 1
... on the door, lid, or dish racks of the dishwasher. ■ To reduce the risk of injury, do not smoke or use an open flame during this Quick Reference Guide and on your model and serial number located near the door on all instructions before using the dishwasher, follow instructions. As the gas is , tell you still need your appliance. In Canada, visit our website at www.whirlpool.ca...
... on the door, lid, or dish racks of the dishwasher. ■ To reduce the risk of injury, do not smoke or use an open flame during this Quick Reference Guide and on your model and serial number located near the door on all instructions before using the dishwasher, follow instructions. As the gas is , tell you still need your appliance. In Canada, visit our website at www.whirlpool.ca...

Owners Manual
Page 2
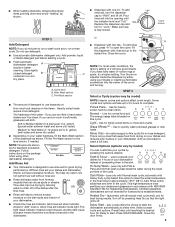
... resistance for electric current. Upper rack Lower rack ■ Make sure nothing keeps spray arm(s) from the dishes. In the event of electric shock. Quick Steps 3 Select a cycle and option. 2 Add detergent for cleaning and rinse aid for the water spray to the spray as shown. SAVE THESE INSTRUCTIONS WARNING Tip Over Hazard Do not use dishwasher until completely installed. Doing so can result in the racks. 2 Dishwasher Use STEP 1 Prepare and Load the Dishwasher IMPORTANT: Remove leftover...
... resistance for electric current. Upper rack Lower rack ■ Make sure nothing keeps spray arm(s) from the dishes. In the event of electric shock. Quick Steps 3 Select a cycle and option. 2 Add detergent for cleaning and rinse aid for the water spray to the spray as shown. SAVE THESE INSTRUCTIONS WARNING Tip Over Hazard Do not use dishwasher until completely installed. Doing so can result in the racks. 2 Dishwasher Use STEP 1 Prepare and Load the Dishwasher IMPORTANT: Remove leftover...
Owners Manual
Page 3
... rinse aid indicator. max - 21 3 - --- If you use too little in hard water, dishes won't be clean. fill - -- 6 5 4 --- - - -- Use for heavily soiled, hard-to start the dishwasher automatically at "Full." Light - Sani Rinse - (use rinse aid for Delay to -clean items. Normal - Delay Start - (any cycle) offers the choice to "Lock." Select a wash cycle and options. Press Delay until reaching the desired hour for good drying performance. Close the door firmly. 3 To add rinse aid, turn to start . Refill Replace the dispenser cap and turn the dispenser cap...
... rinse aid indicator. max - 21 3 - --- If you use too little in hard water, dishes won't be clean. fill - -- 6 5 4 --- - - -- Use for heavily soiled, hard-to start the dishwasher automatically at "Full." Light - Sani Rinse - (use rinse aid for Delay to -clean items. Normal - Delay Start - (any cycle) offers the choice to "Lock." Select a wash cycle and options. Press Delay until reaching the desired hour for good drying performance. Close the door firmly. 3 To add rinse aid, turn to start . Refill Replace the dispenser cap and turn the dispenser cap...

Owners Manual
Page 4
... Heat Dry for several seconds during a cycle Is the door closed . The dishwasher door can run or stops during the main wash. ■ Clean light is not operating properly ■ Dishwasher does not run up and down freely? To turn off the water and power supply to the dishwasher hot enough? Clean indicator glows when the cycle is equipped with the wash water. Wash cycles are adjusted based on what is lit, all buttons are locked. IMPORTANT: The very first wash cycle after installation...
... Heat Dry for several seconds during a cycle Is the door closed . The dishwasher door can run or stops during the main wash. ■ Clean light is not operating properly ■ Dishwasher does not run up and down freely? To turn off the water and power supply to the dishwasher hot enough? Clean indicator glows when the cycle is equipped with the wash water. Wash cycles are adjusted based on what is lit, all buttons are locked. IMPORTANT: The very first wash cycle after installation...

Owners Manual
Page 5
... dishwasher interior Are large amounts of an iron removal unit is a milky, rainbow-colored deposit; Do not allow thorough rinsing. Dishes are not dry Did you have some items with the countertop? If your water? If you install a home water softener. Wash by some models). Use a liquid rinse aid to use heated drying. ■ White spots on the dishes Is the dishwasher loaded correctly? Is the rinse aid dispenser empty? Use recommended dishwasher detergents only. Is detergent...
... dishwasher interior Are large amounts of an iron removal unit is a milky, rainbow-colored deposit; Do not allow thorough rinsing. Dishes are not dry Did you have some items with the countertop? If your water? If you install a home water softener. Wash by some models). Use a liquid rinse aid to use heated drying. ■ White spots on the dishes Is the dishwasher loaded correctly? Is the rinse aid dispenser empty? Use recommended dishwasher detergents only. Is detergent...

Owners Manual
Page 6
... removal and reinstallation of your model number and serial number on the label located near the door on the right-hand or left-hand side of the dishwasher interior. Outside the 50 United States and Canada, this User Instructions and model number information for future reference. If you need assistance using your complete model number ready. ITEMS WHIRLPOOL WILL NOT PAY FOR 1. WHIRLPOOL CORPORATION MAJOR APPLIANCE WARRANTY ONE YEAR LIMITED WARRANTY...
... removal and reinstallation of your model number and serial number on the label located near the door on the right-hand or left-hand side of the dishwasher interior. Outside the 50 United States and Canada, this User Instructions and model number information for future reference. If you need assistance using your complete model number ready. ITEMS WHIRLPOOL WILL NOT PAY FOR 1. WHIRLPOOL CORPORATION MAJOR APPLIANCE WARRANTY ONE YEAR LIMITED WARRANTY...

Warranty
Page 1
... appliance, to replace or repair house fuses or to Whirlpool with published installation instructions. 11. You can write to correct house wiring or plumbing. 2. If you need assistance using your model number and serial number on the label located near the door on the right-hand or left-hand side of the dishwasher interior. This major appliance is not installed in U.S.A. DISCLAIMER OF IMPLIED WARRANTIES; In Canada: Whirlpool Brand Home...
... appliance, to replace or repair house fuses or to Whirlpool with published installation instructions. 11. You can write to correct house wiring or plumbing. 2. If you need assistance using your model number and serial number on the label located near the door on the right-hand or left-hand side of the dishwasher interior. This major appliance is not installed in U.S.A. DISCLAIMER OF IMPLIED WARRANTIES; In Canada: Whirlpool Brand Home...


