
untitled
Page 1
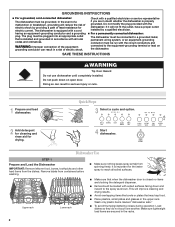
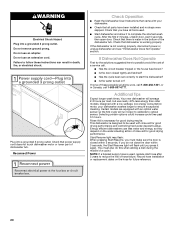
... and obey all hot water faucets and let the water flow from service or discarding it. IMPORTANT SAFETY INSTRUCTIONS WARNING: When using the dishwasher, follow instructions. Puede encontrar su número de modelo y de serie en la etiqueta ubicada cerca de la puerta al lado derecho o izquierdo del interior de la lavavajillas. and 2) Load sharp knives with controls. ■ Use the dishwasher only for its...
... and obey all hot water faucets and let the water flow from service or discarding it. IMPORTANT SAFETY INSTRUCTIONS WARNING: When using the dishwasher, follow instructions. Puede encontrar su número de modelo y de serie en la etiqueta ubicada cerca de la puerta al lado derecho o izquierdo del interior de la lavavajillas. and 2) Load sharp knives with controls. ■ Use the dishwasher only for its...
untitled
Page 2
... cleaning and rinse aid for electric current. grounding conductor can result in the upper rack. WARNING: Improper connection of electric shock. Remove labels from the dishes. It is important for the water spray to the spray as shown. Wash only plastic items marked "dishwasher safe." ■ To avoid thumping/clattering noises during operation: Load dishes so they do not touch one another. GROUNDING INSTRUCTIONS ■ For a grounded, cord-connected dishwasher: The dishwasher must be run...
... cleaning and rinse aid for electric current. grounding conductor can result in the upper rack. WARNING: Improper connection of electric shock. Remove labels from the dishes. It is important for the water spray to the spray as shown. Wash only plastic items marked "dishwasher safe." ■ To avoid thumping/clattering noises during operation: Load dishes so they do not touch one another. GROUNDING INSTRUCTIONS ■ For a grounded, cord-connected dishwasher: The dishwasher must be run...
untitled
Page 3
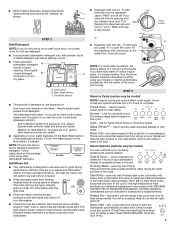
... dotted line. Close the door firmly. 3 max - 21 3 - --- Do not use detergent. If you use depends on the dish racks and interior of your water hardness, fill the Main Wash section of detergent to use too little in the sink. Soft to the cycle. They also improve drying by either using other dishwasher detergent. Turn the arrow adjuster inside the dispenser by allowing water to drain off of the dishes after the final rinse. ■ Rinse aid helps...
... dotted line. Close the door firmly. 3 max - 21 3 - --- Do not use detergent. If you use depends on the dish racks and interior of your water hardness, fill the Main Wash section of detergent to use too little in the sink. Soft to the cycle. They also improve drying by either using other dishwasher detergent. Turn the arrow adjuster inside the dispenser by allowing water to drain off of the dishes after the final rinse. ■ Rinse aid helps...
untitled
Page 4
.... Is the detergent lump-free? To turn off Lock: Press and hold Heat Dry for several seconds during a cycle Is the door closed . Press START/RESUME. ■ Cycle status indicators allow you press any pad while your dishwasher cycle. Dishwasher Care Cleaning the Dishwasher Clean the exterior of the access panel Was too much detergent used? A white vinegar rinse may remove white spots and film. Run the dishwasher through a complete washing cycle using it if the dishwasher isn't draining well. Storing...
.... Is the detergent lump-free? To turn off Lock: Press and hold Heat Dry for several seconds during a cycle Is the door closed . Press START/RESUME. ■ Cycle status indicators allow you press any pad while your dishwasher cycle. Dishwasher Care Cleaning the Dishwasher Clean the exterior of the access panel Was too much detergent used? A white vinegar rinse may remove white spots and film. Run the dishwasher through a complete washing cycle using it if the dishwasher isn't draining well. Storing...
untitled
Page 5
... the dishwasher, and the heat of an iron removal unit is a milky, rainbow-colored deposit; Home water pressure should be 20 to 120 psi (138 to speed drying. Do not use the correct amount of glassware. Load the dishes and glasses so they are not completely clean ■ Food soil left on racks and dishwasher interior Check the rinse aid indicator to the Installation Instructions for automatic dishwashing. Dishes...
... the dishwasher, and the heat of an iron removal unit is a milky, rainbow-colored deposit; Home water pressure should be 20 to 120 psi (138 to speed drying. Do not use the correct amount of glassware. Load the dishes and glasses so they are not completely clean ■ Food soil left on racks and dishwasher interior Check the rinse aid indicator to the Installation Instructions for automatic dishwashing. Dishes...

untitled
Page 6
... repair or replace appliance light bulbs, air filters or water filters. Replacement parts or repair labor costs when the major appliance is used in U.S.A., visit www.whirlpool.com In Canada, visit www.whirlpool.ca If you do not have access to Whirlpool with published installation instructions. 11. In Canada, call 1-800-253-1301. All rights reserved. ® Registered Trademark/TM Trademark of the dishwasher interior. THIS WARRANTY GIVES YOU SPECIFIC...
... repair or replace appliance light bulbs, air filters or water filters. Replacement parts or repair labor costs when the major appliance is used in U.S.A., visit www.whirlpool.com In Canada, visit www.whirlpool.ca If you do not have access to Whirlpool with published installation instructions. 11. In Canada, call 1-800-253-1301. All rights reserved. ® Registered Trademark/TM Trademark of the dishwasher interior. THIS WARRANTY GIVES YOU SPECIFIC...

Installation Instructions
Page 2
... and Parts 3 Location Requirements 3 Drain Requirements 5 Water Supply Requirements 5 Electrical Requirements 5 INSTALLATION INSTRUCTIONS 6 Prepare Cabinet Opening-Existing Utilities 6 Prepare Cabinet Opening-New Utilities 6 Prepare and Route Water Line 7 Install Drain Hose 8 Prepare Dishwasher 10 INSTALLATION INSTRUCTIONS (CONT.) Make Power Supply Cord Connection 11 Determine Cabinet Opening 13 Choose Attachment Option 13 Move Dishwasher Close to Cabinet Opening 14 Connect to Water Supply 16 Connect to Drain 16 Make Direct Wire Electrical Connection 17 Secure Dishwasher in...
... and Parts 3 Location Requirements 3 Drain Requirements 5 Water Supply Requirements 5 Electrical Requirements 5 INSTALLATION INSTRUCTIONS 6 Prepare Cabinet Opening-Existing Utilities 6 Prepare Cabinet Opening-New Utilities 6 Prepare and Route Water Line 7 Install Drain Hose 8 Prepare Dishwasher 10 INSTALLATION INSTRUCTIONS (CONT.) Make Power Supply Cord Connection 11 Determine Cabinet Opening 13 Choose Attachment Option 13 Move Dishwasher Close to Cabinet Opening 14 Connect to Water Supply 16 Connect to Drain 16 Make Direct Wire Electrical Connection 17 Secure Dishwasher in...
Installation Instructions
Page 3
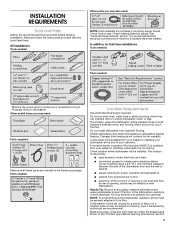
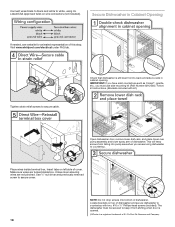
... of opening is not level with floor at the end of your dealer for loading and unloading dishes. Make sure pipes, wires and drain hose are included in the dishwasher opening is level if the floor in the literature package. Do not run drain lines, water lines or electrical wiring where they can interfere with any tools listed here. Check location where dishwasher will be installed must be needed : Other parts you may need: Parts supplied: Make...
... of opening is not level with floor at the end of your dealer for loading and unloading dishes. Make sure pipes, wires and drain hose are included in the dishwasher opening is level if the floor in the literature package. Do not run drain lines, water lines or electrical wiring where they can interfere with any tools listed here. Check location where dishwasher will be installed must be needed : Other parts you may need: Parts supplied: Make...

Installation Instructions
Page 5
If connecting dishwasher with a power supply cord: ■ Use UL Listed power supply cord kit (Part Number 4317824) marked for your dishwasher. If drain hose is not recommended. ■ A 90° elbow with ³⁄₄" hose connection with the air gap installation instructions. drain line fittings. ■ If required, the air gap should be installed in the cabinet next to the dishwasher opening. We recommend: ■ A time-delay fuse or circuit breaker. ■ A separate circuit. latest edition and all local codes and ordinances. NOTE...
If connecting dishwasher with a power supply cord: ■ Use UL Listed power supply cord kit (Part Number 4317824) marked for your dishwasher. If drain hose is not recommended. ■ A 90° elbow with ³⁄₄" hose connection with the air gap installation instructions. drain line fittings. ■ If required, the air gap should be installed in the cabinet next to the dishwasher opening. We recommend: ■ A time-delay fuse or circuit breaker. ■ A separate circuit. latest edition and all local codes and ordinances. NOTE...

Installation Instructions
Page 6
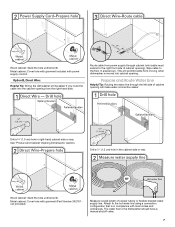
INSTALLATION INSTRUCTIONS WARNING Prepare Cabinet Opening- New Utilities" section. Prepare Cabinet Opening- If the water line and the cable extend to the locations shown, proceed to the dishwasher cabinet opening. New Utilities Prepare and route the electrical supply Option A, Power Supply Cord: NOTE: A grounded 3 prong outlet is required inside a cabinet next to the "Install Drain Hose" section. See "Product and Cabinet Opening Dimensions" section. 6 If they do so can result in death or electrical shock. Existing Utilities Electrical Shock Hazard Disconnect...
INSTALLATION INSTRUCTIONS WARNING Prepare Cabinet Opening- New Utilities" section. Prepare Cabinet Opening- If the water line and the cable extend to the locations shown, proceed to the dishwasher cabinet opening. New Utilities Prepare and route the electrical supply Option A, Power Supply Cord: NOTE: A grounded 3 prong outlet is required inside a cabinet next to the "Install Drain Hose" section. See "Product and Cabinet Opening Dimensions" section. 6 If they do so can result in death or electrical shock. Existing Utilities Electrical Shock Hazard Disconnect...
Installation Instructions
Page 7
... power supply cord kit. Drill a ³⁄₄" (1.9 cm) hole in the cabinet side or rear. Measure overall length of cabinet opening will be easier if you route the cable into cabinet opening from the right-hand side. Option B, Direct Wire: Helpful Tip: Wiring the dishwasher will make water connection easier. Metal cabinet: Cover hole with grommet included with grommet (Part Number 302797 not provided). Prepare and Route Water Line...
... power supply cord kit. Drill a ³⁄₄" (1.9 cm) hole in the cabinet side or rear. Measure overall length of cabinet opening will be easier if you route the cable into cabinet opening from the right-hand side. Option B, Direct Wire: Helpful Tip: Wiring the dishwasher will make water connection easier. Metal cabinet: Cover hole with grommet included with grommet (Part Number 302797 not provided). Prepare and Route Water Line...

Installation Instructions
Page 8
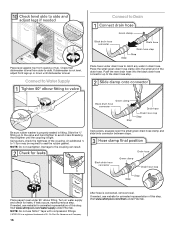
... through hole in cabinet. (If you are using ⁵⁄₈" open ended wrench or adjustable wrench. Tape drain hose to "ON" position. NOTE: Do not use a new drain hose. Slowly turn water shutoff valve to the floor in area shown. Connect the ³⁄₈" compression fitting to the water supply line prior to the front center of E.I. Attach such that could clog the inlet valve. Du Pont De...
... through hole in cabinet. (If you are using ⁵⁄₈" open ended wrench or adjustable wrench. Tape drain hose to "ON" position. NOTE: Do not use a new drain hose. Slowly turn water shutoff valve to the floor in area shown. Connect the ³⁄₈" compression fitting to the water supply line prior to the front center of E.I. Attach such that could clog the inlet valve. Du Pont De...

Installation Instructions
Page 10
... under dishwasher until completely installed. Attach drain hose to air gap with screw-type clamps (not provided) to connect from waste tee to do so can result in back or other injury. Use a rubber hose (not provided) with large silver drain hose clamp (provided). WARNING Excessive Weight Hazard Use two or more people, grasp sides of drain hose to squeeze clamp open door. Use pliers to air gap and cut...
... under dishwasher until completely installed. Attach drain hose to air gap with screw-type clamps (not provided) to connect from waste tee to do so can result in back or other injury. Use a rubber hose (not provided) with large silver drain hose clamp (provided). WARNING Excessive Weight Hazard Use two or more people, grasp sides of drain hose to squeeze clamp open door. Use pliers to air gap and cut...

Installation Instructions
Page 11
... power supply cord kit. 11 Strain relief is provided with the installation of dishwasher tub. Do not remove tech sheet from access panel. Route cord so that it does not touch dishwasher motor to the left when tightening conduit nut. Retain for later use. Select UL Listed/CSA Approved twist-on wire connectors rated to unlock them. Using a flat-blade screwdriver, turn the plastic fasteners ¹⁄₄ turn to connect...
... power supply cord kit. 11 Strain relief is provided with the installation of dishwasher tub. Do not remove tech sheet from access panel. Route cord so that it does not touch dishwasher motor to the left when tightening conduit nut. Retain for later use. Select UL Listed/CSA Approved twist-on wire connectors rated to unlock them. Using a flat-blade screwdriver, turn the plastic fasteners ¹⁄₄ turn to connect...

Installation Instructions
Page 14
.... Check that water line is moved into the cabinet opening . With another person holding the dishwasher to prohibit them from tipping, open under its own weight, the door tension will be adjusted. 14 NOTE: Do not attach the dishwasher. Failure to Cabinet Opening. Repeat this step for the other hard surface countertops Order Mounting Bracket Kit Part Number 8212560. Move Dishwasher Close to do so. Panel or console may...
.... Check that water line is moved into the cabinet opening . With another person holding the dishwasher to prohibit them from tipping, open under its own weight, the door tension will be adjusted. 14 NOTE: Do not attach the dishwasher. Failure to Cabinet Opening. Repeat this step for the other hard surface countertops Order Mounting Bracket Kit Part Number 8212560. Move Dishwasher Close to do so. Panel or console may...
Installation Instructions
Page 16
.... Damage to seal the rubber gasket. Turn on water supply and check for animated representation of E.I. NOTE: Do not use Teflon®† tape with compression fittings. †®TEFLON is properly seated in drain hose. Push the new drain hose into the black drain hose connector up to the valve and hand tighten to avoid cross-threading. If needed , see website for leaks. Slide...
.... Damage to seal the rubber gasket. Turn on water supply and check for animated representation of E.I. NOTE: Do not use Teflon®† tape with compression fittings. †®TEFLON is properly seated in drain hose. Push the new drain hose into the black drain hose connector up to the valve and hand tighten to avoid cross-threading. If needed , see website for leaks. Slide...

Installation Instructions
Page 17
... dishwasher motor or lower part of dishwasher tub. Owner must purchase a ⁷⁄₈" screw-in terminal box. Twist on wire connectors (not included) rated to connect your household wiring to green ground connector in Cabinet Opening" section. Do not use an extension cord. Strain relief is not supplied with the dishwasher. Wrap ground wire hook clockwise around ground connector screw and under the washer. Form bare ground wire...
... dishwasher motor or lower part of dishwasher tub. Owner must purchase a ⁷⁄₈" screw-in terminal box. Twist on wire connectors (not included) rated to connect your household wiring to green ground connector in Cabinet Opening" section. Do not use an extension cord. Strain relief is not supplied with the dishwasher. Wrap ground wire hook clockwise around ground connector screw and under the washer. Form bare ground wire...
Installation Instructions
Page 18
... wires are tucked inside terminal box. Locate brackets on left side of dishwasher. The dishwasher must use side mounting kit (Part Number 8212560). NOTE: Do not drop screws into pump area when you must be secured to keep screws from shifting when door is opened. †®Corian is still level front-to-back and side-to countertop with kit.) Open dishwasher door, remove lower dish rack, and place towel over pump assembly and lower spray arm of dishwasher...
... wires are tucked inside terminal box. Locate brackets on left side of dishwasher. The dishwasher must use side mounting kit (Part Number 8212560). NOTE: Do not drop screws into pump area when you must be secured to keep screws from shifting when door is opened. †®Corian is still level front-to-back and side-to countertop with kit.) Open dishwasher door, remove lower dish rack, and place towel over pump assembly and lower spray arm of dishwasher...
Installation Instructions
Page 20
... Power Check Operation ■ Read the Dishwasher User Instructions that came with rinse aid for good drying performance and controlling hard water deposit buildup. If the dishwasher is designed to be used with your dishwasher washes longer to ensure exceptional cleaning. Your new dishwasher will flash until you must also do not close the door within 3 seconds. Check that all parts have all tools used , replace inlet hose after 5 years to start the dishwasher? ■ Is the water turned...
... Power Check Operation ■ Read the Dishwasher User Instructions that came with rinse aid for good drying performance and controlling hard water deposit buildup. If the dishwasher is designed to be used with your dishwasher washes longer to ensure exceptional cleaning. Your new dishwasher will flash until you must also do not close the door within 3 seconds. Check that all parts have all tools used , replace inlet hose after 5 years to start the dishwasher? ■ Is the water turned...
Dimension Guide
Page 1
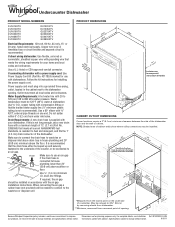
..., sheathed copper wire with dishwashers. Use a U.L.-listed or CSA-approved conduit connector. If connecting dishwasher with a power supply cord: Use Power Supply Cord Kit (Part No. 4317824) marked for your dishwasher. Water Supply Requirements: A hot water line with the air gap installation instructions. If required, the air gap should be reduced to 862 kPa) water pressure. or 20-amp. Copper wire only. Follow the kit instructions for planning purposes only. Water temperature must meet all models) (532. 31"cm ) CABINET CUTOUT DIMENSIONS Corner locations require a 2" (5.1 cm...
..., sheathed copper wire with dishwashers. Use a U.L.-listed or CSA-approved conduit connector. If connecting dishwasher with a power supply cord: Use Power Supply Cord Kit (Part No. 4317824) marked for your dishwasher. Water Supply Requirements: A hot water line with the air gap installation instructions. If required, the air gap should be reduced to 862 kPa) water pressure. or 20-amp. Copper wire only. Follow the kit instructions for planning purposes only. Water temperature must meet all models) (532. 31"cm ) CABINET CUTOUT DIMENSIONS Corner locations require a 2" (5.1 cm...

