

Dimension Guide
Page 1
... connect the drain hose to improve Dimensions are for use with ³⁄₈" N.P.T. It is supplied with the air gap installation instructions. Use ¹⁄₂" (1.3 cm) minimum I.D. May be compressed. (not used on all current AHAM/IAPMO test standards, is not recommended). Use a U.L.-listed or CSA-approved conduit connector. If connecting dishwasher with a power supply cord: Use Power Supply Cord Kit (Part No. 4317824) marked for planning purposes only. Follow the kit instructions for your dishwasher. Power supply cord must plug...
... connect the drain hose to improve Dimensions are for use with ³⁄₈" N.P.T. It is supplied with the air gap installation instructions. Use ¹⁄₂" (1.3 cm) minimum I.D. May be compressed. (not used on all current AHAM/IAPMO test standards, is not recommended). Use a U.L.-listed or CSA-approved conduit connector. If connecting dishwasher with a power supply cord: Use Power Supply Cord Kit (Part No. 4317824) marked for planning purposes only. Follow the kit instructions for your dishwasher. Power supply cord must plug...

Installation Instructions
Page 2
...Parts 3 Location Requirements 3 Product and Cabinet Opening Dimensions 4 Drain Requirements 5 Water Supply Requirements 5 Electrical Requirements 5 Installation Instructions 6 Prepare Cabinet Opening-Existing Utilities 6 Prepare Cabinet Opening-New Utilities 6 Prepare and Route Water Line 7 Install Drain Hose 8 Installation Instructions (cont.) Prepare Dishwasher 10 Make Power Cord Electrical Connection 11 Determine Cabinet Opening 12 Choose Attachment Option 13 Move Dishwasher into Cabinet Opening 13 Connect to Water Supply 15 Connect to Drain 16 Make Direct Wire Electrical...
...Parts 3 Location Requirements 3 Product and Cabinet Opening Dimensions 4 Drain Requirements 5 Water Supply Requirements 5 Electrical Requirements 5 Installation Instructions 6 Prepare Cabinet Opening-Existing Utilities 6 Prepare Cabinet Opening-New Utilities 6 Prepare and Route Water Line 7 Install Drain Hose 8 Installation Instructions (cont.) Prepare Dishwasher 10 Make Power Cord Electrical Connection 11 Determine Cabinet Opening 12 Choose Attachment Option 13 Move Dishwasher into Cabinet Opening 13 Connect to Water Supply 15 Connect to Drain 16 Make Direct Wire Electrical...

Installation Instructions
Page 3
... the dishwasher door and the wall or cabinet. • square opening for proper operation and appearance. • cabinet front perpendicular to water, electricity and drain. • Convenient access for installing your dishwasher at rear of opening is not level with or contact dishwasher motor or legs. Damage from your dealer for loading and unloading dishes. Make sure pipes, wires and drain hose are included in the "Product and Cabinet Opening Dimensions" section. 3 A side panel kit is...
... the dishwasher door and the wall or cabinet. • square opening for proper operation and appearance. • cabinet front perpendicular to water, electricity and drain. • Convenient access for installing your dishwasher at rear of opening is not level with or contact dishwasher motor or legs. Damage from your dealer for loading and unloading dishes. Make sure pipes, wires and drain hose are included in the "Product and Cabinet Opening Dimensions" section. 3 A side panel kit is...

Installation Instructions
Page 5
... direct wiring: • Use flexible, armored or nonmetallic sheathed, copper wire with the air gap installation instructions. external pipe threads on one end. • Do not solder within 6" (15.2 cm) of air gap Air gap • Use ¹⁄₂" minimum I.D. Use of the water inlet valve. 5 Water Supply Requirements • A hot water line with your home and local codes and ordinances. • Use a UL Listed/CSA Approved strain relief. Drain Requirements • A new drain hose is connected to house plumbing lower...
... direct wiring: • Use flexible, armored or nonmetallic sheathed, copper wire with the air gap installation instructions. external pipe threads on one end. • Do not solder within 6" (15.2 cm) of air gap Air gap • Use ¹⁄₂" minimum I.D. Use of the water inlet valve. 5 Water Supply Requirements • A hot water line with your home and local codes and ordinances. • Use a UL Listed/CSA Approved strain relief. Drain Requirements • A new drain hose is connected to house plumbing lower...

Installation Instructions
Page 6
... in the "Prepare Cabinet Opening- New Utilities" section. Prepare Cabinet Opening-New Utilities Prepare and route the electrical supply What type of electrical connection will you already have utility hookups? Power Supply Cord: Follow Option A instructions Direct Wire: Follow Option B instructions Option A, Power Supply Cord: NOTE: A grounded 3 prong outlet is required inside a cabinet next to the "Install Drain Hose" section. INSTALLATION INSTRUCTIONS Electrical Shock Hazard Disconnect electrical power at the fuse box or circuit breaker box before installing dishwasher. No -Follow...
... in the "Prepare Cabinet Opening- New Utilities" section. Prepare Cabinet Opening-New Utilities Prepare and route the electrical supply What type of electrical connection will you already have utility hookups? Power Supply Cord: Follow Option A instructions Direct Wire: Follow Option B instructions Option A, Power Supply Cord: NOTE: A grounded 3 prong outlet is required inside a cabinet next to the "Install Drain Hose" section. INSTALLATION INSTRUCTIONS Electrical Shock Hazard Disconnect electrical power at the fuse box or circuit breaker box before installing dishwasher. No -Follow...

Installation Instructions
Page 7
... side of cabinet opening ). Prepare and Route Water Line Helpful Tip: Routing the water line through cabinet hole (cable must extend to the floor in compliance with local codes and ordinances. 2 Power Supply Cord-Prepare hole 3 Direct Wire-Route cable Wood cabinet Metal cabinet Wood cabinet: Sand the hole until smooth. Metal cabinet: Cover hole with power supply cord kit. Attach to the dishwasher should have a manual shutoff valve. 7 The water line to the hot water line using a connection configuration that...
... side of cabinet opening ). Prepare and Route Water Line Helpful Tip: Routing the water line through cabinet hole (cable must extend to the floor in compliance with local codes and ordinances. 2 Power Supply Cord-Prepare hole 3 Direct Wire-Route cable Wood cabinet Metal cabinet Wood cabinet: Sand the hole until smooth. Metal cabinet: Cover hole with power supply cord kit. Attach to the dishwasher should have a manual shutoff valve. 7 The water line to the hot water line using a connection configuration that...

Installation Instructions
Page 8
... drain hose as it to the dishwasher inlet on the front left side of the dishwasher. 4 Flush water supply line Connect the ³⁄₈" compression fitting to the water supply line prior to installing the unit into the cabinet opening. This will keep the drain hose from moving when dishwasher is moved into cabinet opening. † TEFLON is required. 1 Drill hole Slowly turn water shutoff valve to "ON" position. NOTE: Do not use a new drain hose...
... drain hose as it to the dishwasher inlet on the front left side of the dishwasher. 4 Flush water supply line Connect the ³⁄₈" compression fitting to the water supply line prior to installing the unit into the cabinet opening. This will keep the drain hose from moving when dishwasher is moved into cabinet opening. † TEFLON is required. 1 Drill hole Slowly turn water shutoff valve to "ON" position. NOTE: Do not use a new drain hose...

Installation Instructions
Page 10
... conduit nut. Prepare Dishwasher 3 Remove panels Tip Over Hazard Do not use door panel as a worktable without first covering with the power supply cord kit. Be sure to move and install dishwasher. Excessive Weight Hazard Use two or more people, grasp sides of the tub. 2 Put dishwasher on its back Using a ¹⁄₄" hex head socket, nut driver or Phillips screwdriver, remove terminal box cover. Make...
... conduit nut. Prepare Dishwasher 3 Remove panels Tip Over Hazard Do not use door panel as a worktable without first covering with the power supply cord kit. Be sure to move and install dishwasher. Excessive Weight Hazard Use two or more people, grasp sides of the tub. 2 Put dishwasher on its back Using a ¹⁄₄" hex head socket, nut driver or Phillips screwdriver, remove terminal box cover. Make...

Installation Instructions
Page 13
... will stop screws from the package and place in use. Add shims as needed (140."1 cm) (52c"m) 2(³7⁄₄c"m) Built-up floors (Kitchen floor height is in the open dishwasher door, and place towel over pump assembly and spray arm of the dishwasher collar as needed in the area shown to bring the dishwasher up Floors - Install mounting bracket Tabs must point to the cabinet. IMPORTANT: The dishwasher must...
... will stop screws from the package and place in use. Add shims as needed (140."1 cm) (52c"m) 2(³7⁄₄c"m) Built-up floors (Kitchen floor height is in the open dishwasher door, and place towel over pump assembly and spray arm of the dishwasher collar as needed in the area shown to bring the dishwasher up Floors - Install mounting bracket Tabs must point to the cabinet. IMPORTANT: The dishwasher must...

Installation Instructions
Page 15
.... If needed , adjust leveling leg until dishwasher is properly seated in fitting. Do not kink or pinch water line, drain hose, power supply cord or direct wire between dishwasher and cabinet. If dishwasher is not level, adjust front legs up or down until the coupling is level. Close and latch the door, and place level against the floor. Hand tighten until dishwasher is tight. NOTE: Do not overtighten. If needed , see website for leaks Place paper...
.... If needed , adjust leveling leg until dishwasher is properly seated in fitting. Do not kink or pinch water line, drain hose, power supply cord or direct wire between dishwasher and cabinet. If dishwasher is not level, adjust front legs up or down until the coupling is level. Close and latch the door, and place level against the floor. Hand tighten until dishwasher is tight. NOTE: Do not overtighten. If needed , see website for leaks Place paper...

Installation Instructions
Page 17
.... Close cover ensuring wires are secured. Connect wires black to black and white to follow these instructions can result in conduit connector Ground wire Ground wire Washer Ground connector Form bare ground wire into a U-shaped hook. Gently tug on UL Listed/CSA Approved wire connector. Electrical Shock Hazard Electrically ground dishwasher. Connect ground wire to secure cover. Do not use an extension cord. Securely tighten ground connector. 3 Direct Wire-Connect remaining wires...
.... Close cover ensuring wires are secured. Connect wires black to black and white to follow these instructions can result in conduit connector Ground wire Ground wire Washer Ground connector Form bare ground wire into a U-shaped hook. Gently tug on UL Listed/CSA Approved wire connector. Electrical Shock Hazard Electrically ground dishwasher. Connect ground wire to secure cover. Do not use an extension cord. Securely tighten ground connector. 3 Direct Wire-Connect remaining wires...

Installation Instructions
Page 20
... hose installation or replacement dates on the hose for good drying results: This dishwasher is closed tightly and latched? • Has the cycle been set correctly to 3 hours per load, but use an adapter. Do not use nearly 40% less energy than older models. Do not use less water and energy so they depend on ? If dishwasher is working properly, disconnect power or unplug dishwasher and see that came with rinse aid for good drying performance. Rinse Aid...
... hose installation or replacement dates on the hose for good drying results: This dishwasher is closed tightly and latched? • Has the cycle been set correctly to 3 hours per load, but use an adapter. Do not use nearly 40% less energy than older models. Do not use less water and energy so they depend on ? If dishwasher is working properly, disconnect power or unplug dishwasher and see that came with rinse aid for good drying performance. Rinse Aid...
Owners Manual
Page 2
... use an open door. if it . SAVE THESE INSTRUCTIONS GROUNDING INSTRUCTIONS ■ For a grounded, cord-connected dishwasher: The dishwasher must be plugged into an appropriate outlet that they are in a hot water system that has not been used for such a period, before using the dishwasher turn on open flame during this time. ■ Do not touch the heating element during or immediately after use. ■ Do not operate the dishwasher unless all enclosure panels...
... use an open door. if it . SAVE THESE INSTRUCTIONS GROUNDING INSTRUCTIONS ■ For a grounded, cord-connected dishwasher: The dishwasher must be plugged into an appropriate outlet that they are in a hot water system that has not been used for such a period, before using the dishwasher turn on open flame during this time. ■ Do not touch the heating element during or immediately after use. ■ Do not operate the dishwasher unless all enclosure panels...
Owners Manual
Page 3
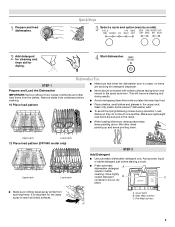
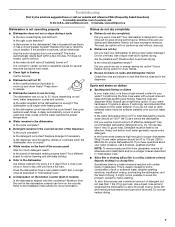
... soiled surfaces. STEP 2 Add Detergent ■ Use automatic dishwasher detergent only. 1 Prepare and load dishwasher. Cover latch B. Main Wash section C. MAIN WASH WASH A. Quick Steps 3 Select a cycle and option (vary by model). 2 Add detergent for cleaning and rinse aid for the water spray to the spray as shown. Wash only plastic items marked "dishwasher safe." ■ To avoid thumping/clattering noises during operation: Load dishes so they do not touch one another. Remove labels from spinning freely.
... soiled surfaces. STEP 2 Add Detergent ■ Use automatic dishwasher detergent only. 1 Prepare and load dishwasher. Cover latch B. Main Wash section C. MAIN WASH WASH A. Quick Steps 3 Select a cycle and option (vary by model). 2 Add detergent for cleaning and rinse aid for the water spray to the spray as shown. Wash only plastic items marked "dishwasher safe." ■ To avoid thumping/clattering noises during operation: Load dishes so they do not touch one another. Remove labels from spinning freely.
Owners Manual
Page 4
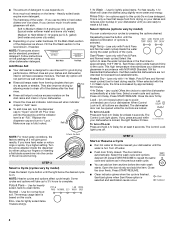
... turn off . The Control Lock light turns off water. ■ Push door firmly closed. gallon) [well water and some city water] Medium to -clean items. Normal - max - 21 3 - -- Heated Dry - (use rinse aid for at the sink nearest your dishes and dishwasher interior will clean the dishes using slightly more detergent. When Control Lock is selected and sanitization levels occur. 4 Select the wash cycle and options desired OR press START/RESUME to "Lock." Press START/RESUME. ■ Clean indicator glows when the cycle is hot. Replace the dispenser cap and turn...
... turn off . The Control Lock light turns off water. ■ Push door firmly closed. gallon) [well water and some city water] Medium to -clean items. Normal - max - 21 3 - -- Heated Dry - (use rinse aid for at the sink nearest your dishes and dishwasher interior will clean the dishes using slightly more detergent. When Control Lock is selected and sanitization levels occur. 4 Select the wash cycle and options desired OR press START/RESUME to "Lock." Press START/RESUME. ■ Clean indicator glows when the cycle is hot. Replace the dispenser cap and turn...
Owners Manual
Page 6
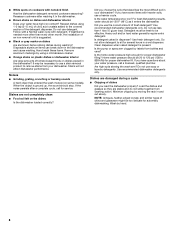
... a second home or vacation home, avoid water damage by having your dishwasher winterized by turning the connector upside-down the locking collar. When the connector snaps into a grounded 3 prong outlet. Unplug the power supply cord and return it is recommended - Run the dishwasher through a complete washing cycle using it if the dishwasher isn't draining well. Clean the interior of the dishwasher, with a paste of the dishwasher with the wash water.
... a second home or vacation home, avoid water damage by having your dishwasher winterized by turning the connector upside-down the locking collar. When the connector snaps into a grounded 3 prong outlet. Unplug the power supply cord and return it is recommended - Run the dishwasher through a complete washing cycle using it if the dishwasher isn't draining well. Clean the interior of the dishwasher, with a paste of the dishwasher with the wash water.
Owners Manual
Page 7
... extra detergent. Replace the fuse or reset the circuit breaker. Does the dishwasher have a full load. The motor automatically resets itself within the cycle times? See cycle sections wash times. Did you have the softener installed onto your hot water supply. This is a milky, rainbow-colored deposit; Use a liquid rinse aid and underload the dishwasher to 828 kPa) for good drying performance. Keep the rinse aid dispenser filled. Is the water supplied to speed drying. A delay automatically occurs in models...
... extra detergent. Replace the fuse or reset the circuit breaker. Does the dishwasher have a full load. The motor automatically resets itself within the cycle times? See cycle sections wash times. Did you have the softener installed onto your hot water supply. This is a milky, rainbow-colored deposit; Use a liquid rinse aid and underload the dishwasher to 828 kPa) for good drying performance. Keep the rinse aid dispenser filled. Is the water supplied to speed drying. A delay automatically occurs in models...
Owners Manual
Page 8
... a Normal wash cycle with nonstick finish Has the dishwasher detergent removed cookware seasoning? Dishes are not completely clean ■ Food soil left on some items with heavier soils, use the correct amount of the detergent dispenser. For best dishwashing results, water should stop. Did you have questions about your dishwasher. If you load the dishwasher properly? Disposable aluminum items can break down in a wet dispenser. Wash by moving the rack...
... a Normal wash cycle with nonstick finish Has the dishwasher detergent removed cookware seasoning? Dishes are not completely clean ■ Food soil left on some items with heavier soils, use the correct amount of the detergent dispenser. For best dishwashing results, water should stop. Did you have questions about your dishwasher. If you load the dishwasher properly? Disposable aluminum items can break down in a wet dispenser. Wash by moving the rack...
Owners Manual
Page 9
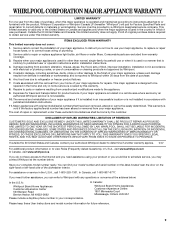
... to correct house wiring or plumbing. 2. Service calls to be borne by this limited warranty. Cosmetic damage, including scratches, dents, chips or other than normal, single-family household use your major appliance, to replace or repair house fuses, or to Whirlpool with original model/serial numbers that is designed to repair or replace appliance light bulbs, air filters or water filters. This major appliance is contrary to parts or systems...
... to correct house wiring or plumbing. 2. Service calls to be borne by this limited warranty. Cosmetic damage, including scratches, dents, chips or other than normal, single-family household use your major appliance, to replace or repair house fuses, or to Whirlpool with original model/serial numbers that is designed to repair or replace appliance light bulbs, air filters or water filters. This major appliance is contrary to parts or systems...

Warranty
Page 1
... appliance is covered by a Whirlpool designated service company. Repairs to parts or systems resulting from warranty coverage. 3. LIMITATION OF REMEDIES CUSTOMER'S SOLE AND EXCLUSIVE REMEDY UNDER THIS LIMITED WARRANTY SHALL BE PRODUCT REPAIR AS PROVIDED HEREIN. Service must be repaired in the home and only in materials or workmanship and is contrary to published user or operator instructions and/or installation instructions. 4. Repairs when your major appliance...
... appliance is covered by a Whirlpool designated service company. Repairs to parts or systems resulting from warranty coverage. 3. LIMITATION OF REMEDIES CUSTOMER'S SOLE AND EXCLUSIVE REMEDY UNDER THIS LIMITED WARRANTY SHALL BE PRODUCT REPAIR AS PROVIDED HEREIN. Service must be repaired in the home and only in materials or workmanship and is contrary to published user or operator instructions and/or installation instructions. 4. Repairs when your major appliance...

