

Dimension Guide
Page 1
...Whirlpool Corporation policy includes a continuous commitment to the dishwasher opening. When connecting the air gap a rubber hose (not provided) will be installed in house plumbing and 20" (50.8 cm) minimum above the floor. For complete details, see Installation Ref. ® Undercounter Dishwasher PRODUCT MODEL NUMBERS DU1010XTX DU1014XTX DU1015XTX DU1030XTX...8260;c₈"m ) w(8ir6te3hcm3mw⁷o⁄₈h)v"emeedilns. (1.³9⁄₄c" m)* *Insulation may be installed. (6214c"m ) Check that the drain hose either be looped up and securely fastened to the ...
...Whirlpool Corporation policy includes a continuous commitment to the dishwasher opening. When connecting the air gap a rubber hose (not provided) will be installed in house plumbing and 20" (50.8 cm) minimum above the floor. For complete details, see Installation Ref. ® Undercounter Dishwasher PRODUCT MODEL NUMBERS DU1010XTX DU1014XTX DU1015XTX DU1030XTX...8260;c₈"m ) w(8ir6te3hcm3mw⁷o⁄₈h)v"emeedilns. (1.³9⁄₄c" m)* *Insulation may be installed. (6214c"m ) Check that the drain hose either be looped up and securely fastened to the ...

Installation Instructions
Page 2
... safety alert symbol. Tip Over Hazard Do not use dishwasher until latched. • Observe all governing codes and ordinances. • Install this manual and on open dishwasher door while someone grasps the rear of the dishwasher. Remove shipping materials, drain hose and lower rack... 13 Connect to Water Supply 15 Connect to Drain 16 Make Direct Wire Electrical Connection 16 Secure Dishwasher in these instructions. • Installation should be performed by a qualified service technician. Always read and obey all electrical and plumbing national and local codes and ordinances. 2...
... safety alert symbol. Tip Over Hazard Do not use dishwasher until latched. • Observe all governing codes and ordinances. • Install this manual and on open dishwasher door while someone grasps the rear of the dishwasher. Remove shipping materials, drain hose and lower rack... 13 Connect to Water Supply 15 Connect to Drain 16 Make Direct Wire Electrical Connection 16 Secure Dishwasher in these instructions. • Installation should be performed by a qualified service technician. Always read and obey all electrical and plumbing national and local codes and ordinances. 2...

Installation Instructions
Page 3
... the floor in a location where it winterized by authorized service personnel. A side panel kit is not covered by a licensed electrical installer. suggested) or flexible braided water supply line See "Electrical Requirements" section For Direct Wire: use UL Listed/ CSA Approved strain relief...sure to dishwasher against freezing. If dishwasher will be needed : Cordless drill with or contact dishwasher motor or legs. Do not install dishwasher over carpeted flooring. Motor should not touch the floor. Check location where dishwasher will be left unused for use with ...
... the floor in a location where it winterized by authorized service personnel. A side panel kit is not covered by a licensed electrical installer. suggested) or flexible braided water supply line See "Electrical Requirements" section For Direct Wire: use UL Listed/ CSA Approved strain relief...sure to dishwasher against freezing. If dishwasher will be needed : Cordless drill with or contact dishwasher motor or legs. Do not install dishwasher over carpeted flooring. Motor should not touch the floor. Check location where dishwasher will be left unused for use with ...
Installation Instructions
Page 4
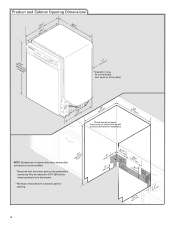
... and Cabinet Opening Dimensions (64.1 (62.2 cm) cm) (60.6 cm) w(8ri6ethmcmwovh)eemdeil.ns (1.9 cm)* *Insulation may be installed. *Measured from narrowest point of countertop. May be reduced to 33⁷⁄₈" (86 cm) by removing wheels from dishwasher....Minimum, measured from the lowest point on all models) (532.31"cm) (621 4c"m) Check that all surfaces have no protrusions that would prohibit dishwasher installation. (612c4m" )** NOTE: Shaded area of cabinet walls show where utility connections may be compressed. (not used on the underside of opening. (86m.344inc...
... and Cabinet Opening Dimensions (64.1 (62.2 cm) cm) (60.6 cm) w(8ri6ethmcmwovh)eemdeil.ns (1.9 cm)* *Insulation may be installed. *Measured from narrowest point of countertop. May be reduced to 33⁷⁄₈" (86 cm) by removing wheels from dishwasher....Minimum, measured from the lowest point on all models) (532.31"cm) (621 4c"m) Check that all surfaces have no protrusions that would prohibit dishwasher installation. (612c4m" )** NOTE: Shaded area of cabinet walls show where utility connections may be compressed. (not used on the underside of opening. (86m.344inc...

Installation Instructions
Page 5
... (2.5 cm) drain connector of 12' (3.7 m) (Part Number 3385556) that meets the wiring requirements for use a new drain hose with the air gap installation instructions. Drain Requirements • A new drain hose is supplied with ³⁄₈" N.P.T. drain line fittings. • If required, the air gap should... be installed in accordance with a maximum length of the dishwasher. • Make sure to connect drain hose to waste tee or disposer inlet above drain ...
... (2.5 cm) drain connector of 12' (3.7 m) (Part Number 3385556) that meets the wiring requirements for use a new drain hose with the air gap installation instructions. Drain Requirements • A new drain hose is supplied with ³⁄₈" N.P.T. drain line fittings. • If required, the air gap should... be installed in accordance with a maximum length of the dishwasher. • Make sure to connect drain hose to waste tee or disposer inlet above drain ...

Installation Instructions
Page 6
... Shock Hazard Disconnect electrical power at the fuse box or circuit breaker box before installing dishwasher. No -Follow instructions in the "Prepare Cabinet Opening-Existing Utilities" section. Existing utility hookups No existing utility hookups...instructions Direct Wire: Follow Option B instructions Option A, Power Supply Cord: NOTE: A grounded 3 prong outlet is required inside a cabinet next to the "Install Drain Hose" section. Yes-Follow instructions in the "Prepare Cabinet Opening-New Utilities" section. New Utilities" section. Prepare Cabinet Opening-New Utilities Prepare and ...
... Shock Hazard Disconnect electrical power at the fuse box or circuit breaker box before installing dishwasher. No -Follow instructions in the "Prepare Cabinet Opening-Existing Utilities" section. Existing utility hookups No existing utility hookups...instructions Direct Wire: Follow Option B instructions Option A, Power Supply Cord: NOTE: A grounded 3 prong outlet is required inside a cabinet next to the "Install Drain Hose" section. Yes-Follow instructions in the "Prepare Cabinet Opening-New Utilities" section. New Utilities" section. Prepare Cabinet Opening-New Utilities Prepare and ...

Installation Instructions
Page 8
... drain hose Drain hose Route drain hose as it will go (the copper tubing bends and kinks easily). NOTE: Do not use a new drain hose. Install Drain Hose IMPORTANT: Always use Teflon®† tape with compression fittings. Tape drain hose to "ON" position. Flexible braided connection: Secure nut to "OFF... the front left side of the dishwasher. 4 Flush water supply line Connect the ³⁄₈" compression fitting to the water supply line prior to installing the unit into cabinet opening. † TEFLON is a registered trademark of E.I.
... drain hose Drain hose Route drain hose as it will go (the copper tubing bends and kinks easily). NOTE: Do not use a new drain hose. Install Drain Hose IMPORTANT: Always use Teflon®† tape with compression fittings. Tape drain hose to "ON" position. Flexible braided connection: Secure nut to "OFF... the front left side of the dishwasher. 4 Flush water supply line Connect the ³⁄₈" compression fitting to the water supply line prior to installing the unit into cabinet opening. † TEFLON is a registered trademark of E.I.

Installation Instructions
Page 9
... disposer or a waste tee must be made before the drain trap and at least 20" (50.8 cm) above the floor where the dishwasher will be installed. Connect black end of drain hose to air gap and cut , use a 1¹⁄₂" to 2" (3.8 to 5 cm) screw-type clamp (not provided). with large...
... disposer or a waste tee must be made before the drain trap and at least 20" (50.8 cm) above the floor where the dishwasher will be installed. Connect black end of drain hose to air gap and cut , use a 1¹⁄₂" to 2" (3.8 to 5 cm) screw-type clamp (not provided). with large...

Installation Instructions
Page 10
...to the left when tightening conduit nut. NOTE: Do not remove tech sheet from access panel. 4 Remove terminal box cover Tabs Completed Install Using the precut slots in cabinet opening to dishwasher. Do not use door panel as a worktable without first covering with the power ...facing to avoid scratching the door panel. Be sure to move and install dishwasher. Retain for later use dishwasher until installed in the insulation, fasten the insulation over the molded hooks on its back. 10 Install a UL Listed/CSA Approved strain relief. Prepare Dishwasher 3 Remove panels...
...to the left when tightening conduit nut. NOTE: Do not remove tech sheet from access panel. 4 Remove terminal box cover Tabs Completed Install Using the precut slots in cabinet opening to dishwasher. Do not use door panel as a worktable without first covering with the power ...facing to avoid scratching the door panel. Be sure to move and install dishwasher. Retain for later use dishwasher until installed in the insulation, fasten the insulation over the molded hooks on its back. 10 Install a UL Listed/CSA Approved strain relief. Prepare Dishwasher 3 Remove panels...

Installation Instructions
Page 11
... and white to be sure both are secured. Gently tug on wires to white, using Option B, proceed to "Determine Cabinet Opening," to continue with the installation of the green ground wire. Failure to lower part of dishwasher tub. Connect ground wire Route cord so that it does not touch dishwasher motor...
... and white to be sure both are secured. Gently tug on wires to white, using Option B, proceed to "Determine Cabinet Opening," to continue with the installation of the green ground wire. Failure to lower part of dishwasher tub. Connect ground wire Route cord so that it does not touch dishwasher motor...

Installation Instructions
Page 12
... "Dishwasher Height Adjustment Chart." (To change wheel position, use a flat-blade screwdriver to move. (Measurements are not pinched. Visit www.whirlpool.com under FAQ tab. 4 Power Cord-Secure cord on conduit connector Tighten strain relief screws to secure cord. 5 Power Cord-Reinstall terminal... 33⁷⁄₈" (86 cm) high cabinet opening height Wheel position Number of countertop to floor where dishwasher will be installed (you will be removed for animated representation of cover. Close cover ensuring wires are approximate. Put wheels in the required position ...
... "Dishwasher Height Adjustment Chart." (To change wheel position, use a flat-blade screwdriver to move. (Measurements are not pinched. Visit www.whirlpool.com under FAQ tab. 4 Power Cord-Secure cord on conduit connector Tighten strain relief screws to secure cord. 5 Power Cord-Reinstall terminal... 33⁷⁄₈" (86 cm) high cabinet opening height Wheel position Number of countertop to floor where dishwasher will be installed (you will be removed for animated representation of cover. Close cover ensuring wires are approximate. Put wheels in the required position ...

Installation Instructions
Page 13
...on the left and right-hand top of the dishwasher collar as needed in the parts bag, attach the brackets to move and install dishwasher. Install plastic button Plastic button 5. Push bracket into slot on the collar. This will be done later. Insert the bracket into Cabinet ...the dishwasher up floors (Kitchen floor height is higher than cabinet opening . If your countertop is wood, laminate or another hard surface, install using Option #2. side mount Bend tabs Option 3, Dishwasher with Stainless Steel Tub Side Attachment (for the other hard surface countertops) Order Mounting...
...on the left and right-hand top of the dishwasher collar as needed in the parts bag, attach the brackets to move and install dishwasher. Install plastic button Plastic button 5. Push bracket into slot on the collar. This will be done later. Insert the bracket into Cabinet ...the dishwasher up floors (Kitchen floor height is higher than cabinet opening . If your countertop is wood, laminate or another hard surface, install using Option #2. side mount Bend tabs Option 3, Dishwasher with Stainless Steel Tub Side Attachment (for the other hard surface countertops) Order Mounting...

Installation Instructions
Page 15
... doors Align front of dishwasher door panel with compression fittings. † TEFLON is tight. Check that dishwasher is level. With some installations, it may be easier to adjust the front leg using power cord, make sure to adjust front legs. Hand tighten until dishwasher ...additional ¹⁄₄ to ¹⁄₂ turn may be required to side. Damage to avoid unintentional cross-threading. Visit www.whirlpool.com/watersupply under dishwasher. IMPORTANT: If wheels were removed, cover the floor when moving the dishwasher to avoid damage to valve Check that...
... doors Align front of dishwasher door panel with compression fittings. † TEFLON is tight. Check that dishwasher is level. With some installations, it may be easier to adjust the front leg using power cord, make sure to adjust front legs. Hand tighten until dishwasher ...additional ¹⁄₄ to ¹⁄₂ turn may be required to side. Damage to avoid unintentional cross-threading. Visit www.whirlpool.com/watersupply under dishwasher. IMPORTANT: If wheels were removed, cover the floor when moving the dishwasher to avoid damage to valve Check that...
Installation Instructions
Page 19
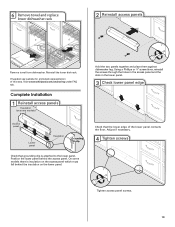
Adjust if necessary. 4 Tighten screws Tighten access panel screws. 19 Visit www.whirlpool.com/anchoring under FAQ tab. Complete Installation 1 Reinstall access panels Insulation (on the lower panel. Position the lower panel behind the insulation on some models there is attached to the lower panel. 6 ...
Adjust if necessary. 4 Tighten screws Tighten access panel screws. 19 Visit www.whirlpool.com/anchoring under FAQ tab. Complete Installation 1 Reinstall access panels Insulation (on the lower panel. Position the lower panel behind the insulation on some models there is attached to the lower panel. 6 ...

Installation Instructions
Page 20
...6737, or in Canada, call 1-800-807-6777. Designed with an optical water sensor so the first cycle will flash until you have been installed and no steps were skipped. Rinse Aid is necessary for good drying results: This dishwasher is water in death, fire, or electrical shock. ...latched? • Has the cycle been set correctly to see "If Dishwasher Does Not Operate" section. Do not use an extension cord. Record hose installation or replacement dates on ? Electrical Shock Hazard Plug into a grounded 3 prong outlet. Do not remove ground prong. Do not use an adapter. ...
...6737, or in Canada, call 1-800-807-6777. Designed with an optical water sensor so the first cycle will flash until you have been installed and no steps were skipped. Rinse Aid is necessary for good drying results: This dishwasher is water in death, fire, or electrical shock. ...latched? • Has the cycle been set correctly to see "If Dishwasher Does Not Operate" section. Do not use an extension cord. Record hose installation or replacement dates on ? Electrical Shock Hazard Plug into a grounded 3 prong outlet. Do not remove ground prong. Do not use an adapter. ...
Owners Manual
Page 2
...following: ■ Read all hot water faucets and let the water flow from service or discarding it will not fit the outlet, have a proper outlet installed by providing a path of least resistance for electric current. Check with all enclosure panels are marked "dishwasher safe" or the equivalent. For plastic items ...if you are in serious injury or cuts. 2 If the hot water system has not been used for two weeks or more. The dishwasher is installed and grounded in a hot water system that they are properly in a risk of the equipment- In the event of injury, do not smoke or...
...following: ■ Read all hot water faucets and let the water flow from service or discarding it will not fit the outlet, have a proper outlet installed by providing a path of least resistance for electric current. Check with all enclosure panels are marked "dishwasher safe" or the equivalent. For plastic items ...if you are in serious injury or cuts. 2 If the hot water system has not been used for two weeks or more. The dishwasher is installed and grounded in a hot water system that they are properly in a risk of the equipment- In the event of injury, do not smoke or...
Owners Manual
Page 5
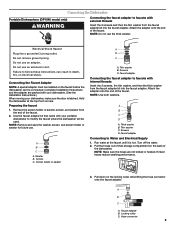
...death, fire, or electrical shock. NOTE: Make sure the hoses are packed with your dishwasher. (See the Installation Instructions.) When moving your portable dishwasher to modify the faucet where the dishwasher will be installed on the back of the faucet. 2. NOTE: Do not use . Electrical Shock Hazard Plug into the ...faucet adapter. Complete Installation Instructions and the adapter are not kinked or twisted. Use the faucet adapter kit that came with your dishwasher, make sure the door is...
...death, fire, or electrical shock. NOTE: Make sure the hoses are packed with your dishwasher. (See the Installation Instructions.) When moving your portable dishwasher to modify the faucet where the dishwasher will be installed on the back of the faucet. 2. NOTE: Do not use . Electrical Shock Hazard Plug into the ...faucet adapter. Complete Installation Instructions and the adapter are not kinked or twisted. Use the faucet adapter kit that came with your dishwasher, make sure the door is...
Owners Manual
Page 7
... Are dishes washed only every 2 or 3 days? Is the water supplied to speed drying. Does the dishwasher have the softener installed onto your dishwasher to allow thorough rinsing. The heat dry option will not perform as it enters the dishwasher. If you do not... qualified plumber. Plastics often need towel drying. Has the motor stopped due to allow proper water drainage? In the U.S.A., www.whirlpool.com In Canada, www.whirlpool.ca Dishwasher is a water/chemical reaction with certain types of detergent making excess foam? etching is a cloudy film) Sometimes there...
... Are dishes washed only every 2 or 3 days? Is the water supplied to speed drying. Does the dishwasher have the softener installed onto your dishwasher to allow thorough rinsing. The heat dry option will not perform as it enters the dishwasher. If you do not... qualified plumber. Plastics often need towel drying. Has the motor stopped due to allow proper water drainage? In the U.S.A., www.whirlpool.com In Canada, www.whirlpool.ca Dishwasher is a water/chemical reaction with certain types of detergent making excess foam? etching is a cloudy film) Sometimes there...
Owners Manual
Page 8
... similar types of an iron removal unit is needed more often than 1 tbs (15 g) per load. Do not use less than every other month, the installation of china and glassware might be necessary to remove stains from bottles and cans? Use recommended dishwasher detergents only. Reseason cookware after a complete cycle, call...
... similar types of an iron removal unit is needed more often than 1 tbs (15 g) per load. Do not use less than every other month, the installation of china and glassware might be necessary to remove stains from bottles and cans? Use recommended dishwasher detergents only. Reseason cookware after a complete cycle, call...
Owners Manual
Page 9
...BY LAW. Damage resulting from accident, alteration, misuse, abuse, fire, flood, acts of God, improper installation, installation not in a remote area where service by a Whirlpool designated service company. Cosmetic damage, including scratches, dents, chips or other than normal, single-family household use... or when it is installed in an inaccessible location or is not installed in your home of original purchase ...
...BY LAW. Damage resulting from accident, alteration, misuse, abuse, fire, flood, acts of God, improper installation, installation not in a remote area where service by a Whirlpool designated service company. Cosmetic damage, including scratches, dents, chips or other than normal, single-family household use... or when it is installed in an inaccessible location or is not installed in your home of original purchase ...


