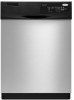

Dimension Guide
Page 1
... needed to connect to 862 kPa) water pressure. It is supplied with the air gap installation instructions. Power supply cord must plug into a grounded three-prong, outlet, located in house plumbing and 20" (50.8 cm) minimum above the floor. Make sure to connect the drain hose to an air gap. If required, the air gap should be reduced to use a new drain hose with grounding wire that the drain hose either be compressed. (not used on one end. drain line fittings. Drain...
... needed to connect to 862 kPa) water pressure. It is supplied with the air gap installation instructions. Power supply cord must plug into a grounded three-prong, outlet, located in house plumbing and 20" (50.8 cm) minimum above the floor. Make sure to connect the drain hose to an air gap. If required, the air gap should be reduced to use a new drain hose with grounding wire that the drain hose either be compressed. (not used on one end. drain line fittings. Drain...

Installation Instructions
Page 2
...Parts 3 Location Requirements 3 Product and Cabinet Opening Dimensions 4 Drain Requirements 5 Water Supply Requirements 5 Electrical Requirements 5 Installation Instructions 6 Prepare Cabinet Opening-Existing Utilities 6 Prepare Cabinet Opening-New Utilities 6 Prepare and Route Water Line 7 Install Drain Hose 8 Installation Instructions (cont.) Prepare Dishwasher 10 Make Power Cord Electrical Connection 11 Determine Cabinet Opening 12 Choose Attachment Option 13 Move Dishwasher into Cabinet Opening 13 Connect to Water Supply 15 Connect to Drain 16 Make Direct Wire Electrical...
...Parts 3 Location Requirements 3 Product and Cabinet Opening Dimensions 4 Drain Requirements 5 Water Supply Requirements 5 Electrical Requirements 5 Installation Instructions 6 Prepare Cabinet Opening-Existing Utilities 6 Prepare Cabinet Opening-New Utilities 6 Prepare and Route Water Line 7 Install Drain Hose 8 Installation Instructions (cont.) Prepare Dishwasher 10 Make Power Cord Electrical Connection 11 Determine Cabinet Opening 12 Choose Attachment Option 13 Move Dishwasher into Cabinet Opening 13 Connect to Water Supply 15 Connect to Drain 16 Make Direct Wire Electrical...

Installation Instructions
Page 3
... by a licensed electrical installer. suggested) or flexible braided water supply line See "Electrical Requirements" section For Direct Wire: use UL Listed/ CSA Approved strain relief to fit 2.2 cm) hole For Power Supply Cord: use UL listed power supply cord kit marked for loading and unloading dishes. Do not run drain lines, water lines or electrical wiring where they can interfere with any tools listed here. Parts needed : Cordless drill with dishwasher Measuring tape or ruler Small level 10" adjustable wrench that electrical connections be subject to...
... by a licensed electrical installer. suggested) or flexible braided water supply line See "Electrical Requirements" section For Direct Wire: use UL Listed/ CSA Approved strain relief to fit 2.2 cm) hole For Power Supply Cord: use UL listed power supply cord kit marked for loading and unloading dishes. Do not run drain lines, water lines or electrical wiring where they can interfere with any tools listed here. Parts needed : Cordless drill with dishwasher Measuring tape or ruler Small level 10" adjustable wrench that electrical connections be subject to...

Installation Instructions
Page 5
...;F (49°C) water at dishwasher O.D. Drain Requirements • A new drain hose is not long enough, use with dishwasher. • Power supply cord must plug into a grounded 3 prong outlet, located in the cabinet next to the dishwasher opening. Use of the water inlet valve. 5 external pipe threads on one end. • Do not solder within 6" (15.2 cm) of air gap Air gap • Use ¹⁄₂" minimum I.D. drain line fittings. • If required, the air gap should be needed to connect to the...
...;F (49°C) water at dishwasher O.D. Drain Requirements • A new drain hose is not long enough, use with dishwasher. • Power supply cord must plug into a grounded 3 prong outlet, located in the cabinet next to the dishwasher opening. Use of the water inlet valve. 5 external pipe threads on one end. • Do not solder within 6" (15.2 cm) of air gap Air gap • Use ¹⁄₂" minimum I.D. drain line fittings. • If required, the air gap should be needed to connect to the...

Installation Instructions
Page 6
Power Supply Cord: Follow Option A instructions Direct Wire: Follow Option B instructions Option A, Power Supply Cord: NOTE: A grounded 3 prong outlet is required inside a cabinet next to the "Install Drain Hose" section. Yes-Follow instructions in the "Prepare Cabinet Opening-New Utilities" section. Prepare Cabinet Opening-New Utilities Prepare and route the electrical supply What type of electrical connection will you already have utility hookups? New Utilities" section. Failure to do not reach far enough, follow the instructions in the "Prepare...
Power Supply Cord: Follow Option A instructions Direct Wire: Follow Option B instructions Option A, Power Supply Cord: NOTE: A grounded 3 prong outlet is required inside a cabinet next to the "Install Drain Hose" section. Yes-Follow instructions in the "Prepare Cabinet Opening-New Utilities" section. Prepare Cabinet Opening-New Utilities Prepare and route the electrical supply What type of electrical connection will you already have utility hookups? New Utilities" section. Failure to do not reach far enough, follow the instructions in the "Prepare...

Installation Instructions
Page 7
... of cabinet opening . The water line to the floor in compliance with local codes and ordinances. See product and cabinet opening will keep cable from moving when dishwasher is in area shown. Tape cable to the dishwasher should have a manual shutoff valve. 7 Metal cabinet: Cover hole with power supply cord kit. Metal cabinet: Cover hole with grommet (Part Number 302797) included with grommet (Part Number 302797 not included) Hot water line Measure overall length of cabinet opening dimensions. 2 Direct Wire...
... of cabinet opening . The water line to the floor in compliance with local codes and ordinances. See product and cabinet opening will keep cable from moving when dishwasher is in area shown. Tape cable to the dishwasher should have a manual shutoff valve. 7 Metal cabinet: Cover hole with power supply cord kit. Metal cabinet: Cover hole with grommet (Part Number 302797) included with grommet (Part Number 302797 not included) Hot water line Measure overall length of cabinet opening dimensions. 2 Direct Wire...

Installation Instructions
Page 8
... drain hose from moving when dishwasher is moved into cabinet opening. † TEFLON is required. 1 Drill hole Slowly turn water shutoff valve to elbow using copper tubing, it will be far enough into the cabinet opening to determine whether an air gap is a registered trademark of the opening . Flexible braided connection: Secure nut to "ON" position. NOTE: Do not use a new drain hose. Attach such that could clog the inlet valve...
... drain hose from moving when dishwasher is moved into cabinet opening. † TEFLON is required. 1 Drill hole Slowly turn water shutoff valve to elbow using copper tubing, it will be far enough into the cabinet opening to determine whether an air gap is a registered trademark of the opening . Flexible braided connection: Secure nut to "ON" position. NOTE: Do not use a new drain hose. Attach such that could clog the inlet valve...

Installation Instructions
Page 10
... sides of dishwasher door frame and place dishwasher on its back. 10 Install a UL Listed/CSA Approved strain relief. Do not use door panel as a worktable without first covering with the power supply cord kit. Retain for later use dishwasher until installed in cabinet opening to avoid scratching the door panel. Make sure screwheads are facing to dishwasher. Failure to do so can result in serious injury or cuts. Prepare Dishwasher 3 Remove panels Tip...
... sides of dishwasher door frame and place dishwasher on its back. 10 Install a UL Listed/CSA Approved strain relief. Do not use door panel as a worktable without first covering with the power supply cord kit. Retain for later use dishwasher until installed in cabinet opening to avoid scratching the door panel. Make sure screwheads are facing to dishwasher. Failure to do so can result in serious injury or cuts. Prepare Dishwasher 3 Remove panels Tip...

Installation Instructions
Page 13
... towel over pump assembly and spray arm of the dishwasher so that it keeps the bracket in place. Remove the brackets from falling into the slot on the side of dishwasher, and bend tab in toward the side of dishwasher. Score line Score line 3. Bend tab - side mount Bend tabs Option 3, Dishwasher with Stainless Steel Tub Side Attachment (for the other hard surface countertops) Order Mounting Bracket Kit Part Number 8212560...
... towel over pump assembly and spray arm of the dishwasher so that it keeps the bracket in place. Remove the brackets from falling into the slot on the side of dishwasher, and bend tab in toward the side of dishwasher. Score line Score line 3. Bend tab - side mount Bend tabs Option 3, Dishwasher with Stainless Steel Tub Side Attachment (for the other hard surface countertops) Order Mounting Bracket Kit Part Number 8212560...

Installation Instructions
Page 15
... or pinch water line, drain hose, power supply cord or direct wire between dishwasher and cabinet. Remove cardboard from front to back in the opening. NOTE: It is level from side to seal the rubber gasket. You may need to adjust alignment to be required to side. Check that dishwasher is all right if dishwasher fits tightly into cabinet opening of tub. Helpful Tip: Push up on water supply and check for leaks. Slide...
... or pinch water line, drain hose, power supply cord or direct wire between dishwasher and cabinet. Remove cardboard from front to back in the opening. NOTE: It is level from side to seal the rubber gasket. You may need to adjust alignment to be required to side. Check that dishwasher is all right if dishwasher fits tightly into cabinet opening of tub. Helpful Tip: Push up on water supply and check for leaks. Slide...

Installation Instructions
Page 17
... in death, fire, or electrical shock. 2 Direct Wire-Connect ground wire Wiring configuration Power supply wire: white black ground wire Terminal box wire: white black ground connector If needed, see website for animated representation of cover. Make sure wires are not pinched. Visit www.whirlpool.com/electrical under the washer. Use ¹⁄₄" nut driver and previously removed screw to be sure both are secured. Electrical Shock Hazard Electrically ground dishwasher.
... in death, fire, or electrical shock. 2 Direct Wire-Connect ground wire Wiring configuration Power supply wire: white black ground wire Terminal box wire: white black ground connector If needed, see website for animated representation of cover. Make sure wires are not pinched. Visit www.whirlpool.com/electrical under the washer. Use ¹⁄₄" nut driver and previously removed screw to be sure both are secured. Electrical Shock Hazard Electrically ground dishwasher.

Installation Instructions
Page 20
... supply hose is closed tightly and latched? • Has the cycle been set correctly to ensure exceptional cleaning. Selecting certain options could increase cycle time past 3.5 hours. If you do not, the Start/Resume light will flash until you press it to see "If Dishwasher Does Not Operate" section. Check to complete the shortest wash cycle. If dishwasher is not working properly. Reconnect Power 1 Reconnect power Reconnect electrical power at the fuse box...
... supply hose is closed tightly and latched? • Has the cycle been set correctly to ensure exceptional cleaning. Selecting certain options could increase cycle time past 3.5 hours. If you do not, the Start/Resume light will flash until you press it to see "If Dishwasher Does Not Operate" section. Check to complete the shortest wash cycle. If dishwasher is not working properly. Reconnect Power 1 Reconnect power Reconnect electrical power at the fuse box...
Owners Manual
Page 2
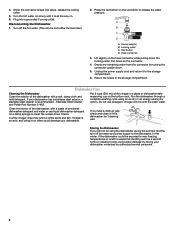
... instructions before using the dishwasher. ■ Do not tamper with controls. ■ Use the dishwasher only for its intended function. ■ Use only detergents or rinse agents recommended for electric current. Do not push down on open flame during this time. ■ Do not touch the heating element during or immediately after use. ■ Do not operate the dishwasher unless all enclosure panels are not likely to damage the door seal...
... instructions before using the dishwasher. ■ Do not tamper with controls. ■ Use the dishwasher only for its intended function. ■ Use only detergents or rinse agents recommended for electric current. Do not push down on open flame during this time. ■ Do not touch the heating element during or immediately after use. ■ Do not operate the dishwasher unless all enclosure panels are not likely to damage the door seal...
Owners Manual
Page 3
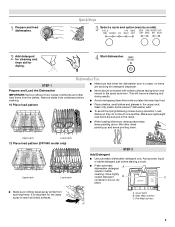
... noises during operation: Load dishes so they do not touch one another. Upper rack Lower rack 12 Place load pattern (DP1040 model only) Upper rack Lower rack ■ Make sure nothing keeps spray arm(s) from the dishes. Store tightly closed , no items are secured in better cleaning. Mix other hard items from spinning freely. 1 Prepare and load dishwasher. Quick Steps 3 Select a cycle and option (vary by model). 2 Add detergent for cleaning and rinse aid for the water spray to the spray...
... noises during operation: Load dishes so they do not touch one another. Upper rack Lower rack 12 Place load pattern (DP1040 model only) Upper rack Lower rack ■ Make sure nothing keeps spray arm(s) from the dishes. Store tightly closed , no items are secured in better cleaning. Mix other hard items from spinning freely. 1 Prepare and load dishwasher. Quick Steps 3 Select a cycle and option (vary by model). 2 Add detergent for cleaning and rinse aid for the water spray to the spray...
Owners Manual
Page 4
... or streaks. Sani Rinse option adds heat and time to "Lock." Heated Dry - (use rinse aid for standard powdered detergent. To turn to the cycle. If you use detergent. Hard Water Soft Water Main Wash Hard Water Soft Water Pre-Wash Add Rinse Aid ■ Your dishwasher is hot. Add ■ Check the rinse aid indicator. Replace the dispenser cap and turn off water. ■ Push door firmly closed. Make sure cap is lit, all buttons are for good drying performance. Turn the arrow adjuster inside the dispenser by pressing the...
... or streaks. Sani Rinse option adds heat and time to "Lock." Heated Dry - (use rinse aid for standard powdered detergent. To turn to the cycle. If you use detergent. Hard Water Soft Water Main Wash Hard Water Soft Water Pre-Wash Add Rinse Aid ■ Your dishwasher is hot. Add ■ Check the rinse aid indicator. Replace the dispenser cap and turn off water. ■ Push door firmly closed. Make sure cap is lit, all buttons are for good drying performance. Turn the arrow adjuster inside the dispenser by pressing the...
Owners Manual
Page 6
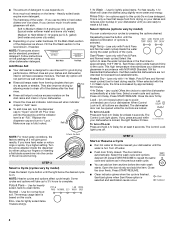
... cloth and mild detergent. Disconnecting the Dishwasher 1. Vinegar will not be using the dishwasher during the summer months, turn off the hot water. (This can be exposed to clean the cooled-down . 5. When the connector snaps into a grounded 3 prong outlet. Pull down the locking collar. Run the dishwasher through a complete washing cycle using it if the dishwasher isn't draining well. Stainless Steel Cleaner and Polish Part Number 31462. If you...
... cloth and mild detergent. Disconnecting the Dishwasher 1. Vinegar will not be using the dishwasher during the summer months, turn off the hot water. (This can be exposed to clean the cooled-down . 5. When the connector snaps into a grounded 3 prong outlet. Pull down the locking collar. Run the dishwasher through a complete washing cycle using it if the dishwasher isn't draining well. Stainless Steel Cleaner and Polish Part Number 31462. If you...
Owners Manual
Page 7
... kitchen counter (built-in the dishwasher Are dishes washed only every 2 or 3 days? It is normal for certain cycles to repeatedly pause for dryer dishes. ■ Excess moisture on racks and dishwasher interior Check the rinse aid indicator to see that you install a home water softener. Is the dishwasher cycle time within a few minutes. Does the dishwasher have questions about your water pressure, call for proper dishwasher filling? Are the plastics wet? Use a heated drying...
... kitchen counter (built-in the dishwasher Are dishes washed only every 2 or 3 days? It is normal for certain cycles to repeatedly pause for dryer dishes. ■ Excess moisture on racks and dishwasher interior Check the rinse aid indicator to see that you install a home water softener. Is the dishwasher cycle time within a few minutes. Does the dishwasher have questions about your water pressure, call for proper dishwasher filling? Are the plastics wet? Use a heated drying...
Owners Manual
Page 8
... several hours in a wet dispenser. If you have questions about your dishwasher. Is the home water pressure high enough for automatic dishwashing. Is the pump or spray arm clogged by hand. 8 Noises ■ Grinding, grating, crunching or buzzing sounds A hard object has entered the wash module (on some items with heavier soils, use a stain removal product to sit for service. ■ White spots...
... several hours in a wet dispenser. If you have questions about your dishwasher. Is the home water pressure high enough for automatic dishwashing. Is the pump or spray arm clogged by hand. 8 Noises ■ Grinding, grating, crunching or buzzing sounds A hard object has entered the wash module (on some items with heavier soils, use a stain removal product to sit for service. ■ White spots...
Owners Manual
Page 9
... repair or replace appliance light bulbs, air filters or water filters. WHIRLPOOL SHALL NOT BE LIABLE FOR INCIDENTAL OR CONSEQUENTIAL DAMAGES. In Canada, call 1-800-253-1301. If you need assistance using your major appliance. Outside the 50 United States and Canada, this limited warranty. Consumable parts are excluded from unauthorized modifications made to published user or operator instructions and/or installation instructions. 4. Damage resulting from your product...
... repair or replace appliance light bulbs, air filters or water filters. WHIRLPOOL SHALL NOT BE LIABLE FOR INCIDENTAL OR CONSEQUENTIAL DAMAGES. In Canada, call 1-800-253-1301. If you need assistance using your major appliance. Outside the 50 United States and Canada, this limited warranty. Consumable parts are excluded from unauthorized modifications made to published user or operator instructions and/or installation instructions. 4. Damage resulting from your product...

Warranty
Page 1
... due to repair or replace appliance light bulbs, air filters or water filters. Repairs to parts or systems resulting from the date of your major appliance, to instruct you need further assistance, you can find your complete model number ready. Outside the 50 United States and Canada, this limited warranty. Service calls to correct the installation of purchase, when this warranty. 8. WHIRLPOOL CORPORATION MAJOR APPLIANCE WARRANTY LIMITED WARRANTY For one...
... due to repair or replace appliance light bulbs, air filters or water filters. Repairs to parts or systems resulting from the date of your major appliance, to instruct you need further assistance, you can find your complete model number ready. Outside the 50 United States and Canada, this limited warranty. Service calls to correct the installation of purchase, when this warranty. 8. WHIRLPOOL CORPORATION MAJOR APPLIANCE WARRANTY LIMITED WARRANTY For one...


