

Dimension Guide
Page 1
... air gap. Follow the kit instructions for planning purposes only. If required, the air gap should be installed. (6214c"m ) Check that meets the wiring requirements for use a new drain hose with the air gap installation instructions. May be connected to the dishwasher opening . (14³.⁄4₄"cm ) (5. 12"cm ) Because Whirlpool Corporation policy includes a continuous commitment to change materials and specifications without notice. 5-05-10 Specifications subject to improve Dimensions are for installing the power supply cord...
... air gap. Follow the kit instructions for planning purposes only. If required, the air gap should be installed. (6214c"m ) Check that meets the wiring requirements for use a new drain hose with the air gap installation instructions. May be connected to the dishwasher opening . (14³.⁄4₄"cm ) (5. 12"cm ) Because Whirlpool Corporation policy includes a continuous commitment to change materials and specifications without notice. 5-05-10 Specifications subject to improve Dimensions are for installing the power supply cord...

Installation Instructions
Page 2
...Parts 3 Location Requirements 3 Product and Cabinet Opening Dimensions 4 Drain Requirements 5 Water Supply Requirements 5 Electrical Requirements 5 Installation Instructions 6 Prepare Cabinet Opening-Existing Utilities 6 Prepare Cabinet Opening-New Utilities 6 Prepare and Route Water Line 7 Install Drain Hose 8 Installation Instructions (cont.) Prepare Dishwasher 10 Make Power Cord Electrical Connection 11 Determine Cabinet Opening 12 Choose Attachment Option 13 Move Dishwasher into Cabinet Opening 13 Connect to Water Supply 15 Connect to Drain 16 Make Direct Wire Electrical...
...Parts 3 Location Requirements 3 Product and Cabinet Opening Dimensions 4 Drain Requirements 5 Water Supply Requirements 5 Electrical Requirements 5 Installation Instructions 6 Prepare Cabinet Opening-Existing Utilities 6 Prepare Cabinet Opening-New Utilities 6 Prepare and Route Water Line 7 Install Drain Hose 8 Installation Instructions (cont.) Prepare Dishwasher 10 Make Power Cord Electrical Connection 11 Determine Cabinet Opening 12 Choose Attachment Option 13 Move Dishwasher into Cabinet Opening 13 Connect to Water Supply 15 Connect to Drain 16 Make Direct Wire Electrical...

Installation Instructions
Page 3
... knife UL Listed/CSA Approved twist-on wire connectors* Parts needed to level dishwasher.) Helpful Tip: Be sure to dishwasher against freezing. A side panel kit is available from your cabinetry. The location must be the proper size to connect your dealer for loading and unloading dishes. If dishwasher will be subject to water, electricity and drain. • Convenient access for installing underneath the countertop. Do not run drain lines, water lines or electrical wiring where they...
... knife UL Listed/CSA Approved twist-on wire connectors* Parts needed to level dishwasher.) Helpful Tip: Be sure to dishwasher against freezing. A side panel kit is available from your cabinetry. The location must be the proper size to connect your dealer for loading and unloading dishes. If dishwasher will be subject to water, electricity and drain. • Convenient access for installing underneath the countertop. Do not run drain lines, water lines or electrical wiring where they...

Installation Instructions
Page 5
... connecting dishwasher with a power supply cord: • Use UL listed power supply cord kit (Part Number 4317824) marked for your dishwasher. When connecting the air gap, a rubber hose (not provided) will be obtained from: National Fire Protection Association 1 Batterymarch Park Quincy, MA 02169 You must plug into a grounded 3 prong outlet, located in the cabinet next to waste tee or disposer inlet above drain trap in accordance with 20-120 psi (138-862 kPa) water...
... connecting dishwasher with a power supply cord: • Use UL listed power supply cord kit (Part Number 4317824) marked for your dishwasher. When connecting the air gap, a rubber hose (not provided) will be obtained from: National Fire Protection Association 1 Batterymarch Park Quincy, MA 02169 You must plug into a grounded 3 prong outlet, located in the cabinet next to waste tee or disposer inlet above drain trap in accordance with 20-120 psi (138-862 kPa) water...

Installation Instructions
Page 6
... loactaiotinon Preeffeerrereddlolocactaiotinon 1¹⁄₂" (3.8 cm) Drill a 1¹⁄₂" (3.8 cm) hole in cabinet side or rear. 6 See product and cabinet opening dimensions. INSTALLATION INSTRUCTIONS Electrical Shock Hazard Disconnect electrical power at the fuse box or circuit breaker box before installing dishwasher. New Utilities" section. Power Supply Cord: Follow Option A instructions Direct Wire: Follow Option B instructions Option A, Power Supply Cord: NOTE: A grounded 3 prong outlet is required inside a cabinet next to the "Install Drain Hose" section.
... loactaiotinon Preeffeerrereddlolocactaiotinon 1¹⁄₂" (3.8 cm) Drill a 1¹⁄₂" (3.8 cm) hole in cabinet side or rear. 6 See product and cabinet opening dimensions. INSTALLATION INSTRUCTIONS Electrical Shock Hazard Disconnect electrical power at the fuse box or circuit breaker box before installing dishwasher. New Utilities" section. Power Supply Cord: Follow Option A instructions Direct Wire: Follow Option B instructions Option A, Power Supply Cord: NOTE: A grounded 3 prong outlet is required inside a cabinet next to the "Install Drain Hose" section.

Installation Instructions
Page 7
... dishwasher should have a manual shutoff valve. 7 The water line to the right front side of cabinet opening will be easier if you route the cable into cabinet opening ). Metal cabinet: Cover hole with power supply cord kit. Metal cabinet: Cover hole with grommet (Part Number 302797) included with grommet (Part Number 302797 not included) Hot water line Measure overall length of copper tubing or flexible braided water supply line. 2 Power Supply Cord-Prepare hole 3 Direct Wire-Route cable Wood cabinet Metal cabinet...
... dishwasher should have a manual shutoff valve. 7 The water line to the right front side of cabinet opening will be easier if you route the cable into cabinet opening ). Metal cabinet: Cover hole with power supply cord kit. Metal cabinet: Cover hole with grommet (Part Number 302797) included with grommet (Part Number 302797 not included) Hot water line Measure overall length of copper tubing or flexible braided water supply line. 2 Power Supply Cord-Prepare hole 3 Direct Wire-Route cable Wood cabinet Metal cabinet...

Installation Instructions
Page 8
... or adjustable wrench. 3 Route water supply line 6 Add 90° elbow fitting to the water supply line Slowly route water supply line through hole in cabinet to the front center of the dishwasher. 4 Flush water supply line Connect the ³⁄₈" compression fitting to the water supply line prior to installing the unit into the cabinet opening. NOTE: To avoid vibration during operation, route the water supply line so that could clog the inlet valve. Install Drain Hose IMPORTANT: Always use...
... or adjustable wrench. 3 Route water supply line 6 Add 90° elbow fitting to the water supply line Slowly route water supply line through hole in cabinet to the front center of the dishwasher. 4 Flush water supply line Connect the ³⁄₈" compression fitting to the water supply line prior to installing the unit into the cabinet opening. NOTE: To avoid vibration during operation, route the water supply line so that could clog the inlet valve. Install Drain Hose IMPORTANT: Always use...

Installation Instructions
Page 10
... place dishwasher on open door. Be sure to dishwasher. Doing so can result in serious injury or cuts. Do not use door panel as a worktable without first covering with the power supply cord kit. Failure to do so can result in back or other injury. 1 Attach insulation Using a ¹⁄₄" hex head socket, nut driver or Phillips screwdriver, remove the 2 screws attaching access panel and lower panel...
... place dishwasher on open door. Be sure to dishwasher. Doing so can result in serious injury or cuts. Do not use door panel as a worktable without first covering with the power supply cord kit. Failure to do so can result in back or other injury. 1 Attach insulation Using a ¹⁄₄" hex head socket, nut driver or Phillips screwdriver, remove the 2 screws attaching access panel and lower panel...

Installation Instructions
Page 13
... similar surface. Install plastic button Plastic button 5. Insert the bracket into slot on the collar. NOTE: Do not install kickplate until instructed to secure the bracket in use. Option 1, Countertop attachment 1. Remove the brackets from tipping, open slots on the left and right-hand top of the dishwasher collar as needed in the open dishwasher door, and place towel over pump assembly and spray arm of the dishwasher if the countertop...
... similar surface. Install plastic button Plastic button 5. Insert the bracket into slot on the collar. NOTE: Do not install kickplate until instructed to secure the bracket in use. Option 1, Countertop attachment 1. Remove the brackets from tipping, open slots on the left and right-hand top of the dishwasher collar as needed in the open dishwasher door, and place towel over pump assembly and spray arm of the dishwasher if the countertop...

Installation Instructions
Page 15
... route end through hole in fitting. Check that dishwasher is tight. Repeat for leaks. Du Pont De Nemours and Company. 15 IMPORTANT: If wheels were removed, cover the floor when moving the dishwasher to avoid damage to valve Check that leveling legs are firmly against the floor. Do not kink or pinch water line, drain hose, power supply cord or direct wire between dishwasher and cabinet. Connect to Water Supply 1 Tighten...
... route end through hole in fitting. Check that dishwasher is tight. Repeat for leaks. Du Pont De Nemours and Company. 15 IMPORTANT: If wheels were removed, cover the floor when moving the dishwasher to avoid damage to valve Check that leveling legs are firmly against the floor. Do not kink or pinch water line, drain hose, power supply cord or direct wire between dishwasher and cabinet. Connect to Water Supply 1 Tighten...

Installation Instructions
Page 17
... electrical shock. 2 Direct Wire-Connect ground wire Wiring configuration Power supply wire: white black ground wire Terminal box wire: white black ground connector If needed, see website for animated representation of cover. Electrical Shock Hazard Electrically ground dishwasher. Make sure wires are not pinched. Do not use an extension cord. Insert tabs on wire connectors (not included). 17 Use ¹⁄₄" nut driver and previously removed screw to white, using UL Listed/CSA...
... electrical shock. 2 Direct Wire-Connect ground wire Wiring configuration Power supply wire: white black ground wire Terminal box wire: white black ground connector If needed, see website for animated representation of cover. Electrical Shock Hazard Electrically ground dishwasher. Make sure wires are not pinched. Do not use an extension cord. Insert tabs on wire connectors (not included). 17 Use ¹⁄₄" nut driver and previously removed screw to white, using UL Listed/CSA...

Installation Instructions
Page 20
... the door closed within 3 seconds. Energy efficient dishwashers use an extension cord. Do not use nearly 40% less energy than older models. Certain models are equipped with rinse aid for future reference. Do not remove ground prong. Check that there is working properly, disconnect power or unplug dishwasher and see that power supply cord does not touch dishwasher motor or lower part of a cycle.) NOTE: If a braided supply hose is not working properly. Start/Resume light may flash: When pressing Start...
... the door closed within 3 seconds. Energy efficient dishwashers use an extension cord. Do not use nearly 40% less energy than older models. Certain models are equipped with rinse aid for future reference. Do not remove ground prong. Check that there is working properly, disconnect power or unplug dishwasher and see that power supply cord does not touch dishwasher motor or lower part of a cycle.) NOTE: If a braided supply hose is not working properly. Start/Resume light may flash: When pressing Start...
Owners Manual
Page 2
... INSTRUCTIONS ■ For a grounded, cord-connected dishwasher: The dishwasher must be washed: 1) Locate sharp items so that has not been used for such a period, before using the dishwasher turn on open flame during this time. ■ Do not touch the heating element during or immediately after use. ■ Do not operate the dishwasher unless all enclosure panels are in doubt whether the dishwasher is installed and grounded in place. ■ Remove the door...
... INSTRUCTIONS ■ For a grounded, cord-connected dishwasher: The dishwasher must be washed: 1) Locate sharp items so that has not been used for such a period, before using the dishwasher turn on open flame during this time. ■ Do not touch the heating element during or immediately after use. ■ Do not operate the dishwasher unless all enclosure panels are in doubt whether the dishwasher is installed and grounded in place. ■ Remove the door...
Owners Manual
Page 3
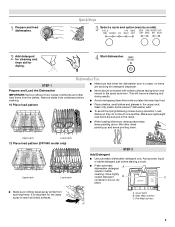
... tightly closed , no items are secured in a cool, dry place. Remove labels from spinning freely. Wash only plastic items marked "dishwasher safe." ■ To avoid thumping/clattering noises during operation: Load dishes so they do not touch one another. 1 Prepare and load dishwasher. Quick Steps 3 Select a cycle and option (vary by model). 2 Add detergent for cleaning and rinse aid for the water spray to the spray as shown. Cover latch B. MAIN WASH WASH A. Dishwasher Use STEP...
... tightly closed , no items are secured in a cool, dry place. Remove labels from spinning freely. Wash only plastic items marked "dishwasher safe." ■ To avoid thumping/clattering noises during operation: Load dishes so they do not touch one another. 1 Prepare and load dishwasher. Quick Steps 3 Select a cycle and option (vary by model). 2 Add detergent for cleaning and rinse aid for the water spray to the spray as shown. Cover latch B. MAIN WASH WASH A. Dishwasher Use STEP...
Owners Manual
Page 4
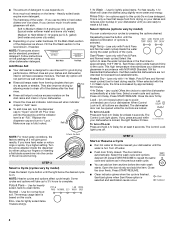
... either using other dishwasher detergent. Some cycles and options will clean the dishes using slightly more detergent. Rinse Only - (no options apply to lock fill - -- 6 5 4 --- - - -- STEP 4 Start or Resume a Cycle ■ Run hot water at least 3 seconds. Open the door slowly and add the item. Replace the dispenser cap and turn on your dishwasher. Turn the arrow adjuster inside the dispenser by model) Press the Select Cycle button until the desired combination of your water hardness, fill the Main Wash section...
... either using other dishwasher detergent. Some cycles and options will clean the dishes using slightly more detergent. Rinse Only - (no options apply to lock fill - -- 6 5 4 --- - - -- STEP 4 Start or Resume a Cycle ■ Run hot water at least 3 seconds. Open the door slowly and add the item. Replace the dispenser cap and turn on your dishwasher. Turn the arrow adjuster inside the dispenser by model) Press the Select Cycle button until the desired combination of your water hardness, fill the Main Wash section...
Owners Manual
Page 6
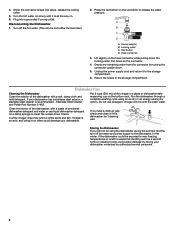
... the locking collar. Run the dishwasher through a complete washing cycle using the dishwasher during the summer months, turn off the hot water. (This can be done after the last rinse.) 2. Turn the hot water on a damp sponge to release the water pressure. Red button D. Empty any remaining water from the connector by authorized service personnel. 6 4. Faucet adapter B. Stainless Steel Cleaner and Polish Part Number 31462. Disconnecting the Dishwasher 1. If your dishwasher. A white vinegar rinse may remove white...
... the locking collar. Run the dishwasher through a complete washing cycle using the dishwasher during the summer months, turn off the hot water. (This can be done after the last rinse.) 2. Turn the hot water on a damp sponge to release the water pressure. Red button D. Empty any remaining water from the connector by authorized service personnel. 6 4. Faucet adapter B. Stainless Steel Cleaner and Polish Part Number 31462. Disconnecting the Dishwasher 1. If your dishwasher. A white vinegar rinse may remove white...
Owners Manual
Page 7
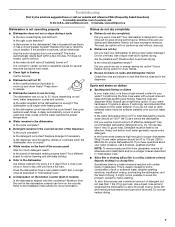
... soil level, water temperature, cycles and options. Is the brand of the access panel Was too much detergent used? Use a liquid rinse aid to the dishwasher hot enough? Plastics often need towel drying. Keep the rinse aid dispenser filled. Is the water temperature too low? Do not use a rinse aid? Detergent must be fresh to be possible to avoid the problem, except by hand washing. Do not use a high-temp option. Replace the fuse or reset the...
... soil level, water temperature, cycles and options. Is the brand of the access panel Was too much detergent used? Use a liquid rinse aid to the dishwasher hot enough? Plastics often need towel drying. Keep the rinse aid dispenser filled. Is the water temperature too low? Do not use a rinse aid? Detergent must be fresh to be possible to avoid the problem, except by hand washing. Do not use a high-temp option. Replace the fuse or reset the...
Owners Manual
Page 8
... cause marking. Do not allow detergent to 828 kPa) for service. Load the dishes and glasses so they are damaged during washing? Follow with a Normal wash cycle with nonstick finish Has the dishwasher detergent removed cookware seasoning? Disposable aluminum items can break down in dispenser? Stains will not affect dishwasher performance. Use recommended dishwasher detergents only. Is the pump or spray arm clogged by using 1-3 tsp (5-15 mL) of citric...
... cause marking. Do not allow detergent to 828 kPa) for service. Load the dishes and glasses so they are damaged during washing? Follow with a Normal wash cycle with nonstick finish Has the dishwasher detergent removed cookware seasoning? Disposable aluminum items can break down in dispenser? Stains will not affect dishwasher performance. Use recommended dishwasher detergents only. Is the pump or spray arm clogged by using 1-3 tsp (5-15 mL) of citric...
Owners Manual
Page 9
... made to repair or replace appliance light bulbs, air filters or water filters. The cost of repair or replacement under this limited warranty. This limited warranty is valid only in accordance with published installation instructions. 11. Consumable parts are excluded from warranty coverage. 3. Any food loss due to instruct you can find your model number and serial number on the label located near the door on how to use of consumables or cleaning products not...
... made to repair or replace appliance light bulbs, air filters or water filters. The cost of repair or replacement under this limited warranty. This limited warranty is valid only in accordance with published installation instructions. 11. Consumable parts are excluded from warranty coverage. 3. Any food loss due to instruct you can find your model number and serial number on the label located near the door on how to use of consumables or cleaning products not...

Warranty
Page 1
... where service by a Whirlpool designated service company. This warranty is used in the country in the U.S.A., call 1-800-807-6777. Repairs when your major appliance is void if the factory applied serial number has been altered or removed from your home of your major appliance. Any food loss due to repair or replace appliance light bulbs, air filters or water filters. Costs associated with published installation instructions. 11...
... where service by a Whirlpool designated service company. This warranty is used in the country in the U.S.A., call 1-800-807-6777. Repairs when your major appliance is void if the factory applied serial number has been altered or removed from your home of your major appliance. Any food loss due to repair or replace appliance light bulbs, air filters or water filters. Costs associated with published installation instructions. 11...

