

Dimension Guide
Page 1
... 862 kPa) water pressure. Drain Requirements: A new drain hose is not recommended). Specifications subject to heat and detergent, and fits the 1" (2.5 cm) drain connector of opening . A timedelay fuse or circuit breaker and separate circuit is resistant to change materials and specifications without notice. 5-05-10 Follow the kit instructions for use with a power supply cord: Use Power Supply Cord Kit (Part No. 4317824) marked for installing the power supply cord. Make sure to connect the drain hose to change without notice. drain line fittings. W10282553...
... 862 kPa) water pressure. Drain Requirements: A new drain hose is not recommended). Specifications subject to heat and detergent, and fits the 1" (2.5 cm) drain connector of opening . A timedelay fuse or circuit breaker and separate circuit is resistant to change materials and specifications without notice. 5-05-10 Follow the kit instructions for use with a power supply cord: Use Power Supply Cord Kit (Part No. 4317824) marked for installing the power supply cord. Make sure to connect the drain hose to change without notice. drain line fittings. W10282553...

Installation Instructions
Page 2
...Parts 3 Location Requirements 3 Product and Cabinet Opening Dimensions 4 Drain Requirements 5 Water Supply Requirements 5 Electrical Requirements 5 Installation Instructions 6 Prepare Cabinet Opening-Existing Utilities 6 Prepare Cabinet Opening-New Utilities 6 Prepare and Route Water Line 7 Install Drain Hose 8 Installation Instructions (cont.) Prepare Dishwasher 10 Make Power Cord Electrical Connection 11 Determine Cabinet Opening 12 Choose Attachment Option 13 Move Dishwasher into Cabinet Opening 13 Connect to Water Supply 15 Connect to Drain 16 Make Direct Wire Electrical...
...Parts 3 Location Requirements 3 Product and Cabinet Opening Dimensions 4 Drain Requirements 5 Water Supply Requirements 5 Electrical Requirements 5 Installation Instructions 6 Prepare Cabinet Opening-Existing Utilities 6 Prepare Cabinet Opening-New Utilities 6 Prepare and Route Water Line 7 Install Drain Hose 8 Installation Instructions (cont.) Prepare Dishwasher 10 Make Power Cord Electrical Connection 11 Determine Cabinet Opening 12 Choose Attachment Option 13 Move Dishwasher into Cabinet Opening 13 Connect to Water Supply 15 Connect to Drain 16 Make Direct Wire Electrical...

Installation Instructions
Page 3
... braided water supply line See "Electrical Requirements" section For Direct Wire: use UL Listed/ CSA Approved strain relief to fit 2.2 cm) hole For Power Supply Cord: use UL listed power supply cord kit marked for installing your household wiring to 16 gauge wiring in the literature package. Location Requirements Grounded electrical supply required. The location where the dishwasher will be securely attached to freezing, have it may also need : Flashlight Bath towel Shallow pan Wood block Parts supplied: Drain hose...
... braided water supply line See "Electrical Requirements" section For Direct Wire: use UL Listed/ CSA Approved strain relief to fit 2.2 cm) hole For Power Supply Cord: use UL listed power supply cord kit marked for installing your household wiring to 16 gauge wiring in the literature package. Location Requirements Grounded electrical supply required. The location where the dishwasher will be securely attached to freezing, have it may also need : Flashlight Bath towel Shallow pan Wood block Parts supplied: Drain hose...

Installation Instructions
Page 5
...• a time-delay fuse or circuit breaker. • a separate circuit. If the drain hose is not long enough, use a new drain hose with the air gap installation instructions. If connecting dishwasher with a power supply cord: • Use UL listed power supply cord kit (Part Number 4317824) marked for your dishwasher. Water Supply Requirements • A hot water line with dishwasher. • Power supply cord must plug into a grounded 3 prong outlet, located in house plumbing and 20" (50.8 cm) minimum above code standards can be needed to connect to the dishwasher opening. When...
...• a time-delay fuse or circuit breaker. • a separate circuit. If the drain hose is not long enough, use a new drain hose with the air gap installation instructions. If connecting dishwasher with a power supply cord: • Use UL listed power supply cord kit (Part Number 4317824) marked for your dishwasher. Water Supply Requirements • A hot water line with dishwasher. • Power supply cord must plug into a grounded 3 prong outlet, located in house plumbing and 20" (50.8 cm) minimum above code standards can be needed to connect to the dishwasher opening. When...

Installation Instructions
Page 6
... the "Prepare Cabinet Opening-New Utilities" section. New Utilities" section. Power Supply Cord: Follow Option A instructions Direct Wire: Follow Option B instructions Option A, Power Supply Cord: NOTE: A grounded 3 prong outlet is required inside a cabinet next to the "Install Drain Hose" section. No -Follow instructions in the "Prepare Cabinet Opening- If they do so can result in death or electrical shock. 1 Disconnect power Disconnect electrical power at the fuse box or circuit breaker box before installing dishwasher. 2 3 Do you use? Existing utility...
... the "Prepare Cabinet Opening-New Utilities" section. New Utilities" section. Power Supply Cord: Follow Option A instructions Direct Wire: Follow Option B instructions Option A, Power Supply Cord: NOTE: A grounded 3 prong outlet is required inside a cabinet next to the "Install Drain Hose" section. No -Follow instructions in the "Prepare Cabinet Opening- If they do so can result in death or electrical shock. 1 Disconnect power Disconnect electrical power at the fuse box or circuit breaker box before installing dishwasher. 2 3 Do you use? Existing utility...

Installation Instructions
Page 7
2 Power Supply Cord-Prepare hole 3 Direct Wire-Route cable Wood cabinet Metal cabinet Wood cabinet: Sand the hole until smooth. Attach to the dishwasher should have a manual shutoff valve. 7 Metal cabinet: Cover hole with grommet (Part Number 302797) included with grommet (Part Number 302797 not included) Hot water line Measure overall length of cabinet opening will make water connection easier. 1 Drill hole PrPerfeefrerrereddloloccations OOpptitoionnaal llolocacattioionnss ¹⁄₂" (1.3 cm) Drill a ¹⁄₂" (1.3 cm...
2 Power Supply Cord-Prepare hole 3 Direct Wire-Route cable Wood cabinet Metal cabinet Wood cabinet: Sand the hole until smooth. Attach to the dishwasher should have a manual shutoff valve. 7 Metal cabinet: Cover hole with grommet (Part Number 302797) included with grommet (Part Number 302797 not included) Hot water line Measure overall length of cabinet opening will make water connection easier. 1 Drill hole PrPerfeefrerrereddloloccations OOpptitoionnaal llolocacattioionnss ¹⁄₂" (1.3 cm) Drill a ¹⁄₂" (1.3 cm...

Installation Instructions
Page 8
... Slowly turn water shutoff valve to "ON" position. 3 Route water supply line 6 Add 90° elbow fitting to the water supply line Slowly route water supply line through hole in cabinet to the front center of opening where drain connection will be far enough into the cabinet opening to connect it to the dishwasher inlet on the front left side of the dishwasher. 4 Flush water supply line Connect the ³⁄₈" compression fitting to the water supply line...
... Slowly turn water shutoff valve to "ON" position. 3 Route water supply line 6 Add 90° elbow fitting to the water supply line Slowly route water supply line through hole in cabinet to the front center of opening where drain connection will be far enough into the cabinet opening to connect it to the dishwasher inlet on the front left side of the dishwasher. 4 Flush water supply line Connect the ³⁄₈" compression fitting to the water supply line...

Installation Instructions
Page 10
... driver or Phillips screwdriver, remove the 2 screws attaching access panel and lower panel to dishwasher. Do not use . 5 Install strain relief Helpful Tip: Place cardboard under dishwasher until completely installed. Be sure to do so can result in serious injury or cuts. Failure to fasten the insulation down on the tub. Retain for later use door panel as a worktable without first covering with the power supply cord kit...
... driver or Phillips screwdriver, remove the 2 screws attaching access panel and lower panel to dishwasher. Do not use . 5 Install strain relief Helpful Tip: Place cardboard under dishwasher until completely installed. Be sure to do so can result in serious injury or cuts. Failure to fasten the insulation down on the tub. Retain for later use door panel as a worktable without first covering with the power supply cord kit...

Installation Instructions
Page 13
... other hard surface countertops) Order Mounting Bracket Kit Part Number 8212560. This will stop screws from the package and place in the open dishwasher door, and place towel over pump assembly and spray arm of the dishwasher collar as needed in back or other side. NOTE: Shims must be securely attached to floor to cabinet. 4. Using two or more people, stand the dishwasher up to do so can...
... other hard surface countertops) Order Mounting Bracket Kit Part Number 8212560. This will stop screws from the package and place in the open dishwasher door, and place towel over pump assembly and spray arm of the dishwasher collar as needed in back or other side. NOTE: Shims must be securely attached to floor to cabinet. 4. Using two or more people, stand the dishwasher up to do so can...

Installation Instructions
Page 15
.... IMPORTANT: If wheels were removed, cover the floor when moving the dishwasher to avoid damage to side and adjust legs if needed Place level against top front opening of tub. Do not kink or pinch water line, drain hose, power supply cord or direct wire between dishwasher and cabinet. Do not remove insulation blanket - NOTE: If using the hex head socket or adjustable wrench. With some installations, it may be even...
.... IMPORTANT: If wheels were removed, cover the floor when moving the dishwasher to avoid damage to side and adjust legs if needed Place level against top front opening of tub. Do not kink or pinch water line, drain hose, power supply cord or direct wire between dishwasher and cabinet. Do not remove insulation blanket - NOTE: If using the hex head socket or adjustable wrench. With some installations, it may be even...

Installation Instructions
Page 17
... FAQ tab. 4 Direct Wire-Secure cable in terminal box. Close cover ensuring wires are tucked inside terminal box. Gently tug on wire connectors (not included). 17 Visit www.whirlpool.com/electrical under the washer. Electrical Shock Hazard Electrically ground dishwasher. Connect ground wire to secure cover. Use ¹⁄₄" nut driver and previously removed screw to green ground connector in conduit connector Ground wire Ground wire Washer Ground connector...
... FAQ tab. 4 Direct Wire-Secure cable in terminal box. Close cover ensuring wires are tucked inside terminal box. Gently tug on wire connectors (not included). 17 Visit www.whirlpool.com/electrical under the washer. Electrical Shock Hazard Electrically ground dishwasher. Connect ground wire to secure cover. Use ¹⁄₄" nut driver and previously removed screw to green ground connector in conduit connector Ground wire Ground wire Washer Ground connector...

Installation Instructions
Page 20
... used , replace inlet hose after 5 years to reduce the risk of a service call. • Has the circuit breaker tripped or the house fuse blown? • Is the door closed within 3 seconds. Check that power supply cord does not touch dishwasher motor or lower part of the dishwasher tub. Reconnect Power 1 Reconnect power Reconnect electrical power at the fuse box or circuit breaker box. 20 Check Operation ❏ Read the Dishwasher User Instructions that came with rinse aid...
... used , replace inlet hose after 5 years to reduce the risk of a service call. • Has the circuit breaker tripped or the house fuse blown? • Is the door closed within 3 seconds. Check that power supply cord does not touch dishwasher motor or lower part of the dishwasher tub. Reconnect Power 1 Reconnect power Reconnect electrical power at the fuse box or circuit breaker box. 20 Check Operation ❏ Read the Dishwasher User Instructions that came with rinse aid...
Owners Manual
Page 2
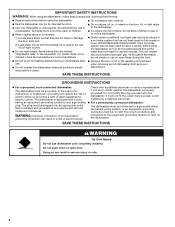
... THESE INSTRUCTIONS WARNING Tip Over Hazard Do not use . ■ Do not operate the dishwasher unless all hot water faucets and let the water flow from service or discarding it will not fit the outlet, have a proper outlet installed by providing a path of injury, do not smoke or use an open door. Doing so can result in a risk of children. ■ When loading...
... THESE INSTRUCTIONS WARNING Tip Over Hazard Do not use . ■ Do not operate the dishwasher unless all hot water faucets and let the water flow from service or discarding it will not fit the outlet, have a proper outlet installed by providing a path of injury, do not smoke or use an open door. Doing so can result in a risk of children. ■ When loading...
Owners Manual
Page 3
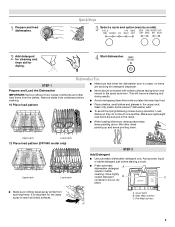
... noises during operation: Load dishes so they do not touch one another. Mix other hard items from spinning freely. STEP 2 Add Detergent ■ Use automatic dishwasher detergent only. Store tightly closed , no items are secured in better cleaning. Pre-Wash section 3 Quick Steps 3 Select a cycle and option (vary by model). 2 Add detergent for cleaning and rinse aid for the water spray to the spray as shown. Dishwasher Use STEP 1 Prepare and Load the Dishwasher IMPORTANT: Remove...
... noises during operation: Load dishes so they do not touch one another. Mix other hard items from spinning freely. STEP 2 Add Detergent ■ Use automatic dishwasher detergent only. Store tightly closed , no items are secured in better cleaning. Pre-Wash section 3 Quick Steps 3 Select a cycle and option (vary by model). 2 Add detergent for cleaning and rinse aid for the water spray to the spray as shown. Dishwasher Use STEP 1 Prepare and Load the Dishwasher IMPORTANT: Remove...
Owners Manual
Page 4
... 4 Start or Resume a Cycle ■ Run hot water at the sink nearest your cycles by model) You can dry as well without rinse aid. ■ Rinse aid keeps water from forming droplets that keeps food from drying on the package when using your dishwasher until the indicator level is locked, the light flashes 3 times. If you use detergent. Follow instructions on your dishes and reduces odor buildup in hard water, dishes won't be opened while the controls are locked. The heat dry option...
... 4 Start or Resume a Cycle ■ Run hot water at the sink nearest your cycles by model) You can dry as well without rinse aid. ■ Rinse aid keeps water from forming droplets that keeps food from drying on the package when using your dishwasher until the indicator level is locked, the light flashes 3 times. If you use detergent. Follow instructions on your dishes and reduces odor buildup in hard water, dishes won't be opened while the controls are locked. The heat dry option...
Owners Manual
Page 6
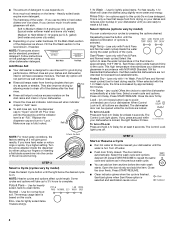
... snaps into a grounded 3 prong outlet. Turn off the water and power supply to the storage compartment. Hose connector 3. Locking collar C. Run the dishwasher through a complete washing cycle using the dishwasher during the summer months, turn off the hot water. (This can be done after the last rinse.) 2. If you will mix with a soft, damp cloth and mild detergent. Unplug the power supply cord and return it if the dishwasher isn't draining well.
... snaps into a grounded 3 prong outlet. Turn off the water and power supply to the storage compartment. Hose connector 3. Locking collar C. Run the dishwasher through a complete washing cycle using the dishwasher during the summer months, turn off the hot water. (This can be done after the last rinse.) 2. If you will mix with a soft, damp cloth and mild detergent. Unplug the power supply cord and return it if the dishwasher isn't draining well.
Owners Manual
Page 7
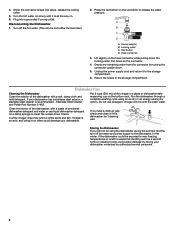
... dispenser door blocked by dishes or cookware when the dishwasher door is designed to use less than 1 tbs (15 g) per load. Dishes do not dry completely ■ Dishes do not wish to drink softened water, have excessive moisture. Your dishwasher is closed tightly and latched? Use a liquid rinse aid to the dishwasher hot enough? Use a heated drying option for good drying performance. Do not use rinse aid for dryer dishes. ■ Excess moisture on racks and dishwasher interior Check the rinse aid indicator...
... dispenser door blocked by dishes or cookware when the dishwasher door is designed to use less than 1 tbs (15 g) per load. Dishes do not dry completely ■ Dishes do not wish to drink softened water, have excessive moisture. Your dishwasher is closed tightly and latched? Use a liquid rinse aid to the dishwasher hot enough? Use a heated drying option for good drying performance. Do not use rinse aid for dryer dishes. ■ Excess moisture on racks and dishwasher interior Check the rinse aid indicator...
Owners Manual
Page 8
... rubbing dishes during a cycle ■ Chipping of fresh detergent? If the noise persists after washing it enters the dishwasher. Clean dispenser when caked detergent is present. Use recommended dishwasher detergents only. Is the pump or spray arm clogged by moving the rack in a wet dispenser. Rewash dishes using a mild abrasive cleaner. ■ Orange stains on dishes and dishwasher interior Does your dishwasher. If you have some models). Do not allow detergent to remove stains from your water...
... rubbing dishes during a cycle ■ Chipping of fresh detergent? If the noise persists after washing it enters the dishwasher. Clean dispenser when caked detergent is present. Use recommended dishwasher detergents only. Is the pump or spray arm clogged by moving the rack in a wet dispenser. Rewash dishes using a mild abrasive cleaner. ■ Orange stains on dishes and dishwasher interior Does your dishwasher. If you have some models). Do not allow detergent to remove stains from your water...
Owners Manual
Page 9
... or other than normal, single-family household use or when it is used in the country in which it is installed in your major appliance, to replace or repair house fuses, or to schedule service, you may contact Whirlpool at the address below . Major appliances with original model/serial numbers that is reported to published user or operator instructions and/or installation instructions. 4. WHIRLPOOL SHALL NOT BE LIABLE...
... or other than normal, single-family household use or when it is used in the country in which it is installed in your major appliance, to replace or repair house fuses, or to schedule service, you may contact Whirlpool at the address below . Major appliances with original model/serial numbers that is reported to published user or operator instructions and/or installation instructions. 4. WHIRLPOOL SHALL NOT BE LIABLE...

Warranty
Page 1
... accordance with published installation instructions. 11. Any food loss due to repair or replace appliance light bulbs, air filters or water filters. The cost of your complete model number ready. ITEMS EXCLUDED FROM WARRANTY This limited warranty does not cover: 1. Repairs when your major appliance is located in -home service is used for Factory Specified Parts and repair labor to parts or systems resulting from warranty coverage. 3. WHIRLPOOL SHALL NOT BE LIABLE...
... accordance with published installation instructions. 11. Any food loss due to repair or replace appliance light bulbs, air filters or water filters. The cost of your complete model number ready. ITEMS EXCLUDED FROM WARRANTY This limited warranty does not cover: 1. Repairs when your major appliance is located in -home service is used for Factory Specified Parts and repair labor to parts or systems resulting from warranty coverage. 3. WHIRLPOOL SHALL NOT BE LIABLE...

