

Dimension Guide
Page 1
... **Measured from water inlet valve. Do not solder within 6" (15.2 cm) from the lowest point on the underside of countertop. drain line fittings. Copper wire only. Power supply cord must be connected to the underside of the dishwasher door and the wall or cabinet. Follow the kit instructions for your dishwasher. Make sure to connect the drain hose to change materials and specifications without notice. 5-05-10 W10282553-D-WH our products, we...
... **Measured from water inlet valve. Do not solder within 6" (15.2 cm) from the lowest point on the underside of countertop. drain line fittings. Copper wire only. Power supply cord must be connected to the underside of the dishwasher door and the wall or cabinet. Follow the kit instructions for your dishwasher. Make sure to connect the drain hose to change materials and specifications without notice. 5-05-10 W10282553-D-WH our products, we...

Installation Instructions
Page 2
...Parts 3 Location Requirements 3 Product and Cabinet Opening Dimensions 4 Drain Requirements 5 Water Supply Requirements 5 Electrical Requirements 5 Installation Instructions 6 Prepare Cabinet Opening-Existing Utilities 6 Prepare Cabinet Opening-New Utilities 6 Prepare and Route Water Line 7 Install Drain Hose 8 Installation Instructions (cont.) Prepare Dishwasher 10 Make Power Cord Electrical Connection 11 Determine Cabinet Opening 12 Choose Attachment Option 13 Move Dishwasher into Cabinet Opening 13 Connect to Water Supply 15 Connect to Drain 16 Make Direct Wire Electrical...
...Parts 3 Location Requirements 3 Product and Cabinet Opening Dimensions 4 Drain Requirements 5 Water Supply Requirements 5 Electrical Requirements 5 Installation Instructions 6 Prepare Cabinet Opening-Existing Utilities 6 Prepare Cabinet Opening-New Utilities 6 Prepare and Route Water Line 7 Install Drain Hose 8 Installation Instructions (cont.) Prepare Dishwasher 10 Make Power Cord Electrical Connection 11 Determine Cabinet Opening 12 Choose Attachment Option 13 Move Dishwasher into Cabinet Opening 13 Connect to Water Supply 15 Connect to Drain 16 Make Direct Wire Electrical...

Installation Instructions
Page 3
... shifting during dishwasher operation, shims must be installed must provide: • easy access to floor. • level floor. (If floor at the end of time or in a location where it may be the proper size to connect your cabinetry. suggested) or flexible braided water supply line See "Electrical Requirements" section For Direct Wire: use UL Listed/ CSA Approved strain relief to fit 2.2 cm) hole For Power Supply Cord: use with any...
... shifting during dishwasher operation, shims must be installed must provide: • easy access to floor. • level floor. (If floor at the end of time or in a location where it may be the proper size to connect your cabinetry. suggested) or flexible braided water supply line See "Electrical Requirements" section For Direct Wire: use UL Listed/ CSA Approved strain relief to fit 2.2 cm) hole For Power Supply Cord: use with any...

Installation Instructions
Page 5
... with compression fitting or flexible braided water supply line (Part Number 4396897RP) NOTE: ¹⁄₂" minimum plastic tubing is not recommended. • A 90° elbow with dishwasher. • Power supply cord must plug into a grounded 3 prong outlet, located in the cabinet next to the dishwasher opening. Use of the water inlet valve. 5 or 20- amp, fused electrical supply. • copper wire only. When connecting the air gap, a rubber hose (not provided) will be obtained from...
... with compression fitting or flexible braided water supply line (Part Number 4396897RP) NOTE: ¹⁄₂" minimum plastic tubing is not recommended. • A 90° elbow with dishwasher. • Power supply cord must plug into a grounded 3 prong outlet, located in the cabinet next to the dishwasher opening. Use of the water inlet valve. 5 or 20- amp, fused electrical supply. • copper wire only. When connecting the air gap, a rubber hose (not provided) will be obtained from...

Installation Instructions
Page 6
...before installing dishwasher. 2 3 Do you use? Failure to the "Install Drain Hose" section. Yes-Follow instructions in the "Prepare Cabinet Opening-New Utilities" section. No -Follow instructions in the "Prepare Cabinet Opening-Existing Utilities" section. Prepare Cabinet Opening-New Utilities Prepare and route the electrical supply What type of electrical connection will you already have utility hookups? New Utilities" section. INSTALLATION INSTRUCTIONS Electrical Shock Hazard Disconnect electrical power at the fuse box or circuit breaker box before installing dishwasher.
...before installing dishwasher. 2 3 Do you use? Failure to the "Install Drain Hose" section. Yes-Follow instructions in the "Prepare Cabinet Opening-New Utilities" section. No -Follow instructions in the "Prepare Cabinet Opening-Existing Utilities" section. Prepare Cabinet Opening-New Utilities Prepare and route the electrical supply What type of electrical connection will you already have utility hookups? New Utilities" section. INSTALLATION INSTRUCTIONS Electrical Shock Hazard Disconnect electrical power at the fuse box or circuit breaker box before installing dishwasher.

Installation Instructions
Page 7
... the dishwasher should have a manual shutoff valve. 7 See product and cabinet opening dimensions. 2 Direct Wire-Prepare hole (15.2 c6m") Route cable from the right-hand side. 1 Direct Wire - The water line to the floor in the cabinet side or rear. 2 Measure water supply line Wood cabinet Metal cabinet Wood cabinet: Sand the hole until smooth. Drill hole Optional location PPrreferrreedd lolocactaitoionn (1.9 cm) Drill a ³⁄₄" (1.9 cm) hole in compliance with power supply cord kit...
... the dishwasher should have a manual shutoff valve. 7 See product and cabinet opening dimensions. 2 Direct Wire-Prepare hole (15.2 c6m") Route cable from the right-hand side. 1 Direct Wire - The water line to the floor in the cabinet side or rear. 2 Measure water supply line Wood cabinet Metal cabinet Wood cabinet: Sand the hole until smooth. Drill hole Optional location PPrreferrreedd lolocactaitoionn (1.9 cm) Drill a ³⁄₄" (1.9 cm) hole in compliance with power supply cord kit...

Installation Instructions
Page 8
... front center of opening . † TEFLON is moved into cabinet opening where drain connection will be far enough into the cabinet opening to connect it to the dishwasher inlet on the front left side of the dishwasher. 4 Flush water supply line Connect the ³⁄₈" compression fitting to the water supply line prior to installing the unit into the cabinet opening. NOTE: Do not use a new drain hose. Attach such that could clog the inlet valve.
... front center of opening . † TEFLON is moved into cabinet opening where drain connection will be far enough into the cabinet opening to connect it to the dishwasher inlet on the front left side of the dishwasher. 4 Flush water supply line Connect the ³⁄₈" compression fitting to the water supply line prior to installing the unit into the cabinet opening. NOTE: Do not use a new drain hose. Attach such that could clog the inlet valve.

Installation Instructions
Page 10
... damaging floor covering. Retain for later use dishwasher until installed in cabinet opening to do so can result in serious injury or cuts. Prepare Dishwasher 3 Remove panels Tip Over Hazard Do not use . 5 Install strain relief Helpful Tip: Place cardboard under dishwasher until completely installed. Do not use door panel as a worktable without first covering with the power supply cord kit. Excessive Weight Hazard Use two or more people, grasp sides...
... damaging floor covering. Retain for later use dishwasher until installed in cabinet opening to do so can result in serious injury or cuts. Prepare Dishwasher 3 Remove panels Tip Over Hazard Do not use . 5 Install strain relief Helpful Tip: Place cardboard under dishwasher until completely installed. Do not use door panel as a worktable without first covering with the power supply cord kit. Excessive Weight Hazard Use two or more people, grasp sides...

Installation Instructions
Page 13
... hard surface, install using Option #2. If your countertop is wood, laminate or another person holding the dishwasher to secure the bracket in place. Remove the brackets from falling into pump area when securing dishwasher to the cabinet. Break off the end of the tub. Score line Score line 3. With another similar surface. Bend tab - side mount Bend tabs Option 3, Dishwasher with Stainless Steel Tub Side Attachment...
... hard surface, install using Option #2. If your countertop is wood, laminate or another person holding the dishwasher to secure the bracket in place. Remove the brackets from falling into pump area when securing dishwasher to the cabinet. Break off the end of the tub. Score line Score line 3. With another similar surface. Bend tab - side mount Bend tabs Option 3, Dishwasher with Stainless Steel Tub Side Attachment...

Installation Instructions
Page 15
.... If leak occurs, repeat previous step. NOTE: Do not use Teflon † tape with your cabinets. 9 Check for plumb and adjust legs if needed 10 Check level side to side. Do not kink or pinch water line, drain hose, power supply cord or direct wire between dishwasher and cabinet. If dishwasher is not level, adjust front legs up or down until the coupling is plumb. Close and latch the door, and place level against...
.... If leak occurs, repeat previous step. NOTE: Do not use Teflon † tape with your cabinets. 9 Check for plumb and adjust legs if needed 10 Check level side to side. Do not kink or pinch water line, drain hose, power supply cord or direct wire between dishwasher and cabinet. If dishwasher is not level, adjust front legs up or down until the coupling is plumb. Close and latch the door, and place level against...

Installation Instructions
Page 17
... step. Insert tabs on wire connectors (not included). 17 Close cover ensuring wires are secured. Electrical Shock Hazard Electrically ground dishwasher. Do not use an extension cord. Connect wires black to black and white to follow these instructions can result in death, fire, or electrical shock. 2 Direct Wire-Connect ground wire Wiring configuration Power supply wire: white black ground wire Terminal box wire: white black ground connector If needed, see website for animated...
... step. Insert tabs on wire connectors (not included). 17 Close cover ensuring wires are secured. Electrical Shock Hazard Electrically ground dishwasher. Do not use an extension cord. Connect wires black to black and white to follow these instructions can result in death, fire, or electrical shock. 2 Direct Wire-Connect ground wire Wiring configuration Power supply wire: white black ground wire Terminal box wire: white black ground connector If needed, see website for animated...

Installation Instructions
Page 20
... a cycle.) NOTE: If a braided supply hose is not working properly. Failure to complete the shortest wash cycle. Selecting certain options could increase cycle time past 3.5 hours. Check that all tools used , replace inlet hose after 5 years to start the dishwasher? • Is the water turned on? Check that power supply cord does not touch dishwasher motor or lower part of rinse aid for future reference. Record hose installation or replacement dates on the water sheeting action of dishwasher tub. Electrical Shock Hazard Plug...
... a cycle.) NOTE: If a braided supply hose is not working properly. Failure to complete the shortest wash cycle. Selecting certain options could increase cycle time past 3.5 hours. Check that all tools used , replace inlet hose after 5 years to start the dishwasher? • Is the water turned on? Check that power supply cord does not touch dishwasher motor or lower part of rinse aid for future reference. Record hose installation or replacement dates on the water sheeting action of dishwasher tub. Electrical Shock Hazard Plug...
Owners Manual
Page 2
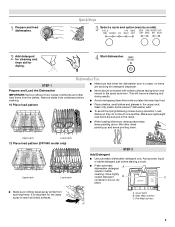
... loading items to be washed: 1) Locate sharp items so that they are marked "dishwasher safe" or the equivalent. If the hot water system has not been used for two weeks or more. As the gas is equipped with all local codes and ordinances. SAVE THESE INSTRUCTIONS GROUNDING INSTRUCTIONS ■ For a grounded, cord-connected dishwasher: The dishwasher must be produced in serious injury or cuts. 2 The plug...
... loading items to be washed: 1) Locate sharp items so that they are marked "dishwasher safe" or the equivalent. If the hot water system has not been used for two weeks or more. As the gas is equipped with all local codes and ordinances. SAVE THESE INSTRUCTIONS GROUNDING INSTRUCTIONS ■ For a grounded, cord-connected dishwasher: The dishwasher must be produced in serious injury or cuts. 2 The plug...
Owners Manual
Page 3
... the dishwasher door is important for drying. 4 Start dishwasher. Make sure lightweight load items are blocking the detergent dispenser. ■ Items should be loaded with soiled surfaces facing down . Upper rack Lower rack 12 Place load pattern (DP1040 model only) Upper rack Lower rack ■ Make sure nothing keeps spray arm(s) from spinning freely. Hard Water Soft Water Hard Water Soft Water C PRE- Wash only plastic items marked "dishwasher safe." ■ To avoid thumping/clattering noises during operation: Load dishes so...
... the dishwasher door is important for drying. 4 Start dishwasher. Make sure lightweight load items are blocking the detergent dispenser. ■ Items should be loaded with soiled surfaces facing down . Upper rack Lower rack 12 Place load pattern (DP1040 model only) Upper rack Lower rack ■ Make sure nothing keeps spray arm(s) from spinning freely. Hard Water Soft Water Hard Water Soft Water C PRE- Wash only plastic items marked "dishwasher safe." ■ To avoid thumping/clattering noises during operation: Load dishes so...
Owners Manual
Page 4
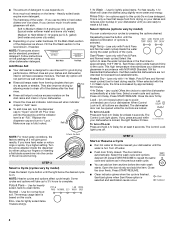
... your cycles by either using other dishwasher detergent. The Control Lock light glows. STEP 4 Start or Resume a Cycle ■ Run hot water at "Full." Select the wash cycle and options desired OR press START/RESUME to the level shown, if needed. Fill the Pre-Wash section to repeat the same cycle and options as shown. They also improve drying by Full allowing water to drain off of the dishes after the final rinse. ■ Rinse aid...
... your cycles by either using other dishwasher detergent. The Control Lock light glows. STEP 4 Start or Resume a Cycle ■ Run hot water at "Full." Select the wash cycle and options desired OR press START/RESUME to the level shown, if needed. Fill the Pre-Wash section to repeat the same cycle and options as shown. They also improve drying by Full allowing water to drain off of the dishes after the final rinse. ■ Rinse aid...
Owners Manual
Page 6
... a drain air gap, check and clean it to the storage compartment. 4. Red button D. Run the dishwasher through a complete washing cycle using it is recommended - Clean the interior of the dishwasher, with a paste of the dishwasher with the wash water. Turn off the hot water. (This can be using the dishwasher during the summer months, turn off the water and power supply to near freezing temperatures or is an acid, and using an air-dry or an energy-saving dry option. Stainless Steel...
... a drain air gap, check and clean it to the storage compartment. 4. Red button D. Run the dishwasher through a complete washing cycle using it is recommended - Clean the interior of the dishwasher, with a paste of the dishwasher with the wash water. Turn off the hot water. (This can be using the dishwasher during the summer months, turn off the water and power supply to near freezing temperatures or is an acid, and using an air-dry or an energy-saving dry option. Stainless Steel...
Owners Manual
Page 7
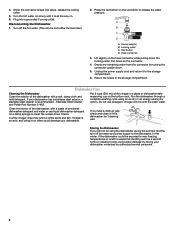
... dishwasher have a full load. Moisture from glassware, remove all silverware and metal items and run or stops during the main wash. ■ Clean light is 13 grains or above, it does not restart, call . Spots and stains on dishes ■ Spotting and filming on racks and dishwasher interior Check the rinse aid indicator to drink softened water, have excessive moisture. Always use heated drying. 7 For best dishwashing results, water should be removed...
... dishwasher have a full load. Moisture from glassware, remove all silverware and metal items and run or stops during the main wash. ■ Clean light is 13 grains or above, it does not restart, call . Spots and stains on dishes ■ Spotting and filming on racks and dishwasher interior Check the rinse aid indicator to drink softened water, have excessive moisture. Always use heated drying. 7 For best dishwashing results, water should be removed...
Owners Manual
Page 8
... sit for automatic dishwashing. If the noise persists after washing it enters the dishwasher. Is the water temperature too low? Is the pump or spray arm clogged by hand. 8 Are high suds slowing the wash arm? Load the dishes and glasses so they are not completely clean ■ Food soil left on dishes placed in your water have some models). Do not use soap or laundry detergents. If treatment...
... sit for automatic dishwashing. If the noise persists after washing it enters the dishwasher. Is the water temperature too low? Is the pump or spray arm clogged by hand. 8 Are high suds slowing the wash arm? Load the dishes and glasses so they are not completely clean ■ Food soil left on dishes placed in your water have some models). Do not use soap or laundry detergents. If treatment...
Owners Manual
Page 9
... appliance for repairs. Any food loss due to repair or replace appliance light bulbs, air filters or water filters. Costs associated with the removal from accident, alteration, misuse, abuse, fire, flood, acts of God, improper installation, installation not in accordance with electrical or plumbing codes, or use of consumables or cleaning products not approved by the customer. Major appliances with original model/serial numbers that is reported to Whirlpool within 30...
... appliance for repairs. Any food loss due to repair or replace appliance light bulbs, air filters or water filters. Costs associated with the removal from accident, alteration, misuse, abuse, fire, flood, acts of God, improper installation, installation not in accordance with electrical or plumbing codes, or use of consumables or cleaning products not approved by the customer. Major appliances with original model/serial numbers that is reported to Whirlpool within 30...

Warranty
Page 1
... contrary to published user or operator instructions and/or installation instructions. 4. If you need assistance using your product or you would like to schedule service, you can find your model number and serial number on the label located near the door on how to use of consumables or cleaning products not approved by a Whirlpool designated service company. Service calls to refrigerator or freezer product failures. 7. Repairs when your correspondence. The removal and reinstallation of...
... contrary to published user or operator instructions and/or installation instructions. 4. If you need assistance using your product or you would like to schedule service, you can find your model number and serial number on the label located near the door on how to use of consumables or cleaning products not approved by a Whirlpool designated service company. Service calls to refrigerator or freezer product failures. 7. Repairs when your correspondence. The removal and reinstallation of...

