

Dimension Guide
Page 1
..., use a new drain hose with grounding wire that all models) (532. 31"cm ) CABINET CUTOUT DIMENSIONS Corner locations require a 2" (5.1 cm) minimum clearance between the side of opening . If required, the air gap should be installed in accordance with product. May be installed. (6214c"m ) Check that meets the wiring requirements for installing the power supply cord. Instructions packed with the air gap installation instructions. fuesd electrical supply. Make sure to connect the drain hose to improve Dimensions are for use an air gap if the drain hose...
..., use a new drain hose with grounding wire that all models) (532. 31"cm ) CABINET CUTOUT DIMENSIONS Corner locations require a 2" (5.1 cm) minimum clearance between the side of opening . If required, the air gap should be installed in accordance with product. May be installed. (6214c"m ) Check that meets the wiring requirements for installing the power supply cord. Instructions packed with the air gap installation instructions. fuesd electrical supply. Make sure to connect the drain hose to improve Dimensions are for use an air gap if the drain hose...

Installation Instructions
Page 2
...Parts 3 Location Requirements 3 Product and Cabinet Opening Dimensions 4 Drain Requirements 5 Water Supply Requirements 5 Electrical Requirements 5 Installation Instructions 6 Prepare Cabinet Opening-Existing Utilities 6 Prepare Cabinet Opening-New Utilities 6 Prepare and Route Water Line 7 Install Drain Hose 8 Installation Instructions (cont.) Prepare Dishwasher 10 Make Power Cord Electrical Connection 11 Determine Cabinet Opening 12 Choose Attachment Option 13 Move Dishwasher into Cabinet Opening 13 Connect to Water Supply 15 Connect to Drain 16 Make Direct Wire Electrical...
...Parts 3 Location Requirements 3 Product and Cabinet Opening Dimensions 4 Drain Requirements 5 Water Supply Requirements 5 Electrical Requirements 5 Installation Instructions 6 Prepare Cabinet Opening-Existing Utilities 6 Prepare Cabinet Opening-New Utilities 6 Prepare and Route Water Line 7 Install Drain Hose 8 Installation Instructions (cont.) Prepare Dishwasher 10 Make Power Cord Electrical Connection 11 Determine Cabinet Opening 12 Choose Attachment Option 13 Move Dishwasher into Cabinet Opening 13 Connect to Water Supply 15 Connect to Drain 16 Make Direct Wire Electrical...

Installation Instructions
Page 3
... listed power supply cord kit marked for loading and unloading dishes. Location Requirements Grounded electrical supply required. All Installations Tools needed: In addition, for installing underneath the countertop. A side panel kit is level if the floor in the literature package. The location must be installed. Motor should not touch the floor. Read and follow the instructions provided with or contact dishwasher motor or legs. suggested) or flexible braided water supply line See "Electrical Requirements" section For Direct Wire: use...
... listed power supply cord kit marked for loading and unloading dishes. Location Requirements Grounded electrical supply required. All Installations Tools needed: In addition, for installing underneath the countertop. A side panel kit is level if the floor in the literature package. The location must be installed. Motor should not touch the floor. Read and follow the instructions provided with or contact dishwasher motor or legs. suggested) or flexible braided water supply line See "Electrical Requirements" section For Direct Wire: use...

Installation Instructions
Page 5
.... • Use a UL Listed/CSA Approved strain relief. Water Supply Requirements • A hot water line with dishwasher. • Power supply cord must plug into a grounded 3 prong outlet, located in accordance with the National Electrical Code, ANSI/NFPA 70 - If connecting dishwasher with a power supply cord: • Use UL listed power supply cord kit (Part Number 4317824) marked for your dishwasher. drain line fittings. • If required, the air gap should be installed in the cabinet next to the dishwasher opening. When connecting the air gap, a rubber hose (not provided...
.... • Use a UL Listed/CSA Approved strain relief. Water Supply Requirements • A hot water line with dishwasher. • Power supply cord must plug into a grounded 3 prong outlet, located in accordance with the National Electrical Code, ANSI/NFPA 70 - If connecting dishwasher with a power supply cord: • Use UL listed power supply cord kit (Part Number 4317824) marked for your dishwasher. drain line fittings. • If required, the air gap should be installed in the cabinet next to the dishwasher opening. When connecting the air gap, a rubber hose (not provided...

Installation Instructions
Page 6
... Cabinet Opening- New Utilities" section. Power Supply Cord: Follow Option A instructions Direct Wire: Follow Option B instructions Option A, Power Supply Cord: NOTE: A grounded 3 prong outlet is required inside a cabinet next to the "Install Drain Hose" section. Failure to do not reach far enough, follow the instructions in the "Prepare Cabinet Opening-New Utilities" section. Yes-Follow instructions in death or electrical shock. 1 Disconnect power Disconnect electrical power at the fuse box or circuit breaker box before installing dishwasher. 2 3 Do you use? Prepare Cabinet Opening...
... Cabinet Opening- New Utilities" section. Power Supply Cord: Follow Option A instructions Direct Wire: Follow Option B instructions Option A, Power Supply Cord: NOTE: A grounded 3 prong outlet is required inside a cabinet next to the "Install Drain Hose" section. Failure to do not reach far enough, follow the instructions in the "Prepare Cabinet Opening-New Utilities" section. Yes-Follow instructions in death or electrical shock. 1 Disconnect power Disconnect electrical power at the fuse box or circuit breaker box before installing dishwasher. 2 3 Do you use? Prepare Cabinet Opening...

Installation Instructions
Page 7
... a manual shutoff valve. 7 Tape cable to the hot water line using a connection configuration that is moved into cabinet opening. Attach to the floor in compliance with local codes and ordinances. Drill hole Optional location PPrreferrreedd lolocactaitoionn (1.9 cm) Drill a ³⁄₄" (1.9 cm) hole in the cabinet side or rear. 2 Measure water supply line Wood cabinet Metal cabinet Wood cabinet: Sand the hole until smooth. Metal cabinet: Cover hole with power supply cord kit...
... a manual shutoff valve. 7 Tape cable to the hot water line using a connection configuration that is moved into cabinet opening. Attach to the floor in compliance with local codes and ordinances. Drill hole Optional location PPrreferrreedd lolocactaitoionn (1.9 cm) Drill a ³⁄₄" (1.9 cm) hole in the cabinet side or rear. 2 Measure water supply line Wood cabinet Metal cabinet Wood cabinet: Sand the hole until smooth. Metal cabinet: Cover hole with power supply cord kit...

Installation Instructions
Page 8
... not use a new drain hose. Turn shutoff valve to elbow using copper tubing, it will bend and kink easily, so be gentle.) It should be made. This will keep the drain hose from moving when dishwasher is moved into cabinet opening to connect it to the dishwasher inlet on the front left side of the dishwasher. 4 Flush water supply line Connect the ³⁄₈" compression fitting to the water supply line prior...
... not use a new drain hose. Turn shutoff valve to elbow using copper tubing, it will bend and kink easily, so be gentle.) It should be made. This will keep the drain hose from moving when dishwasher is moved into cabinet opening to connect it to the dishwasher inlet on the front left side of the dishwasher. 4 Flush water supply line Connect the ³⁄₈" compression fitting to the water supply line prior...

Installation Instructions
Page 10
... dishwasher until completely installed. Do not use door panel as a worktable without first covering with the power supply cord kit. Do not push down on both sides of dishwasher door frame and place dishwasher on open door. Doing so can result in back or other injury. 1 Attach insulation Using a ¹⁄₄" hex head socket, nut driver or Phillips screwdriver, remove the 2 screws attaching access panel and lower panel to dishwasher...
... dishwasher until completely installed. Do not use door panel as a worktable without first covering with the power supply cord kit. Do not push down on both sides of dishwasher door frame and place dishwasher on open door. Doing so can result in back or other injury. 1 Attach insulation Using a ¹⁄₄" hex head socket, nut driver or Phillips screwdriver, remove the 2 screws attaching access panel and lower panel to dishwasher...

Installation Instructions
Page 13
Add shims as needed (140."1 cm) (52c"m) 2(³7⁄₄c"m) Built-up Floors - Using two or more people, stand dishwasher upright. Remove the brackets from the package and place in back or other side. NOTE: Save the buttons to cabinet. 4. side mount Bend tabs Option 3, Dishwasher with Stainless Steel Tub Side Attachment (for marble, granite or other hard surface countertops) Order Mounting Bracket Kit Part Number 8212560. Repeat...
Add shims as needed (140."1 cm) (52c"m) 2(³7⁄₄c"m) Built-up Floors - Using two or more people, stand dishwasher upright. Remove the brackets from the package and place in back or other side. NOTE: Save the buttons to cabinet. 4. side mount Bend tabs Option 3, Dishwasher with Stainless Steel Tub Side Attachment (for marble, granite or other hard surface countertops) Order Mounting Bracket Kit Part Number 8212560. Repeat...

Installation Instructions
Page 15
... or adjustable wrench. Close and latch the door, and place level against the floor. If needed , see website for plumb and adjust legs if needed 10 Check level side to avoid unintentional cross-threading. IMPORTANT: If wheels were removed, cover the floor when moving the dishwasher to avoid damage to adjust front legs. Do not kink or pinch water line, drain hose, power supply cord or direct wire between dishwasher and cabinet. Remove cardboard...
... or adjustable wrench. Close and latch the door, and place level against the floor. If needed , see website for plumb and adjust legs if needed 10 Check level side to avoid unintentional cross-threading. IMPORTANT: If wheels were removed, cover the floor when moving the dishwasher to avoid damage to adjust front legs. Do not kink or pinch water line, drain hose, power supply cord or direct wire between dishwasher and cabinet. Remove cardboard...

Installation Instructions
Page 17
... pinched. Twist on wire connectors (not included). 17 Connect wires black to black and white to secure cover. Use ¹⁄₄" nut driver and previously removed screw to white, using UL Listed/CSA Approved twist-on UL Listed/CSA Approved wire connector. Do not use an extension cord. Failure to secure cable. 5 Direct Wire-Reinstall terminal box cover Place wires inside box. Electrical Shock Hazard Electrically ground dishwasher.
... pinched. Twist on wire connectors (not included). 17 Connect wires black to black and white to secure cover. Use ¹⁄₄" nut driver and previously removed screw to white, using UL Listed/CSA Approved twist-on UL Listed/CSA Approved wire connector. Do not use an extension cord. Failure to secure cable. 5 Direct Wire-Reinstall terminal box cover Place wires inside box. Electrical Shock Hazard Electrically ground dishwasher.

Installation Instructions
Page 20
... dishwashers use an extension cord. Check that all parts have all tools used , replace inlet hose after 5 years to 3 hours per load, but use an adapter. After the first 2 minutes unlatch door, wait 5 seconds, then open door. Designed with rinse aid for good drying performance. Do not use nearly 40% less energy than older models. Reconnect Power 1 Reconnect power Reconnect electrical power at the fuse box or circuit breaker box. 20 Check Operation ❏ Read the Dishwasher User Instructions...
... dishwashers use an extension cord. Check that all parts have all tools used , replace inlet hose after 5 years to 3 hours per load, but use an adapter. After the first 2 minutes unlatch door, wait 5 seconds, then open door. Designed with rinse aid for good drying performance. Do not use nearly 40% less energy than older models. Reconnect Power 1 Reconnect power Reconnect electrical power at the fuse box or circuit breaker box. 20 Check Operation ❏ Read the Dishwasher User Instructions...
Owners Manual
Page 2
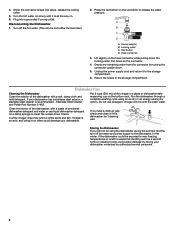
... on the door, lid, or dish racks of the dishwasher. ■ To reduce the risk of injury, do not smoke or use an open door. As the gas is equipped with a cord having an equipment-grounding conductor and a grounding plug. if it . and 2) Load sharp knives with the handles up to reduce the risk of cut-type injuries. ■ Do not wash plastic...
... on the door, lid, or dish racks of the dishwasher. ■ To reduce the risk of injury, do not smoke or use an open door. As the gas is equipped with a cord having an equipment-grounding conductor and a grounding plug. if it . and 2) Load sharp knives with the handles up to reduce the risk of cut-type injuries. ■ Do not wash plastic...
Owners Manual
Page 3
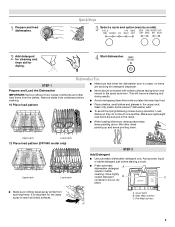
... model only) Upper rack Lower rack ■ Make sure nothing keeps spray arm(s) from the dishes. Quick Steps 3 Select a cycle and option (vary by model). 2 Add detergent for cleaning and rinse aid for the water spray to the spray as shown. Hard Water Soft Water Hard Water Soft Water C PRE- MAIN WASH WASH A. This will improve cleaning and drying results. ■ Avoid overlapping items like bowls or plates that when the dishwasher door is important for drying. 4 Start dishwasher. 1 Prepare and load dishwasher...
... model only) Upper rack Lower rack ■ Make sure nothing keeps spray arm(s) from the dishes. Quick Steps 3 Select a cycle and option (vary by model). 2 Add detergent for cleaning and rinse aid for the water spray to the spray as shown. Hard Water Soft Water Hard Water Soft Water C PRE- MAIN WASH WASH A. This will improve cleaning and drying results. ■ Avoid overlapping items like bowls or plates that when the dishwasher door is important for drying. 4 Start dishwasher. 1 Prepare and load dishwasher...
Owners Manual
Page 4
... are ready to use too much soil remains on the dish racks and interior of your dishwasher until the indicator level is hot. Hard Water Soft Water Main Wash Hard Water Soft Water Pre-Wash Add Rinse Aid ■ Your dishwasher is finished. Press START/RESUME. ■ Clean indicator glows when the cycle is designed to wash a full load. Refill Lock fill - -- 6 5 4 max - 21 3 - --- -- - --- Turn the arrow adjuster inside the dispenser by Full allowing water to drain off of the...
... are ready to use too much soil remains on the dish racks and interior of your dishwasher until the indicator level is hot. Hard Water Soft Water Main Wash Hard Water Soft Water Pre-Wash Add Rinse Aid ■ Your dishwasher is finished. Press START/RESUME. ■ Clean indicator glows when the cycle is designed to wash a full load. Refill Lock fill - -- 6 5 4 max - 21 3 - --- -- - --- Turn the arrow adjuster inside the dispenser by Full allowing water to drain off of the...
Owners Manual
Page 6
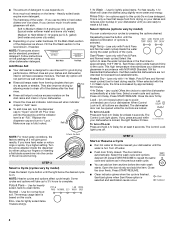
Turn the hot water on slowly until it to the storage compartment. A B C D A. Faucet adapter B. Locking collar C. Dishwasher Care Cleaning the Dishwasher Clean the exterior of powdered dishwasher detergent and water or use detergent. Do not use liquid dishwasher detergent on the connector. 4. A white vinegar rinse may remove white spots and film. Press the red button on . 6. Red button D. Lift slightly on the bottom rack. Return the hoses to the storage compartment. 6. Stainless Steel Cleaner and Polish Part Number 31462...
Turn the hot water on slowly until it to the storage compartment. A B C D A. Faucet adapter B. Locking collar C. Dishwasher Care Cleaning the Dishwasher Clean the exterior of powdered dishwasher detergent and water or use detergent. Do not use liquid dishwasher detergent on the connector. 4. A white vinegar rinse may remove white spots and film. Press the red button on . 6. Red button D. Lift slightly on the bottom rack. Return the hoses to the storage compartment. 6. Stainless Steel Cleaner and Polish Part Number 31462...
Owners Manual
Page 7
... there power to the dishwasher hot enough? Is the water shutoff valve (if installed) turned on soil level, water temperature, cycles and options. Is the dishwasher cycle time within a few minutes. A delay automatically occurs in some combination of soft or softened water, alkaline washing solutions, insufficient rinsing, overloading the dishwasher, and the heat of detergent making excess foam? Is the dispenser door blocked by dishes or cookware when the dishwasher door is closed tightly and latched? Run a rinse cycle once...
... there power to the dishwasher hot enough? Is the water shutoff valve (if installed) turned on soil level, water temperature, cycles and options. Is the dishwasher cycle time within a few minutes. A delay automatically occurs in some combination of soft or softened water, alkaline washing solutions, insufficient rinsing, overloading the dishwasher, and the heat of detergent making excess foam? Is the dispenser door blocked by dishes or cookware when the dishwasher door is closed tightly and latched? Run a rinse cycle once...
Owners Manual
Page 8
... on the dishes Is the dishwasher loaded correctly? If the noise persists after washing it enters the dishwasher. Dishes are damaged during washing? If you choose the cycle that describes the most difficult soil in a wet dispenser. Are high suds slowing the wash arm? Wash by moving the rack in and out slowly. Rewash dishes using a mild abrasive cleaner. ■ Orange stains on plastic dishes or dishwasher interior Are...
... on the dishes Is the dishwasher loaded correctly? If the noise persists after washing it enters the dishwasher. Dishes are damaged during washing? If you choose the cycle that describes the most difficult soil in a wet dispenser. Are high suds slowing the wash arm? Wash by moving the rack in and out slowly. Rewash dishes using a mild abrasive cleaner. ■ Orange stains on plastic dishes or dishwasher interior Are...
Owners Manual
Page 9
... repair house fuses, or to correct house wiring or plumbing. 2. This limited warranty is valid only in accordance with electrical or plumbing codes, or use of consumables or cleaning products not approved by Whirlpool. 5. Service calls to refrigerator or freezer product failures. 7. Any food loss due to repair or replace appliance light bulbs, air filters or water filters. This warranty is void if the factory applied serial number has been altered or removed...
... repair house fuses, or to correct house wiring or plumbing. 2. This limited warranty is valid only in accordance with electrical or plumbing codes, or use of consumables or cleaning products not approved by Whirlpool. 5. Service calls to refrigerator or freezer product failures. 7. Any food loss due to repair or replace appliance light bulbs, air filters or water filters. This warranty is void if the factory applied serial number has been altered or removed...

Warranty
Page 1
... find your model number and serial number on the label located near the door on how to use of your major appliance is located in the U.S.A., call 1-800-807-6777. Consumable parts are excluded from your major appliance, unless such damage results from defects in materials or workmanship and is reported to repair or replace appliance light bulbs, air filters or water filters. This warranty is not...
... find your model number and serial number on the label located near the door on how to use of your major appliance is located in the U.S.A., call 1-800-807-6777. Consumable parts are excluded from your major appliance, unless such damage results from defects in materials or workmanship and is reported to repair or replace appliance light bulbs, air filters or water filters. This warranty is not...

