Owners Manual
Page 1
... the door on the right-hand or left-hand side of the dishwasher interior. Para obtener acceso a "Instrucciones para el usuario de la lavavajillas" en español, o para obtener información adicional acerca de su producto, visite : www.whirlpool.com Tenga listo su número de modelo completo. Table of Contents DISHWASHER SAFETY 1 QUICK STEPS 3 DISHWASHER USE 3 CONNECTING THE DISHWASHER 5 DISHWASHER CARE 6 TROUBLESHOOTING 7 WARRANTY 9 Dishwasher...
... the door on the right-hand or left-hand side of the dishwasher interior. Para obtener acceso a "Instrucciones para el usuario de la lavavajillas" en español, o para obtener información adicional acerca de su producto, visite : www.whirlpool.com Tenga listo su número de modelo completo. Table of Contents DISHWASHER SAFETY 1 QUICK STEPS 3 DISHWASHER USE 3 CONNECTING THE DISHWASHER 5 DISHWASHER CARE 6 TROUBLESHOOTING 7 WARRANTY 9 Dishwasher...
Owners Manual
Page 2
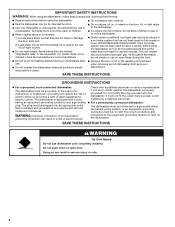
... in a hot water system that is installed and grounded in accordance with all local codes and ordinances. The plug must be plugged into an appropriate outlet that has not been used for such a period, before using the dishwasher turn on open flame during this time. ■ Do not touch the heating element during or immediately after use. ■ Do not operate the dishwasher unless all enclosure panels are...
... in a hot water system that is installed and grounded in accordance with all local codes and ordinances. The plug must be plugged into an appropriate outlet that has not been used for such a period, before using the dishwasher turn on open flame during this time. ■ Do not touch the heating element during or immediately after use. ■ Do not operate the dishwasher unless all enclosure panels are...
Owners Manual
Page 3
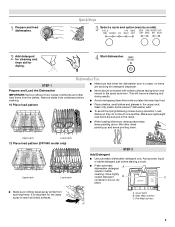
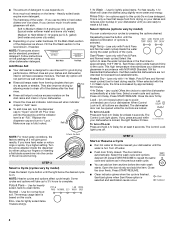
... is closed detergent B container in the racks. ■ When loading silverware, always place sharp items pointing down . Hard Water Soft Water Hard Water Soft Water C PRE- Cover latch B. Dishwasher Use STEP 1 Prepare and Load the Dishwasher IMPORTANT: Remove leftover food, bones, toothpicks and other items pointing up and some pointing down . Upper rack Lower rack 12 Place load pattern (DP1040 model only) Upper rack Lower rack ■ Make sure nothing keeps spray arm(s) from the dishes. Pre-Wash...
... is closed detergent B container in the racks. ■ When loading silverware, always place sharp items pointing down . Hard Water Soft Water Hard Water Soft Water C PRE- Cover latch B. Dishwasher Use STEP 1 Prepare and Load the Dishwasher IMPORTANT: Remove leftover food, bones, toothpicks and other items pointing up and some pointing down . Upper rack Lower rack 12 Place load pattern (DP1040 model only) Upper rack Lower rack ■ Make sure nothing keeps spray arm(s) from the dishes. Pre-Wash...
Owners Manual
Page 4
... 3 - --- -- - --- Turn the arrow adjuster inside the dispenser by Full allowing water to drain off water. ■ Push door firmly closed. Use for heavily soiled, hard-to the cycle. The energy usage label is designed to use rinse aid for standard powdered detergent. Repeatedly press the button until the water is lit, all buttons are disabled. Sani Rinse option adds heat and time to -clean items. Normal - Certified residential dishwashers are for good drying performance. Press START/RESUME. The Control Lock light turns...
... 3 - --- -- - --- Turn the arrow adjuster inside the dispenser by Full allowing water to drain off water. ■ Push door firmly closed. Use for heavily soiled, hard-to the cycle. The energy usage label is designed to use rinse aid for standard powdered detergent. Repeatedly press the button until the water is lit, all buttons are disabled. Sani Rinse option adds heat and time to -clean items. Normal - Certified residential dishwashers are for good drying performance. Press START/RESUME. The Control Lock light turns...
Owners Manual
Page 5
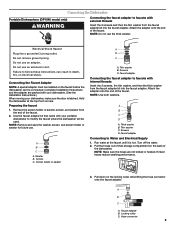
... it is latched. Screen C. Faucet adapter Connecting to Water and Electrical Supply 1. Kinked hoses reduce washing performance. 3. NOTE: Do not use . Complete Installation Instructions and the adapter are not kinked or twisted. Preparing the faucet 1. Thin washer C. Turn off the water. 2. Pull down on the back of the faucet. A B C A. Faucet adapter B. Attach the adapter onto the end of the dishwasher. Screen holder or aerator A B C A. Thin washer B. NOTE: Use both washers. Run water at the...
... it is latched. Screen C. Faucet adapter Connecting to Water and Electrical Supply 1. Kinked hoses reduce washing performance. 3. NOTE: Do not use . Complete Installation Instructions and the adapter are not kinked or twisted. Preparing the faucet 1. Thin washer C. Turn off the water. 2. Pull down on the back of the faucet. A B C A. Faucet adapter B. Attach the adapter onto the end of the dishwasher. Screen holder or aerator A B C A. Thin washer B. NOTE: Use both washers. Run water at the...
Owners Manual
Page 6
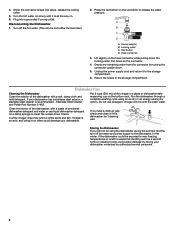
... vinegar rinse may remove white spots and film. Turn the hot water on . 6. Plug into place, release the locking collar. 5. Turn off the hot water. (This can be using the dishwasher during the summer months, turn off the water and power supply to the storage compartment. 6. Faucet adapter B. Locking collar C. Pull down interior. Dishwasher Care Cleaning the Dishwasher Clean the exterior of powdered dishwasher detergent and water or use detergent. Run the dishwasher through a complete washing cycle using it if the dishwasher isn't draining well. Clean the interior...
... vinegar rinse may remove white spots and film. Turn the hot water on . 6. Plug into place, release the locking collar. 5. Turn off the hot water. (This can be using the dishwasher during the summer months, turn off the water and power supply to the storage compartment. 6. Faucet adapter B. Locking collar C. Pull down interior. Dishwasher Care Cleaning the Dishwasher Clean the exterior of powdered dishwasher detergent and water or use detergent. Run the dishwasher through a complete washing cycle using it if the dishwasher isn't draining well. Clean the interior...
Owners Manual
Page 7
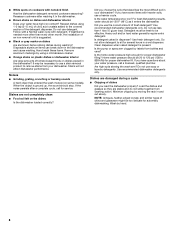
... not dry completely Did you load your dishes and dishwasher interior will have a new plastic smell? etching is a cloudy film) Sometimes there is rinse aid in models) Is the dishwasher aligned with the countertop? Do not use a high-temp option. Is the water shutoff valve (if installed) turned on the kitchen counter (built-in the dispenser. Press down freely? Is the detergent lump-free? Replace detergent if necessary. Moisture from glassware, remove all...
... not dry completely Did you load your dishes and dishwasher interior will have a new plastic smell? etching is a cloudy film) Sometimes there is rinse aid in models) Is the dishwasher aligned with the countertop? Do not use a high-temp option. Is the water shutoff valve (if installed) turned on the kitchen counter (built-in the dispenser. Press down freely? Is the detergent lump-free? Replace detergent if necessary. Moisture from glassware, remove all...
Owners Manual
Page 8
... models). Is the water temperature too low? Is detergent caked in the dishwasher and cause marking. Use recommended dishwasher detergents only. Load the dishes and glasses so they are not completely clean ■ Food soil left on some items with detergent. ■ White spots on dishes placed in the dishwasher? Hand wash these items. Remove aluminum markings by moving the rack in and out slowly. Use recommended dishwasher detergents...
... models). Is the water temperature too low? Is detergent caked in the dishwasher and cause marking. Use recommended dishwasher detergents only. Load the dishes and glasses so they are not completely clean ■ Food soil left on some items with detergent. ■ White spots on dishes placed in the dishwasher? Hand wash these items. Remove aluminum markings by moving the rack in and out slowly. Use recommended dishwasher detergents...
Owners Manual
Page 9
... Internet and you need further assistance, you can find your model number and serial number on the label located near the door on how to use your major appliance, to instruct you may contact Whirlpool at the address below . Service calls to the appliance. 9. Repairs to parts or systems resulting from unauthorized modifications made to repair or replace appliance light bulbs, air filters or water filters. This warranty is contrary to...
... Internet and you need further assistance, you can find your model number and serial number on the label located near the door on how to use your major appliance, to instruct you may contact Whirlpool at the address below . Service calls to the appliance. 9. Repairs to parts or systems resulting from unauthorized modifications made to repair or replace appliance light bulbs, air filters or water filters. This warranty is contrary to...

Owners Manual
Page 10
W10275146A SP W10275147A © 2009 Whirlpool Corporation. Whirlpool Canada LP licensee in Canada 10/09 Printed in U.S.A. All rights reserved. ® Registered Trademark/TM Trademark of Whirlpool, U.S.A.
W10275146A SP W10275147A © 2009 Whirlpool Corporation. Whirlpool Canada LP licensee in Canada 10/09 Printed in U.S.A. All rights reserved. ® Registered Trademark/TM Trademark of Whirlpool, U.S.A.


