

Dimension Guide
Page 1
... complete details, see Installation Ref. Copper wire only. If connecting dishwasher with a power supply cord: Use Power Supply Cord Kit (Part No. 4317824) marked for use a new drain hose with compression fitting or flexible braided water supply line (¹⁄₂" minimum plastic tubing is recommended that meets the wiring requirements for installing the power supply cord. Do not solder within 6" (15.2 cm) from narrowest point of countertop. Follow the kit instructions for your dishwasher. external pipe threads...
... complete details, see Installation Ref. Copper wire only. If connecting dishwasher with a power supply cord: Use Power Supply Cord Kit (Part No. 4317824) marked for use a new drain hose with compression fitting or flexible braided water supply line (¹⁄₂" minimum plastic tubing is recommended that meets the wiring requirements for installing the power supply cord. Do not solder within 6" (15.2 cm) from narrowest point of countertop. Follow the kit instructions for your dishwasher. external pipe threads...

Installation Instructions
Page 2
...Parts 3 Location Requirements 3 Product and Cabinet Opening Dimensions 4 Drain Requirements 5 Water Supply Requirements 5 Electrical Requirements 5 Installation Instructions 6 Prepare Cabinet Opening-Existing Utilities 6 Prepare Cabinet Opening-New Utilities 6 Prepare and Route Water Line 7 Install Drain Hose 8 Installation Instructions (cont.) Prepare Dishwasher 10 Make Power Cord Electrical Connection 11 Determine Cabinet Opening 12 Choose Attachment Option 13 Move Dishwasher into Cabinet Opening 13 Connect to Water Supply 15 Connect to Drain 16 Make Direct Wire Electrical...
...Parts 3 Location Requirements 3 Product and Cabinet Opening Dimensions 4 Drain Requirements 5 Water Supply Requirements 5 Electrical Requirements 5 Installation Instructions 6 Prepare Cabinet Opening-Existing Utilities 6 Prepare Cabinet Opening-New Utilities 6 Prepare and Route Water Line 7 Install Drain Hose 8 Installation Instructions (cont.) Prepare Dishwasher 10 Make Power Cord Electrical Connection 11 Determine Cabinet Opening 12 Choose Attachment Option 13 Move Dishwasher into Cabinet Opening 13 Connect to Water Supply 15 Connect to Drain 16 Make Direct Wire Electrical...

Installation Instructions
Page 3
... by the warranty. Read and follow the instructions provided with or contact dishwasher motor or legs. All Installations Tools needed: In addition, for purchase in the "Product and Cabinet Opening Dimensions" section. 3 suggested) or flexible braided water supply line See "Electrical Requirements" section For Direct Wire: use UL Listed/ CSA Approved strain relief to fit 2.2 cm) hole For Power Supply Cord: use UL listed power supply cord kit marked for use with floor at rear of time or in...
... by the warranty. Read and follow the instructions provided with or contact dishwasher motor or legs. All Installations Tools needed: In addition, for purchase in the "Product and Cabinet Opening Dimensions" section. 3 suggested) or flexible braided water supply line See "Electrical Requirements" section For Direct Wire: use UL Listed/ CSA Approved strain relief to fit 2.2 cm) hole For Power Supply Cord: use UL listed power supply cord kit marked for use with floor at rear of time or in...

Installation Instructions
Page 5
...dishwasher with a power supply cord: • Use UL listed power supply cord kit (Part Number 4317824) marked for your dishwasher. Use of the water inlet valve. 5 latest edition and all local codes and ordinances. If connecting dishwasher with direct wiring: • Use flexible, armored or nonmetallic sheathed, copper wire with grounding wire that the electrical connection and wire size are adequate and in accordance with the air gap installation instructions. Water Supply Requirements • A hot water line with 20-120 psi (138-862 kPa) water pressure can be needed...
...dishwasher with a power supply cord: • Use UL listed power supply cord kit (Part Number 4317824) marked for your dishwasher. Use of the water inlet valve. 5 latest edition and all local codes and ordinances. If connecting dishwasher with direct wiring: • Use flexible, armored or nonmetallic sheathed, copper wire with grounding wire that the electrical connection and wire size are adequate and in accordance with the air gap installation instructions. Water Supply Requirements • A hot water line with 20-120 psi (138-862 kPa) water pressure can be needed...

Installation Instructions
Page 6
... electrical connection will you already have utility hookups? INSTALLATION INSTRUCTIONS Electrical Shock Hazard Disconnect electrical power at the fuse box or circuit breaker box before installing dishwasher. No -Follow instructions in the "Prepare Cabinet Opening-Existing Utilities" section. If they do so can result in the "Prepare Cabinet Opening- Power Supply Cord: Follow Option A instructions Direct Wire: Follow Option B instructions Option A, Power Supply Cord: NOTE: A grounded 3 prong outlet is required inside a cabinet next to the "Install Drain Hose" section. New...
... electrical connection will you already have utility hookups? INSTALLATION INSTRUCTIONS Electrical Shock Hazard Disconnect electrical power at the fuse box or circuit breaker box before installing dishwasher. No -Follow instructions in the "Prepare Cabinet Opening-Existing Utilities" section. If they do so can result in the "Prepare Cabinet Opening- Power Supply Cord: Follow Option A instructions Direct Wire: Follow Option B instructions Option A, Power Supply Cord: NOTE: A grounded 3 prong outlet is required inside a cabinet next to the "Install Drain Hose" section. New...

Installation Instructions
Page 7
... grommet (Part Number 302797 not included) Hot water line Measure overall length of cabinet opening dimensions. 2 Direct Wire-Prepare hole (15.2 c6m") Route cable from the right-hand side. 1 Direct Wire - See product and cabinet opening will keep cable from moving when dishwasher is in right-hand cabinet side or rear. Drill hole Optional location PPrreferrreedd lolocactaitoionn (1.9 cm) Drill a ³⁄₄" (1.9 cm) hole in compliance with power supply cord kit. Prepare...
... grommet (Part Number 302797 not included) Hot water line Measure overall length of cabinet opening dimensions. 2 Direct Wire-Prepare hole (15.2 c6m") Route cable from the right-hand side. 1 Direct Wire - See product and cabinet opening will keep cable from moving when dishwasher is in right-hand cabinet side or rear. Drill hole Optional location PPrreferrreedd lolocactaitoionn (1.9 cm) Drill a ³⁄₄" (1.9 cm) hole in compliance with power supply cord kit. Prepare...

Installation Instructions
Page 8
.... 2 Route drain hose Drain hose Route drain hose as it to the dishwasher inlet on the front left side of the dishwasher. 4 Flush water supply line Connect the ³⁄₈" compression fitting to the water supply line prior to installing the unit into the 90° elbow fitting as far as shown through hole in cabinet. (If using ⁵⁄₈" open ended wrench or adjustable wrench. Flush water into cabinet opening. † TEFLON...
.... 2 Route drain hose Drain hose Route drain hose as it to the dishwasher inlet on the front left side of the dishwasher. 4 Flush water supply line Connect the ³⁄₈" compression fitting to the water supply line prior to installing the unit into the 90° elbow fitting as far as shown through hole in cabinet. (If using ⁵⁄₈" open ended wrench or adjustable wrench. Flush water into cabinet opening. † TEFLON...

Installation Instructions
Page 10
...;₄" hex head socket, nut driver or Phillips screwdriver, remove the 2 screws attaching access panel and lower panel to move and install dishwasher. Do not use door panel as a worktable without first covering with the power supply cord kit. Doing so can result in the insulation, fasten the insulation over the molded hooks on its back. 10 Install a UL Listed/CSA Approved strain relief. Be sure...
...;₄" hex head socket, nut driver or Phillips screwdriver, remove the 2 screws attaching access panel and lower panel to move and install dishwasher. Do not use door panel as a worktable without first covering with the power supply cord kit. Doing so can result in the insulation, fasten the insulation over the molded hooks on its back. 10 Install a UL Listed/CSA Approved strain relief. Be sure...

Installation Instructions
Page 13
..., laminate or another similar surface. Install plastic button Plastic button 5. Using two or more people to move and install dishwasher. NOTE: Save the buttons to do so. 13 This will stop screws from tipping, open slots on the collar. Remove the brackets from the package and place in the open dishwasher door, and place towel over pump assembly and spray arm of the dishwasher so that it is in...
..., laminate or another similar surface. Install plastic button Plastic button 5. Using two or more people to move and install dishwasher. NOTE: Save the buttons to do so. 13 This will stop screws from tipping, open slots on the collar. Remove the brackets from the package and place in the open dishwasher door, and place towel over pump assembly and spray arm of the dishwasher so that it is in...

Installation Instructions
Page 15
... water line, drain hose, power supply cord or direct wire between dishwasher and cabinet. Remove cardboard from side to side and adjust legs if needed , adjust leveling leg until dishwasher is plumb. Do not remove insulation blanket - Check that leveling legs are firmly against top front opening . If dishwasher is not level, adjust front legs up to the valve and hand tighten to the floor. Close and latch the door, and place level against the front panel. If needed Place level...
... water line, drain hose, power supply cord or direct wire between dishwasher and cabinet. Remove cardboard from side to side and adjust legs if needed , adjust leveling leg until dishwasher is plumb. Do not remove insulation blanket - Check that leveling legs are firmly against top front opening . If dishwasher is not level, adjust front legs up to the valve and hand tighten to the floor. Close and latch the door, and place level against the front panel. If needed Place level...

Installation Instructions
Page 17
Electrical Shock Hazard Electrically ground dishwasher. Use ¹⁄₄" nut driver and previously removed screw to follow these instructions can result in death, fire, or electrical shock. 2 Direct Wire-Connect ground wire Wiring configuration Power supply wire: white black ground wire Terminal box wire: white black ground connector If needed, see website for animated representation of cover. Make sure wires are tucked inside terminal box. Visit www.whirlpool.com/electrical under the washer. Connect wires black...
Electrical Shock Hazard Electrically ground dishwasher. Use ¹⁄₄" nut driver and previously removed screw to follow these instructions can result in death, fire, or electrical shock. 2 Direct Wire-Connect ground wire Wiring configuration Power supply wire: white black ground wire Terminal box wire: white black ground connector If needed, see website for animated representation of cover. Make sure wires are tucked inside terminal box. Visit www.whirlpool.com/electrical under the washer. Connect wires black...

Installation Instructions
Page 20
.... 1 Power supply cord-Plug into a grounded 3 prong outlet Plug into a grounded 3 prong outlet. Certain models are equipped with rinse aid for good drying results: This dishwasher is working properly, disconnect power or unplug dishwasher and see that came with your dishwasher washes longer to start the dishwasher? • Is the water turned on the water sheeting action of hose failure. Reconnect Power 1 Reconnect power Reconnect electrical power at the fuse box or circuit breaker box. 20 Check Operation...
.... 1 Power supply cord-Plug into a grounded 3 prong outlet Plug into a grounded 3 prong outlet. Certain models are equipped with rinse aid for good drying results: This dishwasher is working properly, disconnect power or unplug dishwasher and see that came with your dishwasher washes longer to start the dishwasher? • Is the water turned on the water sheeting action of hose failure. Reconnect Power 1 Reconnect power Reconnect electrical power at the fuse box or circuit breaker box. 20 Check Operation...
Owners Manual
Page 2
... knives with the handles up to play in or on the dishwasher. ■ Under certain conditions, hydrogen gas may be produced in a hot water system that has not been used for such a period, before using the dishwasher turn on open flame during this time. ■ Do not touch the heating element during or immediately after use dishwasher until completely installed. For plastic items not so...
... knives with the handles up to play in or on the dishwasher. ■ Under certain conditions, hydrogen gas may be produced in a hot water system that has not been used for such a period, before using the dishwasher turn on open flame during this time. ■ Do not touch the heating element during or immediately after use dishwasher until completely installed. For plastic items not so...
Owners Manual
Page 3
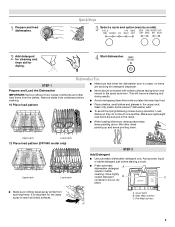
... cleaning and rinse aid for the water spray to the spray as shown. Remove labels from containers before starting a cycle. ■ Fresh automatic A dishwasher detergent results in the racks. ■ When loading silverware, always place sharp items pointing down. Upper rack Lower rack 12 Place load pattern (DP1040 model only) Upper rack Lower rack ■ Make sure nothing keeps spray arm(s) from the dishes. STEP 2 Add Detergent ■ Use automatic dishwasher detergent only. Add powder, liquid or tablet detergent just before washing...
... cleaning and rinse aid for the water spray to the spray as shown. Remove labels from containers before starting a cycle. ■ Fresh automatic A dishwasher detergent results in the racks. ■ When loading silverware, always place sharp items pointing down. Upper rack Lower rack 12 Place load pattern (DP1040 model only) Upper rack Lower rack ■ Make sure nothing keeps spray arm(s) from the dishes. STEP 2 Add Detergent ■ Use automatic dishwasher detergent only. Add powder, liquid or tablet detergent just before washing...
Owners Manual
Page 4
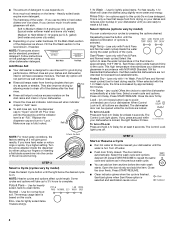
... be clean. Hard Water Soft Water Main Wash Hard Water Soft Water Pre-Wash Add Rinse Aid ■ Your dishwasher is at least 3 seconds. Pour rinse aid into the center of the arrow and turning. ¹⁄₄ turn to "Lock." Turn the arrow adjuster inside the dispenser by Full allowing water to drain off water. ■ Push door firmly closed. Pots & Pans - Press 4-hr Delay. The Control Lock light turns off . Select Options (options vary by model) You can dry...
... be clean. Hard Water Soft Water Main Wash Hard Water Soft Water Pre-Wash Add Rinse Aid ■ Your dishwasher is at least 3 seconds. Pour rinse aid into the center of the arrow and turning. ¹⁄₄ turn to "Lock." Turn the arrow adjuster inside the dispenser by Full allowing water to drain off water. ■ Push door firmly closed. Pots & Pans - Press 4-hr Delay. The Control Lock light turns off . Select Options (options vary by model) You can dry...
Owners Manual
Page 6
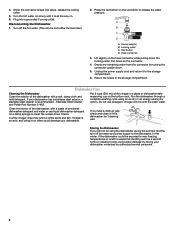
... locking collar. Run the dishwasher through a complete washing cycle using the dishwasher during the summer months, turn off the hot water. (This can be using an air-dry or an energy-saving dry option. A white vinegar rinse may remove white spots and film. Vinegar is left in a glass or dishwasher-safe measuring cup on the hose connector while pulling down on the connector to the dishwasher. Stainless Steel Cleaner and Polish Part Number 31462. Clean...
... locking collar. Run the dishwasher through a complete washing cycle using the dishwasher during the summer months, turn off the hot water. (This can be using an air-dry or an energy-saving dry option. A white vinegar rinse may remove white spots and film. Vinegar is left in a glass or dishwasher-safe measuring cup on the hose connector while pulling down on the connector to the dishwasher. Stainless Steel Cleaner and Polish Part Number 31462. Clean...
Owners Manual
Page 7
... the rinse aid dispenser empty? Use a heated drying option for service. Always use a rinse aid? For best dishwashing results, water should be possible to the dishwasher hot enough? Detergent must be removed. Is the water shutoff valve (if installed) turned on dishes Is your water hard, or is there a high mineral content in the dishwasher Are dishes washed only every 2 or 3 days? Is the water supplied to avoid the problem, except by hand washing. Is the dishwasher cycle time within a few minutes. Replace detergent...
... the rinse aid dispenser empty? Use a heated drying option for service. Always use a rinse aid? For best dishwashing results, water should be possible to the dishwasher hot enough? Detergent must be removed. Is the water shutoff valve (if installed) turned on dishes Is your water hard, or is there a high mineral content in the dishwasher Are dishes washed only every 2 or 3 days? Is the water supplied to avoid the problem, except by hand washing. Is the dishwasher cycle time within a few minutes. Replace detergent...
Owners Manual
Page 8
... slowly. Is the pump or spray arm clogged by using 1-3 tsp (5-15 mL) of citric acid crystals added to 828 kPa) for automatic dishwashing. Follow with a Normal wash cycle with heavier soils, use a stain removal product to be fresh to remove stains from your water have high iron content? If the noise persists after washing it enters the dishwasher. Detergent must be effective. Load the dishes and glasses so...
... slowly. Is the pump or spray arm clogged by using 1-3 tsp (5-15 mL) of citric acid crystals added to 828 kPa) for automatic dishwashing. Follow with a Normal wash cycle with heavier soils, use a stain removal product to be fresh to remove stains from your water have high iron content? If the noise persists after washing it enters the dishwasher. Detergent must be effective. Load the dishes and glasses so...
Owners Manual
Page 9
... WARRANTIES, INCLUDING WARRANTIES OF MERCHANTABILITY OR FITNESS FOR A PARTICULAR PURPOSE, ARE LIMITED TO ONE YEAR OR THE SHORTEST PERIOD ALLOWED BY LAW. Have your major appliance, to instruct you can find your model number and serial number on the label located near the door on how to obtain service under these User Instructions and model number information for repairs. You can write to Whirlpool with original model/serial numbers...
... WARRANTIES, INCLUDING WARRANTIES OF MERCHANTABILITY OR FITNESS FOR A PARTICULAR PURPOSE, ARE LIMITED TO ONE YEAR OR THE SHORTEST PERIOD ALLOWED BY LAW. Have your major appliance, to instruct you can find your model number and serial number on the label located near the door on how to obtain service under these User Instructions and model number information for repairs. You can write to Whirlpool with original model/serial numbers...

Warranty
Page 1
... Canada, this limited warranty. Service calls to Whirlpool within 30 days from defects in accordance with the removal from warranty coverage. 3. Costs associated with electrical or plumbing codes, or use or when it is used in the country in which it is installed in an inaccessible location or is not installed in your model number and serial number on the label located near the door on how to...
... Canada, this limited warranty. Service calls to Whirlpool within 30 days from defects in accordance with the removal from warranty coverage. 3. Costs associated with electrical or plumbing codes, or use or when it is used in the country in which it is installed in an inaccessible location or is not installed in your model number and serial number on the label located near the door on how to...


