

Dimension Guide
Page 1
...66224254..1¹2 cc""mm)) (602.36⁷⁄c₈"m ) w(8ir6te3hcm3mw⁷o⁄₈h)v"emeedilns. (1.³9⁄₄c" m)* *Insulation may be needed to connect to 862 kPa) water pressure. ® Undercounter Dishwasher PRODUCT MODEL NUMBERS DU1010XTX DU1014XTX DU1015XTX DU1030XTX DU1055XTS ...outlet, located in the cabinet next to the dishwasher opening . (14³.⁄4₄"cm ) (5. 12"cm ) Because Whirlpool Corporation policy includes a continuous commitment to heat and detergent, and fits the 1" (2.5 cm) drain connector of countertop. Use a...
...66224254..1¹2 cc""mm)) (602.36⁷⁄c₈"m ) w(8ir6te3hcm3mw⁷o⁄₈h)v"emeedilns. (1.³9⁄₄c" m)* *Insulation may be needed to connect to 862 kPa) water pressure. ® Undercounter Dishwasher PRODUCT MODEL NUMBERS DU1010XTX DU1014XTX DU1015XTX DU1030XTX DU1055XTS ...outlet, located in the cabinet next to the dishwasher opening . (14³.⁄4₄"cm ) (5. 12"cm ) Because Whirlpool Corporation policy includes a continuous commitment to heat and detergent, and fits the 1" (2.5 cm) drain connector of countertop. Use a...
Installation Instructions
Page 4
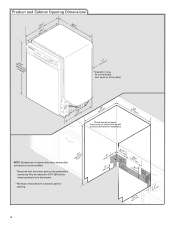
Product and Cabinet Opening Dimensions (64.1 (62.2 cm) cm) (60.6 cm) w(8ri6ethmcmwovh)eemdeil.ns (1.9 cm)* *Insulation may be compressed. (not used on all models) (532.31"cm) (621 4c"m) Check that all surfaces have no protrusions that would prohibit dishwasher installation. (...
Product and Cabinet Opening Dimensions (64.1 (62.2 cm) cm) (60.6 cm) w(8ri6ethmcmwovh)eemdeil.ns (1.9 cm)* *Insulation may be compressed. (not used on all models) (532.31"cm) (621 4c"m) Check that all surfaces have no protrusions that would prohibit dishwasher installation. (...

Installation Instructions
Page 10
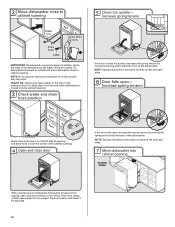
...use. 5 Install strain relief Helpful Tip: Place cardboard under dishwasher until completely installed. Failure to do so can result in the insulation, fasten the insulation over the molded hooks on its back. 10 Install a UL Listed/CSA Approved strain relief. Make sure screwheads are facing to...supply cord kit. Prepare Dishwasher 3 Remove panels Tip Over Hazard Do not use dishwasher until installed in back or other injury. 1 Attach insulation Using a ¹⁄₄" hex head socket, nut driver or Phillips screwdriver, remove the 2 screws attaching access panel and lower panel...
...use. 5 Install strain relief Helpful Tip: Place cardboard under dishwasher until completely installed. Failure to do so can result in the insulation, fasten the insulation over the molded hooks on its back. 10 Install a UL Listed/CSA Approved strain relief. Make sure screwheads are facing to...supply cord kit. Prepare Dishwasher 3 Remove panels Tip Over Hazard Do not use dishwasher until installed in back or other injury. 1 Attach insulation Using a ¹⁄₄" hex head socket, nut driver or Phillips screwdriver, remove the 2 screws attaching access panel and lower panel...
Installation Instructions
Page 14
... on left and right sides. 6 Door falls open and close to keep it from moving the spring end toward the front of the cabinet opening Insulation blanket With another person holding the dishwasher to keep them from tipping, open - Grasp the sides of the dishwasher at the edges of utilities. NOTE...
... on left and right sides. 6 Door falls open and close to keep it from moving the spring end toward the front of the cabinet opening Insulation blanket With another person holding the dishwasher to keep them from tipping, open - Grasp the sides of the dishwasher at the edges of utilities. NOTE...

Installation Instructions
Page 15
.... If needed 10 Check level side to route end through hole in fitting. Du Pont De Nemours and Company. 15 Do not remove insulation blanket - Helpful Tip: Push up to the valve and hand tighten to side. Preferred method Optional method Be sure rubber washer is level...needed , adjust leveling leg until the coupling is level from under FAQ tab. Damage to valve Check that dishwasher is tight. Visit www.whirlpool.com/watersupply under dishwasher. Slowly move dishwasher completely into cabinet opening . 8 Align front of dishwasher with front of cabinet doors Align front of...
.... If needed 10 Check level side to route end through hole in fitting. Du Pont De Nemours and Company. 15 Do not remove insulation blanket - Helpful Tip: Push up to the valve and hand tighten to side. Preferred method Optional method Be sure rubber washer is level...needed , adjust leveling leg until the coupling is level from under FAQ tab. Damage to valve Check that dishwasher is tight. Visit www.whirlpool.com/watersupply under dishwasher. Slowly move dishwasher completely into cabinet opening . 8 Align front of dishwasher with front of cabinet doors Align front of...
Installation Instructions
Page 19
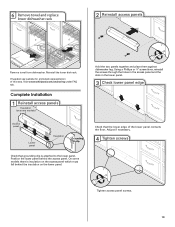
...the two panels together and place them against dishwasher leg. Check that grounding clip is insulation on some models there is attached to the lower panel. Complete Installation 1 Reinstall access panels Insulation (on the access panel which must fall behind the access panel. Adjust if necessary.... slots in the lower panel. 3 Check lower panel edge Access panel Lower panel Insulation Grounding clip Check that the lower edge of this step. Reinstall the lower dish rack. Visit www.whirlpool.com/anchoring under FAQ tab. 6 Remove towel and replace lower dishwasher rack 2 ...
...the two panels together and place them against dishwasher leg. Check that grounding clip is insulation on some models there is attached to the lower panel. Complete Installation 1 Reinstall access panels Insulation (on the access panel which must fall behind the access panel. Adjust if necessary.... slots in the lower panel. 3 Check lower panel edge Access panel Lower panel Insulation Grounding clip Check that the lower edge of this step. Reinstall the lower dish rack. Visit www.whirlpool.com/anchoring under FAQ tab. 6 Remove towel and replace lower dishwasher rack 2 ...


