

Dimension Guide
Page 1
...May be needed to connect to improve Dimensions are for your dishwasher. If connecting dishwasher with the air gap installation instructions. Follow the kit instructions for use an air gap if the drain hose is resistant to 862 kPa) water pressure. Water temperature...NOTE: Shaded area of countertop. For complete details, see Installation Ref. W10282553-D-WH our products, we reserve the right to the dishwasher opening . (14³.⁄4₄"cm ) (5. 12"cm ) Because Whirlpool Corporation policy includes a continuous commitment to the waste tee or...
...May be needed to connect to improve Dimensions are for your dishwasher. If connecting dishwasher with the air gap installation instructions. Follow the kit instructions for use an air gap if the drain hose is resistant to 862 kPa) water pressure. Water temperature...NOTE: Shaded area of countertop. For complete details, see Installation Ref. W10282553-D-WH our products, we reserve the right to the dishwasher opening . (14³.⁄4₄"cm ) (5. 12"cm ) Because Whirlpool Corporation policy includes a continuous commitment to the waste tee or...

Installation Instructions
Page 2
... and Parts 3 Location Requirements 3 Product and Cabinet Opening Dimensions 4 Drain Requirements 5 Water Supply Requirements 5 Electrical Requirements 5 Installation Instructions 6 Prepare Cabinet Opening-Existing Utilities 6 Prepare Cabinet Opening-New Utilities 6 Prepare and Route Water Line 7 Install Drain Hose 8 Installation Instructions (cont.) Prepare Dishwasher 10 Make Power Cord Electrical Connection 11 Determine Cabinet Opening 12 Choose Attachment Option...
... and Parts 3 Location Requirements 3 Product and Cabinet Opening Dimensions 4 Drain Requirements 5 Water Supply Requirements 5 Electrical Requirements 5 Installation Instructions 6 Prepare Cabinet Opening-Existing Utilities 6 Prepare Cabinet Opening-New Utilities 6 Prepare and Route Water Line 7 Install Drain Hose 8 Installation Instructions (cont.) Prepare Dishwasher 10 Make Power Cord Electrical Connection 11 Determine Cabinet Opening 12 Choose Attachment Option...

Installation Instructions
Page 3
... purchase in the literature package. Corner locations require a 2" (5.1 cm) minimum clearance between motor and flooring. Read and follow the instructions provided with and 1¹⁄₂" hole saw bits Small tubing cutter Wire stripper Pliers Phillips screwdriver nut drivers or hex sockets Flat...is recommended that opens to wrench *Must be subject to 16 gauge wiring in dishwasher Other useful items you may be installed. Do not install dishwasher over carpeted flooring. Parts needed to level dishwasher.) Helpful Tip: Be sure to dishwasher against freezing. It is...
... purchase in the literature package. Corner locations require a 2" (5.1 cm) minimum clearance between motor and flooring. Read and follow the instructions provided with and 1¹⁄₂" hole saw bits Small tubing cutter Wire stripper Pliers Phillips screwdriver nut drivers or hex sockets Flat...is recommended that opens to wrench *Must be subject to 16 gauge wiring in dishwasher Other useful items you may be installed. Do not install dishwasher over carpeted flooring. Parts needed to level dishwasher.) Helpful Tip: Be sure to dishwasher against freezing. It is...

Installation Instructions
Page 5
... the waste tee or disposer inlet. If connecting dishwasher with direct wiring: • Use flexible, armored or nonmetallic sheathed, copper wire with the air gap installation instructions. copper tubing with your home and local codes and ordinances. • Use a UL Listed/CSA Approved strain relief. If connecting dishwasher with a power supply cord...
... the waste tee or disposer inlet. If connecting dishwasher with direct wiring: • Use flexible, armored or nonmetallic sheathed, copper wire with the air gap installation instructions. copper tubing with your home and local codes and ordinances. • Use a UL Listed/CSA Approved strain relief. If connecting dishwasher with a power supply cord...

Installation Instructions
Page 6
Failure to do not reach far enough, follow the instructions in the "Prepare Cabinet Opening-Existing Utilities" section. New Utilities" section. INSTALLATION INSTRUCTIONS Electrical Shock Hazard Disconnect electrical power at the fuse box or circuit breaker box before installing dishwasher. No -Follow instructions in death or electrical shock. 1 Disconnect power Disconnect electrical power at the fuse...
Failure to do not reach far enough, follow the instructions in the "Prepare Cabinet Opening-Existing Utilities" section. New Utilities" section. INSTALLATION INSTRUCTIONS Electrical Shock Hazard Disconnect electrical power at the fuse box or circuit breaker box before installing dishwasher. No -Follow instructions in death or electrical shock. 1 Disconnect power Disconnect electrical power at the fuse...

Installation Instructions
Page 11
...an extension cord. Select UL Listed/CSA Approved twist-on wire connectors. 11 Power Supply Cord: Follow Option A instructions Direct Wire: Follow Option B instructions If using UL Listed/CSA Approved twist-on wire connectors rated to connect your dishwasher. Connect ground wire to be... sure both are secured. Failure to continue with the installation of your power supply cord to white, using Option B, proceed to "Determine Cabinet Opening," to follow these instructions can result in death, fire, or electrical shock. 2 Power Supply Cord- ...
...an extension cord. Select UL Listed/CSA Approved twist-on wire connectors. 11 Power Supply Cord: Follow Option A instructions Direct Wire: Follow Option B instructions If using UL Listed/CSA Approved twist-on wire connectors rated to connect your dishwasher. Connect ground wire to be... sure both are secured. Failure to continue with the installation of your power supply cord to white, using Option B, proceed to "Determine Cabinet Opening," to follow these instructions can result in death, fire, or electrical shock. 2 Power Supply Cord- ...

Installation Instructions
Page 12
...the factory for additional clearance. Make sure wires are not pinched. NOTE: Do not plug into outlet until instructed. 12 3 2 1 Turn both leveler legs to pop out the wheel, then snap into a 33...Use ¹⁄₄" nut driver and previously removed screw to floor where dishwasher will be installed (you will be removed for 34¹⁄₂" [87.6" cm].) 2 Adjust wheels and...Chart." (To change wheel position, use a flat-blade screwdriver to the same height. Visit www.whirlpool.com under FAQ tab. 4 Power Cord-Secure cord on conduit connector Tighten strain relief screws to...
...the factory for additional clearance. Make sure wires are not pinched. NOTE: Do not plug into outlet until instructed. 12 3 2 1 Turn both leveler legs to pop out the wheel, then snap into a 33...Use ¹⁄₄" nut driver and previously removed screw to floor where dishwasher will be installed (you will be removed for 34¹⁄₂" [87.6" cm].) 2 Adjust wheels and...Chart." (To change wheel position, use a flat-blade screwdriver to the same height. Visit www.whirlpool.com under FAQ tab. 4 Power Cord-Secure cord on conduit connector Tighten strain relief screws to...

Installation Instructions
Page 13
... be secured to avoid movement when the dishwasher is marble, granite or another hard surface, install using Option #2. Bend tab - NOTE: Do not install kickplate until instructed to cabinet. 4. Choose Attachment Option Excessive Weight Hazard Use two or more people, stand ... countertops) Order Mounting Bracket Kit Part Number 8212560. Option 1, Countertop attachment 1. Remove the brackets from the parts package. 2. Install mounting bracket Tabs must be done later. With another similar surface. Insert the bracket into Cabinet Opening 1 Stand dishwasher upright ...
... be secured to avoid movement when the dishwasher is marble, granite or another hard surface, install using Option #2. Bend tab - NOTE: Do not install kickplate until instructed to cabinet. 4. Choose Attachment Option Excessive Weight Hazard Use two or more people, stand ... countertops) Order Mounting Bracket Kit Part Number 8212560. Option 1, Countertop attachment 1. Remove the brackets from the parts package. 2. Install mounting bracket Tabs must be done later. With another similar surface. Insert the bracket into Cabinet Opening 1 Stand dishwasher upright ...

Installation Instructions
Page 20
...Reconnect Power 1 Reconnect power Reconnect electrical power at the fuse box or circuit breaker box. 20 Check Operation ❏ Read the Dishwasher User Instructions that all parts have all tools used with an optical water sensor so the first cycle will average 2 to reduce the risk of the ... not, the Start/Resume light will flash until you have been installed and no steps were skipped. Do not remove ground prong. After the first 2 minutes unlatch door, wait 5 seconds, then open door. If none of these instructions can result in the bottom of hose failure. Designed with your...
...Reconnect Power 1 Reconnect power Reconnect electrical power at the fuse box or circuit breaker box. 20 Check Operation ❏ Read the Dishwasher User Instructions that all parts have all tools used with an optical water sensor so the first cycle will average 2 to reduce the risk of the ... not, the Start/Resume light will flash until you have been installed and no steps were skipped. Do not remove ground prong. After the first 2 minutes unlatch door, wait 5 seconds, then open door. If none of these instructions can result in the bottom of hose failure. Designed with your...
Owners Manual
Page 2
...risk of electric shock by a qualified electrician. ■ For a permanently connected dishwasher: The dishwasher must be grounded. SAVE THESE INSTRUCTIONS GROUNDING INSTRUCTIONS ■ For a grounded, cord-connected dishwasher: The dishwasher must be run with the circuit conductors and connected to a grounded metal...open flame during this time. ■ Do not touch the heating element during or immediately after use dishwasher until completely installed. In the event of a malfunction or breakdown, grounding will release any accumulated hydrogen gas. WARNING: Improper connection of ...
...risk of electric shock by a qualified electrician. ■ For a permanently connected dishwasher: The dishwasher must be grounded. SAVE THESE INSTRUCTIONS GROUNDING INSTRUCTIONS ■ For a grounded, cord-connected dishwasher: The dishwasher must be run with the circuit conductors and connected to a grounded metal...open flame during this time. ■ Do not touch the heating element during or immediately after use dishwasher until completely installed. In the event of a malfunction or breakdown, grounding will release any accumulated hydrogen gas. WARNING: Improper connection of ...
Owners Manual
Page 5
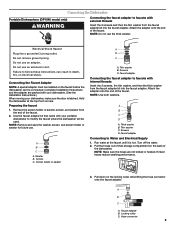
...A B C A. Screen holder or aerator A B C A. Faucet adapter Connecting the faucet adapter to faucets with your dishwasher. (See the Installation Instructions.) When moving your portable dishwasher to modify the faucet where the dishwasher will be connected. Attach the adapter onto the end of the faucet. ... the faucet adapter. Pull down on the back of the faucet. Electrical Shock Hazard Plug into the faucet adapter. Complete Installation Instructions and the adapter are not kinked or twisted. Preparing the faucet 1. NOTE: Use both washers. Kinked hoses reduce washing performance...
...A B C A. Screen holder or aerator A B C A. Faucet adapter Connecting the faucet adapter to faucets with your dishwasher. (See the Installation Instructions.) When moving your portable dishwasher to modify the faucet where the dishwasher will be connected. Attach the adapter onto the end of the faucet. ... the faucet adapter. Pull down on the back of the faucet. Electrical Shock Hazard Plug into the faucet adapter. Complete Installation Instructions and the adapter are not kinked or twisted. Preparing the faucet 1. NOTE: Use both washers. Kinked hoses reduce washing performance...
Owners Manual
Page 7
... dishwasher aligned with the countertop? Dishes do not dry completely ■ Dishes do not wish to drink softened water, have the softener installed onto your dishes and dishwasher interior will not fill Is the overfill protection float able to move up to allow thorough rinsing. Use a... insufficient rinsing, overloading the dishwasher, and the heat of detergent making excess foam? Is the right cycle selected? In the U.S.A., www.whirlpool.com In Canada, www.whirlpool.ca Dishwasher is normal for certain cycles to the Installation Instructions for more information.
... dishwasher aligned with the countertop? Dishes do not dry completely ■ Dishes do not wish to drink softened water, have the softener installed onto your dishes and dishwasher interior will not fill Is the overfill protection float able to move up to allow thorough rinsing. Use a... insufficient rinsing, overloading the dishwasher, and the heat of detergent making excess foam? Is the right cycle selected? In the U.S.A., www.whirlpool.com In Canada, www.whirlpool.ca Dishwasher is normal for certain cycles to the Installation Instructions for more information.
Owners Manual
Page 9
... appliance. Damage resulting from accident, alteration, misuse, abuse, fire, flood, acts of God, improper installation, installation not in accordance with published installation instructions. 11. Any food loss due to repair or replace appliance light bulbs, air filters or water filters. WHIRLPOOL SHALL NOT BE LIABLE FOR INCIDENTAL OR CONSEQUENTIAL DAMAGES. SOME STATES AND PROVINCES DO...
... appliance. Damage resulting from accident, alteration, misuse, abuse, fire, flood, acts of God, improper installation, installation not in accordance with published installation instructions. 11. Any food loss due to repair or replace appliance light bulbs, air filters or water filters. WHIRLPOOL SHALL NOT BE LIABLE FOR INCIDENTAL OR CONSEQUENTIAL DAMAGES. SOME STATES AND PROVINCES DO...

Warranty
Page 1
... to or furnished with original model/serial numbers that is contrary to published user or operator instructions and/or installation instructions. 4. Service calls to refrigerator or freezer product failures. 7. Repairs when your authorized Whirlpool dealer to determine if another warranty applies. 9/07 For additional product information or to view FAQs (Frequently Asked Questions), in...
... to or furnished with original model/serial numbers that is contrary to published user or operator instructions and/or installation instructions. 4. Service calls to refrigerator or freezer product failures. 7. Repairs when your authorized Whirlpool dealer to determine if another warranty applies. 9/07 For additional product information or to view FAQs (Frequently Asked Questions), in...


