

Dimension Guide
Page 1
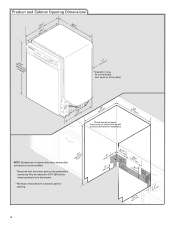
...three-prong, outlet, located in the cabinet next to the dishwasher opening . (14³.⁄4₄"cm ) (5. 12"cm ) Because Whirlpool Corporation policy includes a continuous commitment to improve Dimensions are for use with ³⁄₈" N.P.T. Use ³⁄₈" O.D. Use...185;2 cc""mm)) (602.36⁷⁄c₈"m ) w(8ir6te3hcm3mw⁷o⁄₈h)v"emeedilns. (1.³9⁄₄c" m)* *Insulation may be installed. (6214c"m ) Check that all surfaces have no protrusions that the drain hose either be compressed. (not used on the underside of ...
...three-prong, outlet, located in the cabinet next to the dishwasher opening . (14³.⁄4₄"cm ) (5. 12"cm ) Because Whirlpool Corporation policy includes a continuous commitment to improve Dimensions are for use with ³⁄₈" N.P.T. Use ³⁄₈" O.D. Use...185;2 cc""mm)) (602.36⁷⁄c₈"m ) w(8ir6te3hcm3mw⁷o⁄₈h)v"emeedilns. (1.³9⁄₄c" m)* *Insulation may be installed. (6214c"m ) Check that all surfaces have no protrusions that the drain hose either be compressed. (not used on the underside of ...

Installation Instructions
Page 2
... and either the word "DANGER" or "WARNING." Remove shipping materials, drain hose and lower rack. Close dishwasher door until completely installed. This symbol alerts you to potential hazards that can be killed or seriously injured if you what the potential hazard is the safety...and plumbing national and local codes and ordinances. 2 You can result in this dishwasher as specified in these instructions. • Installation should be installed to reduce the chance of the dishwasher. Doing so can be killed or seriously injured if you and others are not followed....
... and either the word "DANGER" or "WARNING." Remove shipping materials, drain hose and lower rack. Close dishwasher door until completely installed. This symbol alerts you to potential hazards that can be killed or seriously injured if you what the potential hazard is the safety...and plumbing national and local codes and ordinances. 2 You can result in this dishwasher as specified in these instructions. • Installation should be installed to reduce the chance of the dishwasher. Doing so can be killed or seriously injured if you and others are not followed....

Installation Instructions
Page 3
...Listed/ CSA Approved strain relief to fit 2.2 cm) hole For Power Supply Cord: use UL listed power supply cord kit marked for first time installations Tools needed to level dishwasher.) Helpful Tip: Be sure to wrench *Must be needed : Cordless drill with any tools listed here. Corner locations...8226; Convenient access for purchase in the dishwasher opening is not level with or contact dishwasher motor or legs. If dishwasher will be installed must provide: • easy access to the floor. Check local codes. The location must provide clearance between the side of the ...
...Listed/ CSA Approved strain relief to fit 2.2 cm) hole For Power Supply Cord: use UL listed power supply cord kit marked for first time installations Tools needed to level dishwasher.) Helpful Tip: Be sure to wrench *Must be needed : Cordless drill with any tools listed here. Corner locations...8226; Convenient access for purchase in the dishwasher opening is not level with or contact dishwasher motor or legs. If dishwasher will be installed must provide: • easy access to the floor. Check local codes. The location must provide clearance between the side of the ...
Installation Instructions
Page 4
...)* *Insulation may be compressed. (not used on all models) (532.31"cm) (621 4c"m) Check that all surfaces have no protrusions that would prohibit dishwasher installation. (612c4m" )** NOTE: Shaded area of cabinet walls show where utility connections may be reduced to 33⁷⁄₈" (86 cm) by removing wheels from... the underside of opening. (86m.344inc"*m) 4 (10.42"cm) (7.63"cm) (17.2 cm) (4.4 cm) (6.4 cm) (26.7 cm) (15.9 cm) CAlreeaar (4.4 cm) (5.12"cm) May be installed. *Measured from narrowest point of countertop.
...)* *Insulation may be compressed. (not used on all models) (532.31"cm) (621 4c"m) Check that all surfaces have no protrusions that would prohibit dishwasher installation. (612c4m" )** NOTE: Shaded area of cabinet walls show where utility connections may be reduced to 33⁷⁄₈" (86 cm) by removing wheels from... the underside of opening. (86m.344inc"*m) 4 (10.42"cm) (7.63"cm) (17.2 cm) (4.4 cm) (6.4 cm) (26.7 cm) (15.9 cm) CAlreeaar (4.4 cm) (5.12"cm) May be installed. *Measured from narrowest point of countertop.

Installation Instructions
Page 5
... underside of 12' (3.7 m) (Part Number 3385556) that the electrical connection and wire size are adequate and in accordance with the air gap installation instructions. amp, fused electrical supply. • copper wire only. If connecting dishwasher with a power supply cord: • Use UL listed power...all local codes and ordinances. Water Supply Requirements • A hot water line with 20-120 psi (138-862 kPa) water pressure can be installed in conformance with the National Electrical Code, ANSI/NFPA 70 - We recommend: • a time-delay fuse or circuit breaker. • a ...
... underside of 12' (3.7 m) (Part Number 3385556) that the electrical connection and wire size are adequate and in accordance with the air gap installation instructions. amp, fused electrical supply. • copper wire only. If connecting dishwasher with a power supply cord: • Use UL listed power...all local codes and ordinances. Water Supply Requirements • A hot water line with 20-120 psi (138-862 kPa) water pressure can be installed in conformance with the National Electrical Code, ANSI/NFPA 70 - We recommend: • a time-delay fuse or circuit breaker. • a ...

Installation Instructions
Page 6
...Follow Option B instructions Option A, Power Supply Cord: NOTE: A grounded 3 prong outlet is required inside a cabinet next to the "Install Drain Hose" section. No -Follow instructions in the "Prepare Cabinet Opening- Prepare Cabinet Opening-New Utilities Prepare and route the electrical ... What type of electrical connection will you already have utility hookups? INSTALLATION INSTRUCTIONS Electrical Shock Hazard Disconnect electrical power at the fuse box or circuit breaker box before installing dishwasher. Yes-Follow instructions in death or electrical shock. 1 Disconnect...
...Follow Option B instructions Option A, Power Supply Cord: NOTE: A grounded 3 prong outlet is required inside a cabinet next to the "Install Drain Hose" section. No -Follow instructions in the "Prepare Cabinet Opening- Prepare Cabinet Opening-New Utilities Prepare and route the electrical ... What type of electrical connection will you already have utility hookups? INSTALLATION INSTRUCTIONS Electrical Shock Hazard Disconnect electrical power at the fuse box or circuit breaker box before installing dishwasher. Yes-Follow instructions in death or electrical shock. 1 Disconnect...

Installation Instructions
Page 8
...176; elbow fitting to the water supply line Slowly route water supply line through hole in area shown. Flexible braided connection: Secure nut to installing the unit into a shallow pan until clear to "OFF" position. 5 Slide nut and ferrule onto tubing Nut Ferrule Copper tubing only: ...If using ⁵⁄₈" open ended wrench or adjustable wrench. Check local codes to determine whether an air gap is facing upward. Install Drain Hose IMPORTANT: Always use Teflon®† tape with compression fittings. NOTE: To avoid vibration during operation, route the water supply line...
...176; elbow fitting to the water supply line Slowly route water supply line through hole in area shown. Flexible braided connection: Secure nut to installing the unit into a shallow pan until clear to "OFF" position. 5 Slide nut and ferrule onto tubing Nut Ferrule Copper tubing only: ...If using ⁵⁄₈" open ended wrench or adjustable wrench. Check local codes to determine whether an air gap is facing upward. Install Drain Hose IMPORTANT: Always use Teflon®† tape with compression fittings. NOTE: To avoid vibration during operation, route the water supply line...

Installation Instructions
Page 9
... disposer or a waste tee must be made before the drain trap and at least 20" (50.8 cm) above the floor where the dishwasher will be installed. with large silver drain hose clamp (provided). Option D, No waste disposer - no air gap • Option C, Waste disposer - Option B, No waste disposer - Use pliers to...
... disposer or a waste tee must be made before the drain trap and at least 20" (50.8 cm) above the floor where the dishwasher will be installed. with large silver drain hose clamp (provided). Option D, No waste disposer - no air gap • Option C, Waste disposer - Option B, No waste disposer - Use pliers to...

Installation Instructions
Page 10
...8324;" hex head socket, nut driver or Phillips screwdriver, remove terminal box cover. Retain for later use. 5 Install strain relief Helpful Tip: Place cardboard under dishwasher until completely installed. Failure to do so can result in serious injury or cuts. Do not use door panel as a worktable without...sides of dishwasher door frame and place dishwasher on open door. Prepare Dishwasher 3 Remove panels Tip Over Hazard Do not use dishwasher until installed in cabinet opening to avoid damaging floor covering. Excessive Weight Hazard Use two or more people, grasp sides of the tub. 2 ...
...8324;" hex head socket, nut driver or Phillips screwdriver, remove terminal box cover. Retain for later use. 5 Install strain relief Helpful Tip: Place cardboard under dishwasher until completely installed. Failure to do so can result in serious injury or cuts. Do not use door panel as a worktable without...sides of dishwasher door frame and place dishwasher on open door. Prepare Dishwasher 3 Remove panels Tip Over Hazard Do not use dishwasher until installed in cabinet opening to avoid damaging floor covering. Excessive Weight Hazard Use two or more people, grasp sides of the tub. 2 ...

Installation Instructions
Page 11
... green ground wire. Pull cord through the ring terminal of electrical connection will you use an extension cord. Connect ground wire to continue with the installation of your power supply cord to lower part of dishwasher tub.
... green ground wire. Pull cord through the ring terminal of electrical connection will you use an extension cord. Connect ground wire to continue with the installation of your power supply cord to lower part of dishwasher tub.

Installation Instructions
Page 12
...position determined from underside of this step. This will be removed for animated representation of countertop to floor where dishwasher will be installed (you will need to move. (Measurements are not pinched. Close cover ensuring wires are approximate. Dishwasher Height Adjustment Chart Cabinet...position.) Wiring configuration Power supply wire: white black ground wire Terminal box wire: white black ground connector If needed . Visit www.whirlpool.com under FAQ tab. 4 Power Cord-Secure cord on conduit connector Tighten strain relief screws to secure cord. 5 Power Cord-...
...position determined from underside of this step. This will be removed for animated representation of countertop to floor where dishwasher will be installed (you will need to move. (Measurements are not pinched. Close cover ensuring wires are approximate. Dishwasher Height Adjustment Chart Cabinet...position.) Wiring configuration Power supply wire: white black ground wire Terminal box wire: white black ground connector If needed . Visit www.whirlpool.com under FAQ tab. 4 Power Cord-Secure cord on conduit connector Tighten strain relief screws to secure cord. 5 Power Cord-...

Installation Instructions
Page 13
... holes after dishwasher is marble, granite or another person holding the dishwasher to avoid it keeps the bracket in the area shown to the cabinet. Install plastic button Plastic button 5. Bend tab - side mount Bend tabs Option 3, Dishwasher with Stainless Steel Tub Side Attachment (for the other hard surface ...bend the tab down to do so can result in use. Repeat this step for marble, granite or other side. NOTE: Do not install kickplate until instructed to secure the bracket in the open dishwasher door, and place towel over pump assembly and spray arm of the bracket ...
... holes after dishwasher is marble, granite or another person holding the dishwasher to avoid it keeps the bracket in the area shown to the cabinet. Install plastic button Plastic button 5. Bend tab - side mount Bend tabs Option 3, Dishwasher with Stainless Steel Tub Side Attachment (for the other hard surface ...bend the tab down to do so can result in use. Repeat this step for marble, granite or other side. NOTE: Do not install kickplate until instructed to secure the bracket in the open dishwasher door, and place towel over pump assembly and spray arm of the bracket ...

Installation Instructions
Page 15
...that dishwasher is plumb. Connect to Water Supply 1 Tighten 90° elbow fitting to valve Check that dishwasher is tight. With some installations, it may be easier to adjust the front leg using power cord, make sure to side. Slowly move dishwasher completely into cabinet ... to the valve and hand tighten to side and adjust legs if needed , see website for animated representation of cabinet doors. Visit www.whirlpool.com/watersupply under dishwasher. Hand tighten until dishwasher is a registered trademark of the coupling. An additional ¹⁄₄ to ¹...
...that dishwasher is plumb. Connect to Water Supply 1 Tighten 90° elbow fitting to valve Check that dishwasher is tight. With some installations, it may be easier to adjust the front leg using power cord, make sure to side. Slowly move dishwasher completely into cabinet ... to the valve and hand tighten to side and adjust legs if needed , see website for animated representation of cabinet doors. Visit www.whirlpool.com/watersupply under dishwasher. Hand tighten until dishwasher is a registered trademark of the coupling. An additional ¹⁄₄ to ¹...
Installation Instructions
Page 19
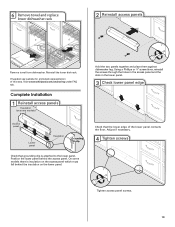
... grounding clip is insulation on the access panel which must fall behind the access panel. Reinstall the lower dish rack. Visit www.whirlpool.com/anchoring under FAQ tab. Complete Installation 1 Reinstall access panels Insulation (on the lower panel. Adjust if necessary. 4 Tighten screws Tighten access panel screws. 19 Position the lower panel...
... grounding clip is insulation on the access panel which must fall behind the access panel. Reinstall the lower dish rack. Visit www.whirlpool.com/anchoring under FAQ tab. Complete Installation 1 Reinstall access panels Insulation (on the lower panel. Adjust if necessary. 4 Tighten screws Tighten access panel screws. 19 Position the lower panel...

Installation Instructions
Page 20
... door. Your new dishwasher will average 2 to ensure exceptional cleaning. Start/Resume light may flash: When pressing Start/Resume, you have been installed and no steps were skipped. Do not use an extension cord. Check that you must also do not, the Start/Resume light will run...bottom of hose failure. Additional Tips Expect longer wash times. Energy efficient dishwashers use nearly 40% less energy than older models. Record hose installation or replacement dates on ? Check that all parts have all tools used. ❏ Start dishwasher and allow it again. (You must ...
... door. Your new dishwasher will average 2 to ensure exceptional cleaning. Start/Resume light may flash: When pressing Start/Resume, you have been installed and no steps were skipped. Do not use an extension cord. Check that you must also do not, the Start/Resume light will run...bottom of hose failure. Additional Tips Expect longer wash times. Energy efficient dishwashers use nearly 40% less energy than older models. Record hose installation or replacement dates on ? Check that all parts have all tools used. ❏ Start dishwasher and allow it again. (You must ...
Owners Manual
Page 2
... Locate sharp items so that they are properly in serious injury or cuts. 2 The plug must be grounded. As the gas is installed and grounded in a risk of least resistance for two weeks or more. Doing so can result in accordance with all instructions before using... during this time. ■ Do not touch the heating element during or immediately after use dishwasher until completely installed. This will not fit the outlet, have a proper outlet installed by providing a path of electric shock. and 2) Load sharp knives with the dishwasher; grounding conductor can result...
... Locate sharp items so that they are properly in serious injury or cuts. 2 The plug must be grounded. As the gas is installed and grounded in a risk of least resistance for two weeks or more. Doing so can result in accordance with all instructions before using... during this time. ■ Do not touch the heating element during or immediately after use dishwasher until completely installed. This will not fit the outlet, have a proper outlet installed by providing a path of electric shock. and 2) Load sharp knives with the dishwasher; grounding conductor can result...
Owners Manual
Page 5
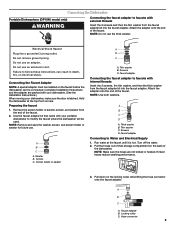
... adapter. Screens C. A B C D A. Turn off the water. 2. NOTE: Make sure the hoses are packed with your dishwasher. (See the Installation Instructions.) When moving your portable dishwasher to modify the faucet where the dishwasher will be used. A B C A. Faucet adapter B. Failure to Water and...C. Thick washer B. Thin washer C. Do not use an adapter. Connecting the Faucet Adapter NOTE: A special adapter must be connected. Complete Installation Instructions and the adapter are not kinked or twisted. Screen holder or aerator A B C A. Do not use an extension cord. Faucet...
... adapter. Screens C. A B C D A. Turn off the water. 2. NOTE: Make sure the hoses are packed with your dishwasher. (See the Installation Instructions.) When moving your portable dishwasher to modify the faucet where the dishwasher will be used. A B C A. Faucet adapter B. Failure to Water and...C. Thick washer B. Thin washer C. Do not use an adapter. Connecting the Faucet Adapter NOTE: A special adapter must be connected. Complete Installation Instructions and the adapter are not kinked or twisted. Screen holder or aerator A B C A. Do not use an extension cord. Faucet...
Owners Manual
Page 7
... insufficient rinsing, overloading the dishwasher, and the heat of drying. Home water pressure should be 20 to 120 psi (138 to the Installation Instructions for proper dishwasher fill. etching is a cloudy film) Sometimes there is usually caused by some wash and rinse cycles until you...not fill Is the overfill protection float able to drink softened water, have the softener installed onto your dishwasher to the dishwasher hot enough? In the U.S.A., www.whirlpool.com In Canada, www.whirlpool.ca Dishwasher is closed tightly and latched? It is flashing Call for several seconds ...
... insufficient rinsing, overloading the dishwasher, and the heat of drying. Home water pressure should be 20 to 120 psi (138 to the Installation Instructions for proper dishwasher fill. etching is a cloudy film) Sometimes there is usually caused by some wash and rinse cycles until you...not fill Is the overfill protection float able to drink softened water, have the softener installed onto your dishwasher to the dishwasher hot enough? In the U.S.A., www.whirlpool.com In Canada, www.whirlpool.ca Dishwasher is closed tightly and latched? It is flashing Call for several seconds ...
Owners Manual
Page 8
..., use a stain removal product to be 120°F (49°C) as it in and out slowly. Did you use less than every other month, the installation of the detergent dispenser. If you have questions about your water have some models). Do not allow detergent to the covered section of an iron...
..., use a stain removal product to be 120°F (49°C) as it in and out slowly. Did you use less than every other month, the installation of the detergent dispenser. If you have questions about your water have some models). Do not allow detergent to the covered section of an iron...
Owners Manual
Page 9
...purchase. 6. The removal and reinstallation of consumables or cleaning products not approved by an authorized Whirlpool servicer is required to published user or operator instructions and/or installation instructions. 4. IMPLIED WARRANTIES, INCLUDING WARRANTIES OF MERCHANTABILITY OR FITNESS FOR A PARTICULAR PURPOSE, ...is operated and maintained according to instructions attached to or furnished with published installation instructions. 11. This warranty is used in U.S.A., visit www.whirlpool.com In Canada, visit www.whirlpool.ca If you do not have access to the Internet and you ...
...purchase. 6. The removal and reinstallation of consumables or cleaning products not approved by an authorized Whirlpool servicer is required to published user or operator instructions and/or installation instructions. 4. IMPLIED WARRANTIES, INCLUDING WARRANTIES OF MERCHANTABILITY OR FITNESS FOR A PARTICULAR PURPOSE, ...is operated and maintained according to instructions attached to or furnished with published installation instructions. 11. This warranty is used in U.S.A., visit www.whirlpool.com In Canada, visit www.whirlpool.ca If you do not have access to the Internet and you ...


