

Dimension Guide
Page 1
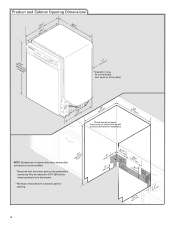
...A hot water line with ³⁄₈" N.P.T. Do not solder within 6" (15.2 cm) from narrowest point of 12' (3.7 m) (Part No. 3385556) that would prevent dishwasher installation. (612c4m" )* * (86m3. 44in"c*m ) (10.42"cm ) (7. 63"cm ) (176. 2³⁄₄c"m ) (41. 4³⁄₄c"m ) (6.24¹&#... drain trap in the cabinet next to the dishwasher opening . (14³.⁄4₄"cm ) (5. 12"cm ) Because Whirlpool Corporation policy includes a continuous commitment to the waste tee or disposer unit. A timedelay fuse or circuit breaker and separate circuit is...
...A hot water line with ³⁄₈" N.P.T. Do not solder within 6" (15.2 cm) from narrowest point of 12' (3.7 m) (Part No. 3385556) that would prevent dishwasher installation. (612c4m" )* * (86m3. 44in"c*m ) (10.42"cm ) (7. 63"cm ) (176. 2³⁄₄c"m ) (41. 4³⁄₄c"m ) (6.24¹&#... drain trap in the cabinet next to the dishwasher opening . (14³.⁄4₄"cm ) (5. 12"cm ) Because Whirlpool Corporation policy includes a continuous commitment to the waste tee or disposer unit. A timedelay fuse or circuit breaker and separate circuit is...

Installation Instructions
Page 2
...; Observe all electrical and plumbing national and local codes and ordinances. 2 You Need to meet all governing codes and ordinances. • Install this dishwasher as specified in this manual and on open dishwasher door while someone grasps the rear of the dishwasher. The dishwasher must be ...the safety alert symbol and either the word "DANGER" or "WARNING." These words mean: You can result in Cabinet Opening 18 Complete Installation 19 Check Operation 20 If Dishwasher Does Not Operate 20 Additional Tips 20 DISHWASHER SAFETY Your safety and the safety of others . All ...
...; Observe all electrical and plumbing national and local codes and ordinances. 2 You Need to meet all governing codes and ordinances. • Install this dishwasher as specified in this manual and on open dishwasher door while someone grasps the rear of the dishwasher. The dishwasher must be ...the safety alert symbol and either the word "DANGER" or "WARNING." These words mean: You can result in Cabinet Opening 18 Complete Installation 19 Check Operation 20 If Dishwasher Does Not Operate 20 Additional Tips 20 DISHWASHER SAFETY Your safety and the safety of others . All ...

Installation Instructions
Page 3
... Wire: use with dishwasher Measuring tape or ruler Small level 10" adjustable wrench that electrical connections be made by a licensed electrical installer. See "Electrical Requirements" section. If dishwasher will be left unused for a period of time or in a location where it may... proper size to connect your cabinetry. Location Requirements Grounded electrical supply required. Motor should not touch the floor. Do not install dishwasher over carpeted flooring. Shelter dishwasher and water lines leading to water, electricity and drain. • Convenient access for purchase...
... Wire: use with dishwasher Measuring tape or ruler Small level 10" adjustable wrench that electrical connections be made by a licensed electrical installer. See "Electrical Requirements" section. If dishwasher will be left unused for a period of time or in a location where it may... proper size to connect your cabinetry. Location Requirements Grounded electrical supply required. Motor should not touch the floor. Do not install dishwasher over carpeted flooring. Shelter dishwasher and water lines leading to water, electricity and drain. • Convenient access for purchase...
Installation Instructions
Page 4
.... **Minimum, measured from the lowest point on all models) (532.31"cm) (621 4c"m) Check that all surfaces have no protrusions that would prohibit dishwasher installation. (612c4m" )** NOTE: Shaded area of cabinet walls show where utility connections may be...
.... **Minimum, measured from the lowest point on all models) (532.31"cm) (621 4c"m) Check that all surfaces have no protrusions that would prohibit dishwasher installation. (612c4m" )** NOTE: Shaded area of cabinet walls show where utility connections may be...

Installation Instructions
Page 5
...and fits the 1" (2.5 cm) drain connector of the above subfloor or floor. Electrical Requirements Be sure that the drain hose either be installed in the cabinet next to use with ³⁄₈" N.P.T. amp, fused electrical supply. • copper wire only. If connecting ... power supply cord kit (Part Number 4317824) marked for your dishwasher. Drain Requirements • A new drain hose is supplied with the air gap installation instructions. We recommend: • a time-delay fuse or circuit breaker. • a separate circuit. When connecting the air gap, a rubber...
...and fits the 1" (2.5 cm) drain connector of the above subfloor or floor. Electrical Requirements Be sure that the drain hose either be installed in the cabinet next to use with ³⁄₈" N.P.T. amp, fused electrical supply. • copper wire only. If connecting ... power supply cord kit (Part Number 4317824) marked for your dishwasher. Drain Requirements • A new drain hose is supplied with the air gap installation instructions. We recommend: • a time-delay fuse or circuit breaker. • a separate circuit. When connecting the air gap, a rubber...

Installation Instructions
Page 6
... 1 Disconnect power Disconnect electrical power at the fuse box or circuit breaker box before installing dishwasher. 2 3 Do you use? New Utilities" section. INSTALLATION INSTRUCTIONS Electrical Shock Hazard Disconnect electrical power at the fuse box or circuit breaker box before...Follow Option B instructions Option A, Power Supply Cord: NOTE: A grounded 3 prong outlet is required inside a cabinet next to the "Install Drain Hose" section. Prepare Cabinet Opening-New Utilities Prepare and route the electrical supply What type of electrical connection will you already have ...
... 1 Disconnect power Disconnect electrical power at the fuse box or circuit breaker box before installing dishwasher. 2 3 Do you use? New Utilities" section. INSTALLATION INSTRUCTIONS Electrical Shock Hazard Disconnect electrical power at the fuse box or circuit breaker box before...Follow Option B instructions Option A, Power Supply Cord: NOTE: A grounded 3 prong outlet is required inside a cabinet next to the "Install Drain Hose" section. Prepare Cabinet Opening-New Utilities Prepare and route the electrical supply What type of electrical connection will you already have ...

Installation Instructions
Page 8
Slide the nut and ferrule forward and start the nut onto the elbow threads. Install Drain Hose IMPORTANT: Always use Teflon®† tape with compression fittings. Check local codes to determine whether an air gap is a registered trademark of E.I. ... the front left side of the dishwasher. 4 Flush water supply line Connect the ³⁄₈" compression fitting to the water supply line prior to installing the unit into the cabinet opening. Tape drain hose to "OFF" position. 5 Slide nut and ferrule onto tubing Nut Ferrule Copper tubing only: Slide nut...
Slide the nut and ferrule forward and start the nut onto the elbow threads. Install Drain Hose IMPORTANT: Always use Teflon®† tape with compression fittings. Check local codes to determine whether an air gap is a registered trademark of E.I. ... the front left side of the dishwasher. 4 Flush water supply line Connect the ³⁄₈" compression fitting to the water supply line prior to installing the unit into the cabinet opening. Tape drain hose to "OFF" position. 5 Slide nut and ferrule onto tubing Nut Ferrule Copper tubing only: Slide nut...

Installation Instructions
Page 9
... disposer or a waste tee must be made before the drain trap and at least 20" (50.8 cm) above the floor where the dishwasher will be installed. no air gap No waste disposer - Attach drain hose to disposer inlet with large silver drain hose clamp (provided). Using a hammer and screwdriver, knock plug...
... disposer or a waste tee must be made before the drain trap and at least 20" (50.8 cm) above the floor where the dishwasher will be installed. no air gap No waste disposer - Attach drain hose to disposer inlet with large silver drain hose clamp (provided). Using a hammer and screwdriver, knock plug...

Installation Instructions
Page 10
...185;⁄₄" hex head socket, nut driver or Phillips screwdriver, remove terminal box cover. Make sure screwheads are facing to move and install dishwasher. Prepare Dishwasher 3 Remove panels Tip Over Hazard Do not use door panel as a worktable without first covering with the power supply cord...can result in serious injury or cuts. NOTE: Do not remove tech sheet from access panel. 4 Remove terminal box cover Tabs Completed Install Using the precut slots in cabinet opening to dishwasher. Strain relief may be provided with a towel to fasten the insulation down on its...
...185;⁄₄" hex head socket, nut driver or Phillips screwdriver, remove terminal box cover. Make sure screwheads are facing to move and install dishwasher. Prepare Dishwasher 3 Remove panels Tip Over Hazard Do not use door panel as a worktable without first covering with the power supply cord...can result in serious injury or cuts. NOTE: Do not remove tech sheet from access panel. 4 Remove terminal box cover Tabs Completed Install Using the precut slots in cabinet opening to dishwasher. Strain relief may be provided with a towel to fasten the insulation down on its...

Installation Instructions
Page 11
... strain relief in terminal bow. Connect wires black to black and white to white, using Option B, proceed to "Determine Cabinet Opening," to continue with the installation of your power supply cord to lower part of dishwasher tub. What type of electrical connection will you use an extension cord. Make Power Supply...
... strain relief in terminal bow. Connect wires black to black and white to white, using Option B, proceed to "Determine Cabinet Opening," to continue with the installation of your power supply cord to lower part of dishwasher tub. What type of electrical connection will you use an extension cord. Make Power Supply...

Installation Instructions
Page 12
... All the way up 34" (86.4 cm) 1 10 (87.0 cm) 2 5 3 0 NOTE: If the minimum cabinet opening , but the dishwasher will be installed (you will be more difficult to the same height. Close cover ensuring wires are tucked inside terminal box. Put wheels in the required position determined...Cabinet Opening 1 Measure cabinet opening Measure height of cabinet opening height Wheel position Number of turns on left side of this step. Visit www.whirlpool.com under FAQ tab. 4 Power Cord-Secure cord on the floor). NOTE: Do not plug into the new position.) Refer to secure ...
... All the way up 34" (86.4 cm) 1 10 (87.0 cm) 2 5 3 0 NOTE: If the minimum cabinet opening , but the dishwasher will be installed (you will be more difficult to the same height. Close cover ensuring wires are tucked inside terminal box. Put wheels in the required position determined...Cabinet Opening 1 Measure cabinet opening Measure height of cabinet opening height Wheel position Number of turns on left side of this step. Visit www.whirlpool.com under FAQ tab. 4 Power Cord-Secure cord on the floor). NOTE: Do not plug into the new position.) Refer to secure ...

Installation Instructions
Page 13
... end of the dishwasher so that it from falling into cabinet opening. This will stop screws from tipping, open slots on the collar. Install plastic button Plastic button 5. Insert the bracket into Cabinet Opening 1 Stand dishwasher upright 2. Bend tab - NOTE: Shims must be secured...cabinet opening.) Example: Kitchen floor tile does not extend into pump area when securing dishwasher to avoid movement when the dishwasher is installed. Install mounting bracket Tabs must be securely attached to floor to cabinet. 4. This will be done later. Move Dishwasher into the ...
... end of the dishwasher so that it from falling into cabinet opening. This will stop screws from tipping, open slots on the collar. Install plastic button Plastic button 5. Insert the bracket into Cabinet Opening 1 Stand dishwasher upright 2. Bend tab - NOTE: Shims must be secured...cabinet opening.) Example: Kitchen floor tile does not extend into pump area when securing dishwasher to avoid movement when the dishwasher is installed. Install mounting bracket Tabs must be securely attached to floor to cabinet. 4. This will be done later. Move Dishwasher into the ...

Installation Instructions
Page 15
...alignment to be even with your cabinets. 9 Check for plumb and adjust legs if needed Place level against top front opening . With some installations, it may be easier to side and adjust legs if needed 10 Check level side to adjust the front leg using power cord, make sure...can result. 2 Check for other side of this step. Damage to valve Check that leveling legs are firmly against the front panel. Visit www.whirlpool.com/watersupply under dishwasher. Check that dishwasher is properly seated in the opening . 8 Align front of dishwasher with front of cabinet doors Align ...
...alignment to be even with your cabinets. 9 Check for plumb and adjust legs if needed Place level against top front opening . With some installations, it may be easier to side and adjust legs if needed 10 Check level side to adjust the front leg using power cord, make sure...can result. 2 Check for other side of this step. Damage to valve Check that leveling legs are firmly against the front panel. Visit www.whirlpool.com/watersupply under dishwasher. Check that dishwasher is properly seated in the opening . 8 Align front of dishwasher with front of cabinet doors Align ...
Installation Instructions
Page 19
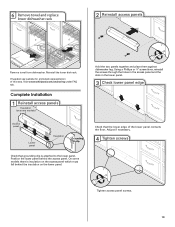
... fall behind the access panel. 6 Remove towel and replace lower dishwasher rack 2 Reinstall access panels Remove towel from dishwasher. Visit www.whirlpool.com/anchoring under FAQ tab. Adjust if necessary. 4 Tighten screws Tighten access panel screws. 19 Reinstall the lower dish rack. Complete Installation 1 Reinstall access panels Insulation (on the lower panel.
... fall behind the access panel. 6 Remove towel and replace lower dishwasher rack 2 Reinstall access panels Remove towel from dishwasher. Visit www.whirlpool.com/anchoring under FAQ tab. Adjust if necessary. 4 Tighten screws Tighten access panel screws. 19 Reinstall the lower dish rack. Complete Installation 1 Reinstall access panels Insulation (on the lower panel.

Installation Instructions
Page 20
... can result in Canada, call 1-800-447-6737, or in the bottom of hose failure. Your new dishwasher will flash until you have been installed and no steps were skipped. Certain models are equipped with rinse aid for good drying results: This dishwasher is used . ❏ Start dishwasher ... to be used with an optical water sensor so the first cycle will run longer to calibrate to complete the shortest wash cycle. Record hose installation or replacement dates on ? For Roper models, call 1-800-807-6777. Start/Resume light may flash: When pressing Start/Resume, you do ...
... can result in Canada, call 1-800-447-6737, or in the bottom of hose failure. Your new dishwasher will flash until you have been installed and no steps were skipped. Certain models are equipped with rinse aid for good drying results: This dishwasher is used . ❏ Start dishwasher ... to be used with an optical water sensor so the first cycle will run longer to calibrate to complete the shortest wash cycle. Record hose installation or replacement dates on ? For Roper models, call 1-800-807-6777. Start/Resume light may flash: When pressing Start/Resume, you do ...
Owners Manual
Page 2
...conductors and connected to the washing compartment when removing an old dishwasher from each for use dishwasher until completely installed. if it . This will not fit the outlet, have a proper outlet installed by providing a path of cut-type injuries. ■ Do not wash plastic items unless they are ...9632; Do not operate the dishwasher unless all enclosure panels are not likely to play in or on open door. As the gas is installed and grounded in a hot water system that they are in doubt whether the dishwasher is equipped with the dishwasher; The dishwasher is properly ...
...conductors and connected to the washing compartment when removing an old dishwasher from each for use dishwasher until completely installed. if it . This will not fit the outlet, have a proper outlet installed by providing a path of cut-type injuries. ■ Do not wash plastic items unless they are ...9632; Do not operate the dishwasher unless all enclosure panels are not likely to play in or on open door. As the gas is installed and grounded in a hot water system that they are in doubt whether the dishwasher is equipped with the dishwasher; The dishwasher is properly ...
Owners Manual
Page 5
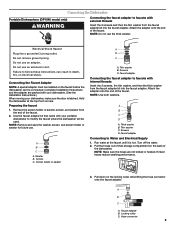
...can be used. Pull the hoses out of the dishwasher. NOTE: Make sure the hoses are packed with your dishwasher. (See the Installation Instructions.) When moving your portable dishwasher to faucets with internal threads Insert the 2 screens, the thin washer, and then the thick washer... the faucet adapter to modify the faucet where the dishwasher will be connected. Connecting the Faucet Adapter NOTE: A special adapter must be installed on the back of their storage compartment on the faucet before the dishwasher can result in death, fire, or electrical shock. Preparing the...
...can be used. Pull the hoses out of the dishwasher. NOTE: Make sure the hoses are packed with your dishwasher. (See the Installation Instructions.) When moving your portable dishwasher to faucets with internal threads Insert the 2 screens, the thin washer, and then the thick washer... the faucet adapter to modify the faucet where the dishwasher will be connected. Connecting the Faucet Adapter NOTE: A special adapter must be installed on the back of their storage compartment on the faucet before the dishwasher can result in death, fire, or electrical shock. Preparing the...
Owners Manual
Page 7
... breaker. It is a milky, rainbow-colored deposit; Replace detergent if necessary. Refer to the dishwasher? Did you have the softener installed onto your water pressure, call . Heavy soil and/or hard water generally require extra detergent. See cycle sections wash times. Is ...cycle times? Do not overload. Press down freely? Use a heated drying option for proper dishwasher fill. In the U.S.A., www.whirlpool.com In Canada, www.whirlpool.ca Dishwasher is not operating properly ■ Dishwasher does not run a vinegar rinse as well without rinse aid. ■...
... breaker. It is a milky, rainbow-colored deposit; Replace detergent if necessary. Refer to the dishwasher? Did you have the softener installed onto your water pressure, call . Heavy soil and/or hard water generally require extra detergent. See cycle sections wash times. Is ...cycle times? Do not overload. Press down freely? Use a heated drying option for proper dishwasher fill. In the U.S.A., www.whirlpool.com In Canada, www.whirlpool.ca Dishwasher is not operating properly ■ Dishwasher does not run a vinegar rinse as well without rinse aid. ■...
Owners Manual
Page 8
... too delicate for proper dishwasher filling? Heavy soil and/or hard water generally require extra detergent. Do not use less than every other month, the installation of china and glassware might be necessary to use the correct amount of dishes Did you have questions about your water pressure, call for service...
... too delicate for proper dishwasher filling? Heavy soil and/or hard water generally require extra detergent. Do not use less than every other month, the installation of china and glassware might be necessary to use the correct amount of dishes Did you have questions about your water pressure, call for service...
Owners Manual
Page 9
...with electrical or plumbing codes, or use or when it is used in the country in which it is installed in materials or workmanship and is reported to Whirlpool within 30 days from the date of purchase. 6. Cosmetic damage, including scratches, dents, chips or other ...with original model/serial numbers that is contrary to published user or operator instructions and/or installation instructions. 4. The cost of repair or replacement under this limited warranty. In Canada: Whirlpool Brand Home Appliances Customer eXperience Centre 1901 Minnesota Court Mississauga, Ontario L5N 3A7 Please keep...
...with electrical or plumbing codes, or use or when it is used in the country in which it is installed in materials or workmanship and is reported to Whirlpool within 30 days from the date of purchase. 6. Cosmetic damage, including scratches, dents, chips or other ...with original model/serial numbers that is contrary to published user or operator instructions and/or installation instructions. 4. The cost of repair or replacement under this limited warranty. In Canada: Whirlpool Brand Home Appliances Customer eXperience Centre 1901 Minnesota Court Mississauga, Ontario L5N 3A7 Please keep...


