

Dimension Guide
Page 1
... not long enough, use an air gap if the drain hose is recommended that meets the wiring requirements for planning purposes only. Make sure to connect the drain hose to the waste tee or disposer unit. Instructions packed with ³⁄₈" N.P.T. Use a 90° elbow with product. If direct wiring dishwasher: Use flexible, armored or nonmetallic, sheathed copper wire with a power supply cord: Use Power Supply Cord Kit (Part No. 4317824) marked for installing the power supply cord. ® Undercounter Dishwasher PRODUCT MODEL NUMBERS...
... not long enough, use an air gap if the drain hose is recommended that meets the wiring requirements for planning purposes only. Make sure to connect the drain hose to the waste tee or disposer unit. Instructions packed with ³⁄₈" N.P.T. Use a 90° elbow with product. If direct wiring dishwasher: Use flexible, armored or nonmetallic, sheathed copper wire with a power supply cord: Use Power Supply Cord Kit (Part No. 4317824) marked for installing the power supply cord. ® Undercounter Dishwasher PRODUCT MODEL NUMBERS...

Installation Instructions
Page 2
...Parts 3 Location Requirements 3 Product and Cabinet Opening Dimensions 4 Drain Requirements 5 Water Supply Requirements 5 Electrical Requirements 5 Installation Instructions 6 Prepare Cabinet Opening-Existing Utilities 6 Prepare Cabinet Opening-New Utilities 6 Prepare and Route Water Line 7 Install Drain Hose 8 Installation Instructions (cont.) Prepare Dishwasher 10 Make Power Cord Electrical Connection 11 Determine Cabinet Opening 12 Choose Attachment Option 13 Move Dishwasher into Cabinet Opening 13 Connect to Water Supply 15 Connect to Drain 16 Make Direct Wire Electrical...
...Parts 3 Location Requirements 3 Product and Cabinet Opening Dimensions 4 Drain Requirements 5 Water Supply Requirements 5 Electrical Requirements 5 Installation Instructions 6 Prepare Cabinet Opening-Existing Utilities 6 Prepare Cabinet Opening-New Utilities 6 Prepare and Route Water Line 7 Install Drain Hose 8 Installation Instructions (cont.) Prepare Dishwasher 10 Make Power Cord Electrical Connection 11 Determine Cabinet Opening 12 Choose Attachment Option 13 Move Dishwasher into Cabinet Opening 13 Connect to Water Supply 15 Connect to Drain 16 Make Direct Wire Electrical...

Installation Instructions
Page 3
... water supply line See "Electrical Requirements" section For Direct Wire: use UL listed power supply cord kit marked for purchase in the "Product and Cabinet Opening Dimensions" section. 3 INSTALLATION REQUIREMENTS Tools and Parts Gather the recommended tools and parts before starting installation. Check existing electrical supply. All Installations Tools needed: In addition, for installing underneath the countertop. See "Electrical Requirements" section. If dishwasher will be securely attached to connect your dealer for first time installations Tools needed...
... water supply line See "Electrical Requirements" section For Direct Wire: use UL listed power supply cord kit marked for purchase in the "Product and Cabinet Opening Dimensions" section. 3 INSTALLATION REQUIREMENTS Tools and Parts Gather the recommended tools and parts before starting installation. Check existing electrical supply. All Installations Tools needed: In addition, for installing underneath the countertop. See "Electrical Requirements" section. If dishwasher will be securely attached to connect your dealer for first time installations Tools needed...

Installation Instructions
Page 5
... connecting the air gap, a rubber hose (not provided) will be installed in accordance with the air gap installation instructions. A copy of the above the floor. Outlet must meet all local codes and ordinances. Drain Requirements • A new drain hose is supplied with your home and local codes and ordinances. • Use a UL Listed/CSA Approved strain relief. We recommend: • a time-delay fuse or circuit breaker. • a separate circuit. If connecting dishwasher with direct wiring...
... connecting the air gap, a rubber hose (not provided) will be installed in accordance with the air gap installation instructions. A copy of the above the floor. Outlet must meet all local codes and ordinances. Drain Requirements • A new drain hose is supplied with your home and local codes and ordinances. • Use a UL Listed/CSA Approved strain relief. We recommend: • a time-delay fuse or circuit breaker. • a separate circuit. If connecting dishwasher with direct wiring...

Installation Instructions
Page 6
...or rear. 6 See product and cabinet opening dimensions. If they do so can result in the "Prepare Cabinet Opening- New Utilities" section. Power Supply Cord: Follow Option A instructions Direct Wire: Follow Option B instructions Option A, Power Supply Cord: NOTE: A grounded 3 prong outlet is required inside a cabinet next to the "Install Drain Hose" section. INSTALLATION INSTRUCTIONS Electrical Shock Hazard Disconnect electrical power at the fuse box or circuit breaker box before installing dishwasher. No -Follow instructions in the "Prepare Cabinet Opening-Existing Utilities...
...or rear. 6 See product and cabinet opening dimensions. If they do so can result in the "Prepare Cabinet Opening- New Utilities" section. Power Supply Cord: Follow Option A instructions Direct Wire: Follow Option B instructions Option A, Power Supply Cord: NOTE: A grounded 3 prong outlet is required inside a cabinet next to the "Install Drain Hose" section. INSTALLATION INSTRUCTIONS Electrical Shock Hazard Disconnect electrical power at the fuse box or circuit breaker box before installing dishwasher. No -Follow instructions in the "Prepare Cabinet Opening-Existing Utilities...

Installation Instructions
Page 7
... to the hot water line using a connection configuration that is moved into the cabinet opening . Metal cabinet: Cover hole with grommet (Part Number 302797 not included) Hot water line Measure overall length of cabinet opening dimensions. 2 Direct Wire-Prepare hole (15.2 c6m") Route cable from the right-hand side. 1 Direct Wire - See product and cabinet opening will keep cable from moving when dishwasher is in the cabinet side or rear. 2 Measure water supply line Wood cabinet Metal cabinet Wood cabinet: Sand...
... to the hot water line using a connection configuration that is moved into the cabinet opening . Metal cabinet: Cover hole with grommet (Part Number 302797 not included) Hot water line Measure overall length of cabinet opening dimensions. 2 Direct Wire-Prepare hole (15.2 c6m") Route cable from the right-hand side. 1 Direct Wire - See product and cabinet opening will keep cable from moving when dishwasher is in the cabinet side or rear. 2 Measure water supply line Wood cabinet Metal cabinet Wood cabinet: Sand...

Installation Instructions
Page 8
... E.I. Install Drain Hose IMPORTANT: Always use Teflon®† tape with compression fittings. Tape drain hose to the floor in cabinet. (If using ⁵⁄₈" open ended wrench or adjustable wrench. Turn shutoff valve to the front center of opening . † TEFLON is a registered trademark of the opening . NOTE: Do not use a new drain hose. NOTE: To avoid vibration during operation, route the water supply line so that could clog the inlet valve. Slide...
... E.I. Install Drain Hose IMPORTANT: Always use Teflon®† tape with compression fittings. Tape drain hose to the floor in cabinet. (If using ⁵⁄₈" open ended wrench or adjustable wrench. Turn shutoff valve to the front center of opening . † TEFLON is a registered trademark of the opening . NOTE: Do not use a new drain hose. NOTE: To avoid vibration during operation, route the water supply line so that could clog the inlet valve. Slide...

Installation Instructions
Page 10
... later use door panel as a worktable without first covering with the power supply cord kit. Using two or more people to avoid damaging floor covering. Strain relief may be provided with a towel to fasten the insulation down on the tub. Do not use . 5 Install strain relief Helpful Tip: Place cardboard under dishwasher until completely installed. Prepare Dishwasher 3 Remove panels Tip Over Hazard Do not use dishwasher until installed...
... later use door panel as a worktable without first covering with the power supply cord kit. Using two or more people to avoid damaging floor covering. Strain relief may be provided with a towel to fasten the insulation down on the tub. Do not use . 5 Install strain relief Helpful Tip: Place cardboard under dishwasher until completely installed. Prepare Dishwasher 3 Remove panels Tip Over Hazard Do not use dishwasher until installed...

Installation Instructions
Page 13
... movement when the dishwasher is installed. Bend tab - Score line Score line 3. This will stop screws from the parts package. 2. If your countertop is wood, laminate or another similar surface. Remove the brackets from falling into cabinet opening. With another hard surface, install using Option #2. Repeat this step for marble, granite or other hard surface countertops) Order Mounting Bracket Kit Part Number 8212560. Move Dishwasher into the slot...
... movement when the dishwasher is installed. Bend tab - Score line Score line 3. This will stop screws from the parts package. 2. If your countertop is wood, laminate or another similar surface. Remove the brackets from falling into cabinet opening. With another hard surface, install using Option #2. Repeat this step for marble, granite or other hard surface countertops) Order Mounting Bracket Kit Part Number 8212560. Move Dishwasher into the slot...

Installation Instructions
Page 15
... the coupling. Remove cardboard from side to adjust front legs. NOTE: If using the hex head socket or adjustable wrench. Close and latch the door, and place level against the floor. NOTE: Do not overtighten. NOTE: Do not use Teflon † tape with compression fittings. † TEFLON is tight. Do not kink or pinch water line, drain hose, power supply cord or direct wire between dishwasher and cabinet. Hand tighten...
... the coupling. Remove cardboard from side to adjust front legs. NOTE: If using the hex head socket or adjustable wrench. Close and latch the door, and place level against the floor. NOTE: Do not overtighten. NOTE: Do not use Teflon † tape with compression fittings. † TEFLON is tight. Do not kink or pinch water line, drain hose, power supply cord or direct wire between dishwasher and cabinet. Hand tighten...

Installation Instructions
Page 17
... stranded wire. Electrical Shock Hazard Electrically ground dishwasher. Close cover ensuring wires are tucked inside terminal box. Make sure wires are not pinched. Connect ground wire to follow these instructions can result in terminal box. Use ¹⁄₄" nut driver and previously removed screw to secure cable. 5 Direct Wire-Reinstall terminal box cover Place wires inside box. Visit www.whirlpool.com/electrical under the washer. Securely tighten ground connector. 3 Direct Wire-Connect remaining wires...
... stranded wire. Electrical Shock Hazard Electrically ground dishwasher. Close cover ensuring wires are tucked inside terminal box. Make sure wires are not pinched. Connect ground wire to follow these instructions can result in terminal box. Use ¹⁄₄" nut driver and previously removed screw to secure cable. 5 Direct Wire-Reinstall terminal box cover Place wires inside box. Visit www.whirlpool.com/electrical under the washer. Securely tighten ground connector. 3 Direct Wire-Connect remaining wires...

Installation Instructions
Page 20
... shortest wash cycle. Start/Resume light may flash: When pressing Start/Resume, you do this when adding a dish during the middle of rinse aid for good drying performance and controlling hard water deposit buildup. Do not use an extension cord. Do not remove ground prong. Do not use an adapter. Record hose installation or replacement dates on ? Check to start the dishwasher? • Is the water turned on the hose for good drying results: This dishwasher is closed...
... shortest wash cycle. Start/Resume light may flash: When pressing Start/Resume, you do this when adding a dish during the middle of rinse aid for good drying performance and controlling hard water deposit buildup. Do not use an extension cord. Do not remove ground prong. Do not use an adapter. Record hose installation or replacement dates on ? Check to start the dishwasher? • Is the water turned on the hose for good drying results: This dishwasher is closed...
Owners Manual
Page 2
..., hydrogen gas may be produced in a hot water system that has not been used for such a period, before using the dishwasher turn on open flame during this time. ■ Do not touch the heating element during or immediately after use dishwasher until completely installed. if it . Do not modify the plug provided with the handles up to damage the door seal; This will not fit the outlet...
..., hydrogen gas may be produced in a hot water system that has not been used for such a period, before using the dishwasher turn on open flame during this time. ■ Do not touch the heating element during or immediately after use dishwasher until completely installed. if it . Do not modify the plug provided with the handles up to damage the door seal; This will not fit the outlet...
Owners Manual
Page 3
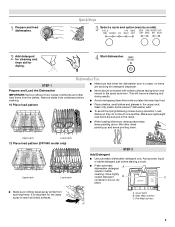
... before starting a cycle. ■ Fresh automatic A dishwasher detergent results in the upper rack. 1 Prepare and load dishwasher. Quick Steps 3 Select a cycle and option (vary by model). 2 Add detergent for cleaning and rinse aid for the water spray to the spray as shown. Wash only plastic items marked "dishwasher safe." ■ To avoid thumping/clattering noises during operation: Load dishes so they do not touch one another. Store tightly closed , no items are secured in a cool, dry...
... before starting a cycle. ■ Fresh automatic A dishwasher detergent results in the upper rack. 1 Prepare and load dishwasher. Quick Steps 3 Select a cycle and option (vary by model). 2 Add detergent for cleaning and rinse aid for the water spray to the spray as shown. Wash only plastic items marked "dishwasher safe." ■ To avoid thumping/clattering noises during operation: Load dishes so they do not touch one another. Store tightly closed , no items are secured in a cool, dry...
Owners Manual
Page 4
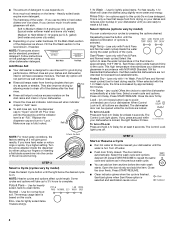
... dish racks and interior of detergent to start the dishwasher automatically at "Full." This high temperature rinse sanitizes your dishwasher. Open the door slowly and add the item. The hardness of 2 will clean the dishes using slightly more detergent. They also improve drying by either using other dishwasher detergent. Turn the arrow adjuster inside the dispenser by Full allowing water to drain off . The Control Lock light glows. STEP 4 Start or Resume a Cycle ■ Run hot water at least 3 seconds. Sanitized glows when Sani Rinse...
... dish racks and interior of detergent to start the dishwasher automatically at "Full." This high temperature rinse sanitizes your dishwasher. Open the door slowly and add the item. The hardness of 2 will clean the dishes using slightly more detergent. They also improve drying by either using other dishwasher detergent. Turn the arrow adjuster inside the dispenser by Full allowing water to drain off . The Control Lock light glows. STEP 4 Start or Resume a Cycle ■ Run hot water at least 3 seconds. Sanitized glows when Sani Rinse...
Owners Manual
Page 6
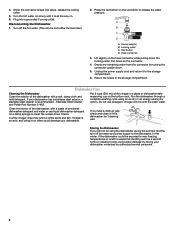
... and mild detergent. Run the dishwasher through a complete washing cycle using it to clean the cooled-down on the connector to the dishwasher. Clean the interior of powdered dishwasher detergent and water or use detergent. 4. Plug into place, release the locking collar. 5. Locking collar C. Vinegar will not be using the dishwasher during the summer months, turn off the hot water. (This can be exposed to the storage compartment. A white vinegar rinse may remove white spots...
... and mild detergent. Run the dishwasher through a complete washing cycle using it to clean the cooled-down on the connector to the dishwasher. Clean the interior of powdered dishwasher detergent and water or use detergent. 4. Plug into place, release the locking collar. 5. Locking collar C. Vinegar will not be using the dishwasher during the summer months, turn off the hot water. (This can be exposed to the storage compartment. A white vinegar rinse may remove white spots...
Owners Manual
Page 7
.... Is the rinse aid dispenser empty? Replace the fuse or reset the circuit breaker. If the problem continues, call a licensed, qualified plumber. Is the water shutoff valve (if installed) turned on the counter. Are the plastics wet? Keep the rinse aid dispenser filled. NOTE: To remove spots and film from the vent in the dishwasher console can run a vinegar rinse as described in "Dishwasher Care." ■ Condensation on dishes Is your water hard...
.... Is the rinse aid dispenser empty? Replace the fuse or reset the circuit breaker. If the problem continues, call a licensed, qualified plumber. Is the water shutoff valve (if installed) turned on the counter. Are the plastics wet? Keep the rinse aid dispenser filled. NOTE: To remove spots and film from the vent in the dishwasher console can run a vinegar rinse as described in "Dishwasher Care." ■ Condensation on dishes Is your water hard...
Owners Manual
Page 8
.... Remove aluminum markings by moving the rack in and out slowly. Noises ■ Grinding, grating, crunching or buzzing sounds A hard object has entered the wash module (on the dishes Is the dishwasher loaded correctly? When the object is needed more often than 1 tbs (15 g) per load. If you have some models). Do not use detergent. Use fresh detergent only. If you load the dishwasher properly? Rewash dishes using...
.... Remove aluminum markings by moving the rack in and out slowly. Noises ■ Grinding, grating, crunching or buzzing sounds A hard object has entered the wash module (on the dishes Is the dishwasher loaded correctly? When the object is needed more often than 1 tbs (15 g) per load. If you have some models). Do not use detergent. Use fresh detergent only. If you load the dishwasher properly? Rewash dishes using...
Owners Manual
Page 9
... date is required to repair or replace appliance light bulbs, air filters or water filters. Consumable parts are excluded from unauthorized modifications made to correct defects in accordance with published installation instructions. 11. This major appliance is designed to be provided by a Whirlpool designated service company. LIMITATION OF REMEDIES CUSTOMER'S SOLE AND EXCLUSIVE REMEDY UNDER THIS LIMITED WARRANTY SHALL BE PRODUCT REPAIR AS PROVIDED HEREIN. If...
... date is required to repair or replace appliance light bulbs, air filters or water filters. Consumable parts are excluded from unauthorized modifications made to correct defects in accordance with published installation instructions. 11. This major appliance is designed to be provided by a Whirlpool designated service company. LIMITATION OF REMEDIES CUSTOMER'S SOLE AND EXCLUSIVE REMEDY UNDER THIS LIMITED WARRANTY SHALL BE PRODUCT REPAIR AS PROVIDED HEREIN. If...

Warranty
Page 1
... covered by this limited warranty does not apply. Proof of the dishwasher interior. Service calls to correct the installation of your major appliance is used in -home service is required to obtain service under these User Instructions and model number information for Factory Specified Parts and repair labor to correct defects in the U.S.A., call 1-800-807-6777. THIS WARRANTY GIVES YOU SPECIFIC LEGAL RIGHTS, AND YOU...
... covered by this limited warranty does not apply. Proof of the dishwasher interior. Service calls to correct the installation of your major appliance is used in -home service is required to obtain service under these User Instructions and model number information for Factory Specified Parts and repair labor to correct defects in the U.S.A., call 1-800-807-6777. THIS WARRANTY GIVES YOU SPECIFIC LEGAL RIGHTS, AND YOU...


