Installation Instructions
Page 2
... reduce the chance of others . We have provided many important safety messages in a prominent location. TABLEOF CONTENTS DRYER SAFETY 2 iNSTALLATiON REQUIREMENTS 4 Location Requirements 4 Tools and Parts 5 Electrical Requirements 6 Gas Supply Requirements 7 Venting Requirements 8 iNSTALLATiON iNSTRUCTiONS - This information should be killed or seriously injured if you don't follow instructions.
... reduce the chance of others . We have provided many important safety messages in a prominent location. TABLEOF CONTENTS DRYER SAFETY 2 iNSTALLATiON REQUIREMENTS 4 Location Requirements 4 Tools and Parts 5 Electrical Requirements 6 Gas Supply Requirements 7 Venting Requirements 8 iNSTALLATiON iNSTRUCTiONS - This information should be killed or seriously injured if you don't follow instructions.
Installation Instructions
Page 3
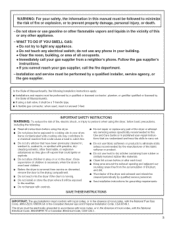
... gasoline, drycleaning solvents, other appliance. = WHAT TO DO iF YOU SMELL GAS: • Do not try to light any appliance. • Do not touch any part of the dryer and exhaust vent should be exposed to the weather. [] Do not use fabric softeners or products to eliminate static unless recommended by...
... gasoline, drycleaning solvents, other appliance. = WHAT TO DO iF YOU SMELL GAS: • Do not try to light any appliance. • Do not touch any part of the dryer and exhaust vent should be exposed to the weather. [] Do not use fabric softeners or products to eliminate static unless recommended by...
Installation Instructions
Page 4
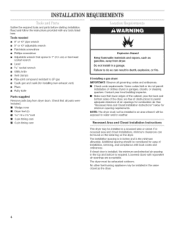
..." below for ease of air openings for installing new exhaust vent) [] Pliers [] Putty knife Parts supplied Remove parts bag from dryer. If closet door is required. If installing a gas dryer: IMPORTANT: Observe all parts were included. [] Wedge cone [] Dryer foot (4) [] %6"-18 x 21/2'' bolt [] 3... and compliance with any tools listed here. The installation spacing is the minimum allowable. INSTALLATIONREQUIREMENTS Gather the required tools and parts before starting installation. No other fuel-burning appliance may be installed in death, explosion, or fire. Read and follow ...
..." below for ease of air openings for installing new exhaust vent) [] Pliers [] Putty knife Parts supplied Remove parts bag from dryer. If closet door is required. If installing a gas dryer: IMPORTANT: Observe all parts were included. [] Wedge cone [] Dryer foot (4) [] %6"-18 x 21/2'' bolt [] 3... and compliance with any tools listed here. The installation spacing is the minimum allowable. INSTALLATIONREQUIREMENTS Gather the required tools and parts before starting installation. No other fuel-burning appliance may be installed in death, explosion, or fire. Read and follow ...

Installation Instructions
Page 7
... size can be used . If using 3/s"approved copper or aluminum tubing. It should be located in a confined area such as the dryer. Gas conversion kit part numbers are not required when the dryer is installed in the same room as a bathroom or closet, provision must be connected using natural gas, do...
... size can be used . If using 3/s"approved copper or aluminum tubing. It should be located in a confined area such as the dryer. Gas conversion kit part numbers are not required when the dryer is installed in the same room as a bathroom or closet, provision must be connected using natural gas, do...
Installation Instructions
Page 8
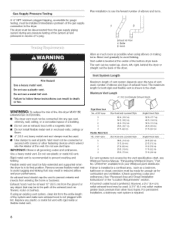
..., clean lint from the gas supply piping system during any object that may be at least 12" (30.5 cm) from your Whirlpool parts distributor. Fire Hazard Use a heavy metal vent. Vent System Length Maximum length of vent system depends upon the type of the vent...23 ft. (7.0 m) 19 ft. (5.8 m) 17 ft. (5.2 m) 15 ft. (4.6 m) For vent systems not covered by the vent specification chart, see Whirlpool Service Manual, "Exhausting Whirlpool Dryers," Part No. Do not use a metal foil vent. Remove excess flexible metal vent to use an exhaust hood with lint. Exhaust hood must not...
..., clean lint from the gas supply piping system during any object that may be at least 12" (30.5 cm) from your Whirlpool parts distributor. Fire Hazard Use a heavy metal vent. Vent System Length Maximum length of vent system depends upon the type of the vent...23 ft. (7.0 m) 19 ft. (5.8 m) 17 ft. (5.2 m) 15 ft. (4.6 m) For vent systems not covered by the vent specification chart, see Whirlpool Service Manual, "Exhausting Whirlpool Dryers," Part No. Do not use a metal foil vent. Remove excess flexible metal vent to use an exhaust hood with lint. Exhaust hood must not...
Installation Instructions
Page 9
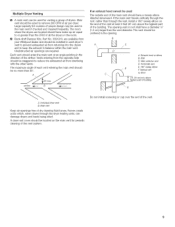
...pointing in the direction of all the dryers in the room. [] Back-draft Damper Kits, Part No. 3391910, are required. I ...... Unobstructed air openings are available from your Whirlpool dealer and should be centered in balance within the main vent. Individualdryervent B.Main vent Keep air... A clean-out cover should have a sweep elbow directed downward. t80 ° sweepelbow E Verticalvent .Roo (61 crn)rain, above the highest part of dryers. Multiple Dryer Venting [] A main vent can damage dryers and loads being dried. Large-capacity lint screens of proper design may be ...
...pointing in the direction of all the dryers in the room. [] Back-draft Damper Kits, Part No. 3391910, are required. I ...... Unobstructed air openings are available from your Whirlpool dealer and should be centered in balance within the main vent. Individualdryervent B.Main vent Keep air... A clean-out cover should have a sweep elbow directed downward. t80 ° sweepelbow E Verticalvent .Roo (61 crn)rain, above the highest part of dryers. Multiple Dryer Venting [] A main vent can damage dryers and loads being dried. Large-capacity lint screens of proper design may be ...
Installation Instructions
Page 10
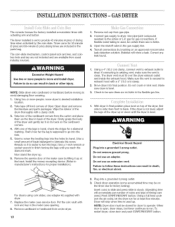
...up . Correct any leak found. Excessive Weight Hazard Use two or more people, move and install dryer. Open dryer and remove the literature and parts packages. Remove cardboard or hardboard from gas pipe. 2. INSTALLATIOINNSTRUCTION-S GASDRYER The console houses the factory-installed accumulator timer with dryer. 7= Replace the...Dryer will stop when time is secured to dryer. Timer cams for gas connections. Check to the action of the legs in the parts bag. If the dryer is clean. Wipe the interior of dryer. Firmly grasp the body of the dryer and gently lay it is...
...up . Correct any leak found. Excessive Weight Hazard Use two or more people, move and install dryer. Open dryer and remove the literature and parts packages. Remove cardboard or hardboard from gas pipe. 2. INSTALLATIOINNSTRUCTION-S GASDRYER The console houses the factory-installed accumulator timer with dryer. 7= Replace the...Dryer will stop when time is secured to dryer. Timer cams for gas connections. Check to the action of the legs in the parts bag. If the dryer is clean. Wipe the interior of dryer. Firmly grasp the body of the dryer and gently lay it is...

Installation Instructions
Page 11
... on its back on the floor in back or other injury. Firmly grasp the body of the drum thoroughly with lock and key in the parts bag. Start to screw the leveling legs into the hole. 5. Remove the service door of the dryer. Connect remaining 2 supply wires to center terminal ... (center) of the legs in death, fire, or electrical shock. Put the coin vault with a damp cloth. 3. Open dryer and remove the literature and parts packages. That's how far the leg is manufactured with a clothes dryer. Use a UL listed strain relief, Disconnect power before moving to do so can result...
... on its back on the floor in back or other injury. Firmly grasp the body of the drum thoroughly with lock and key in the parts bag. Start to screw the leveling legs into the hole. 5. Remove the service door of the dryer. Connect remaining 2 supply wires to center terminal ... (center) of the legs in death, fire, or electrical shock. Put the coin vault with a damp cloth. 3. Open dryer and remove the literature and parts packages. That's how far the leg is manufactured with a clothes dryer. Use a UL listed strain relief, Disconnect power before moving to do so can result...


