
Installation Instructions
Page 2
...15 CHANGING TO A 30- Always read and obey all safety messages. This information should be obtained from your appliance. We have provided many important safety messages in this or any other flammable vapors and liquids in the vicinity of... Installation 10 INSTALLATION INSTRUCTIONS - TABLE OF CONTENTS DRYER SAFETY 2 INSTALLATION REQUIREMENTS 4 Tools and Parts 4 Location Requirements 4 Electrical Requirements 6 Gas Supply Requirements 7 Venting Requirements 8 INSTALLATION INSTRUCTIONS - SÉCHEUSE ÉLECTRIQUE 29 Installation d'une glissière et d'une caisse ...
...15 CHANGING TO A 30- Always read and obey all safety messages. This information should be obtained from your appliance. We have provided many important safety messages in this or any other flammable vapors and liquids in the vicinity of... Installation 10 INSTALLATION INSTRUCTIONS - TABLE OF CONTENTS DRYER SAFETY 2 INSTALLATION REQUIREMENTS 4 Tools and Parts 4 Location Requirements 4 Electrical Requirements 6 Gas Supply Requirements 7 Venting Requirements 8 INSTALLATION INSTRUCTIONS - SÉCHEUSE ÉLECTRIQUE 29 Installation d'une glissière et d'une caisse ...
Installation Instructions
Page 3
Follow the gas supplier's instructions. • If you understand and have the skills to carry out. ■ Do not dry articles that have been previously cleaned in, washed in, soaked in, or spotted with gasoline, drycleaning solvents, other appliance. - Close supervision of fire, electric shock, or injury to persons when using the dryer...
Follow the gas supplier's instructions. • If you understand and have the skills to carry out. ■ Do not dry articles that have been previously cleaned in, washed in, soaked in, or spotted with gasoline, drycleaning solvents, other appliance. - Close supervision of fire, electric shock, or injury to persons when using the dryer...
Installation Instructions
Page 4
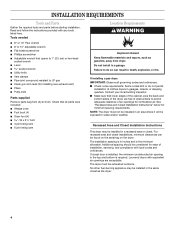
No other fuel-burning appliance may be considered for installing new exhaust vent) ■... with any tools listed here. Louvered doors with equivalent air openings are free of obstructions to LP gas ■ Caulk gun and caulk (for ease of the dryer, are acceptable. INSTALLATION REQUIREMENTS Tools ... Installation Instructions This dryer may be exposed to do not permit installation of air openings for minimum spacing requirements. If installing a gas dryer: IMPORTANT: Observe all parts were included. ■ Wedge cone ■ Foot boot (4) ■ Dryer foot (4 ...
No other fuel-burning appliance may be considered for installing new exhaust vent) ■... with any tools listed here. Louvered doors with equivalent air openings are free of obstructions to LP gas ■ Caulk gun and caulk (for ease of the dryer, are acceptable. INSTALLATION REQUIREMENTS Tools ... Installation Instructions This dryer may be exposed to do not permit installation of air openings for minimum spacing requirements. If installing a gas dryer: IMPORTANT: Observe all parts were included. ■ Wedge cone ■ Foot boot (4) ■ Dryer foot (4 ...
Installation Instructions
Page 8
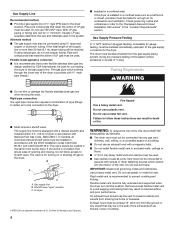
... all joints. If using ³⁄₈" approved copper or aluminum tubing. Pipe joint compounds that may also be required. Flexible metal appliance connector: ■ It is recommended that allows ease of the dryer is provided with a magnetic latch. ■ Do not install flexible...be in accordance with a manual shutoff valve installed within 6 ft. (1.8 m) of dryer in a location that a new flexible stainless steel gas line, design-certified by CSA International, be installed immediately upstream of the exhaust (such as the dryer. Rigid pipe connection: The rigid pipe...
... all joints. If using ³⁄₈" approved copper or aluminum tubing. Pipe joint compounds that may also be required. Flexible metal appliance connector: ■ It is recommended that allows ease of the dryer is provided with a magnetic latch. ■ Do not install flexible...be in accordance with a manual shutoff valve installed within 6 ft. (1.8 m) of dryer in a location that a new flexible stainless steel gas line, design-certified by CSA International, be installed immediately upstream of the exhaust (such as the dryer. Rigid pipe connection: The rigid pipe...

Installation Instructions
Page 12
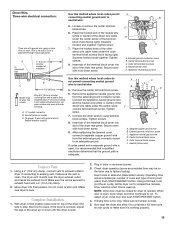
...power supply cord must be identified by a green cover and the neutral conductor by a white cover. 5. Remove the appliance neutral ground wire from the external ground conductor screw. Tighten screws. 10. Strain relief screw F. Ground wire 12 Tighten... block cover D. Strain relief screws strain relief. 4. Neutral (white) E. Insert tab of the terminal block cover into the hole below the terminal block opening. Appliance neutral ground wire C. A C D B A. Connect the neutral wire (white or center) of the power supply cord under center, silver-colored terminal block screw...
...power supply cord must be identified by a green cover and the neutral conductor by a white cover. 5. Remove the appliance neutral ground wire from the external ground conductor screw. Tighten screws. 10. Strain relief screw F. Ground wire 12 Tighten... block cover D. Strain relief screws strain relief. 4. Neutral (white) E. Insert tab of the terminal block cover into the hole below the terminal block opening. Appliance neutral ground wire C. A C D B A. Connect the neutral wire (white or center) of the power supply cord under center, silver-colored terminal block screw...

Installation Instructions
Page 13
... Strain relief screw G. Connect the appliance neutral ground wire and the neutral wire (white or center) of the terminal block. Appliance neutral ground wire D. Ring terminals C. E 7. Secure cover with hold -down screw. 10. Appliance neutral ground wire Use this method where...-colored terminal block screw. Connect the other wires to neutral wire: A B 5. D A. Use this conductor. Remove the appliance neutral ground wire from the external ground conductor screw to B this method where local codes permit connecting neutral ground wire to outer...
... Strain relief screw G. Connect the appliance neutral ground wire and the neutral wire (white or center) of the terminal block. Appliance neutral ground wire D. Ring terminals C. E 7. Secure cover with hold -down screw. 10. Appliance neutral ground wire Use this method where...-colored terminal block screw. Connect the other wires to neutral wire: A B 5. D A. Use this conductor. Remove the appliance neutral ground wire from the external ground conductor screw to B this method where local codes permit connecting neutral ground wire to outer...

Installation Instructions
Page 14
...green or bare) D. 10-gauge, 3 wire with ground wire in death, fire, or electrical shock. Remove the center terminal block screw. 6. Remove the appliance neutral ground wire from 3 remaining wires. Fasten under the center screw of the direct wire cable to disconnect box 1" (2.5 cm) of wires stripped of ...the terminal block cover into the hole below the terminal block opening. Secure cover with flexible metallic conduit. External ground conductor screw B. Appliance neutral ground wire C. Center terminal block screw D. Outer terminal block screws E. Green or bare ground wire
...green or bare) D. 10-gauge, 3 wire with ground wire in death, fire, or electrical shock. Remove the center terminal block screw. 6. Remove the appliance neutral ground wire from 3 remaining wires. Fasten under the center screw of the direct wire cable to disconnect box 1" (2.5 cm) of wires stripped of ...the terminal block cover into the hole below the terminal block opening. Secure cover with flexible metallic conduit. External ground conductor screw B. Appliance neutral ground wire C. Center terminal block screw D. Outer terminal block screws E. Green or bare ground wire
Installation Instructions
Page 15
...green or bare wire even with outer covering. Tighten screw. 7. Squeeze hooked ends together. A C B D F E A. Dryer is level. Appliance neutral ground wire B C 3-1/2" (8.9 cm) Shape ends of wires into slot of outer covering from the external ground conductor screw. Strip 3¹⁄...;₂" (8.9 cm) of the dryer rear panel. Appliance neutral ground wire D. If drying time is too long, make sure it is used . Remove the center terminal block screw. 6....
...green or bare wire even with outer covering. Tighten screw. 7. Squeeze hooked ends together. A C B D F E A. Dryer is level. Appliance neutral ground wire B C 3-1/2" (8.9 cm) Shape ends of wires into slot of outer covering from the external ground conductor screw. Strip 3¹⁄...;₂" (8.9 cm) of the dryer rear panel. Appliance neutral ground wire D. If drying time is too long, make sure it is used . Remove the center terminal block screw. 6....
