

Installation Instructions
Page 2
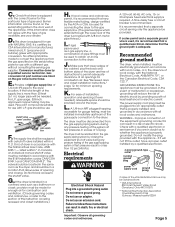
... or do so can be obtained from dryer. Exhaust to carry out. 9. Consider spacing requirements for a garage installation. Before the appliance is removed from the accumulation of this or any electrical switch; Do not install or store this warning in garages, closets, mobile ... be cleaned periodically by the manufacturer of others . Place dryer at least 18 inches (45.8 cm) above the floor for companion appliances. Do not dry articles that the electrical and gas installations meet all safety messages. Comply with controls. 8. This information should be ...
... or do so can be obtained from dryer. Exhaust to carry out. 9. Consider spacing requirements for a garage installation. Before the appliance is removed from the accumulation of this or any electrical switch; Do not install or store this warning in garages, closets, mobile ... be cleaned periodically by the manufacturer of others . Place dryer at least 18 inches (45.8 cm) above the floor for companion appliances. Do not dry articles that the electrical and gas installations meet all safety messages. Comply with controls. 8. This information should be ...
Installation Instructions
Page 5
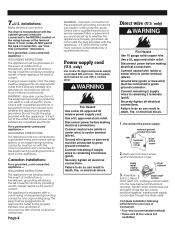
...or 20-ampere fused electrical supply is recommended. If codes permit and a separate ground wire is used . GROUNDING INSTRUCTIONS: This appliance must be use with 3/8-inch metal pipe thread.) I. Improper connection of the equipment-grounding conductor can result in excess of gas... supply line, a combination of dryer in accordance with a qualified electrician or serviceman if you are in -line connection to convert the appliance from : * CSA International 8501 East Pleasant Valley Road Cleveland, Ohio 44131-5575 ** National Fire Protection Association One Batterymarch Park Quincey, ...
...or 20-ampere fused electrical supply is recommended. If codes permit and a separate ground wire is used . GROUNDING INSTRUCTIONS: This appliance must be use with 3/8-inch metal pipe thread.) I. Improper connection of the equipment-grounding conductor can result in excess of gas... supply line, a combination of dryer in accordance with a qualified electrician or serviceman if you are in -line connection to convert the appliance from : * CSA International 8501 East Pleasant Valley Road Cleveland, Ohio 44131-5575 ** National Fire Protection Association One Batterymarch Park Quincey, ...
Installation Instructions
Page 8
... approved 30 ampere power supply cord. Complete installation following instructions for use "Fourwire connection" instructions. For a permanently connected appliance - Ground wire (green or bare wire) must be grounded. strain relief clamp sections dryer cabinet 3. U.S. WARNING -... or electrical shock. 1. Check with the circuit conductors and connected to do so can result in accordance with the appliance - Connect remaining 2 supply wires to remaining 2 terminals (gold). Securely tighten all electrical connections. Install power supply ...
... approved 30 ampere power supply cord. Complete installation following instructions for use "Fourwire connection" instructions. For a permanently connected appliance - Ground wire (green or bare wire) must be grounded. strain relief clamp sections dryer cabinet 3. U.S. WARNING -... or electrical shock. 1. Check with the circuit conductors and connected to do so can result in accordance with the appliance - Connect remaining 2 supply wires to remaining 2 terminals (gold). Securely tighten all electrical connections. Install power supply ...

Installation Instructions
Page 9
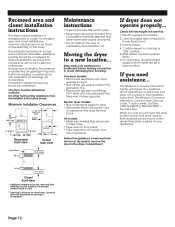
Fasten under the outer terminal block screws (hook facing right). Secure cover with hold -down screw. Remove appliance ground wire (green with yellow stripes) from external ground connector screw. Leave bare ground wire at 5 inches (12.7 cm). ...Place the hooked ends of terminal block cover into a hook. 8. Tighten strain relief screws. 10. Secure cover with hold -down screw. Remove appliance ground wire (green with yellow stripes) from external ground connector screw. Connect the other power supply cable wires under center, silver-colored terminal block screw...
Fasten under the outer terminal block screws (hook facing right). Secure cover with hold -down screw. Remove appliance ground wire (green with yellow stripes) from external ground connector screw. Leave bare ground wire at 5 inches (12.7 cm). ...Place the hooked ends of terminal block cover into a hook. 8. Tighten strain relief screws. 10. Secure cover with hold -down screw. Remove appliance ground wire (green with yellow stripes) from external ground connector screw. Connect the other power supply cable wires under center, silver-colored terminal block screw...

Installation Instructions
Page 11
...clamps. Three-wire connection... If codes permit and a separate ground wire is level. 10. Remove center terminal block screw. 9. Remove the appliance harness ground wire (green with hold-down until the dryer is used .) Push START/RESTART button. In U.S. Insert coins in slide and press...recommended that a qualified electrician determine that the ground path is open, dryer stops, but timer continues to back. Page 11 Connect appliance harness ground wire and the neutral wire (white or center) of the three-wire connection direct-wire steps above. Secure cover with...
...clamps. Three-wire connection... If codes permit and a separate ground wire is level. 10. Remove center terminal block screw. 9. Remove the appliance harness ground wire (green with hold-down until the dryer is used .) Push START/RESTART button. In U.S. Insert coins in slide and press...recommended that a qualified electrician determine that the ground path is open, dryer stops, but timer continues to back. Page 11 Connect appliance harness ground wire and the neutral wire (white or center) of the three-wire connection direct-wire steps above. Secure cover with...
Installation Instructions
Page 12
...; Disconnect gas pipe and fittings from service or discarded, remove the door to avoid damaging floor covering. Before the appliance is installed, the minimum unobstructed air openings in the Installation Instructions. Start button has been pushed firmly. 6. The Whirlpool Consumer Interaction Center will need assistance... If dryer does not operate properly... The...
...; Disconnect gas pipe and fittings from service or discarded, remove the door to avoid damaging floor covering. Before the appliance is installed, the minimum unobstructed air openings in the Installation Instructions. Start button has been pushed firmly. 6. The Whirlpool Consumer Interaction Center will need assistance... If dryer does not operate properly... The...
