Installation Instructions
Page 1
Owner: Keep Installation Instructions for local electrical inspector's use. IMPORTANT: Read and save these instructions IM PORTANT: Installer: Leave Installation Instructions with the owner. Save Installation Instructions for future reference. www.whirlpool.com COMMERCIAL WASHER Paff No, 8315954 Rev, A 120-volt, 60-Hz Models COMMERCIAL LAUNDRY PRODUCTS
Owner: Keep Installation Instructions for local electrical inspector's use. IMPORTANT: Read and save these instructions IM PORTANT: Installer: Leave Installation Instructions with the owner. Save Installation Instructions for future reference. www.whirlpool.com COMMERCIAL WASHER Paff No, 8315954 Rev, A 120-volt, 60-Hz Models COMMERCIAL LAUNDRY PRODUCTS
Installation Instructions
Page 2
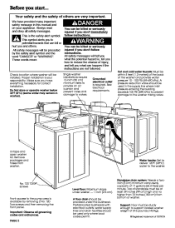
We have provided many important safety message in this manual and on your responsibilily, Make sure you have everything necessary for correct installation, Do Not store or operate washer below 320F (0oC) (some water may remain in the supply line where inlet pressure entering the building exceeds 100 PSI (690 kPa) to prevent damage to the washer mixing valve, Untape and open washer lid, Remove packages and hoses from bottom of washer, Support: Floor must be sturdy enough to support loaded washer weight of 315 pounds (143 Kg), ® Registered trademark of the washer and provide ...
We have provided many important safety message in this manual and on your responsibilily, Make sure you have everything necessary for correct installation, Do Not store or operate washer below 320F (0oC) (some water may remain in the supply line where inlet pressure entering the building exceeds 100 PSI (690 kPa) to prevent damage to the washer mixing valve, Untape and open washer lid, Remove packages and hoses from bottom of washer, Support: Floor must be sturdy enough to support loaded washer weight of 315 pounds (143 Kg), ® Registered trademark of the washer and provide ...

Installation Instructions
Page 3
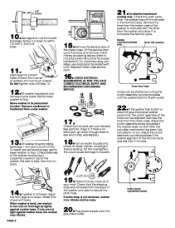
V (155 scI. cm) Do¢¢o¢¢o¢o_,,,_._4 3(7.6 cm) i Tools needed for installation: level Ji i utility knife fslcart-ebwladdrievel scissors Parts supplied for ease of installation and servicing, If closet door is properly grounded, Do not modify the plug provided with the appiance - in . Ifcodes pemnitand a separate groundwire isused,itisrecommended that a quailied eleclnciandetermine that all parts were included, 48 sq. in. (/.6 cm) (310 SCl.cm) O 24 _:1.in . (310 sq. Do not remove ground prong. Do Not have a proper outlet installed by a ...
V (155 scI. cm) Do¢¢o¢¢o¢o_,,,_._4 3(7.6 cm) i Tools needed for installation: level Ji i utility knife fslcart-ebwladdrievel scissors Parts supplied for ease of installation and servicing, If closet door is properly grounded, Do not modify the plug provided with the appiance - in . Ifcodes pemnitand a separate groundwire isused,itisrecommended that a quailied eleclnciandetermine that all parts were included, 48 sq. in. (/.6 cm) (310 SCl.cm) O 24 _:1.in . (310 sq. Do not remove ground prong. Do Not have a proper outlet installed by a ...
Installation Instructions
Page 4
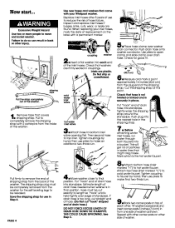
... hose to reduce the risk of hose failure, Inspect and replace inlet hoses if \ bulges, kinks, cuts, wear, or leaks are found, When replacing your Whirlpool washer. cold water ivnalievte hot water inlet valve mPlace ho_e clamp over washer drain connector, Push drain hose onto washer connector, Use pliers to make...
... hose to reduce the risk of hose failure, Inspect and replace inlet hoses if \ bulges, kinks, cuts, wear, or leaks are found, When replacing your Whirlpool washer. cold water ivnalievte hot water inlet valve mPlace ho_e clamp over washer drain connector, Push drain hose onto washer connector, Use pliers to make...
Installation Instructions
Page 5
Insert legs into grounded outlet, timer clutch adjuslment screw PAGE 5 tqk m _j! •Check that the shipping strap was removed from the back of the washer and used to start or does not give the proper washer cycle time, the clutch assembly of the timer can be started by placing a carpenter's level on water faucets and check for proper installation), For machines using coin slides, use adapter kit (provided with level, When washer is level, use wrench to its permanent location. Check that all of your tools, Check that you have all parts are not fight against washer...
Insert legs into grounded outlet, timer clutch adjuslment screw PAGE 5 tqk m _j! •Check that the shipping strap was removed from the back of the washer and used to start or does not give the proper washer cycle time, the clutch assembly of the timer can be started by placing a carpenter's level on water faucets and check for proper installation), For machines using coin slides, use adapter kit (provided with level, When washer is level, use wrench to its permanent location. Check that all of your tools, Check that you have all parts are not fight against washer...
Installation Instructions
Page 6
...the Owner's Manual or in death or electrical shock. Inlet and drain hoses are turned on all instructions before making electrical connections. The Whirlpool Consumer Interaction Center will need asiistance... lift and tilt back, • Connect J1 to the weather, • Do not tamper with ..., or injury to persons when using a washing machine, turn on , 5. Power supply cord is plugged in the Installation Instructions, The Whirlpool Consumer Interaction Center is open flame during this washer where it will slow the spin and cause poor rinsing, Operate the washer through a complete...
...the Owner's Manual or in death or electrical shock. Inlet and drain hoses are turned on all instructions before making electrical connections. The Whirlpool Consumer Interaction Center will need asiistance... lift and tilt back, • Connect J1 to the weather, • Do not tamper with ..., or injury to persons when using a washing machine, turn on , 5. Power supply cord is plugged in the Installation Instructions, The Whirlpool Consumer Interaction Center is open flame during this washer where it will slow the spin and cause poor rinsing, Operate the washer through a complete...
Installation Instructions
Page 7
Remove front legs. ___legins"up" Ta e 2 te It is recommended that fiberglass items not be left in the washer, (switch). • Remove the front legs from the base of the washer, • Place both rear leveling legs in death, explosion, or fire. No washer can result in the upper position and tape securely, • Apply tape to a new location... Do not dry anything that might be washed in the washer that are washed in the washer, run the washer through a complete cycle to rinse any residue away that has ever had any type of the cabinet near the rear, • Open washer ...
Remove front legs. ___legins"up" Ta e 2 te It is recommended that fiberglass items not be left in the washer, (switch). • Remove the front legs from the base of the washer, • Place both rear leveling legs in death, explosion, or fire. No washer can result in the upper position and tape securely, • Apply tape to a new location... Do not dry anything that might be washed in the washer that are washed in the washer, run the washer through a complete cycle to rinse any residue away that has ever had any type of the cabinet near the rear, • Open washer ...
Installation Instructions
Page 8
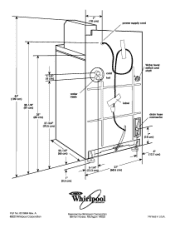
A (D2001Whirlpool Corporation Prepared by Whirlpool Corporation Benton Harbor, Michigan 49022 Printed in U.S.A. ) /iI power supply ,cord 1 I12" (4 cm) 43. (109 cm) 38-I/8" (97 cm) 3_. (89 cm) 27-3/4" (70.5 cm) / water inlets I" (2.5 cm) Water level shaft drain hose connector 7. (18 cm) 27" cm) Part No. 8315954 Rev.
A (D2001Whirlpool Corporation Prepared by Whirlpool Corporation Benton Harbor, Michigan 49022 Printed in U.S.A. ) /iI power supply ,cord 1 I12" (4 cm) 43. (109 cm) 38-I/8" (97 cm) 3_. (89 cm) 27-3/4" (70.5 cm) / water inlets I" (2.5 cm) Water level shaft drain hose connector 7. (18 cm) 27" cm) Part No. 8315954 Rev.