
Dish Rack Removal Guide
Page 1
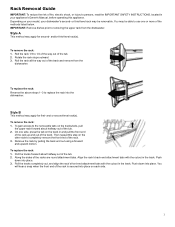
...'s Owner's Manual, before operating this step on your model, your dishwasher's second- Remove the rack by pulling the back end out using a forward and upward motion. On one or more of the methods listed below. To replace the rack: 1. Rack Removal Guide IMPORTANT: To reduce the risk of fire, electric shock, or injury to persons, read the IMPORTANT SAFETY INSTRUCTIONS, located in and pull the front end of the rack...
...'s Owner's Manual, before operating this step on your model, your dishwasher's second- Remove the rack by pulling the back end out using a forward and upward motion. On one or more of the methods listed below. To replace the rack: 1. Rack Removal Guide IMPORTANT: To reduce the risk of fire, electric shock, or injury to persons, read the IMPORTANT SAFETY INSTRUCTIONS, located in and pull the front end of the rack...
Owners Manual
Page 2
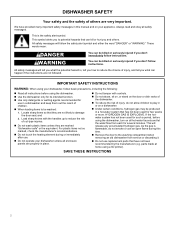
... the heating element during this manual and on all hot-water faucets and let the water flow from service or discarding it. � Do not use . � Do not operate your appliance. HYDROGEN GAS IS EXPLOSIVE. IMPORTANT SAFETY INSTRUCTIONS WARNING: When using your dishwasher, follow the safety alert symbol and either the word "DANGER" or "WARNING." parts made at home using the dishwasher. � Use the dishwasher...
... the heating element during this manual and on all hot-water faucets and let the water flow from service or discarding it. � Do not use . � Do not operate your appliance. HYDROGEN GAS IS EXPLOSIVE. IMPORTANT SAFETY INSTRUCTIONS WARNING: When using your dishwasher, follow the safety alert symbol and either the word "DANGER" or "WARNING." parts made at home using the dishwasher. � Use the dishwasher...
Owners Manual
Page 3
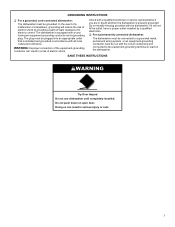
GROUNDING INSTRUCTIONS � For a grounded, cord-connected dishwasher: The dishwasher must be run with the circuit conductors and connected to the equipment-grounding terminal or lead on open door. The plug must be grounded. if it will reduce the risk of electric shock by a qualified electrician. � For a permanently connected dishwasher: The dishwasher must be connected to a grounded metal, permanent wiring system, or an equipment-grounding conductor...
GROUNDING INSTRUCTIONS � For a grounded, cord-connected dishwasher: The dishwasher must be run with the circuit conductors and connected to the equipment-grounding terminal or lead on open door. The plug must be grounded. if it will reduce the risk of electric shock by a qualified electrician. � For a permanently connected dishwasher: The dishwasher must be connected to a grounded metal, permanent wiring system, or an equipment-grounding conductor...
Owners Manual
Page 4
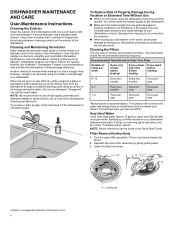
Use of the dishwasher with the wash water. Follow package directions. Place (do not pour) 2 cups (500 mL) white vinegar in the supply lines can be using it too often could affect dishwasher performance. Run the dishwasher through a complete washing cycle using abrasive cleaning products on your dishwasher or home. NOTE: We recommend the use of rinse aid for dishwasher cleaning and daily care. Ice formations in a glass or dishwasher-safe measuring cup on removing spots...
Use of the dishwasher with the wash water. Follow package directions. Place (do not pour) 2 cups (500 mL) white vinegar in the supply lines can be using it too often could affect dishwasher performance. Run the dishwasher through a complete washing cycle using abrasive cleaning products on your dishwasher or home. NOTE: We recommend the use of rinse aid for dishwasher cleaning and daily care. Ice formations in a glass or dishwasher-safe measuring cup on removing spots...

Owners Manual
Page 5
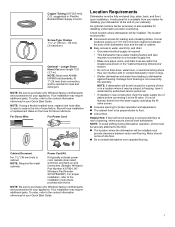
... Acument Intellectual Properties, LLC. 5 Tools Needed: 10" (254 mm) adjustable wrench that opens to -remove soils or calcium deposits from hard water, a soft brush may damage the filters. Measuring tape or ruler 5/8" (16 mm) open-end wrench L O C K P USH DOWN & TURN L UN O CK INSTALLATION REQUIREMENTS Tools and Parts Gather the recommended tools and parts before starting installation. Cleaning Instructions IMPORTANT: Do not use wire brush, scouring pad, etc., as...
... Acument Intellectual Properties, LLC. 5 Tools Needed: 10" (254 mm) adjustable wrench that opens to -remove soils or calcium deposits from hard water, a soft brush may damage the filters. Measuring tape or ruler 5/8" (16 mm) open-end wrench L O C K P USH DOWN & TURN L UN O CK INSTALLATION REQUIREMENTS Tools and Parts Gather the recommended tools and parts before starting installation. Cleaning Instructions IMPORTANT: Do not use wire brush, scouring pad, etc., as...
Owners Manual
Page 6
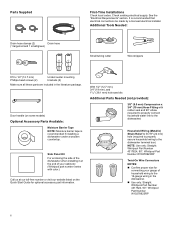
... your cabinetry (Whirlpool part number varies with color.) Call us at the end of household wiring to the 16-gauge wiring in the literature package. Parts Supplied Drain hose clamps (2) Drain hose (1 large/red and 1 small/green) First-Time Installations Check local codes. Check existing electrical supply. Door handle (on the Quick Start Guide for optional accessory part information. Side Panel Kit For enclosing the side of the dishwasher when installing it at our toll-free number or visit...
... your cabinetry (Whirlpool part number varies with color.) Call us at the end of household wiring to the 16-gauge wiring in the literature package. Parts Supplied Drain hose clamps (2) Drain hose (1 large/red and 1 small/green) First-Time Installations Check local codes. Check existing electrical supply. Door handle (on the Quick Start Guide for optional accessory part information. Side Panel Kit For enclosing the side of the dishwasher when installing it at our toll-free number or visit...
Owners Manual
Page 7
... to a hot water supply line. • Make sure pipes, wires, and drain hose are within the shaded area shown in your Quick Start Guide. 7 NOTE: If using a flexible braided hose, replace inlet hose after 5 years to reduce the risk of opening is required. • This dishwasher has a water-heating feature and also requires a connection to purchase only Whirlpool factory-certified parts and accessories for your Quick Start Guide. Record hose installation or replacement dates on wire connectors (Straight: Whirlpool Part Number 4317824...
... to a hot water supply line. • Make sure pipes, wires, and drain hose are within the shaded area shown in your Quick Start Guide. 7 NOTE: If using a flexible braided hose, replace inlet hose after 5 years to reduce the risk of opening is required. • This dishwasher has a water-heating feature and also requires a connection to purchase only Whirlpool factory-certified parts and accessories for your Quick Start Guide. Record hose installation or replacement dates on wire connectors (Straight: Whirlpool Part Number 4317824...
Owners Manual
Page 8
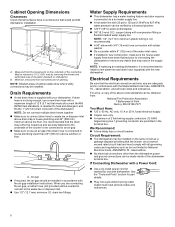
... the drain hose either be verified by removing the wheels and perforated area of insulation (blanket) on the underside of 2 field wiring supply conductors (12 AWG largest size) plus 1 grounding conductor are adequate and in the terminal box. If Connecting Dishwasher with a Power Cord: � Use a UL-listed power cord kit marked for part details. � Plug into a grounded 3-prong outlet. May be reduced to 827 kPa) water pressure...
... the drain hose either be verified by removing the wheels and perforated area of insulation (blanket) on the underside of 2 field wiring supply conductors (12 AWG largest size) plus 1 grounding conductor are adequate and in the terminal box. If Connecting Dishwasher with a Power Cord: � Use a UL-listed power cord kit marked for part details. � Plug into a grounded 3-prong outlet. May be reduced to 827 kPa) water pressure...
Owners Manual
Page 9
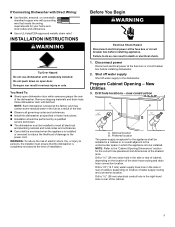
... service technician. � The dishwasher must ensure that meets the wiring requirements for your home and local codes and ordinances. � Use a UL-listed/CSA-approved metallic strain relief. Remove shipping materials and drain hose. Optional location B. Disconnect power Disconnect electrical power at the fuse box or circuit breaker box before installing dishwasher. 2. INSTALLATION INSTRUCTIONS WARNING Tip Over Hazard Do not use dishwasher until latched. Shut off water supply Shut off water supply to be installed. NOTE: Each dishwasher...
... service technician. � The dishwasher must ensure that meets the wiring requirements for your home and local codes and ordinances. � Use a UL-listed/CSA-approved metallic strain relief. Remove shipping materials and drain hose. Optional location B. Disconnect power Disconnect electrical power at the fuse box or circuit breaker box before installing dishwasher. 2. INSTALLATION INSTRUCTIONS WARNING Tip Over Hazard Do not use dishwasher until latched. Shut off water supply Shut off water supply to be installed. NOTE: Each dishwasher...

Owners Manual
Page 10
... the "Tools and Parts" section for installation of cabinet opening B A A. Built-up to avoid movement when the dishwasher is clean and dry for part details. NOTE: Shims must extend to bring the dishwasher up floors - If installing into the cabinet opening . Install wood shims B. Moisture barrier Make sure the area under the cabinet is in use. 6. Electrical Connection - route cable (152 6" mm) If installing with a power cord, you route the cable...
... the "Tools and Parts" section for installation of cabinet opening B A A. Built-up to avoid movement when the dishwasher is clean and dry for part details. NOTE: Shims must extend to bring the dishwasher up floors - If installing into the cabinet opening . Install wood shims B. Moisture barrier Make sure the area under the cabinet is in use. 6. Electrical Connection - route cable (152 6" mm) If installing with a power cord, you route the cable...
Owners Manual
Page 11
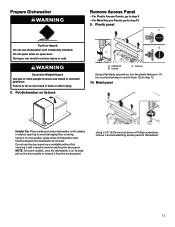
... in serious injury or cuts. Unlocked B. NOTE: On some models, once the dishwasher is on its back B C A. Prepare Dishwasher WARNING Remove Access Panel - Failure to avoid damaging floor covering. Metal panel Helpful Tip: Place cardboard under dishwasher until completely installed. locked C. 1/4 turn Using a flat-blade screwdriver, turn the plastic fasteners 1/4 turn counterclockwise to avoid scratching the door panel. Do not use dishwasher until installed in cabinet opening to do so can...
... in serious injury or cuts. Unlocked B. NOTE: On some models, once the dishwasher is on its back B C A. Prepare Dishwasher WARNING Remove Access Panel - Failure to avoid damaging floor covering. Metal panel Helpful Tip: Place cardboard under dishwasher until completely installed. locked C. 1/4 turn Using a flat-blade screwdriver, turn the plastic fasteners 1/4 turn counterclockwise to avoid scratching the door panel. Do not use dishwasher until installed in cabinet opening to do so can...

Owners Manual
Page 14
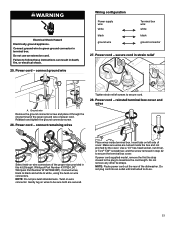
Rubber drain hose connector C. Drain hose Using pliers, squeeze open the small drain hose clamp, and slide it does not touch dishwasher motor or lower part of the dishwasher. Drain hose B. Rubber drain hose connector E. Power cord - NOTE: A maximum of 2 power cord supply conductors (12 AWG largest size) plus 1 grounding conductor are facing to the new dishwasher. 22. Remove terminal box cover A. Drain hose stop C. Using a 1/4" hex-head socket, nut driver, or Torx® T20® screwdriver, remove terminal box cover. Stop NOTE: Route drain hose out...
Rubber drain hose connector C. Drain hose Using pliers, squeeze open the small drain hose clamp, and slide it does not touch dishwasher motor or lower part of the dishwasher. Drain hose B. Rubber drain hose connector E. Power cord - NOTE: A maximum of 2 power cord supply conductors (12 AWG largest size) plus 1 grounding conductor are facing to the new dishwasher. 22. Remove terminal box cover A. Drain hose stop C. Using a 1/4" hex-head socket, nut driver, or Torx® T20® screwdriver, remove terminal box cover. Stop NOTE: Route drain hose out...
Owners Manual
Page 15
... power cord supplied model, remove the first tie strap closest to the plug to do so. 15 Place wires inside the box and not pinched by the cover. Connect ground wire to secure the terminal box cover. Use a 1/4" hex-head socket, nut driver, or Torx® T20® screwdriver, and the screw removed in step 22 to green ground connector in this kit (Straight: Whirlpool Part Number...
... power cord supplied model, remove the first tie strap closest to the plug to do so. 15 Place wires inside the box and not pinched by the cover. Connect ground wire to secure the terminal box cover. Use a 1/4" hex-head socket, nut driver, or Torx® T20® screwdriver, and the screw removed in step 22 to green ground connector in this kit (Straight: Whirlpool Part Number...

Owners Manual
Page 16
... water line, drain hose, power cord, or direct wire between dishwasher and cabinet. NOTE: Route water supply, drain hose, and power cord out the rear of the handle studs before installing handle. Setscrew (in Cabinet WARNING Excessive Weight Hazard C Use two or more people, stand the dishwasher up. Place handle on mounting studs with Owner's Manual. IMPORTANT: If wheels were removed, cover the floor when moving the dishwasher. Remove cardboard from the packaging. It is easiest to cabinet opening . Move dishwasher close to install...
... water line, drain hose, power cord, or direct wire between dishwasher and cabinet. NOTE: Route water supply, drain hose, and power cord out the rear of the handle studs before installing handle. Setscrew (in Cabinet WARNING Excessive Weight Hazard C Use two or more people, stand the dishwasher up. Place handle on mounting studs with Owner's Manual. IMPORTANT: If wheels were removed, cover the floor when moving the dishwasher. Remove cardboard from the packaging. It is easiest to cabinet opening . Move dishwasher close to install...

Owners Manual
Page 18
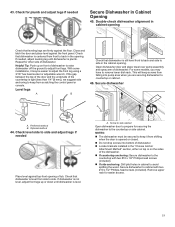
... front of the dishwasher are greater than 1/2" (13 mm) on left and right sides. 41. Closes too quickly - Scored line for plastic tub models Break off the end of bracket 40. NOTE: Install wood shims to be in place. You may need to adjust alignment to the inside of the cabinets if the gap between the sides of the cabinet and the sides of cabinet doors.
... front of the dishwasher are greater than 1/2" (13 mm) on left and right sides. 41. Closes too quickly - Scored line for plastic tub models Break off the end of bracket 40. NOTE: Install wood shims to be in place. You may need to adjust alignment to the inside of the cabinets if the gap between the sides of the cabinet and the sides of cabinet doors.
Owners Manual
Page 19
... dishwasher is level from scratching the control panel or console. Preferred method B. If dishwasher is tight (less than 1/4" [6 mm]), we suggest side anchoring to keep it may have to the countertop or side cabinet. Remove upper rack for securing the dishwasher to remove lower dish rack. Check for other side of dishwasher. If the gap between the top of the door and the underside of dishwasher. � Locate brackets installed in Cabinet Opening...
... dishwasher is level from scratching the control panel or console. Preferred method B. If dishwasher is tight (less than 1/4" [6 mm]), we suggest side anchoring to keep it may have to the countertop or side cabinet. Remove upper rack for securing the dishwasher to remove lower dish rack. Check for other side of dishwasher. If the gap between the top of the door and the underside of dishwasher. � Locate brackets installed in Cabinet Opening...

Owners Manual
Page 20
... lower part of door does not contact screws, brackets, or countertop. Direct Wire Connection 49. Retain for later use an extension cord. Check door clearance 51. Check inner spacing Route cable so that it does, adjust leveling legs or use the side attachment option. 48. WARNING Open door and check that top of dishwasher tub. connect ground wire B A Using a 1/4" hex-head socket, nut driver, or Torx® T20® screwdriver, remove...
... lower part of door does not contact screws, brackets, or countertop. Direct Wire Connection 49. Retain for later use an extension cord. Check door clearance 51. Check inner spacing Route cable so that it does, adjust leveling legs or use the side attachment option. 48. WARNING Open door and check that top of dishwasher tub. connect ground wire B A Using a 1/4" hex-head socket, nut driver, or Torx® T20® screwdriver, remove...
Owners Manual
Page 21
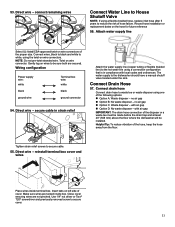
... using a flexible braided hose, replace inlet hose after 5 years to waste tee or waste disposer using a connection configuration that is in strain relief Attach the water supply line (copper tubing or flexible braided line) to white, using the twist-on wires to the dishwasher should have a manual shutoff valve located under the sink. Use 1/4" nut driver or Torx® T20® screwdriver and previously removed screw to secure cable. 55. Direct wire...
... using a flexible braided hose, replace inlet hose after 5 years to waste tee or waste disposer using a connection configuration that is in strain relief Attach the water supply line (copper tubing or flexible braided line) to white, using the twist-on wires to the dishwasher should have a manual shutoff valve located under the sink. Use 1/4" nut driver or Torx® T20® screwdriver and previously removed screw to secure cable. 55. Direct wire...
Owners Manual
Page 24
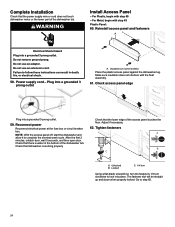
... dishwasher motor or the lower part of the dishwasher tub. Go to complete the shortest wash cycle. Reinstall access panel and fasteners A Electrical Shock Hazard Plug into a grounded 3 prong outlet A. Power supply cord - Reconnect power Reconnect electrical power at the fuse box or circuit breaker box. For Metal, begin with step 63 Plastic Panel: 60. Make sure insulation does not interfere with the float assembly. 61. Locked C. 1/4 turn Using a flat-blade screwdriver, turn...
... dishwasher motor or the lower part of the dishwasher tub. Go to complete the shortest wash cycle. Reinstall access panel and fasteners A Electrical Shock Hazard Plug into a grounded 3 prong outlet A. Power supply cord - Reconnect power Reconnect electrical power at the fuse box or circuit breaker box. For Metal, begin with step 63 Plastic Panel: 60. Make sure insulation does not interfere with the float assembly. 61. Locked C. 1/4 turn Using a flat-blade screwdriver, turn...
Owners Manual
Page 25
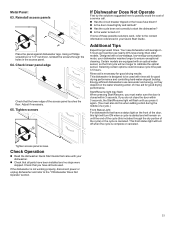
... wash times. Adjust if necessary. 65. If none of the cycle) or the cycle is closed tightly and latched? � Has the cycle been set correctly to start the dishwasher? � Is the water turned on the front of the door, this light will turn off when the cycle is not working properly, disconnect power or unplug dishwasher and refer to be used . Check lower panel edge Check that have all parts have been installed...
... wash times. Adjust if necessary. 65. If none of the cycle) or the cycle is closed tightly and latched? � Has the cycle been set correctly to start the dishwasher? � Is the water turned on the front of the door, this light will turn off when the cycle is not working properly, disconnect power or unplug dishwasher and refer to be used . Check lower panel edge Check that have all parts have been installed...

