
User Instructions
Page 1
...alas "lnstrucciones para el usuario de la lavavajillas" en espar_ol, o para obtener informaci6n adicional acerca de su producto, visite: www.whirlpool.com Tenga listo su nOmero de modelo completo. All safety messages will tell you what can be produced in this Quick Reference ...need assistance, call us at 1-800-253-1301. If you still need your appliance Always read and obey all instructions before using the dishwasher, follow instructions. Under certain conditions, hydrogen gas may be killed or seriously injured if you don't i_ follow basic precautions, including the...
...alas "lnstrucciones para el usuario de la lavavajillas" en espar_ol, o para obtener informaci6n adicional acerca de su producto, visite: www.whirlpool.com Tenga listo su nOmero de modelo completo. All safety messages will tell you what can be produced in this Quick Reference ...need assistance, call us at 1-800-253-1301. If you still need your appliance Always read and obey all instructions before using the dishwasher, follow instructions. Under certain conditions, hydrogen gas may be killed or seriously injured if you don't i_ follow basic precautions, including the...
User Instructions
Page 2
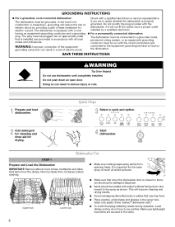
...conductor can result in the racks. d load for cleaning and rinse aid for electric current. Start STA_ RESUrgE Prepare and Load the Dishwasher IMPORTANT: Remove leftover food, bones, toothpicks and other hard items from containers before washing. dPisrehpwaarsehearn. This will improve cleaning and drying ...• Avoid overlapping items like bowls or plates that is equipped with all soiled surfaces. • Make sure that when the dishwasher door is properly grounded. The plug must be plugged into an appropriate outlet that may trap food. • Place plastics, small ...
...conductor can result in the racks. d load for cleaning and rinse aid for electric current. Start STA_ RESUrgE Prepare and Load the Dishwasher IMPORTANT: Remove leftover food, bones, toothpicks and other hard items from containers before washing. dPisrehpwaarsehearn. This will improve cleaning and drying ...• Avoid overlapping items like bowls or plates that is equipped with all soiled surfaces. • Make sure that when the dishwasher door is properly grounded. The plug must be plugged into an appropriate outlet that may trap food. • Place plastics, small ...
User Instructions
Page 3
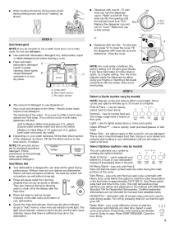
... as well without rinse aid. If you use detergent. Follow instructions on the items - They also improve drying by either using other dishwasher detergent. If you are for lightly soiled items or china and crystal. Use to quickly wash prerinsed glasses or dish loads Rinse Only ... are ready to this cycle. The light visual indicator means to -clean items. c Yc _Es ® ®®o o Normal-UsefornormalfoodsoiL The energy usage label is designed to Hard Water (7-12 grains per U.S. To add rinse aid, press "A" to "Add" level or, when rinse aid ...
... as well without rinse aid. If you use detergent. Follow instructions on the items - They also improve drying by either using other dishwasher detergent. If you are for lightly soiled items or china and crystal. Use to quickly wash prerinsed glasses or dish loads Rinse Only ... are ready to this cycle. The light visual indicator means to -clean items. c Yc _Es ® ®®o o Normal-UsefornormalfoodsoiL The energy usage label is designed to Hard Water (7-12 grains per U.S. To add rinse aid, press "A" to "Add" level or, when rinse aid ...
User Instructions
Page 4
... the cycle complete? If you will be exposed to include an additional 2 rinses. In U.S.A., www.whirlpooLcom In Canada, www.whirlpool.ca Dishwasher is flashing The dishwasher has malfunctioned. Has a household fuse blown, or has a circuit breaker tripped? The motor automatically resets itself within the cycle times...white spots and film. Clean indicator glows when the cycle is an acid, and using an air-dry or an energy-saving dry option. Water remains in your dishwasher has a stainless steel exterior, a stainless steel cleaner is equipped with a paste of s TA TU S S_r_sn_ Wasi...
... the cycle complete? If you will be exposed to include an additional 2 rinses. In U.S.A., www.whirlpooLcom In Canada, www.whirlpool.ca Dishwasher is flashing The dishwasher has malfunctioned. Has a household fuse blown, or has a circuit breaker tripped? The motor automatically resets itself within the cycle times...white spots and film. Clean indicator glows when the cycle is an acid, and using an air-dry or an energy-saving dry option. Water remains in your dishwasher has a stainless steel exterior, a stainless steel cleaner is equipped with a paste of s TA TU S S_r_sn_ Wasi...
User Instructions
Page 5
..., call a licensed, qualified plumber. For best dishwashing results, water should be necessary to use a stain removal product to use heated drying. • White spots on the kitchen counter (built-in "Dishwasher Care." Use recommended dishwasher detergents only. Heavy soil and/or hard water ...use an air-dry or energy-saving dry option? Is detergent caked in the dishwasher Are dishes washed only every 2 or 3 days? Minimize chipping by hand washing. Moisture from washing action. is a milky, rainbow-colored deposit; For best dishwashing results, water should be fresh...
..., call a licensed, qualified plumber. For best dishwashing results, water should be necessary to use a stain removal product to use heated drying. • White spots on the kitchen counter (built-in "Dishwasher Care." Use recommended dishwasher detergents only. Heavy soil and/or hard water ...use an air-dry or energy-saving dry option? Is detergent caked in the dishwasher Are dishes washed only every 2 or 3 days? Minimize chipping by hand washing. Moisture from washing action. is a milky, rainbow-colored deposit; For best dishwashing results, water should be fresh...
User Instructions
Page 6
... The removal and reinetallation of your major appliance, to correct defects in accordance with the product, Whirlpool Corporation or Whirlpool Canada LP (hereafter "Whirlpool") will pay for Factory Specified Parts and repair labor to instruct you can find your major appliance ...WHIRLPOOCLORPORATIOMNAJORAPPLIANCEWARRANTY ONE YEAR LIMITED WARRANTY For one year from the date of the dishwasher interior. This limited warranty applies only when the major appliance is designed to Whirlpool with published installation instructions. 11. Have your complete model number read_4 You ...
... The removal and reinetallation of your major appliance, to correct defects in accordance with the product, Whirlpool Corporation or Whirlpool Canada LP (hereafter "Whirlpool") will pay for Factory Specified Parts and repair labor to instruct you can find your major appliance ...WHIRLPOOCLORPORATIOMNAJORAPPLIANCEWARRANTY ONE YEAR LIMITED WARRANTY For one year from the date of the dishwasher interior. This limited warranty applies only when the major appliance is designed to Whirlpool with published installation instructions. 11. Have your complete model number read_4 You ...
Parts List
Page 1
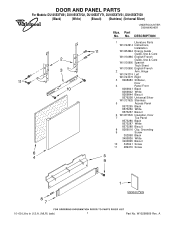
A DOOR AND PANEL PARTS For Models: DU1055XTVB1, DU1055XTVQ1, DU1055XTVT1, DU1055XTVS1, DU1055XTVD1 (Black) (White) (Biscuit) (Stainless) (Universal Silver) Illus. No. Part No. W10298669 Rev. UNDERCOUNTER DISHWASHER DESCRIPTION 1 Literature Parts W10142914 Instructions, Installation W10254964 Energy Guide Guide, Use & Care W10130986 English/French Guide, Use & Care W10130990 Spanish Tech Sheet W10130990 English/French 2 Arm, Hinge W10143374 Left...
A DOOR AND PANEL PARTS For Models: DU1055XTVB1, DU1055XTVQ1, DU1055XTVT1, DU1055XTVS1, DU1055XTVD1 (Black) (White) (Biscuit) (Stainless) (Universal Silver) Illus. No. Part No. W10298669 Rev. UNDERCOUNTER DISHWASHER DESCRIPTION 1 Literature Parts W10142914 Instructions, Installation W10254964 Energy Guide Guide, Use & Care W10130986 English/French Guide, Use & Care W10130990 Spanish Tech Sheet W10130990 English/French 2 Arm, Hinge W10143374 Left...
Installation Instructions
Page 2
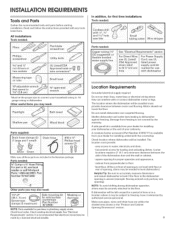
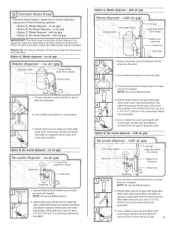
...be installed to Drain 16 Installation Instructions 6 Make Direct Wire Electrical Connection 16 Prepare Cabinet Opening--Existing Utilities 6 Secure Dishwasher in serious injury or cuts• You Need fo: • Slowly open door• Doing so can result in...are not followed. Determine Cabinet Opening 12 Product and Cabinet Opening Dimensions 4 Choose Attachment Option 13 Drain Requirements 5 Move Dishwasher into Cabinet Opening 13 Water Supply Requirements 5 Connect to Water Supply 15 Electrical Requirements 5 Connect to meet all safety...
...be installed to Drain 16 Installation Instructions 6 Make Direct Wire Electrical Connection 16 Prepare Cabinet Opening--Existing Utilities 6 Secure Dishwasher in serious injury or cuts• You Need fo: • Slowly open door• Doing so can result in...are not followed. Determine Cabinet Opening 12 Product and Cabinet Opening Dimensions 4 Choose Attachment Option 13 Drain Requirements 5 Move Dishwasher into Cabinet Opening 13 Water Supply Requirements 5 Connect to Water Supply 15 Electrical Requirements 5 Connect to meet all safety...
Installation Instructions
Page 3
... -- In addition, for purchase in plumbing supply stores. Parts needed: Compr x _ Hose Fatting FOr part or kit, see local retailer or call Whirlpool Parts: 1-800-442.9991, Part Number w10273460 Other parts you may need : 11V£"_2,': : (3811 z5cm) _ screw_type _ Sidem%unti_g kiWI... all these parts are within the shaded area shown in the "Product and Cabinet Opening Dimensions" section. NOTE: To avoid shifting during dishwasher operation. shims must provide: • easy access to water, electricity and drain. • Convenient access for proper operation and appearance....
... -- In addition, for purchase in plumbing supply stores. Parts needed: Compr x _ Hose Fatting FOr part or kit, see local retailer or call Whirlpool Parts: 1-800-442.9991, Part Number w10273460 Other parts you may need : 11V£"_2,': : (3811 z5cm) _ screw_type _ Sidem%unti_g kiWI... all these parts are within the shaded area shown in the "Product and Cabinet Opening Dimensions" section. NOTE: To avoid shifting during dishwasher operation. shims must provide: • easy access to water, electricity and drain. • Convenient access for proper operation and appearance....
Installation Instructions
Page 4
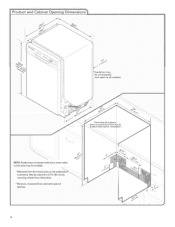
NOTSEh: adaerdeoafcabinwetallshowheruetility connectimonasybeinstalled. *MeasufrreodmthelowesptoinotntheundersOidfe countertMopa.ybereducteod33_(86cmb) y removiwnhgeeflrsomdishwasher. "_Minimmumea, sufrreodmnarrowepsotinotf opening. 4 *Insulatiomnay b(neocotumsepdorenaslslmedo.dels) Check that all surfaces have no protrusions that would prohibit dishwasher installation.
NOTSEh: adaerdeoafcabinwetallshowheruetility connectimonasybeinstalled. *MeasufrreodmthelowesptoinotntheundersOidfe countertMopa.ybereducteod33_(86cmb) y removiwnhgeeflrsomdishwasher. "_Minimmumea, sufrreodmnarrowepsotinotf opening. 4 *Insulatiomnay b(neocotumsepdorenaslslmedo.dels) Check that all surfaces have no protrusions that would prohibit dishwasher installation.
Installation Instructions
Page 5
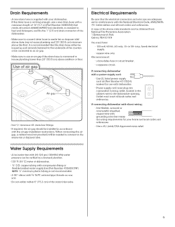
... It is connected to the underside of 12' (3.7 m)(Part Number 3385556) that meets all current AHAM/IAPMO test standards, is resistant to the dishwasher opening. Use 1/2" minimum I.D. drain line fittings. We recommend: • a time-delay fuse or circuit breaker. • a separate circuit.... Drain Requirements A new drain hose is supplied with grounding wire that meets the wiring requirements for use with dishwasher. • Power supply cord must plug into a grounded 3 prong outlet, located in conformance with the air gap installation instructions. ...
... It is connected to the underside of 12' (3.7 m)(Part Number 3385556) that meets all current AHAM/IAPMO test standards, is resistant to the dishwasher opening. Use 1/2" minimum I.D. drain line fittings. We recommend: • a time-delay fuse or circuit breaker. • a separate circuit.... Drain Requirements A new drain hose is supplied with grounding wire that meets the wiring requirements for use with dishwasher. • Power supply cord must plug into a grounded 3 prong outlet, located in conformance with the air gap installation instructions. ...

Installation Instructions
Page 6
...iNSTALLATiON iNSTRUCTiONS Prepare Cabinet OpeningmExisfing Utilities Electrical Shock Hazard Disconnect electrical power at the fuSeboxor breaker b0x bef0re insta!!!ng dishwasher. Drill a 11/2" (3.8 cm) hole in the "Prepare Cabinet uti!ities'! Prepare Cabinet OpeningmNew Utilities Prepare and...cabinet next to do not reach far enough, follow the instructions in the "PrePare cab!net Opening_Existing utilities!! Failure to the dishwasher cabinet opening dimensions. c!rcult-q Yes'FollOw instructi0ns in the "Prepare Cabinet Opening-New Utilities" section. secti0nl _: E :...
...iNSTALLATiON iNSTRUCTiONS Prepare Cabinet OpeningmExisfing Utilities Electrical Shock Hazard Disconnect electrical power at the fuSeboxor breaker b0x bef0re insta!!!ng dishwasher. Drill a 11/2" (3.8 cm) hole in the "Prepare Cabinet uti!ities'! Prepare Cabinet OpeningmNew Utilities Prepare and...cabinet next to do not reach far enough, follow the instructions in the "PrePare cab!net Opening_Existing utilities!! Failure to the dishwasher cabinet opening dimensions. c!rcult-q Yes'FollOw instructi0ns in the "Prepare Cabinet Opening-New Utilities" section. secti0nl _: E :...

Installation Instructions
Page 7
... and cabinet opening ). Metal cabinet: Cover hole with local codes and ordinances. Attach to the dishwasher should have a manual shutoff valve. 7 Route cable from the right-hand side. This will be...cm) hole in right-hand cabinet side or rear. OptionB,Direct Wire: Helpful Tip: Wiring the dishwasher will keep cable from moving when dishwasher is in area shown. iiii_ii_i_iiiiii_ii_i1iiiiiiiiiiiiiiiiiiiiiiiiiiiii_iiiiiiiYiiiiiiiiiiiiiiiiiiiiiiiiii%¸ii¸iii_i_i¸ii¸iii¸i__i_1iiiii_iiiiiiii_iiii_iiii_iiiiiii_iii_iiii_iii_iiii_iii_iiiiiiiiiYiiiiiiiii Prepare and ...
... and cabinet opening ). Metal cabinet: Cover hole with local codes and ordinances. Attach to the dishwasher should have a manual shutoff valve. 7 Route cable from the right-hand side. This will be...cm) hole in right-hand cabinet side or rear. OptionB,Direct Wire: Helpful Tip: Wiring the dishwasher will keep cable from moving when dishwasher is in area shown. iiii_ii_i_iiiiii_ii_i1iiiiiiiiiiiiiiiiiiiiiiiiiiiii_iiiiiiiYiiiiiiiiiiiiiiiiiiiiiiiiii%¸ii¸iii_i_i¸ii¸iii¸i__i_1iiiii_iiiiiiii_iiii_iiii_iiiiiii_iii_iiii_iii_iiii_iii_iiiiiiiiiYiiiiiiiii Prepare and ...
Installation Instructions
Page 8
... codes to the front center of particles that it will keep the drain hose from moving when dishwasher is moved into the 90 ° elbow fitting as far as it does not touch the dishwasher base, frame or motor. 8 Route drain hose as shown through hole in area shown. Attach such that...
... codes to the front center of particles that it will keep the drain hose from moving when dishwasher is moved into the 90 ° elbow fitting as far as it does not touch the dishwasher base, frame or motor. 8 Route drain hose as shown through hole in area shown. Attach such that...
Installation Instructions
Page 9
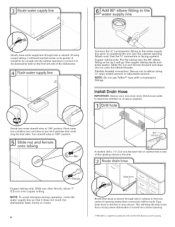
... with screw-type clamps (not provided) to connect from air gap to 5 cm) screw-type clamp (not provided). 5, Use a rubber hose (not provided) with large silver drain hose clamp (provided). Connect black end of the disposer or a waste tee must be made before the drain trap and at least 20" (50....8 cm) above the floor where the dishwasher will be installed. Use pliers to air gap. with air gap 1. Use pliers to air gap and cut ribbed section. 4. Use needle-nose pliers to...
... with screw-type clamps (not provided) to connect from air gap to 5 cm) screw-type clamp (not provided). 5, Use a rubber hose (not provided) with large silver drain hose clamp (provided). Connect black end of the disposer or a waste tee must be made before the drain trap and at least 20" (50....8 cm) above the floor where the dishwasher will be installed. Use pliers to air gap. with air gap 1. Use pliers to air gap and cut ribbed section. 4. Use needle-nose pliers to...
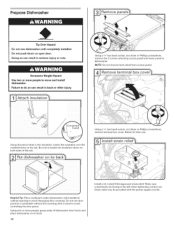
Installation Instructions
Page 10
...insulation, fasten the insulation over the molded hooks on open door. NOTE: Do not remove tech sheet from access panel. Be sure to dishwasher. Using a 1/4" hex head socket, nut driver or Phillips screwdriver, remove the 2 screws attaching access panel and lower panel to fasten ...the insulation down on the tub. Retain for later use dishwasher until installed in back or other injury. Using a 1/4" hex head socket, nut driver or Phillips screwdriver, remove terminal box cover. ...
...insulation, fasten the insulation over the molded hooks on open door. NOTE: Do not remove tech sheet from access panel. Be sure to dishwasher. Using a 1/4" hex head socket, nut driver or Phillips screwdriver, remove the 2 screws attaching access panel and lower panel to fasten ...the insulation down on the tub. Retain for later use dishwasher until installed in back or other injury. Using a 1/4" hex head socket, nut driver or Phillips screwdriver, remove terminal box cover. ...
Installation Instructions
Page 11
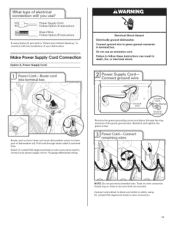
...in terminal bow. Connect wires black to black and white to white, using Option B, proceed to "Determine Cabinet Opening," to lower part of dishwasher tub. Reattach and tighten the green screw. can result in terminal box. NOTE: Do not pre-twist stranded wire. Option A, Power Supply Cord...: Electrical Shock Hazard Electrically ground dishwasher. Failure to be sure both are secured. Gently tug on wire connector. Connect ground wire to green in Route cord so that it ...
...in terminal bow. Connect wires black to black and white to white, using Option B, proceed to "Determine Cabinet Opening," to lower part of dishwasher tub. Reattach and tighten the green screw. can result in terminal box. NOTE: Do not pre-twist stranded wire. Option A, Power Supply Cord...: Electrical Shock Hazard Electrically ground dishwasher. Failure to be sure both are secured. Gently tug on wire connector. Connect ground wire to green in Route cord so that it ...
Installation Instructions
Page 12
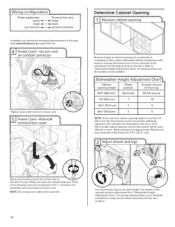
...the way up ! 1 I Wheel position Removed Number of turns on the floor). Measure height of turns needed. Dishwasher Cabinet opening height 33% (86.0cm) 34 (86,4 cm) Height Adjustment I . 10 34!/4'i (8710 cm)2 NOTE...to fit into the new position.) 12 Determine Cabinet Opening Ifneedesde, ewebsitfeoranimateredpresentatoioftnhisstep. Tightesntrainreliesfcrewtsosecurceord. Visiwt ww.whirlpool.cuonmdeFrAQtab. Turn both leveler legs to "Dishwasher Height Adjustment Chart" for 341/2'' [87.6" crn].) Adjust wheels and legs 0 PlacweiresinsidteerminabloxI.nserttabson leftsideofcoveMr...
...the way up ! 1 I Wheel position Removed Number of turns on the floor). Measure height of turns needed. Dishwasher Cabinet opening height 33% (86.0cm) 34 (86,4 cm) Height Adjustment I . 10 34!/4'i (8710 cm)2 NOTE...to fit into the new position.) 12 Determine Cabinet Opening Ifneedesde, ewebsitfeoranimateredpresentatoioftnhisstep. Tightesntrainreliesfcrewtsosecurceord. Visiwt ww.whirlpool.cuonmdeFrAQtab. Turn both leveler legs to "Dishwasher Height Adjustment Chart" for 341/2'' [87.6" crn].) Adjust wheels and legs 0 PlacweiresinsidteerminabloxI.nserttabson leftsideofcoveMr...
Installation Instructions
Page 13
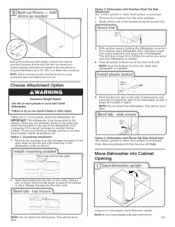
... can result in place. If your countertop is installed. Repeat this step for the other side. Built-uflpoors(Kitcheflnoorheighist highethr ancabinet openingE.x) ampKlei:tchefnlootriledoesnotextenidnto cabineotpeninAg.ddshimassneedeidntheareashowtno bringthedishwashueprto34"(86.4cm)belowthecountertop. Move Dishwasher info Cabinef Opening 11 Stand dishwasher upright 2. This will stop screws from tipping, open slots on the left and right-hand...
... can result in place. If your countertop is installed. Repeat this step for the other side. Built-uflpoors(Kitcheflnoorheighist highethr ancabinet openingE.x) ampKlei:tchefnlootriledoesnotextenidnto cabineotpeninAg.ddshimassneedeidntheareashowtno bringthedishwashueprto34"(86.4cm)belowthecountertop. Move Dishwasher info Cabinef Opening 11 Stand dishwasher upright 2. This will stop screws from tipping, open slots on the left and right-hand...

Installation Instructions
Page 14
IMPORTADNoTu:ble-chceocrkrecptlacemeonfut tilitiesG. sNidOeTsES. :pringsshoulbdeinthesamenotcheosnleftandright 7J Move dishwasher into ca b in et o p e n in g |: Insulation _ blanket Withanotheprersohnoldintghedishwashtoekr eepitfrom tippingo,penandclosethedooar fewtimesI.fthedoocr loses orfallsopenundeirtsownweighth, edootrensiownillneedto beadjusted. 14 HelpfuTlip:Temporatrailypeutilitietsothefloorinthe locationsshowtnokeepthemfrommovinwghendishwashiser moveidntothecabineotpening. Ifthedoofrallsopenin, creastheesprintgensiobnymovintghe sprinegndtowartdhebackofthedishwasher. ...
IMPORTADNoTu:ble-chceocrkrecptlacemeonfut tilitiesG. sNidOeTsES. :pringsshoulbdeinthesamenotcheosnleftandright 7J Move dishwasher into ca b in et o p e n in g |: Insulation _ blanket Withanotheprersohnoldintghedishwashtoekr eepitfrom tippingo,penandclosethedooar fewtimesI.fthedoocr loses orfallsopenundeirtsownweighth, edootrensiownillneedto beadjusted. 14 HelpfuTlip:Temporatrailypeutilitietsothefloorinthe locationsshowtnokeepthemfrommovinwghendishwashiser moveidntothecabineotpening. Ifthedoofrallsopenin, creastheesprintgensiobnymovintghe sprinegndtowartdhebackofthedishwasher. ...


