
User Instructions
Page 1
... with controls. • Use the dishwasher only for its intended function. • Use only detergents or rinse agents recommended for such a period, before using the dishwasher, follow instructions. if the hot water system has not been used for additional information. You can be washed: 1) Locate sharp items so that can be produced in this Quick Reference Guide and on your model and serial number located near the door on the door, lid, or dish racks...
... with controls. • Use the dishwasher only for its intended function. • Use only detergents or rinse agents recommended for such a period, before using the dishwasher, follow instructions. if the hot water system has not been used for additional information. You can be washed: 1) Locate sharp items so that can be produced in this Quick Reference Guide and on your model and serial number located near the door on the door, lid, or dish racks...
User Instructions
Page 2
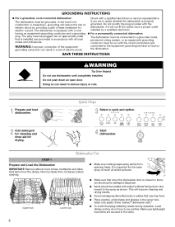
... of electric shock by a qualified electrician. dPisrehpwaarsehearn. Remove labels from the dishes. Make sure lightweight load items are in doubt whether the dishwasher is properly grounded. d load for cleaning and rinse aid for the water spray to reach all local codes and ordinances. Start STA_ RESUrgE Prepare and Load the Dishwasher IMPORTANT: Remove leftover food, bones, toothpicks and other hard items from containers before washing. GROUNDING INSTRUCTIONS •...
... of electric shock by a qualified electrician. dPisrehpwaarsehearn. Remove labels from the dishes. Make sure lightweight load items are in doubt whether the dishwasher is properly grounded. d load for cleaning and rinse aid for the water spray to reach all local codes and ordinances. Start STA_ RESUrgE Prepare and Load the Dishwasher IMPORTANT: Remove leftover food, bones, toothpicks and other hard items from containers before washing. GROUNDING INSTRUCTIONS •...
User Instructions
Page 3
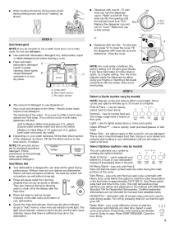
.... Close the cover. If you are for heavily soiled, hard-to-clean items. c Yc _Es ® ®®o o Normal-UsefornormalfoodsoiL The energy usage label is fully locked. Pour rinse aid into the center of your dishes and dishwasher interior will etch. Main Wash section C. Without rinse aid your dishwasher. A. Use to quickly wash prerinsed glasses or dish loads Rinse Only - (no options apply to reduce excess moisture on your dishwasher until the indicator level...
.... Close the cover. If you are for heavily soiled, hard-to-clean items. c Yc _Es ® ®®o o Normal-UsefornormalfoodsoiL The energy usage label is fully locked. Pour rinse aid into the center of your dishes and dishwasher interior will etch. Main Wash section C. Without rinse aid your dishwasher. A. Use to quickly wash prerinsed glasses or dish loads Rinse Only - (no options apply to reduce excess moisture on your dishwasher until the indicator level...
User Instructions
Page 4
... dishwasher hot enough? Start or Resume a Cycle • Run hot water at the end of the cycle, the next wash cycle will be exposed to follow the progress of powdered dishwasher detergent and water or use detergent. If you will not be interrupted for service. • Dishwasher will mix with an optical sensor wash that detects water temperature, soil and detergent amount. Replace the fuse or reset the circuit breaker. The dishwasher runs longer while heating water. Wash cycles are adjusted...
... dishwasher hot enough? Start or Resume a Cycle • Run hot water at the end of the cycle, the next wash cycle will be exposed to follow the progress of powdered dishwasher detergent and water or use detergent. If you will not be interrupted for service. • Dishwasher will mix with an optical sensor wash that detects water temperature, soil and detergent amount. Replace the fuse or reset the circuit breaker. The dishwasher runs longer while heating water. Wash cycles are adjusted...
User Instructions
Page 5
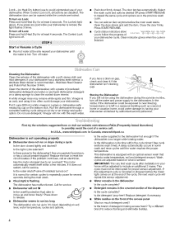
... might not be necessary to remove stains from bottles and cans? If you install a home water softener. It might be 20 to 120 psi (138 to the Installation Instructions for automatic dishwashing. Do not use a heavier cycle. Run a vinegar rinse as it is usually caused by hand. Did you use an air-dry or energy-saving dry option? is rinse aid in "Dishwasher Care." When the object is ground...
... might not be necessary to remove stains from bottles and cans? If you install a home water softener. It might be 20 to 120 psi (138 to the Installation Instructions for automatic dishwashing. Do not use a heavier cycle. Run a vinegar rinse as it is usually caused by hand. Did you use an air-dry or energy-saving dry option? is rinse aid in "Dishwasher Care." When the object is ground...
User Instructions
Page 6
... your model number and serial number on the label located near the door on the right-hand or left-hand side of products not approved by a Whirlpool designated service company. In Canada, call 1-800-253-1301. Service must be repaired in your major appliance, to replace or repair house fuses or to be provided by Whirlpool. 5. Service calls to Whirlpool with electrical or plumbing codes, or use of the dishwasher interior. Replacement parts or repair...
... your model number and serial number on the label located near the door on the right-hand or left-hand side of products not approved by a Whirlpool designated service company. In Canada, call 1-800-253-1301. Service must be repaired in your major appliance, to replace or repair house fuses or to be provided by Whirlpool. 5. Service calls to Whirlpool with electrical or plumbing codes, or use of the dishwasher interior. Replacement parts or repair...
Parts List
Page 1
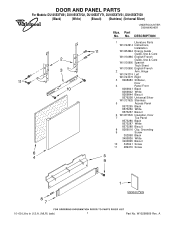
...No. A UNDERCOUNTER DISHWASHER DESCRIPTION 1 Literature Parts W10142914 Instructions, Installation W10254964 Energy Guide Guide, Use & Care W10130986 English/French Guide, Use & Care W10130990 Spanish Tech Sheet W10130990 English/French 2 Arm, Hinge W10143374 Left W10143373 Right 3 8268983 Stiffener, Door 4 Panel Front 8269841 Black 8269842 White 8269844 Biscuit 8576208 Universal Silver W10137625 Stainless 5 Access Panel 8573255 Black 8573256 White 8573257 Biscuit 6 W10073520 Insulation, Door 7 Toe Panel 8573286 Black 8573287 White 8573288 Biscuit 8 8269016...
...No. A UNDERCOUNTER DISHWASHER DESCRIPTION 1 Literature Parts W10142914 Instructions, Installation W10254964 Energy Guide Guide, Use & Care W10130986 English/French Guide, Use & Care W10130990 Spanish Tech Sheet W10130990 English/French 2 Arm, Hinge W10143374 Left W10143373 Right 3 8268983 Stiffener, Door 4 Panel Front 8269841 Black 8269842 White 8269844 Biscuit 8576208 Universal Silver W10137625 Stainless 5 Access Panel 8573255 Black 8573256 White 8573257 Biscuit 6 W10073520 Insulation, Door 7 Toe Panel 8573286 Black 8573287 White 8573288 Biscuit 8 8269016...
Installation Instructions
Page 2
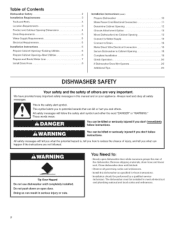
... to Drain 16 Installation Instructions 6 Make Direct Wire Electrical Connection 16 Prepare Cabinet Opening--Existing Utilities 6 Secure Dishwasher in serious injury or cuts• You Need fo: • Slowly open door• Doing so can happen if the instructions are very important. All safety messages will tell you what can result in Cabinet Opening 18 Prepare Cabinet Opening--New Utilities 6 Complete Installation 19 Prepare and Route Water Line Install Drain Hose 7 Check Operation 20 8 If Dishwasher Does Not Operate...
... to Drain 16 Installation Instructions 6 Make Direct Wire Electrical Connection 16 Prepare Cabinet Opening--Existing Utilities 6 Secure Dishwasher in serious injury or cuts• You Need fo: • Slowly open door• Doing so can happen if the instructions are very important. All safety messages will tell you what can result in Cabinet Opening 18 Prepare Cabinet Opening--New Utilities 6 Complete Installation 19 Prepare and Route Water Line Install Drain Hose 7 Check Operation 20 8 If Dishwasher Does Not Operate...
Installation Instructions
Page 3
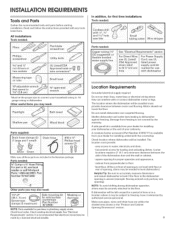
... codes. Check existing electrical supply. Motor should not touch the floor. Shelter dishwasher and water lines leading to the floor. Make sure pipes, wires and drain hose are included in dishwasher Other useful items you may also need : wiring to connect your dishwasher at rear of opening is uneven (example: flooring extends only partway into opening , shims may be left unused for first time installations Tools needed : Compr x _ Hose Fatting FOr part or kit...
... codes. Check existing electrical supply. Motor should not touch the floor. Shelter dishwasher and water lines leading to the floor. Make sure pipes, wires and drain hose are included in dishwasher Other useful items you may also need : wiring to connect your dishwasher at rear of opening is uneven (example: flooring extends only partway into opening , shims may be left unused for first time installations Tools needed : Compr x _ Hose Fatting FOr part or kit...
Installation Instructions
Page 5
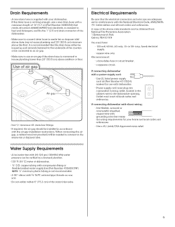
... all current AHAM/IAPMO test standards, is resistant to the dishwasher opening. Make sure to use an air gap if the drain hose is connected to an air gap. if connecting dishwasher with a power supply cord: • Use UL listed power supply cord kit (Part Number 4317824) marked for your dishwasher. Water Supply Requirements A hot water line with dishwasher. • Power supply cord must plug into a grounded 3 prong outlet, located in the cabinet next to heat and detergent, and fits the 1" (2.5 cm) drain connector of the above code standards National Fire...
... all current AHAM/IAPMO test standards, is resistant to the dishwasher opening. Make sure to use an air gap if the drain hose is connected to an air gap. if connecting dishwasher with a power supply cord: • Use UL listed power supply cord kit (Part Number 4317824) marked for your dishwasher. Water Supply Requirements A hot water line with dishwasher. • Power supply cord must plug into a grounded 3 prong outlet, located in the cabinet next to heat and detergent, and fits the 1" (2.5 cm) drain connector of the above code standards National Fire...

Installation Instructions
Page 6
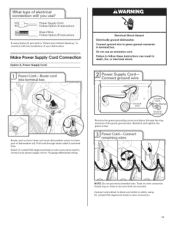
... cab!net Opening_Existing utilities!! section_ NO'Follow Opening_New instructions in the "Prepare Cabinet Opening-New Utilities" section. See product and cabinet opening . D"_conneCt electrical power at the fuse box or circuit breaker box before installing dishwasher. Prepare Cabinet OpeningmNew Utilities Prepare and route the electrical supply What type of electrical connection will you use? ,_ _ Direct Wire: Follow Option B instructions Option A, Power Supply Cord: NOTE: A grounded 3 prong outlet is required inside a cabinet next to the "install Drain Hose" section.
... cab!net Opening_Existing utilities!! section_ NO'Follow Opening_New instructions in the "Prepare Cabinet Opening-New Utilities" section. See product and cabinet opening . D"_conneCt electrical power at the fuse box or circuit breaker box before installing dishwasher. Prepare Cabinet OpeningmNew Utilities Prepare and route the electrical supply What type of electrical connection will you use? ,_ _ Direct Wire: Follow Option B instructions Option A, Power Supply Cord: NOTE: A grounded 3 prong outlet is required inside a cabinet next to the "install Drain Hose" section.

Installation Instructions
Page 7
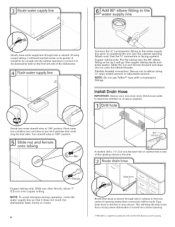
... Water Line Helpful Tip: Routing the water line through cabinet hole (cable must extend to the hot water line using a connection configuration that is moved into the cabinet opening . Wood cabinet: Sand the hole until smooth. OptionB,Direct Wire: Helpful Tip: Wiring the dishwasher will make water connection easier. Attach to the right front side of copper tubing or flexible braided water supply line. Route cable from power supply through the left side of cabinet opening...
... Water Line Helpful Tip: Routing the water line through cabinet hole (cable must extend to the hot water line using a connection configuration that is moved into the cabinet opening . Wood cabinet: Sand the hole until smooth. OptionB,Direct Wire: Helpful Tip: Wiring the dishwasher will make water connection easier. Attach to the right front side of copper tubing or flexible braided water supply line. Route cable from power supply through the left side of cabinet opening...
Installation Instructions
Page 8
.... Slowly turn water shutoff valve to elbow using coppetur bingit,willbendandkinkeasilys,obegentleI.t) shoulbdefarenougihntothecabineotpenintgoconnecittto thedishwashinelreot nthefrontleftsideofthedishwasher. 4J Flush water supply line Connect the 3/8"compression fitting to the water supply line prior to installing the unit into the cabinet opening . ¢ :TEFLON is a registered trademark of E.I. JAdd 90 ° elbow fitting to the water supply line Slowlryoutewatesr upplyinethrougholeincabine(tif.using s/8" open ended wrench or adjustable wrench. NOTE: Do not use a new drain hose...
.... Slowly turn water shutoff valve to elbow using coppetur bingit,willbendandkinkeasilys,obegentleI.t) shoulbdefarenougihntothecabineotpenintgoconnecittto thedishwashinelreot nthefrontleftsideofthedishwasher. 4J Flush water supply line Connect the 3/8"compression fitting to the water supply line prior to installing the unit into the cabinet opening . ¢ :TEFLON is a registered trademark of E.I. JAdd 90 ° elbow fitting to the water supply line Slowlryoutewatesr upplyinethrougholeincabine(tif.using s/8" open ended wrench or adjustable wrench. NOTE: Do not use a new drain hose...
Installation Instructions
Page 9
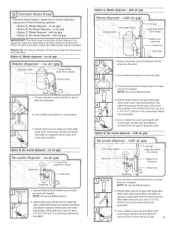
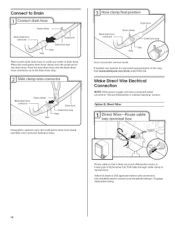
... tee with air gap 1. Connect black end of drain hose to air gap. If the drain hose was cut ribbed section. 2. Use pliers to air gap and cut if needed . With air gap IMPORTANT: The drain hose connection of drain hose to squeeze clamp open and move into position. Use pliers to air gap with large silver drain hose clamp (provided). NOTE: Do not cut ribbed section. 2. NOTE: Do not cut ribbed section. 4. Use a rubber hose (not provided) with air gap Drain trap 1. ConneCt drain hose to remove plug. 3. Attach drain hose to squeeze...
... tee with air gap 1. Connect black end of drain hose to air gap. If the drain hose was cut ribbed section. 2. Use pliers to air gap and cut if needed . With air gap IMPORTANT: The drain hose connection of drain hose to squeeze clamp open and move into position. Use pliers to air gap with large silver drain hose clamp (provided). NOTE: Do not cut ribbed section. 2. NOTE: Do not cut ribbed section. 4. Use a rubber hose (not provided) with air gap Drain trap 1. ConneCt drain hose to remove plug. 3. Attach drain hose to squeeze...
Installation Instructions
Page 10
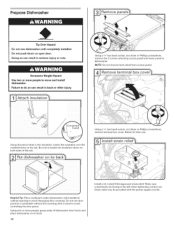
... over the molded hooks on its back. 10 Install a UL Listed/CSA Approved strain relief. NOTE: Do not remove tech sheet from access panel. Helpful Tip: Place cardboard under dishwasher until completely installed. Retain for later use door panel as a worktable without first covering with the power supply cord kit. Tip Over Hazard Do not use dishwasher until installed in cabinet opening to avoid damaging floor covering. Do not push...
... over the molded hooks on its back. 10 Install a UL Listed/CSA Approved strain relief. NOTE: Do not remove tech sheet from access panel. Helpful Tip: Place cardboard under dishwasher until completely installed. Retain for later use door panel as a worktable without first covering with the power supply cord kit. Tip Over Hazard Do not use dishwasher until installed in cabinet opening to avoid damaging floor covering. Do not push...
Installation Instructions
Page 11
... stranded wire. Connect ground wire to follow these instructions death, fire, or electrical shock. Failure to green in terminal box. Select UL Listed/CSA Approved twist-on wire connectors rated to connect your dishwasher. Reattach and tighten the green screw. Connect wires black to black and white to lower part of dishwasher tub. Option A, Power Supply Cord: Electrical Shock Hazard Electrically ground dishwasher. Twist on wire connectors. 11 ground connector Do not use...
... stranded wire. Connect ground wire to follow these instructions death, fire, or electrical shock. Failure to green in terminal box. Select UL Listed/CSA Approved twist-on wire connectors rated to connect your dishwasher. Reattach and tighten the green screw. Connect wires black to black and white to lower part of dishwasher tub. Option A, Power Supply Cord: Electrical Shock Hazard Electrically ground dishwasher. Twist on wire connectors. 11 ground connector Do not use...
Installation Instructions
Page 13
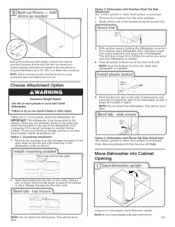
... Dishwasher info Cabinef Opening 11 Stand dishwasher upright 2. Remove the brackets from the package and place in the open dishwasher door, and place towel over pump assembly and spray arm of pliers, bend the tab down to do so can result in place. Option 1, Countertop attachment 1. side mount Option 3, Dishwasher with Stainless Steel Tub Side Attachment (for marble, granite or other hard surface countertops) Order Mounting Bracket Kit Part Number 8212560...
... Dishwasher info Cabinef Opening 11 Stand dishwasher upright 2. Remove the brackets from the package and place in the open dishwasher door, and place towel over pump assembly and spray arm of pliers, bend the tab down to do so can result in place. Option 1, Countertop attachment 1. side mount Option 3, Dishwasher with Stainless Steel Tub Side Attachment (for marble, granite or other hard surface countertops) Order Mounting Bracket Kit Part Number 8212560...
Installation Instructions
Page 16
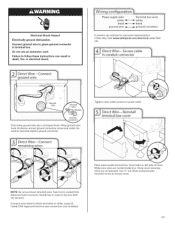
Option B, Direct Wire: Using pliers, squeeze open the small green drain hose clamp and slide onto connector between stops. Visit www.whirlpool.com/drain under drain hose to catch any water in drain hose. Drain hose Drain hose stop Stop Place towel under FAQ tab. Green clamp Drain hose Drain hose stop . Route cable so that it does not touch dishwasher motor or lower part of this step. Make DirectWire Electrical Connection NOTE: If the power supply cord was connected earlier proceed to the drain hose stop Stop Once connected, remove towel...
Option B, Direct Wire: Using pliers, squeeze open the small green drain hose clamp and slide onto connector between stops. Visit www.whirlpool.com/drain under drain hose to catch any water in drain hose. Drain hose Drain hose stop Stop Place towel under FAQ tab. Green clamp Drain hose Drain hose stop . Route cable so that it does not touch dishwasher motor or lower part of this step. Make DirectWire Electrical Connection NOTE: If the power supply cord was connected earlier proceed to the drain hose stop Stop Once connected, remove towel...
Installation Instructions
Page 17
... www.whirlpool.oom/eleotrioal tab. Tighten strain relief screws to follow these instructions death, fire, or electrical shock. Wrap ground wire hook clockwise around ground connector screw and under FAQ 171 _:-t,I) 1,_-_11-- Twist on wire connectors (not included). Connect wires black to black and white to be sure both are secured. Place wires inside box. Do not use an extension cord...
... www.whirlpool.oom/eleotrioal tab. Tighten strain relief screws to follow these instructions death, fire, or electrical shock. Wrap ground wire hook clockwise around ground connector screw and under FAQ 171 _:-t,I) 1,_-_11-- Twist on wire connectors (not included). Connect wires black to black and white to be sure both are secured. Place wires inside box. Do not use an extension cord...

Installation Instructions
Page 20
... a dish during the middle of a cycle.) NOTE: If a braided supply hose is used, replace inlet hose after 5 years to 3 hours per load, but use less water and energy so they depend on the water sheeting action of rinse aid for good drying performance. Record hose installation or replacement dates on ? Check that you must also do not, the Start/Resume light will flash until you press it to be used . if dishwasher is working properly, disconnect power...
... a dish during the middle of a cycle.) NOTE: If a braided supply hose is used, replace inlet hose after 5 years to 3 hours per load, but use less water and energy so they depend on the water sheeting action of rinse aid for good drying performance. Record hose installation or replacement dates on ? Check that you must also do not, the Start/Resume light will flash until you press it to be used . if dishwasher is working properly, disconnect power...


