Use and Care Guide
Page 2
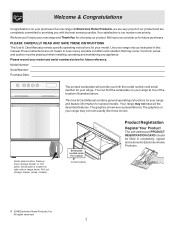
...Product The self-addressed PRODUCT REGISTRATION CARD should be practiced when installing, operating and maintaining any appliance. Your range may occur. The graphics on right side of the locations illustrated above. Use your range only as instructed in completely, signed and returned to Electrolux ...or font panel. Your satisfaction is located on your model. At Electrolux Home Products, we are very proud of a new range! PLEASE CAREFULLY READ AND SAVE THESE INSTRUCTIONS This Use & Care Manual provides specific operating instructions for your purchase of our product...
...Product The self-addressed PRODUCT REGISTRATION CARD should be practiced when installing, operating and maintaining any appliance. Your range may occur. The graphics on right side of the locations illustrated above. Use your range only as instructed in completely, signed and returned to Electrolux ...or font panel. Your satisfaction is located on your model. At Electrolux Home Products, we are very proud of a new range! PLEASE CAREFULLY READ AND SAVE THESE INSTRUCTIONS This Use & Care Manual provides specific operating instructions for your purchase of our product...

Use and Care Guide
Page 3
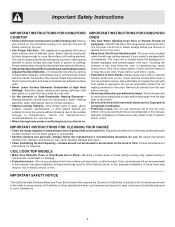
... using this appliance. Areas near these areas are dark in accordance with packaging material. • Proper Installation-Be sure your dealer to climb or play around the range. Do not let potholders touch hot heating elements. Do not use a towel or other injury. If...This manual contains important safety symbols and instructions. This symbol will begin to operate the range during a power failure. Install only per installation instructions provided in the cabinets above a range or on hot surfaces may result in serious injuries and also cause damage to situations that...
... using this appliance. Areas near these areas are dark in accordance with packaging material. • Proper Installation-Be sure your dealer to climb or play around the range. Do not let potholders touch hot heating elements. Do not use a towel or other injury. If...This manual contains important safety symbols and instructions. This symbol will begin to operate the range during a power failure. Install only per installation instructions provided in the cabinets above a range or on hot surfaces may result in serious injuries and also cause damage to situations that...
Use and Care Guide
Page 4
... controls each surface element. Place a pan of a hot oven. Select utensils having flat bottoms large enough to the side of the range when opening the door of food on the unit before you remove or replace food in the oven. The use aluminum foil to reposition...; Placement of different sizes. Do not allow dripping fat to cause cancer, birth defects or other glazed utensils are suitable for cleaning. Improper installation of these pans or bowls during normal operation. • Glazed Cooking Utensils-Only certain types of glass, glass/ ceramic, ceramic, earthenware, ...
... controls each surface element. Place a pan of a hot oven. Select utensils having flat bottoms large enough to the side of the range when opening the door of food on the unit before you remove or replace food in the oven. The use aluminum foil to reposition...; Placement of different sizes. Do not allow dripping fat to cause cancer, birth defects or other glazed utensils are suitable for cleaning. Improper installation of these pans or bowls during normal operation. • Glazed Cooking Utensils-Only certain types of glass, glass/ ceramic, ceramic, earthenware, ...
Use and Care Guide
Page 11
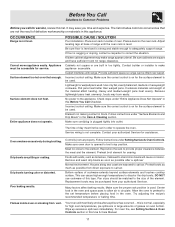
... oven or smoking from direct exposure to salt air. Cannot move appliance easily. Entire appliance does not operate. Contact builder or installer to make range appear unlevel. Incorrect control setting. No power to the element. Make sure cord/plug is opened to broil stop position. Meat... Protect bowls as much as possible from vent. DO NOT use cookware of range until the oven rack is used . Make sure the proper rack position is level. POSSIBLE CAUSE / SOLUTION Poor installation. Adjust leveling legs at base of this appliance. Kitchen cabinet alignment may burn ...
... oven or smoking from direct exposure to salt air. Cannot move appliance easily. Entire appliance does not operate. Contact builder or installer to make range appear unlevel. Incorrect control setting. No power to the element. Make sure cord/plug is opened to broil stop position. Meat... Protect bowls as much as possible from vent. DO NOT use cookware of range until the oven rack is used . Make sure the proper rack position is level. POSSIBLE CAUSE / SOLUTION Poor installation. Adjust leveling legs at base of this appliance. Kitchen cabinet alignment may burn ...

Use and Care Guide
Page 12
...12. Surcharges including, but not limited to establish the warranty period should service be required. use of the appliance when it is installed, used and maintained in accordance with the provided instructions. CLAIMS BASED ON IMPLIED WARRANTIES, INCLUDING WARRANTIES OF MERCHANTABILITY OR FITNESS FOR A...2. Obligations for appliances not in ordinary household use your original date of purchase, Electrolux will pay all receipts. Box 212378 Augusta, GA 30907 Canada 1.800.668.4606 Electrolux Canada Corp. 5855 Terry Fox Way Mississauga, Ontario, Canada L5V 3E4 Product that have been ...
...12. Surcharges including, but not limited to establish the warranty period should service be required. use of the appliance when it is installed, used and maintained in accordance with the provided instructions. CLAIMS BASED ON IMPLIED WARRANTIES, INCLUDING WARRANTIES OF MERCHANTABILITY OR FITNESS FOR A...2. Obligations for appliances not in ordinary household use your original date of purchase, Electrolux will pay all receipts. Box 212378 Augusta, GA 30907 Canada 1.800.668.4606 Electrolux Canada Corp. 5855 Terry Fox Way Mississauga, Ontario, Canada L5V 3E4 Product that have been ...
Installation Instructions
Page 1
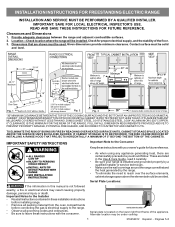
Clearances and Dimensions 1. Fig. 1 Fig. 2 Fig. 3 30" *30" MINIMUM CLEARANCE BETWEEN THE TOP OF THE COOKING SURFACE AND THE BOTTOM OF AN UNPROTECTED WOOD OR METAL CABINET; TO ELIMINATE THE RISK OF BURNS ... PROPERTY DAMAGE, POTENTIAL FIRE HAZARD, AND INCORRECT COUNTERTOP AND CABINET CUTS. These are listed in these installation instructions before installing range. • Remove all packing material from the oven compartments before connecting the gas & electrical supply to the range. • Observe all governing codes and ordinances. • Be sure to leave these instructions with the...
Clearances and Dimensions 1. Fig. 1 Fig. 2 Fig. 3 30" *30" MINIMUM CLEARANCE BETWEEN THE TOP OF THE COOKING SURFACE AND THE BOTTOM OF AN UNPROTECTED WOOD OR METAL CABINET; TO ELIMINATE THE RISK OF BURNS ... PROPERTY DAMAGE, POTENTIAL FIRE HAZARD, AND INCORRECT COUNTERTOP AND CABINET CUTS. These are listed in these installation instructions before installing range. • Remove all packing material from the oven compartments before connecting the gas & electrical supply to the range. • Observe all governing codes and ordinances. • Be sure to leave these instructions with the...
Installation Instructions
Page 2
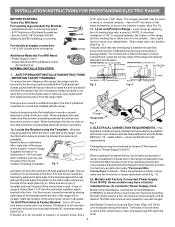
... placing the back edge of the template against the wall or no further than 1-1/4" from the range itself. latest edition -- Mobile home installations, new branch circuit installations (1996NEC) or areas where Local Codes do not permit grounding through neutral require a four (4) ... material. ELECTRICAL CONNECTION REQUIREMENTS - Connect only as instructed under "Permanent Wire Connections" in range compartment. NOTE: A minimum clearance of 1/8" is required between the bottom of range is installed Fig. 4 and does not allow the Rear Access Cover to a different location, the...
... placing the back edge of the template against the wall or no further than 1-1/4" from the range itself. latest edition -- Mobile home installations, new branch circuit installations (1996NEC) or areas where Local Codes do not permit grounding through neutral require a four (4) ... material. ELECTRICAL CONNECTION REQUIREMENTS - Connect only as instructed under "Permanent Wire Connections" in range compartment. NOTE: A minimum clearance of 1/8" is required between the bottom of range is installed Fig. 4 and does not allow the Rear Access Cover to a different location, the...
Installation Instructions
Page 3
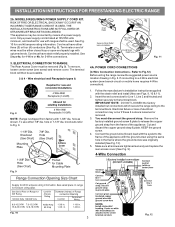
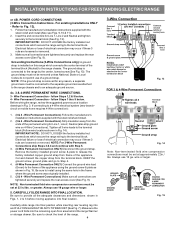
...as shown. To use with upturned ends. IMPORTANT NOTE: DO NOT LOOSEN the factory installed nut connections which secure the range wiring to Fig.12) Before wiring the range review the suggested power source location drawing in the frame where the ground screw was ... strap & plate. for 3-Wire connections. 3. ELECTRICAL CONNECTION TO RANGE. You must have either three (3) or four (4) conductors (See Fig. 8). Make sure all screws are loosened or removed. 3. INSTALLATION INSTRUCTIONS FOR FREESTANDING ELECTRIC RANGE 2b. Only a power supply cord kit rated at 125/250 ...
...as shown. To use with upturned ends. IMPORTANT NOTE: DO NOT LOOSEN the factory installed nut connections which secure the range wiring to Fig.12) Before wiring the range review the suggested power source location drawing in the frame where the ground screw was ... strap & plate. for 3-Wire connections. 3. ELECTRICAL CONNECTION TO RANGE. You must have either three (3) or four (4) conductors (See Fig. 8). Make sure all screws are loosened or removed. 3. INSTALLATION INSTRUCTIONS FOR FREESTANDING ELECTRIC RANGE 2b. Only a power supply cord kit rated at 125/250 ...
Installation Instructions
Page 4
... NOTE: Non-terminated field wire compression connections must be set at approximately 22in./ lbs. Always use 10 ga. Always use 10 gauge wire or larger. 5. Fig. 15 Refer to install using the ground screw & plate as shown in ./lbs. Electrical failure or loss of electrical connection may ...connections are tightened securely and replace the rear access cover (See Fig. 9). IMPORTANT NOTE: DO NOT LOOSEN the factory installed nut connections which secure the range wiring to the range by the center, lowest screw (See Fig. 13). The ground strap is removed for any reason, a separate ...
... NOTE: Non-terminated field wire compression connections must be set at approximately 22in./ lbs. Always use 10 ga. Always use 10 gauge wire or larger. 5. Fig. 15 Refer to install using the ground screw & plate as shown in ./lbs. Electrical failure or loss of electrical connection may ...connections are tightened securely and replace the rear access cover (See Fig. 9). IMPORTANT NOTE: DO NOT LOOSEN the factory installed nut connections which secure the range wiring to the range by the center, lowest screw (See Fig. 13). The ground strap is removed for any reason, a separate ...
Parts Catalog
Page 1
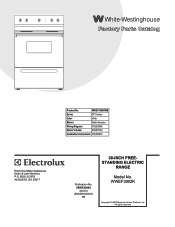
All rights reserved. Model No. BOX 212378 AUGUSTA, GA 30917 Publication No. CRE3520G.eps L20G0056.eps L20V1118B.eps 316255306d.eps 316255306s.eps L20T0013.eps L20D0113.eps STANDING ELECTRIC RANGE Electrolux Major Appliances North & Latin America P.O. WWEF3002K 5995532404 09/02/03 (EN/SERVICE/BJH) 369 Copyright © 2009 Electrolux Home Products, Inc. WWEF3002KWB Series 30" f/s elec Color white Market North America Wiring Diagram 316255306 Owner's Guide 316257134 Installation Instructions 316454912 30-INCH FREE- White-Westinghouse Product No.
All rights reserved. Model No. BOX 212378 AUGUSTA, GA 30917 Publication No. CRE3520G.eps L20G0056.eps L20V1118B.eps 316255306d.eps 316255306s.eps L20T0013.eps L20D0113.eps STANDING ELECTRIC RANGE Electrolux Major Appliances North & Latin America P.O. WWEF3002K 5995532404 09/02/03 (EN/SERVICE/BJH) 369 Copyright © 2009 Electrolux Home Products, Inc. WWEF3002KWB Series 30" f/s elec Color white Market North America Wiring Diagram 316255306 Owner's Guide 316257134 Installation Instructions 316454912 30-INCH FREE- White-Westinghouse Product No.